在Objective-C的编程过程当中,常常会涉及到对文件的一些操作,OC也提供了专业的类来进行文件操作,那就是NSFileManager类。通过NSFileManager类我们可以对文件进行创建、删除、移动等操作。
1.NSFileManager
// 获取电脑桌面的路径(下面是本机路径)
NSString*desktopPath=@"/Users/hcios/Desktop";
// 在桌面路径后拼上想要创建的目录名(如:test)
NSString*directoryPath=[desktopPath stringByAppendingPathComponent:@"test"];
// 创建一个默认的fileManager
NSFileManager*fileManager=[NSFileManagerdefaultManager];
// fileManager在filePath路径上创建一个目录
BOOL b=[fileManager createDirectoryAtPath:directoryPath withIntermediateDirectories:YES attributes:nilerror:nil];
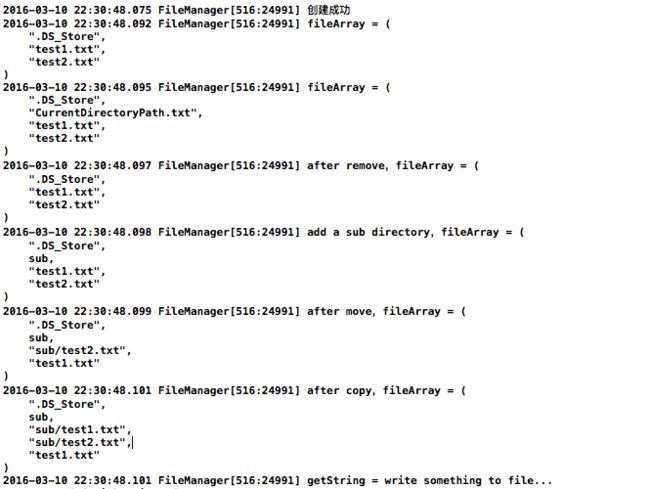
NSLog(@"%@",b?@"创建成功":@"创建失败");
// 创建两个文件路径
NSString*filePath1=[directoryPath stringByAppendingPathComponent:@"test1.txt"];
NSString*filePath2=[directoryPath stringByAppendingPathComponent:@"test2.txt"];
// 创建一个字符串,转成NSData *类型,写入文件
NSString*contents=@"write something to file...";
NSData*data=[contents dataUsingEncoding:NSUTF8StringEncoding];
// 判断该路径文件是否存在
if(![fileManager fileExistsAtPath:filePath1]){
// 文件不存在则创建文件,创建的同时写入data
[fileManager createFileAtPath:filePath1 contents:data attributes:nil];
}
if(![fileManager fileExistsAtPath:filePath2]){
[fileManager createFileAtPath:filePath2 contents:data attributes:nil];
}
// 两种方式获取一个目录中的所有文件名(有时会获取到隐藏文件)
NSArray*fileArray=[fileManager subpathsAtPath:directoryPath];
fileArray=[fileManager subpathsOfDirectoryAtPath:directoryPath error:nil];
NSLog(@"fileArray = %@",fileArray);
// 将directoryPath改为当前路径,fileManager会默认在当前路径下操作
[fileManager changeCurrentDirectoryPath:directoryPath];
NSString*filePath3=@"CurrentDirectoryPath.txt";
if(![fileManager fileExistsAtPath:filePath3]){
[fileManager createFileAtPath:filePath3 contents:data attributes:nil];
}
fileArray=[fileManager subpathsAtPath:directoryPath];
NSLog(@"fileArray = %@",fileArray);
// 删除文件
[fileManager removeItemAtPath:filePath3 error:nil];
fileArray=[fileManager subpathsAtPath:directoryPath];
NSLog(@"after remove,fileArray = %@",fileArray);
// 在当前目录下创建一个子目录sub
[fileManager createDirectoryAtPath:@"sub"withIntermediateDirectories:YES attributes:nilerror:nil];
fileArray=[fileManager subpathsAtPath:directoryPath];
NSLog(@"add a sub directory,fileArray = %@",fileArray);
// 将test2.txt移动到sub目录中去
[fileManager moveItemAtPath:filePath2 toPath:[@"sub"stringByAppendingPathComponent:@"test2.txt"]error:nil];
fileArray=[fileManager subpathsAtPath:directoryPath];
NSLog(@"after move,fileArray = %@",fileArray);
// 将test1.txt复制一份到sub目录中去
[fileManager copyItemAtPath:filePath1 toPath:[@"sub"stringByAppendingPathComponent:@"test1.txt"]error:nil];
fileArray=[fileManager subpathsAtPath:directoryPath];
NSLog(@"after copy,fileArray = %@",fileArray);
// 读取文件中的内容,并将NSData *型数据转成NSString *型数据
NSData*getData=[fileManager contentsAtPath:filePath1];
NSString*getString=[[NSStringalloc]initWithData:getData encoding:NSUTF8StringEncoding];
NSLog(@"getString = %@",getString);
2.NSBundle
NSBundle 类,直接继承 NSObject 类。 这个类的对象,代表了 app 中代码和资源的文件在文件系统里所在的位置,通俗的说,就是定位了程序使用的资源(代码,图形,音乐等数据)在文件系统里的位置,并可以动态的加载、或卸载掉可执行代码。
bundle在英文中的解释是“捆、束”的意思,那么我们可以将NSBundle理解为是将程序的所有资源捆在一起的对象,我们的程序是一个bundle。 在Finder中,一个应用程序看上去和其他文件没有什么区别。但是实际上它是一个包含了nib文件,编译代码,以及其他资源的目录. 我们把这个目录叫做程序的main bundle,在 Xcode 里,使用应用程序、框架、或者插件的时候,Xcode 会生成对应的资源的目录包。
对于有GUI的应用程序来说,我们可以通过NSBundle来获取资源的路径,但是对于没有GUI的程序(比如OS X的控制台程序),就不能通过NSBundle来获取资源的路径。
+(NSBundle*)mainBundle;
上面的mainBundle方法返回一个 NSBundle类的对象,这个对象就是一个绝对路径,这个路径保存的是当前可执行的应用程序根目录路径,应用程序在编译之后, 资源文件就直接复制到了根目录下。然后我们根据资源文件的名称和类型就可以获取到它们,例如下面获取一张图片:
// 获取应用程序的main bundle
NSBundle*mainBundle=[NSBundlemainBundle];
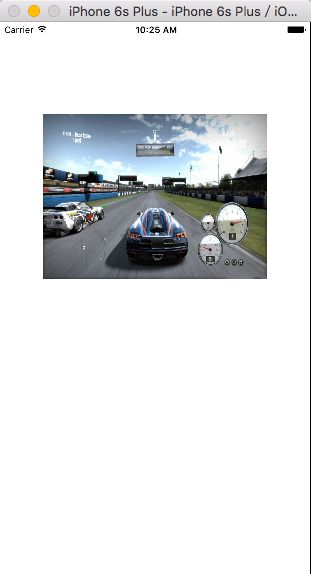
// 获取图片的路径(图片为test.jpg)
NSString*imagePath=[mainBundle pathForResource:@"test"ofType:@"jpg"];
// 根据图片的路径获取图片
UIImage*image=[UIImageimageWithContentsOfFile:imagePath];
// 将图片放入imageView中
self.imageView.image=image;
3.NSURL
URL:统一资源定位符是对可以从互联网上得到的资源的位置和访问方法的一种简洁的表示,是互联网上标准资源的地址。互联网上的每个文件都有一个唯一的URL,它包含的信息指出文件的位置以及浏览器应该怎么处理它。如果URL中包含中文或者某些特殊字符时,需要对URL做一些处理,使用UTF-8的编码格式来做转换。
// 将网络上一张图片的url用字符串格式保存
NSString*URLString=@"http://7xow65.com1.z0.glb.clouddn.com/wp-content/uploads/2016/03/cefc1e178a82b901adddeaae738da9773912ef3f.jpg";
// 将字符串格式的url转换成OC中 NSURL *类型的对象
NSURL*url=[NSURLURLWithString:URLString];
// 获取url地址中的图片,保存为NSData *类型的对象
NSData*data=[NSDatadataWithContentsOfURL:url];
// 将data转换为UIImage *类型的对象并放入imageView中
self.imageView.image=[UIImageimageWithData:data];
// 获取url中各种参数
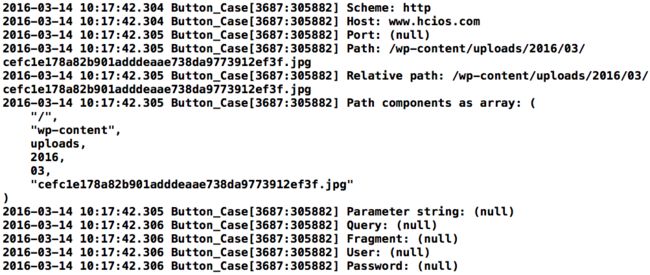
NSLog(@"Scheme: %@",[url scheme]);
NSLog(@"Host: %@",[url host]);
NSLog(@"Port: %@",[url port]);
NSLog(@"Path: %@",[url path]);
NSLog(@"Relative path: %@",[url relativePath]);
NSLog(@"Path components as array: %@",[url pathComponents]);
NSLog(@"Parameter string: %@",[url parameterString]);
NSLog(@"Query: %@",[url query]);
NSLog(@"Fragment: %@",[url fragment]);
NSLog(@"User: %@",[url user]);
NSLog(@"Password: %@",[url password]);