我是三台机器要做cluster集群,所以每台机器启2个端口。
服务器1:192.168.31.146
服务器2:192.168.31.147
服务器3:192.168.31.148
三台所用端口均为 7001、7002
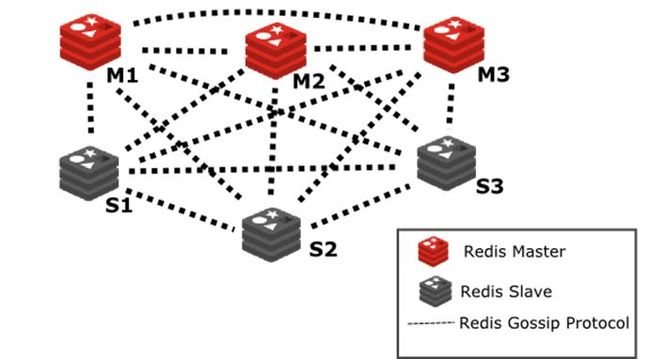
官方推荐RedisCluster最少6个节点,三主三从。并且物理节点数要为奇数,可根据
(n-1)/2算出来你最多可挂几个物理节点保证不影响正常运行
安装集群环境
1.1 安装gcc,g++
yum install gcc g++
1.2 安装ruby脚本运行环境
yum install ruby
1.3 修改ruby下载源,不然国外的源下载不了
gem sources --add https://gems.ruby-china.org/ --remove https://rubygems.org/
1.4 安装redis集群工具
gem install redis -v 3.3.5安装redis
2.1cd /下载redis、解压
wget http://download.redis.io/releases/redis-3.2.4.tar.gz
tar -zxvf redis-3.2.4.tar.gz
2.3 编译安装到指定目录
cd redis-3.2.4
make install PREFIX=/usr/local/redis
2.4 从redis的源码目录中复制redis.conf到redis的安装目录
cp redis.conf /usr/local/redis/bin-
集群的搭建
现在才是正真的集群搭建。每台服务器创建2个实例,端口7001~7002
3.1 跳到指定目录、创建目录redis-cluster
mkdir /usr/local/redis-cluster
3.2 进入redis/bin目录,把持久化文件删掉
cd /usr/local/redis/bin
rm -f dump.rdb
3.3 创建多个redis实例
cp -r /usr/local/redis/bin /usr/local/redis-cluster/redis01
cp -r /usr/local/redis/bin /usr/local/redis-cluster/redis02
3.4 去编辑各个实例下面的配置文件
vi /usr/local/redis-cluster/redis01/redis.conf修改1: port端口号(不要重复,依次修改) 修改2: bind 的IP 127.0.0.1 改为 0.0.0.0 修改3: 打开cluster-enable前面的注释 修改4: daemonize 改为yes 修改5: maxmemory 5gb (Redis最大使用的内存大小) 修改6: maxmemory-policy allkeys-lru (内存满了使用LRU算法清除key)同理,去
redis02修改这些配置⚠️注意:如果想给集群加密码,那么不要在这时候加,因为加密后创建集群关联就会失败报错,等集群启动成功后,kill掉所有redis服务再修改并启动各个服务。
修改:masterauth xxxx
修改:requirepass xxxx
3.5 把创建集群的ruby脚本复制到redis-cluster的目录下
去到redis的安装文件
cd /usr/local/redis-3.2.4/src
复制脚本到redis-cluster目录下
cp *.rb /usr/local/redis-cluster/
3.8 再回去redis-cluster目录
cd /usr/local/redis-cluster -
开始创建集群
这个时候开始创建集群,但是需要把每一个实例都启动起来好麻烦,所有在这时候创建一个脚本
4.1 创建redis集群启动的脚本
vim startall.sh
内容如下:#!/bin/sh # chkconfig: 2345 90 10 # description: Redis is a persistent key-value database cd /usr/local/redis-cluster/redis01 /usr/local/redis-cluster/redis01/redis-server redis.conf cd .. cd /usr/local/redis-cluster/redis02 /usr/local/redis-cluster/redis02/redis-server redis.conf cd ..编辑脚本权限
chmod +x startall.sh
利用脚本启动redis集群
./startall.sh
查看他们的运行状态
ps aux|grep redis -
创建集群
5.1 我们还缺少一个东西没有安装(如果已安装请忽略)
gem install redis -v 3.3.5这里注意,我指定版本是因为我的Ruby是2.0.0版本的,最新版本redis 4.0.0 是要求Ruby最低2.2.0版本以上的
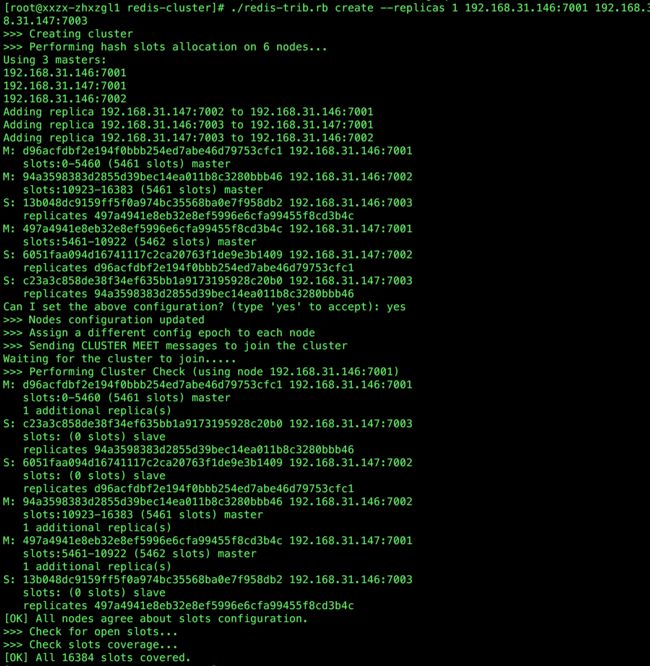
5.2 创建集群
./redis-trib.rb create --replicas 1 192.168.31.146:7001 192.168.31.146:7002 192.168.31.147:7001 192.168.31.147:7002 192.168.31.148:7001 192.168.31.148:7002
这里需要注意,以上配置你需要在两台以上的机器内都要配置,并且保证各个机器上的redis服务和端口是启动状态,这样才可以成功创建集群。
#查看集群状态
/usr/local/redis/bin/redis-cli -c -p 7001 cluster nodes
- 开机自启动redis-cluster
# 拷贝脚本到启动目录
cp /usr/local/redis-cluster/startall.sh /etc/init.d/redisd
# 添加启动配置
chkconfig redisd on
如果要扩展新的机器节点参考
提醒一点,新加入集群的master节点需要重新slots,把节点插到分配的hash槽内才能使用参考
如果碰巧所有redis集群内的服务器都同时重启了,那么需要重新创建集群。
那么你需要把所有redis服务停掉
ps -ef | grep redis | grep -v grep | awk '{print $2}' | xargs kill -9
并删除各个redis-cluster目录下各个端口文件夹里的dump.rdb 和 nodes.conf文件,如:
 示例
示例
下面是我以前的配置备份,作为参考
[root@localhost redis-stable]# yum install net-tools -y
[root@localhost script]# yum install wget -y
[root@localhost script]# wget http://dl.fedoraproject.org/pub/epel/epel-release-latest-7.noarch.rpm
[root@localhost script]# yum install epel-release-latest-7.noarch.rpm
[root@localhost script]# yum repolist
[root@localhost script]# yum install -y gcc tcl
[root@localhost script]# mkdir /soft
[root@localhost script]# cd /soft
[root@localhost script]# wget http://download.redis.io/releases/redis-stable.tar.gz
[root@localhost script]# tar zxf redis-stable.tar.gz -C /usr/local/src/
[root@localhost script]# cd /usr/local/src/redis-stable/
[root@localhost script]# mkdir /usr/local/redis3
[root@localhost script]# make PREFIX=/usr/local/redis3 install
[root@localhost script]# mkdir -p /usr/local/redis3/cluster
[root@localhost script]# cp /usr/local/src/redis-stable/redis.conf /usr/local/redis3/cluster/redis-cluster.conf
[root@localhost script]# mkdir -p /data/redis/{data,log,var}
[root@localhost script]# vim /usr/local/redis3/cluster/redis-cluster.conf
daemonize yes
pidfile /data/redis/var/redis.pid
bind 0.0.0.0
port 7000
unixsocket /data/redis/var/redis.sock
timeout 0
tcp-keepalive 0
databases 16
cluster-enabled yes
cluster-config-file /usr/local/redis3/cluster/nodes.conf
cluster-node-timeout 15000
cluster-migration-barrier 1
cluster-require-full-coverage yes
loglevel warning
logfile /data/redis/log/redis.log
save 900 1
save 300 10
save 60 10000
stop-writes-on-bgsave-error yes
rdbcompression yes
rdbchecksum yes
dbfilename dump.rdb
dir /data/redis/data
maxmemory 20000mb
appendonly no
appendfsync everysec
no-appendfsync-on-rewrite yes
auto-aof-rewrite-percentage 100
auto-aof-rewrite-min-size 64mb
lua-time-limit 5000
slowlog-log-slower-than 10000
slowlog-max-len 1024
hash-max-ziplist-entries 512
hash-max-ziplist-value 64
list-max-ziplist-entries 512
list-max-ziplist-value 64
set-max-intset-entries 512
zset-max-ziplist-entries 128
zset-max-ziplist-value 64
activerehashing yes

[root@localhost redis-stable]# yum install -y ruby rubygems
[root@localhost redis-stable]# gem sources --remove https://rubygems.org/
[root@localhost redis-stable]# gem sources -a https://ruby.taobao.org/
[root@localhost redis-stable]# gem sources -l
[root@localhost redis-stable]# gem install redis
[root@localhost redis-stable]# cp /usr/local/src/redis-stable/src/redis-trib.rb /usr/local/redis3/bin/redis-trib
[root@localhost redis-stable]# cat >> /etc/hosts << EOF
172.17.25.120 redisCluster1.dev.inc.ubaby.cn redisCluster1
172.17.25.130 redisCluster2.dev.inc.ubaby.cn redisCluster2
172.17.25.121 redisCluster3.dev.inc.ubaby.cn redisCluster3
172.17.25.131 redisCluster4.dev.inc.ubaby.cn redisCluster4
172.17.25.122 redisCluster5.dev.inc.ubaby.cn redisCluster5
172.17.25.132 redisCluster6.dev.inc.ubaby.cn redisCluster6
EOF
[root@localhost redis-stable]# /usr/local/redis3/bin/redis-server /usr/local/redis3/cluster/redis-cluster.conf
[root@localhost redis-stable]# /usr/local/redis3/bin/redis-trib create --replicas 1 172.17.25.120:7000 172.17.25.121:7000 172.17.25.122:7000 172.17.25.130:7000 172.17.25.131:7000 172.17.25.132:7000
[root@localhost redis-stable]# /usr/local/redis3/bin/redis-cli -p 7000 cluster nodes
重新配置,清空内容(如下)
rm -rf nodes_7000.conf *
rm -rf /data/redis/data_7000/*
rm -rf /data/redis/data_7001/*
rm -rf /data/redis/data_7002/*
rm -rf /data/redis/data_7003/*
rm -rf /data/redis/data_7004/*
rm -rf /data/redis/data_7005/*
ps -ef | grep redis | awk '{print $2}' | xargs kill
ps -ef | grep redis
ls
../bin/redis-server redis_7000.conf
ps -ef | grep redis
ls
ll -Z
chmod 777 ./*
../bin/redis-server redis_7000.conf
ps -ef | grep redis
ls /data/redis/data_7000/
vi redis_7000.conf
vi redis_7001.conf
vi redis_7002.conf
vi redis_7003.conf
vi redis_7004.conf
vi redis_7005.conf
../bin/redis-server redis_7000.conf
../bin/redis-server redis_7001.conf
../bin/redis-server redis_7002.conf
../bin/redis-server redis_7003.conf
../bin/redis-server redis_7004.conf
../bin/redis-server redis_7005.conf
 /usr/local/redis3/bin/redis-trib create --replicas 1 192.168.1.60:7000 192.168.1.60:7001 192.168.1.60:7002 192.168.1.60:7003 192.168.1.60:7004 192.168.1.60:7005

systemctl stop firewalld.service #关闭防火墙
/usr/local/redis3/bin/redis-cli -c -p 7000
127.0.0.1:7000> config set protected-mode "no"  #关闭保护模式
一. 问题如下
在192.168.56.57客户端登录192.168.56.56的redis服务器时,报错如下:
[root@localhost src]# ./redis-cli -h  192.168.56.56  -p  6379 -a  "aabbcc"
192.168.56.56:6379> ping
Error: Connection reset by peer

再telnet一下192.168.56.56的redis服务器的6379端口,提示redis服务有保护模式,需要解除
[root@localhost src]# telnet 192.168.56.56  6379
Trying 192.168.56.56...
Connected to 192.168.56.56.
Escape character is '^]'.

-DENIED Redis is running in protected modebecause protected mode is enabled, no bind address was specified, noauthentication password is requested to clients.
In this mode connections areonly accepted from the loopback interface. If you want to connect from externalcomputers to Redis you may adopt one of the following
solutions: 1) Justdisable protected mode sending the command 'CONFIG SET protected-mode no' fromthe loopback interface by connecting to Redis from the same host
the server isrunning, however MAKE SURE Redis is not publicly accessible from internet ifyou do so. Use CONFIG REWRITE to make this change permanent.
2) Alternativelyyou can just disable the protected mode by editing the Redis configurationfile, and setting the protected mode option to 'no', and then restarting theserver.
3) If you started the server manually just for testing, restart it withthe '--protected-mode no' option.
4) Setup a bind address or an authenticationpassword. NOTE: You only need to do one of the above things in order for theserver to start accepting connections from the outside.
Connection closed by foreign host.
二. 解决方案
1、修改redis服务器的配置文件
vi redis.conf

注释以下绑定的主机地址
# bind 127.0.0.1

2、修改redis服务器的参数配置

修改redis的守护进程为no ,不启用
127.0.0.1:6379> config set daemonize "no"
OK

修改redis的保护模式为no,不启用
127.0.0.1:6379> config set protected-mode "no"
OK
三. 问题解决
再次telnet一下192.168.56.56的redis服务器的6379端口,无问题
[root@localhost Packages]# telnet 192.168.56.56  6379
Trying 192.168.56.56...
Connected to 192.168.56.56.
Escape character is '^]'.


再次在192.168.56.57客户端登录192.168.56.56的redis服务器,无问题
[root@localhost src]# ./redis-cli -h  192.168.56.56 -p 6379 -a "aabbcc"
192.168.56.56:6379> ping
PONG
修改配置、添加密码
# 修改配置

sed -i 's/port 6379/port 7001/' /usr/local/redis-cluster/redis01/redis.conf

sed -i 's/bind 127.0.0.1/bind 0.0.0.0/' /usr/local/redis-cluster/redis01/redis.conf

sed -i 's/# cluster-enabled yes/cluster-enabled yes/' /usr/local/redis-cluster/redis01/redis.conf

sed -i 's/daemonize no/daemonize yes/' /usr/local/redis-cluster/redis01/redis.conf

sed -i 's/# maxmemory /maxmemory 5gb/' /usr/local/redis-cluster/redis01/redis.conf

sed -i 's/# maxmemory-policy noeviction/maxmemory-policy allkeys-lru/' /usr/local/redis-cluster/redis01/redis.conf
# 复制到其他节点
\cp -v redis01/redis.conf redis02/
......
# 修改其他节点端口
sed -i 's/port 7001/port 7002/' /usr/local/redis-cluster/redis02/redis.conf
......
# 杀掉所有进程
ps -ef | grep redis | grep -v grep | awk '{print $2}' | xargs kill -9
# 添加密码
sed -i 's/# masterauth /masterauth nasoft2018/' /usr/local/redis-cluster/redis01/redis.conf

sed -i 's/# requirepass foobared/requirepass nasoft2018/' /usr/local/redis-cluster/redis01/redis.conf
错误案例
MISCONF Redis is configured to save RDB snapshots, but is currently not able to persist on disk. Commands that may modify the data set are disabled. Please check Redis logs for details about the error.

大意为:(错误)misconf redis被配置以保存数据库快照,但misconf redis目前不能在硬盘上持久化。用来修改数据集合的命令不能用,请使用日志的错误详细信息。

这是由于强制停止redis快照,不能持久化引起的,运行info命令查看redis快照的状态

解决方案如下:
连接redis后运行 config set stop-writes-on-bgsave-error no 命令
关闭配置项stop-writes-on-bgsave-error解决该问题。

这只是临时解决让Redis忽略了这个错误,让程序继续往下运行,但实际上数据还是会存储到硬盘失败!

修改/etc/sysctl.conf
vm.overcommit_memory=1

网上查了一下,有人也遇到类似的问题,并且给出了很好的分析(详见:http://www.linuxidc.com/Linux/2012-07/66079.htm),简单地说:Redis在保存数据到硬盘时为了避免主进程假死,需要Fork一份主进程,然后在Fork进程内完成数据保存到硬盘的操作,如果主进程使用了4GB的内存,Fork子进程的时候需要额外的4GB,此时内存就不够了,Fork失败,进而数据保存硬盘也失败了。

redis错误:LOADING Redis is loading the dataset in memory
原因是,redis使用的内存超过操作系统一半的内存

查看文件占的内存
du -sh ./*|grep G
df -h