实践出真知——HAProxy实现web负载均衡群集(可跟做)
前言
本文主要介绍通过Haproxy软件实现由nginx提供的web网站的负载均衡群集实践流程。
Haproxy简述
haproxy基于C语言编写的开放源代码的软件,主要是提供高可用、负载均衡等功能,其基于四层或七层协议实现代理。
而前面所说的LVS实现负载均衡的不足之处在于其不支持正则表达式以及无法实现动态分离,且对于大型网站配置更加复杂。
haproxy支持常见的算法有轮循、最小连接、基于源访问的hash算法等
实验环境
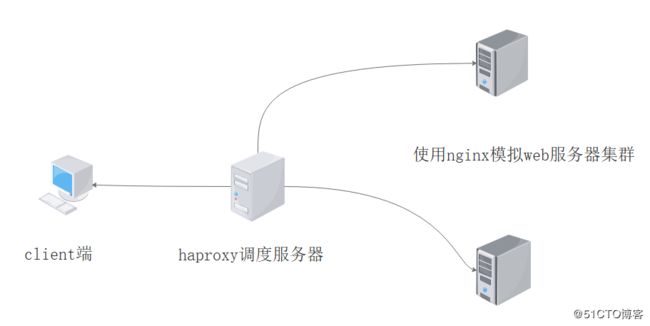
一台haproxy服务器,两台nginx服务器,一台客户机
地址规划如下:
| 服务器名称 | IP地址(NAT) |
|---|---|
| haproxy | 20.0.0.128 |
| nginx1 | 20.0.0.130 |
| nginx2 | 20.0.0.131 |
客户机处于同一网段即可。
软件包:
链接:https://pan.baidu.com/s/1OWiwXR8hxys5EMilgBsD3A
提取码:v53w
实验拓扑
实验流程
1、搭建配置haproxy服务器
1)软件包和环境配置
[root@lokott ~]# hostnamectl set-hostname haproxy
[root@lokott ~]# su
[root@haproxy ~]# yum install bzip2-devel pcre-devel gcc gcc-c++ make -y
[root@haproxy ~]# tar zxvf haproxy-1.5.19.tar.gz -C /opt
[root@haproxy ~]# cd /opt
[root@haproxy opt]# ls
haproxy-1.5.19  rh
2)编译安装haproxy
#切换至haproxy目录
[root@haproxy opt]# cd haproxy-1.5.19/

#查看系统版本号3100
[root@haproxy haproxy-1.5.19]# uname -a
Linux haproxy 3.10.0-693.el7.x86_64 #1 SMP Tue Aug 22 21:09:27 UTC 2017 x86_64 x86_64 x86_64 GNU/Linux

#编译haproxy
[root@haproxy haproxy-1.5.19]# make TARGET=linux3100

#编译安装
[root@haproxy haproxy-1.5.19]# make install
#创建haproxy文件目录
[root@haproxy haproxy-1.5.19]# mkdir /etc/haproxy

#复制模板文件到haproxy目录
[root@haproxy haproxy-1.5.19]# cp examples/haproxy.cfg /etc/haproxy/

#修改haproxy.cfg文件
[root@haproxy haproxy-1.5.19]# vim /etc/haproxy/haproxy.cfg
#注释chroot和redispatch条目,防止启动失败
global
        log 127.0.0.1   local0
        log 127.0.0.1   local1 notice
        #log loghost    local0 info
        maxconn 4096
        #chroot /usr/share/haproxy
        uid 99
        gid 99
        daemon
        #debug
        #quiet

defaults
        log     global
        mode    http
        option  httplog
        option  dontlognull
        retries 3
        #redispatch
        maxconn 2000
        contimeout      5000
        clitimeout      50000
        srvtimeout      50000

#删除原有的所有listen条目,添加一下条目
listen webcluster 0.0.0.0:80
       option httpchk GET /index.html
       balance roundrobin
       server inst1 20.0.0.130:80 check inter 2000 fall 3
       server inst2 20.0.0.131:80 check inter 2000 fall 3

#复制haproxy启动脚本到系统启动进程中
3)进行优化
#复制haproxy启动脚本到系统启动进程中
[root@haproxy haproxy-1.5.19]# cp examples/haproxy.init /etc/init.d/haproxy

#授予脚本执行权限
[root@haproxy haproxy-1.5.19]# chmod +x /etc/init.d/haproxy

#添加脚本到service管理条目中
[root@haproxy haproxy-1.5.19]# chkconfig --add haproxy

#建立脚本命令软链接
[root@haproxy haproxy-1.5.19]# ln -s /usr/local/sbin/haproxy /usr/sbin/haproxy

#启动服务
[root@haproxy haproxy-1.5.19]# service haproxy start
Starting haproxy (via systemctl):                          [  确定  ]

#关闭防火墙和安全功能
[root@Haproxy haproxy-1.5.19]# systemctl stop firewalld.service
[root@Haproxy haproxy-1.5.19]# setenforce 0
2、两台服务器手工编译安装nginx
nginx手工编译安装的过程前面的文章有过详细介绍,本文直接给出安装配置过程,不过多赘述了,主要在最后验证负载均衡时两个页面内容需要不一样(实验验证),这里以nginx1例
[root@nginx1 ~]# yum install zlib-devel pcre-devel gcc gcc-c++ make -y
#解压Nginx源码包到/opt目录
root@nginx1 ~]# tar zxvf nginx-1.12.0.tar.gz -C /opt

#创建Nginx管理用户
root@nginx1 ~]# cd /opt
[root@nginx1 opt]# useradd -M -s /sbin/nologin nginx

[root@nginx1 opt]# cd nginx-1.12.0/
[root@nginx1 nginx-1.12.0]# ./configure --prefix=/usr/local/nginx --user=nginx --group=nginx
.编译安装

[root@nginx1 nginx-1.12.0]# make && make install

[root@nginx1 nginx-1.12.0]# cd /usr/local/nginx/html/
[root@nginx1 html]# echo "this is nginx1 web" >index.html

[root@nginx2 nginx-1.12.0]# cd /usr/local/nginx/html/
[root@nginx2 html]# echo "this is nginx2 web" >index.html

[root@nginx1 html]# ln -s /usr/local/nginx/sbin/nginx  /usr/local/sbin/

[root@nginx1 html]# systemctl stop firewalld.service
[root@nginx1 html]# setenforce 0
[root@nginx1 html]# nginx
3、测试验证
如下图所示:
haproxy配置文件参数简述
Haproxy配置文件通常分为三个部分
global:为全局配置
defaults:为默认配置
listen:为应用组件配置
1、global配置参数

log127.0.0.1 lcal0:配置日志记录,local0为日志设备,默认存放到系统日志
log127.0.0.1 loca1 notice:notice为日志级别,通常有24个级别
maxconn4096:最大连接数
uid 99:用户uid
gid 99:用户gid

2、defaults配置项配置默认参数,一般会被应用组件继承,如果在应用组件中没有特别声明,将安装默认配置参数设置

log global:定义日志为global配置中的日志定义
mode http:模式为http
option httplog:采用http日志格式记录日志
retries 3:检查节点服务器失败连续达到三次则认为节点不可用
maxconn2000:最大连接数(可以优化)
contimeout5000:连接超时时间
clitimeout50000:客户端超时时间
srvtimeout50000:服务器超时时间

3、listen配置项目一般为配置应用模块参数

listen appli4- backup 0.0.0.0:10004:定义一个appli4- backup的应用
option httpchk /index.html检查服务器的index.html文件
option persist:强制将请求发送到已经down掉的服务器
balance roundrobin:负载均衡调度算法使用轮询算法
server inst1 20.0.0.130:80 check inter 2000 fall 3:定义在线节点
server inst2 20.0.0.131:81 check inter 2000 fall 3 backup:定义备份节点


