galera简介:galera为msyql/mariadb提供主主复制,所有的msyql/mariadb server是对等的,不分主从关系。下面搭建miradb+galera
本次环境为2台虚拟机,操作系统均为centos7 其中 :
node1:192.168.8.59
node2:192.168.8.140
1、关闭防火墙和selinux
2、配置yum源
[mariadb]
name = MariaDB
baseurl = http://yum.mariadb.org/10.1/centos7-amd64
gpgkey=https://yum.mariadb.org/RPM-GPG-KEY-MariaDB
gpgcheck=1
3、在2台主机上分别安装以下几个服务
yum install rsync nmap lsof perl-DBI nc MariaDB-server MariaDB-client MariaDB-compat galera socat jemalloc
4、启动数据库服务,并且对数据库进行安全优化,“ mysql_secure_installation ”设置密码为‘root’
5、修改配置文件(两个服务端都要改,注意wsrep_node_address为本机ip)
vim /etc/my.cnf.d/server.cnf
#
[galera]
wsrep_on=ON
wsrep_provider=/usr/lib64/galera/libgalera_smm.so
wsrep_cluster_address='gcomm://192.168.8.59,192.168.8.140'
wsrep_cluster_name='galera'
wsrep_node_address='192.168.8.140'
wsrep_node_name='node1'
wsrep_sst_method=rsync
binlog_format=row
default_storage_engine=InnoDB
innodb_autoinc_lock_mode=2
bind-address=0.0.0.0
wsrep_sst_auth=root:root
4、启动服务,查看端口
[root@node1 ~]# lsof -i:4567
COMMAND PID USER FD TYPE DEVICE SIZE/OFF NODE NAME
mysqld 22162 mysql 11u IPv4 44908 0t0 TCP *:tram (LISTEN)
mysqld 22162 mysql 13u IPv4 44911 0t0 TCP 192.168.8.140:35922->192.168.8.59:tram (ESTABLISHED)
[root@node1 ~]# lsof -i:3306
COMMAND PID USER FD TYPE DEVICE SIZE/OFF NODE NAME
mysqld 22162 mysql 32u IPv4 45258 0t0 TCP *:mysql (LISTEN)
可以看到多一个4567的端口
5、查看状态
[root@node2 ~]# mysql -u root -p -e "show status like 'wsrep%'"
Enter password:
+------------------------------+--------------------------------------+
| Variable_name | Value |
+------------------------------+--------------------------------------+
| wsrep_apply_oooe | 0.000000 |
| wsrep_apply_oool | 0.000000 |
| wsrep_apply_window | 0.000000 |
| wsrep_causal_reads | 0 |
| wsrep_cert_deps_distance | 0.000000 |
| wsrep_cert_index_size | 0 |
| wsrep_cert_interval | 0.000000 |
| wsrep_cluster_conf_id | 2 |
| wsrep_cluster_size | 2 |
| wsrep_cluster_state_uuid | a857719c-2667-11e6-8e3f-aa2deb9d92a9 |
| wsrep_cluster_status | Primary |
| wsrep_commit_oooe | 0.000000 |
| wsrep_commit_oool | 0.000000 |
| wsrep_commit_window | 0.000000 |
| wsrep_connected | ON |
| wsrep_evs_delayed | |
| wsrep_evs_evict_list | |
| wsrep_evs_repl_latency | 0/0/0/0/0 |
| wsrep_evs_state | OPERATIONAL |
| wsrep_flow_control_paused | 0.000000 |
| wsrep_flow_control_paused_ns | 0 |
| wsrep_flow_control_recv | 0 |
| wsrep_flow_control_sent | 0 |
| wsrep_gcomm_uuid | 5c7c83d5-2672-11e6-a40c-4ac0f0858b55 |
| wsrep_incoming_addresses | 192.168.8.59:3306,192.168.8.140:3306 |
| wsrep_last_committed | 11 |
| wsrep_local_bf_aborts | 0 |
| wsrep_local_cached_downto | 18446744073709551615 |
| wsrep_local_cert_failures | 0 |
| wsrep_local_commits | 0 |
| wsrep_local_index | 0 |
| wsrep_local_recv_queue | 0 |
| wsrep_local_recv_queue_avg | 0.166667 |
| wsrep_local_recv_queue_max | 2 |
| wsrep_local_recv_queue_min | 0 |
| wsrep_local_replays | 0 |
| wsrep_local_send_queue | 0 |
| wsrep_local_send_queue_avg | 0.000000 |
| wsrep_local_send_queue_max | 1 |
| wsrep_local_send_queue_min | 0 |
| wsrep_local_state | 4 |
| wsrep_local_state_comment | Synced |
| wsrep_local_state_uuid | a857719c-2667-11e6-8e3f-aa2deb9d92a9 |
| wsrep_protocol_version | 7 |
| wsrep_provider_name | Galera |
| wsrep_provider_vendor | Codership Oy
| wsrep_provider_version | 25.3.15(r3578) |
| wsrep_ready | ON |
| wsrep_received | 6 |
| wsrep_received_bytes | 477 |
| wsrep_repl_data_bytes | 0 |
| wsrep_repl_keys | 0 |
| wsrep_repl_keys_bytes | 0 |
| wsrep_repl_other_bytes | 0 |
| wsrep_replicated | 0 |
| wsrep_replicated_bytes | 0 |
| wsrep_thread_count | 2 |
+------------------------------+--------------------------------------+
看状态时主要查看:
wsrep_cluster_size            2  #number of nodes
wsrep_connected              ON
wsrep_ready                    ON   #It's running,awesome !
wsrep_incoming_addresses     | 此时是连接的状态
可以看到状态为正常
测试!
在node1上创建数据库erick
MariaDB [(none)]> create database erick;
ERROR 2006 (HY000): MySQL server has gone away
No connection. Trying to reconnect...
Connection id: 16
Current database: *** NONE ***
Query OK, 1 row affected (0.06 sec)
MariaDB [(none)]> show databases;
+--------------------+
| Database |
+--------------------+
| erick |
| information_schema |
| mysql |
| performance_schema |
+--------------------+
4 rows in set (0.00 sec)
在node2上查看,并且删除
MariaDB [(none)]> show databases;
ERROR 2006 (HY000): MySQL server has gone away
No connection. Trying to reconnect...
Connection id: 4
Current database: *** NONE ***
+--------------------+
| Database |
+--------------------+
| erick |
| information_schema |
| mysql |
| performance_schema |
+--------------------+
4 rows in set (0.00 sec)
MariaDB [(none)]>
MariaDB [(none)]> drop database erick;
Query OK, 0 rows affected (0.14 sec)
MariaDB [(none)]>
在node1上查看数据库是否被删除
MariaDB [(none)]> show databases;
+--------------------+
| Database |
+--------------------+
| information_schema |
| mysql |
| performance_schema |
+--------------------+
3 rows in set (0.00 sec)
MariaDB [(none)]>
至此实验完成!
################################
在此添加一台haproxy服务器做负载均衡,机器为centos6.5
hostname ip
erick1 192.168.8.163
haproxy安装过程略。修改配置文件
[root@erick1 ~]# cat /etc/haproxy/haproxy.cfg
global
log 127.0.0.1 local0 notice
maxconn 65536
nbproc 10
ulimit-n 231097
tune.ssl.default-dh-param 1024
daemon
defaults
log global
mode http
option httplog
option dontlognull
option forwardfor
retries 3
option redispatch
maxconn 65535
timeout connect 5s
timeout client 5m
timeout server 5m
timeout check 1s
timeout http-request 10s
timeout http-keep-alive 10s
listen Stats *:8080
mode http
stats enable
stats uri /
stats refresh 15s
stats show-node
stats show-legends
stats hide-version
listen Mysqld 192.168.8.163:3306
#cookie SERVERID rewrite
mode tcp
maxconn 200
balance roundrobin
#option mysql-check user erick
server node1 192.168.8.140:3306 check port 3306
server node2 192.168.8.59:3306 check port 3306
这时可以在web上监控状态
可以看到msyql的状态,即使当断开一台msyql服务器时也不影响工作。
之前已经完成了haproxy对msyql的代理,现在添加一台机器,并利用之前的机器做高可用。
机器规划
hostname os版本 ip 所装服务
erick1 centos6.5 192.168.8.163 vip:192.168.8.200 haproxy+keepalived
erick centos6.5 192.168.8.182 vip:192.168.8.200 haproxy+keepalived
node1 centos7 192.168.8.59 mysql+galera
node2 centos7 192.168.8.140 mysql+galera
之前已经安装过mysql+galera和haproxy了,下面只在erick1和erick上安装keepalived即可(安装过程略,yum安装即可)
编辑配置文件:
[root@erick1 keepalived]# cat keepalived.conf
! Configuration File for keepalived
global_defs {
router_id LVS_DEVEL
}
vrrp_script chk_haproxy {
script "/usr/local/keepalived/check_haproxy.sh"
interval 2
weight 2
}
vrrp_instance VI_1 {
state MASTER
interface eth0
virtual_router_id 51
priority 100
advert_int 1
authentication {
auth_type PASS
auth_pass 5555
}
track_script {
chk_haproxy #监测haproxy进程状态
}
virtual_ipaddress {
192.168.8.200
}
}
编辑从节点的配置文件
[root@erick ~]# cat /etc/keepalived/keepalived.conf
! Configuration File for keepalived
global_defs {
router_id LVS_DEVEL
}
vrrp_script chk_haproxy {
script "/usr/local/keepalived/check_haproxy.sh"
interval 2
weight 2
}
vrrp_instance VI_1 {
state BACKUP
interface eth0
virtual_router_id 51
priority 99
advert_int 1
authentication {
auth_type PASS
auth_pass 5555
}
track_script {
chk_haproxy #??haproxy????
}
virtual_ipaddress {
192.168.8.200
}
}
检查haproxy状态的脚本:
[root@erick ~]# cat /etc/keepalived/check_haproxy.sh
#!/bin/bash
if [ $(ps -C haproxy --no-header | wc -l) -eq 0 ]; then
/etc/init.d/haproxy start
fi
sleep 2
if [ $(ps -C haproxy --no-header | wc -l) -eq 0 ]; then
/etc/init.d/keepalived stop
fi
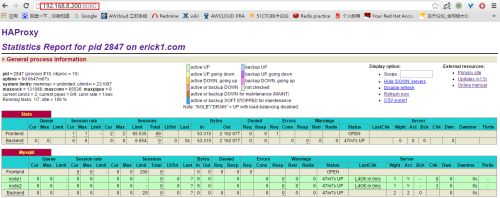
在web浏览器中使用vip访问haproxy查看msyql状态
至此keepalive已经实现对haproxy的高可用了。
参考文献:
http://tunnelix.com/mariadb-galera-cluster-installation/
https://geekdudes.wordpress.com/2015/07/18/setting-up-failover-cluster-for-mariadb-on-centos-7/
http://severalnines.com/tutorials/mysql-load-balancing-haproxy-tutorial#3
