高级网络配置
一 bond网络
1)定义:
Red Hat Enterprise Linux 允许管理员使用bonding 内核模块和称为通道绑定接口的
特殊网络接口将多个网络接口绑定到一个通道。根据选择的绑定模式 , 通道绑定使两个或更多个网络接口作为一个网络接口 , 从而增加带宽和 / 提供冗余性
2)选择 Linux 以太网绑定模式:
1 模式 0 ( 平衡轮循 ) - 轮循策略 , 所有接口都使用采用轮循方式在所有 Slave 中传输封包 ; 任何Slave 都可以接收
2 模式 1 ( 主动备份 ) - 容错。一次只能使用一个Slave 接口 , 但是如果该接口出现故障 , 另一个Slave 将 接替它
3 模式 3 ( 广播 ) - 容错。所有封包都通过所有Slave 接口广播
3)利用 nmcli 命令管理 bond
二 team接口
1)定义:
team 也是链路聚合的一种方式,最多支持8块网卡
2)支持模式:
broadcast广播容错
activebackup主备
roundrobin轮询
loadbalance负载均衡
3)配置
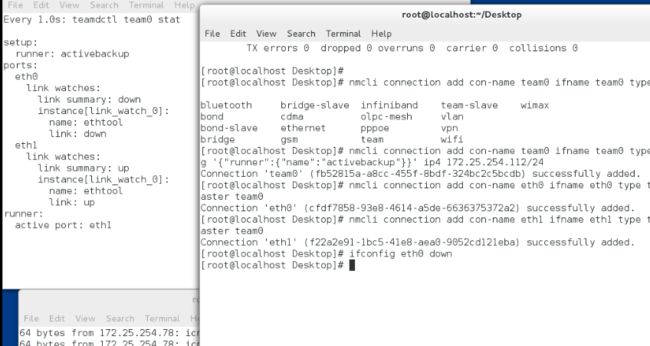
1 nmcli connection add con-name team0 ifname team0 type team config '{"runner":{"name":"activebackup"}}' ip4 172.25.254.112/24###添加team0,runner指工作方式,name指工作方式的名称###
2 nmcli connection add con-name eth0 ifname eth0 type team-slave master team0###将eth0添入team0###
3 nmcli connection add con-name eth1 ifname eth1 type team-slave master team0###将eth1添入###
4)测试:
watch -n 1 teamdctl team0 stat###监控team0的变化###
ifconfig eth0 down
ifconfig eth0 up
ifconfig eth1 down###在此期间发现网络一直是通的###
三 网桥
1 systemctl stop NetworkManager.service
2 cd /etc/sysconfig/network-scripts/
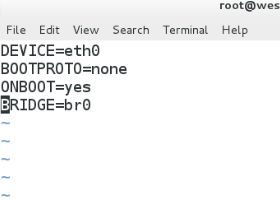
3 vim ifcfg-eth0
内容:
DDEVICE=eth0###设备名称###
ONBOOT=yes###开启服务设备自动激活###
BOOTPROTO=none##网卡工作状态###
BRIDGE=br0###网卡开启的网络接口###
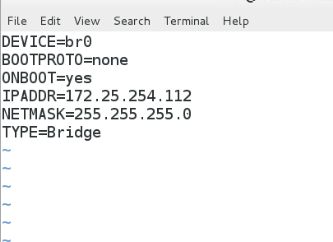
4 vim ifcfg-br0
内容:
DEVICE=br0
ONBOOT=yes
BOOTPROTO=none
IPADDR=172.25.254.112
NETMASK=255.255.255.0
TYPE=Bridge##网络接口类型是桥接
5 systemctl restart network
6 systemctl start NetworkManager
过程如下:
[root@westos-mail ~]# cd /etc/sysconfig/network-scripts/
[root@westos-mail network-scripts]# vim ifcfg-eth0
[root@westos-mail network-scripts]# vim ifcfg-br0
[root@westos-mail network-scripts]# systemctl restart network
[root@westos-mail network-scripts]# systemctl start NetworkManager
[root@westos-mail network-scripts]# ifconfig
br0: flags=4163
inet 172.25.254.112 netmask 255.255.255.0 broadcast 172.25.254.255
inet6 fe80::5054:ff:fe00:4e0a prefixlen 64 scopeid 0x20
ether 52:54:00:00:4e:0a txqueuelen 0 (Ethernet)
RX packets 0 bytes 0 (0.0 B)
RX errors 0 dropped 0 overruns 0 frame 0
TX packets 59 bytes 7887 (7.7 KiB)
TX errors 0 dropped 0 overruns 0 carrier 0 collisions 0
eth0: flags=4163
ether 52:54:00:00:4e:0a txqueuelen 1000 (Ethernet)
RX packets 48 bytes 3826 (3.7 KiB)
RX errors 0 dropped 0 overruns 0 frame 0
TX packets 1049 bytes 65762 (64.2 KiB)
TX errors 0 dropped 0 overruns 0 carrier 0 collisions 0
eth1: flags=4163
ether 52:54:00:b5:e6:60 txqueuelen 1000 (Ethernet)
RX packets 1091 bytes 69222 (67.5 KiB)
RX errors 0 dropped 0 overruns 0 frame 0
TX packets 0 bytes 0 (0.0 B)
TX errors 0 dropped 0 overruns 0 carrier 0 collisions 0
lo: flags=73
inet 127.0.0.1 netmask 255.0.0.0
inet6 ::1 prefixlen 128 scopeid 0x10
loop txqueuelen 0 (Local Loopback)
RX packets 1082 bytes 93888 (91.6 KiB)
RX errors 0 dropped 0 overruns 0 frame 0
TX packets 1082 bytes 93888 (91.6 KiB)
TX errors 0 dropped 0 overruns 0 carrier 0 collisions 0
四 命令管理方式
1 添加:
systemctl stop NetworkManager
brctl show ###显示网桥###
brctl addbr br0 ###添加网桥br0###
brctl addif br0 eth0 ###将eth0添加入br0###
ifconfig eth0 up ###使eth0 up###
ifconfig br0 172.25.254.112 netmask 255.255.255.0 ###临时设定br0的ip###
brctl show
过程如下:
[root@westos-mail ~]# systemctl stop NetworkManager.service
[root@westos-mail ~]# brctl show
bridge namebridge idSTP enabledinterfaces
[root@westos-mail ~]# brctl addbr br0
[root@westos-mail ~]# brctl show
bridge namebridge idSTP enabledinterfaces
br08000.000000000000no
[root@westos-mail ~]# brctl addif br0 eth0
[root@westos-mail ~]# ifconfig
lo: flags=73
inet 127.0.0.1 netmask 255.0.0.0
inet6 ::1 prefixlen 128 scopeid 0x10
loop txqueuelen 0 (Local Loopback)
RX packets 916 bytes 78872 (77.0 KiB)
RX errors 0 dropped 0 overruns 0 frame 0
TX packets 916 bytes 78872 (77.0 KiB)
TX errors 0 dropped 0 overruns 0 carrier 0 collisions 0
[root@westos-mail ~]# ifconfig eth0 up
[root@westos-mail ~]# ifconfig br0 172.25.254.112 netmask 255.255.255.0
[root@westos-mail ~]# brctl show
bridge namebridge idSTP enabledinterfaces
br08000.525400004e0anoeth0
测试:
ping 172.25.254.78
[root@westos-mail ~]# ping 172.25.254.78
PING 172.25.254.78 (172.25.254.78) 56(84) bytes of data.
64 bytes from 172.25.254.78: icmp_seq=1 ttl=64 time=0.209 ms
64 bytes from 172.25.254.78: icmp_seq=2 ttl=64 time=0.137 ms
^C
--- 172.25.254.78 ping statistics ---
2 packets transmitted, 2 received, 0% packet loss, time 1000ms
rtt min/avg/max/mdev = 0.137/0.173/0.209/0.036 ms
[root@westos-mail ~]#
2 删除 :
ifconfig br0 down###使br0 down###
brctl delif br0 eth0###将eth0从br0上摘除###
brctl delbr br0###删除br0###
brctl show
过程如下:
[root@westos-mail network-scripts]# ifconfig br0 down
[root@westos-mail network-scripts]# brctl delif br0 eth0
[root@westos-mail network-scripts]# brctl delbr br0
[root@westos-mail network-scripts]# brctl show
bridge namebridge idSTP enabledinterfaces
五 ipv6 网络的管理
1) 定义:
ipv6全称为Internet Protocol Version 6 ,是IETF(和互联网工程任务组)设计的用于替代现行版本 IP 协议的下一代 IP 协议,IPv6 采用 128 位 2 进制数码表示。
2) IPv6 表示方式
1 为方便操作, ipv6 被换算成 8x16 进制的一串数字
2 任意位数的 0 可以用 :: 来表示
例:
2000:0000:0000:0000:0000:0000:0000:0001
2000::1
3)ipv6 的文件设定:
1 vim /etc/sysconfig/network-scripts/ifcfg-eth0
DEVICE=eth0
ONBOOT=yes
BOOTPROTO=none
IPADDR=172.25.254.112
NETMASK=255.255.255.0
IPV6INIT=yes ###开启ipv6###
IPV6_AUTOCONF=no ###不启用ipv6地址的自动配置###
IPV6ADDR=2017::1120/64 ###ipv6的的地址###
2 systemctl restart network
查看:
[root@westos-mail network-scripts]# ifconfig eth0
eth0: flags=4163
inet 172.25.254.112 netmask 255.255.255.0 broadcast 172.25.254.255
inet6 2017::1120 prefixlen 64 scopeid 0x0
inet6 fe80::5054:ff:fe00:4e0a prefixlen 64 scopeid 0x20
ether 52:54:00:00:4e:0a txqueuelen 1000 (Ethernet)
RX packets 87 bytes 8711 (8.5 KiB)
RX errors 0 dropped 0 overruns 0 frame 0
TX packets 2020 bytes 125940 (122.9 KiB)
TX errors 0 dropped 0 overruns 0 carrier 0 collisions 0
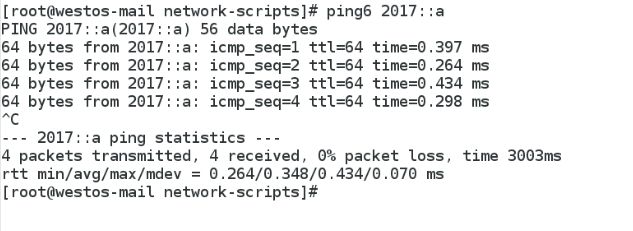
如果要测试能否ping通,ipv6的要用ping6
例:ping62017::a/64


