简介
Mybatis 是一个持久层框架,它对 JDBC 进行了高级封装,使我们的代码中不会出现任何的 JDBC 代码,另外,它还通过 xml 或注解的方式将 sql 从 DAO/Repository 层中解耦出来,除了这些基本功能外,它还提供了动态 sql、延迟加载、缓存等功能。 相比 Hibernate,Mybatis 更面向数据库,可以灵活地对 sql 语句进行优化。
针对 Mybatis 的分析,我会拆分成使用、配置、源码、生成器等部分,都放在 Mybatis 这个系列里,内容将持续更新。本文是这个系列的第一篇文章,将从以下两个问题展开 :
-
持久层框架解决了哪些问题?
-
如何使用 Mybatis(这里会从入门到深入)?
项目环境的说明
为了更好地分析 Mybatis 的特性,本项目不会引入任何的依赖注入框架,将使用比较原生态的方式来使用 Mybatis。
工程环境
JDK:1.8.0_231
maven:3.6.1
IDE:Spring Tool Suites4 for Eclipse 4.12 (装有 Mybatipse 插件)
mysql:5.7.28
依赖引入
Mybatis 有自带的连接池,但实际项目中建议还是引入第三方的比较好。
            org.Mybatis
            Mybatis
            3.5.4


            mysql
            mysql-connector-java
            8.0.15


            ch.qos.logback
            logback-core
            1.2.3
            jar


            ch.qos.logback
            logback-classic
            1.2.3
            jar


            com.zaxxer
            HikariCP
            2.6.1


            junit
            junit
            4.12
            test
数据库脚本
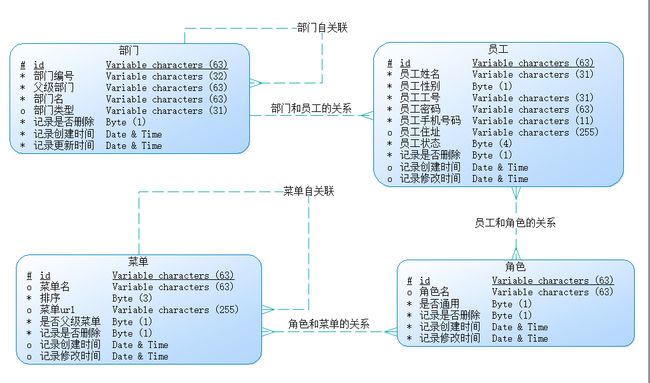
在这个项目里面,我希望尽可能地模拟出实际项目的各种场景,例如,高级条件查询、关联查询(一对一关联、多对多关联和自关联),并研究在对应场景下如何使用 Mybatis 解决问题。本项目的 ER 图如下,涉及到 4 张主表和 2 张中间表,具体的 sql 脚本也提供好了([脚本路径]( https://github.com/ZhangZiSheng001/mybatis-projects /sql)):
持久层框架解决了哪些问题
在分析如何使用 mybatis 之前,我们先来研究一个问题:持久层框架解决了哪些问题?
假设没有持久层框架,首先想到的就是使用 JDBC 来操作数据库。这里我简单地引入一个需求,就是我想通过 id 查询出一个员工对象。下面仅会从repository/DAO 层的角度来考虑如何实现,所以我们不需要去考虑 service 层中事务提交和连接关闭的问题,当然,这样会遇到一个问题,就是我们必须保证 service 层的事务和持久层的是同一个,这一点会通过 **Utils 来解决,因为不是本文重点,这里不展开。
用 JDBC 方式查询一个员工
下面用 JDBC 查询员工对象。
有人可能会问,就算你不适用持久层框架,你还可以使用 DBUtils 或者自己封装 JDBC 代码啊?这里需要强调下,这种封装其实是持久层框架应该做的事,我们自己手动封装,其实已经在实现一个持久层框架了。所以,为了暴露纯粹的 JDBC 实现的缺点,这里尽量不去封装。
    @Override
    public Employee get(String id) throws SQLException {
        Employee employee = null;
        PreparedStatement statement = null;
        ResultSet resultSet = null;

        // 创建sql
        String sql = "select * from demo_employee where id = ?";
        try {
            // 获得连接(JDBCUtils保证同一线程获得同一个连接对象)
            Connection connection = JDBCUtils.getConnection();
            // 获得Statement对象
            statement = connection.prepareStatement(sql);

            // 设置参数
            statement.setObject(1, id);

            // 执行,获取结果集
            resultSet = statement.executeQuery();

            if(resultSet.next()) {
                // 映射结果集
                employee = convert(resultSet);
            }
            // 返回员工对象
            return employee;

        } finally {
            // 释放资源
            JDBCUtils.release(null, statement, resultSet);
        }
    }

    /**
     * 通过结果集构造员工对象
     * @author: zzs
     * @date: 2020年3月28日 下午12:20:02
     * @param resultSet
     * @return: Employee
     * @throws SQLException
     */
    private Employee convert(ResultSet resultSet) throws SQLException {
        Employee employee = new Employee();
        employee.setId(resultSet.getString("id"));
        employee.setName(resultSet.getString("name"));
        employee.setGender(resultSet.getBoolean("gender"));
        employee.setNo(resultSet.getString("no"));
        employee.setAddress(resultSet.getString("address"));
        employee.setDeleted(resultSet.getBoolean("deleted"));
        employee.setDepartmentId(resultSet.getString("department_id"));
        employee.setPassword(resultSet.getString("password"));
        employee.setPhone(resultSet.getString("phone"));
        employee.setStatus(resultSet.getByte("status"));
        employee.setCreate(resultSet.getDate("gmt_create"));
        employee.setModified(resultSet.getDate("gmt_modified"));
        return employee;
    }
通过上面的代码,我们可以看到两个主要的问题:
- 每个 Repository/DAO 方法都会出现繁琐、重复的 JDBC 代码。
- sql 和 DAO/Repository 的程序代码耦合度太高,不能统一管理。这里的 sql 包括了 sql 的定义、参数设置和结果集映射,强调一点,不是说 sql 不能出现在 java 类中,而是说应该从 DAO/Repository 的程序代码中解耦出来,进行集中管理。
说到这里,我们可以总结出来,为了项目的方便和解耦,一个基本的持久层框架需要做到:
- 对 JDBC 代码进行高级封装,为我们提供更简单的接口。
- 将 sql 从 DAO/Repository 中解耦出来。
Mybatis 作为一个优秀的持久层框架,针对以上问题提供了解决方案,下面我们再看看使用 Mybatis 如何实现上面的需求。
用 Mybatis 方式查询一个员工
还是通过查询员工的例子来说明,代码如下:
    public Employee get(String id) {
        return MybatisUtils.getMapper(EmployeeMapper.class).selectByPrimaryKey(id);
    }
上面的代码没有出现任何的 JDBC 代码和 sql 代码,因为 Mybatis 对 JDBC 进行了高级封装,并且采用 Mapper 的注解或 xml 文件来统一管理 sql 的定义、参数设置和结果集映射。下面看下 xml 文件的方式:
e.id,
e.`name`,
e.gender,
e.no,
e.password,
e.phone,
e.address,
e.status,
e.deleted,
e.department_id,
e.gmt_create,
e.gmt_modified
针对 sql 解耦的问题,早期的持久层框架都偏向于将 sql 独立在配置文件中,后来才逐渐引入注解的支持,如下是Mybatis 的注解方式(EmployeeMapper 接口):
    @Select("SELECT e.id, e.`name`, e.gender, e.no, e.password, e.phone, e.address, e.status, e.deleted, e.department_id, e.gmt_create, e.gmt_modified FROM demo_employee e WHERE id = #{id}")
    @resultMap("BaseResultMap")
    Employee selectByPrimaryKey(String id);
我认为,正如前面说到的,sql 在项目中存在形式不是重点,我们的目的是希望 sql 能被统一管理,基于这个目的实现的不同方案,都是合理的。
Mybatis 作为一款优秀的持久层框架,除了解决上面的两个基本问题,还为我们提供了懒加载、缓存、动态语句、插件等功能,下文会讲到。
补充
通过上面的内容,我们已经回答了问题:持久层框架解决了哪些问题?这里需要补充一点:
本文只是指出持久层框架的需要解决的基本问题,并没有强调必须使用 Mybatis 或 Hibernate 等通用框架。出于性能方面的考虑,部分开发者可能会采用更轻量的实现,而不是使用流行的通用框架。当然,这也是自己造轮子和使用通用轮子的区别了。
如何使用 Mybatis
本项目会模拟实际开发的各种场景来研究 Mybatis 的使用方法。在我看来,在项目创建时,repository/DAO 层只要有以下几个方法,已经可以满足大部分使用需求。在 repository/DAO 层定义大量的*By*方法是非常低级和不负责任的,然而,我接触过许多人都是这么搞的。
public interface IEmployeeRepository {
    // 查询
    Employee get(String id);//根据id查询

    List list(EmployeeCondition con);//根据条件查询

    long count(EmployeeCondition con);//根据条件查询数量

    // 删除
    int delete(EmployeeCondition con);//根据条件删除

    int delete(String id);//根据id删除

    // 新增
    int save(Employee employee);//新增

    int save(List list);//批量新增

    // 更新
    int update(Employee employee, EmployeeCondition con);//根据条件更新

    int update(Employee employee);//更新
}
下面的使用例子将针对这个接口进行展开,主要分成4个部分:
- 入门例子。通过根据id查询员工和新增员工的例子说明;
- 高级条件查询。
- 关联查询。查询员工并带出部门、角色,这里会先使用嵌套 select 查询的方式,然后再给出可以解决 “N+1 查询问题” 的嵌套结果映射。
从入门例子开始
本文的包结构如下。test 里的测试简单看成是 service 层在调用 respository 层的方法,由于我必须在 service 层 和 respository 层中拿到同一个“连接”来管理事务或释放资源,所有 util 中将“连接”绑定到了当前线程。
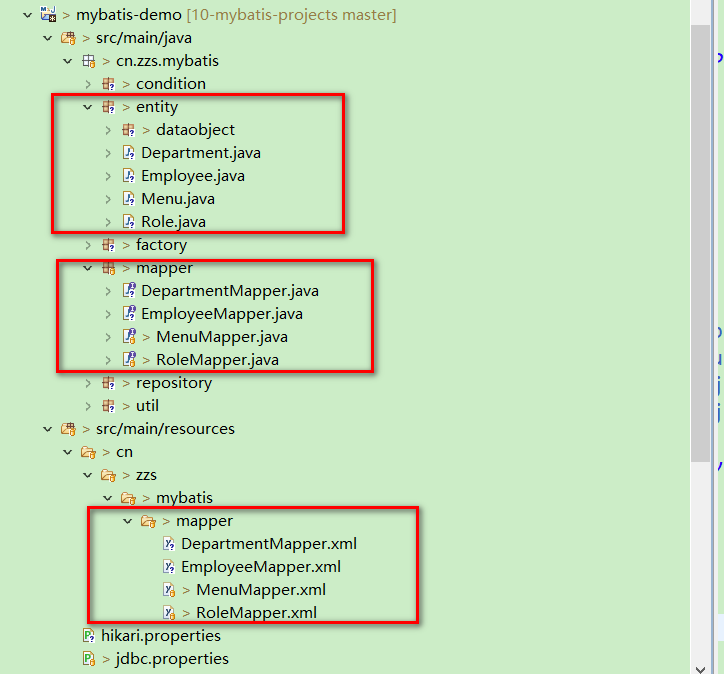
在进行下面工作之前,我们需要先创建好实体和 mapper 文件(如图圈红部分),实际项目中,我们可以使用 Mybatis-generator 或者自定义的代码生成器生成,mapper 中将包含基本的 CRUD 代码。
配置 configuration 文件
这个是 Mybatis 的主配置文件,它影响着 Mybatis 的行为和属性信息。配置文件的层级结构如下:
configuration(配置)
- properties(属性)
- settings(设置)
- typeAliases(类型别名)
- typeHandlers(类型处理器)
- objectFactory(对象工厂)
- plugins(插件)
- environments(环境配置)
- environment(环境变量)
- transactionManager(事务管理器)
- dataSource(数据源)
- environment(环境变量)
- databaseIdProvider(数据库厂商标识)
- mappers(映射器)
作为入门例子,这里只进行了简单的配置,本系列的第二篇博客将详细讲解这些配置。
注意:configuration 的标签必须按顺序写,不然会报错。
以上配置作用如下:
-
typeAliases:类型别名,仅在 *Mapper.xml 中使用。通过配置实体类的包名,我们可以在 xml 中直接通过 Employee 来表示员工类型,而不需要使用全限定类名;
-
environments:环境配置。下篇文章再详细讲吧。这里简单说下 dataSource,由于引入的是第三方数据源,所以得重写 org.apache.ibatis.datasource.DataSourceFactory接口,如下:
public class HikariDataSourceFactory implements DataSourceFactory {

       private DataSource dataSource;

       public HikariDataSourceFactory() {
           super();
           try {
               HikariConfig config = new HikariConfig("/hikari.properties");
               dataSource = new HikariDataSource(config);
           } catch(Exception e) {
               throw new RuntimeException("创建数据源失败", e);
           }
       }
       @Override
       public DataSource getDataSource() {
           return dataSource;
       }

       @Override
       public void setProperties(Properties props) {
           // TODO Auto-generated method stub

       }
}
- mappers:映射器。其实就是告诉 Mybatis 映射器放在哪里,注意,Mapper 接口和 xml 文件编译打包后必须在同一个路径下。如果你的 xml 文件放在 src/main/java 中(不建议),需要在 pom 文件中增加以下配置:
                src/main/java
                false

                    **/mapper/*.xml


                src/main/resources

                    **
配置 mapper xml文件
Mybatis 的映射文件只有很少的几个顶级元素(按照应被定义的顺序列出):
cache– 该命名空间的缓存配置。cache-ref– 引用其它命名空间的缓存配置。resultMap– 描述如何从数据库结果集中加载对象,是最复杂也是最强大的元素。parameterMap– 老式风格的参数映射。此元素已被废弃,并可能在将来被移除!请使用行内参数映射。文档中不会介绍此元素。sql– 可被其它语句引用的可重用语句块。insert– 映射插入语句。update– 映射更新语句。delete– 映射删除语句。select– 映射查询语句。
这里也只进行了简单的配置,本系列的第二篇博客再详细讲。
e.id,
e.`name`,
e.gender,
e.no,
e.password,
e.phone,
e.address,
e.status,
e.deleted,
e.department_id,
e.gmt_create,
e.gmt_modified
insert into
demo_employee
(id, name, gender,no, password, phone,address, status, deleted,department_id, gmt_create, gmt_modified)
values (
#{id,jdbcType=VARCHAR},
#{name,jdbcType=VARCHAR},
#{gender,jdbcType=BIT},
#{no,jdbcType=VARCHAR},
#{password,jdbcType=VARCHAR},
#{phone,jdbcType=VARCHAR},
#{address,jdbcType=VARCHAR},
#{status,jdbcType=TINYINT},
#{deleted,jdbcType=BIT},
#{departmentId,jdbcType=VARCHAR},
#{create,jdbcType=TIMESTAMP},
#{modified,jdbcType=TIMESTAMP}
)
在以上配置中,使用了三个元素:
- resultMap:表列名(或查询出来的别名)与实体属性的映射关系。除了 id 和关联对象字段外,只要表列名(或查询出来的别名)与实体属性一致,可以不用配置。 如果在主配置文件开启了驼峰命名自动映射
mapUnderscoreToCamelCase,则遵循驼峰命名规则的字段都能自动映射。 - sql: 用来定义可重用的 SQL 代码片段,可以在查询或变更语句中通过 include 引用。如果数据库的字段名和实体类的不一致,需要设置列别名。
- select: 查询语句。其中,id 是所在命名空间中唯一的标识符,可以被用来引用这条语句,与 mapper 文件中的,parameterType 是入参类型,resultMap 是映射表。
- insert:插入语句。
注意下参数符号 #{id }, 它告诉 Mybatis 创建一个预处理语句(PreparedStatement)参数,在 JDBC 中,这样的一个参数在 SQL 中会由一个“?”来标识,并被传递到一个新的预处理语句中。不过有时你就是想直接在 SQL 语句中直接插入一个不转义的字符串。 比如 ORDER BY 子句,这时候你可以使用 “$” 字符:
ORDER BY ${columnName}
获取 SqlSession
在以下代码中,存在三个主要对象:
SqlSessionFactoryBuilder:一旦创建了 SqlSessionFactory,就不再需要它了,因此 SqlSessionFactoryBuilder 实例的最佳作用域是方法作用域。SqlSessionFactory:一旦被创建就应该在应用的运行期间一直存在,没有任何理由丢弃它或重新创建另一个实例, 因此 SqlSessionFactory 的最佳作用域是应用作用域。SqlSession:每个线程都应该有它自己的 SqlSession 实例。SqlSession 的实例不是线程安全的,因此是不能被共享的,所以它的最佳的作用域是请求或方法作用域。 SqlSession 的作用类似于 JDBC 的Connection,使用完后必须 close。
    // 加载配置文件,初始化SqlSessionFactory对象
    String resource = "Mybatis-config.xml";
    InputStream in = Resources.getResourceAsStream(resource));
    SqlSessionFactory sqlSessionFactory = new SqlSessionFactoryBuilder().build(in);
    // 获取sqlSession 注意,这种方式获取的 SqlSession 需手动提交事务。
    SqlSession sqlSession = sqlSessionFactory.openSession();
为了保证同一个线程在 service 和 repository 中拿到同一个 SqlSession 对象,本项目中定义了工具类 cn.zzs.Mybatis.util.MybatisUtils 来获取 SqlSession,并提供了事务管理和资源释放等方法。
public class MybatisUtils {

    private static SqlSessionFactory sqlSessionFactory;

    private static ThreadLocal localSqlSession = new ThreadLocal<>();

    static {
        init();
    }

    private static void init() {
        try {
            // 加载配置文件,初始化SqlSessionFactory对象
            InputStream inputStream = Resources.getResourceAsStream("mybatis-config.xml");
            sqlSessionFactory = new SqlSessionFactoryBuilder().build(inputStream);
        } catch(Exception e) {
            throw new RuntimeException("初始化SqlSessionFactory失败", e);
        }
    }

    public static void startSqlSession() {
        localSqlSession.set(sqlSessionFactory.openSession());
    }

    public static void commit() {
        final SqlSession sqlSession = localSqlSession.get();
        if(sqlSession == null) {
            throw new SqlSessionException("sqlSession未创建");
        }
        sqlSession.commit();
    }

    public void rollback() {
        final SqlSession sqlSession = localSqlSession.get();
        if(sqlSession == null) {
            throw new SqlSessionException("sqlSession未创建");
        }
        sqlSession.rollback();
    }

    public static void close() {
        final SqlSession sqlSession = localSqlSession.get();
        if(sqlSession == null) {
            throw new SqlSessionException("sqlSession未创建");
        }
        try {
            sqlSession.close();
        } finally {
            localSqlSession.set(null);
        }
    }

    public static  T getMapper(Class type) {
        final SqlSession sqlSession = localSqlSession.get();
        if(sqlSession == null) {
            throw new SqlSessionException("sqlSession未创建");
        }
        return sqlSession.getMapper(type);
    }
}
如果不想自己写工具类也行,mybatis 提供了SqlSessionManager来安全地获取 SqlSession,如下,使用时可以将它作为 repository/DAO 和 service 的全局对象,直接当成 sqlSession 对象来使用,但必须现在 service 层调用 startManagedSession 方法。
public class SqlSessionManager implements SqlSessionFactory, SqlSession {

  private final SqlSessionFactory sqlSessionFactory;

  private final ThreadLocal localSqlSession = new ThreadLocal<>();

  public static SqlSessionManager newInstance(InputStream inputStream) {
    return new SqlSessionManager(new SqlSessionFactoryBuilder().build(inputStream, null, null));
  }

  public void startManagedSession() {
    this.localSqlSession.set(openSession());
  }

  @Override
  public void commit() {
    final SqlSession sqlSession = localSqlSession.get();
    if (sqlSession == null) {
      throw new SqlSessionException("Error:  Cannot commit.  No managed session is started.");
    }
    sqlSession.commit();
  }

  @Override
  public void rollback() {
    final SqlSession sqlSession = localSqlSession.get();
    if (sqlSession == null) {
      throw new SqlSessionException("Error:  Cannot rollback.  No managed session is started.");
    }
    sqlSession.rollback();
  }
}
编写 Repository
repository 的代码非常简单,只需要拿到 Mapper 对象,就能直接进行数据库操作了。注意,这里的 Mapper 不能作为实例变量。
public class EmployeeRepository implements IEmployeeRepository {

    @Override
    public Employee get(String id) {
        return MybatisUtils.getMapper(EmployeeMapper.class).selectByPrimaryKey(id);
    }

    @Override
    public int save(Employee employee) {
        return MybatisUtils.getMapper(EmployeeMapper.class).insert(employee);
    }
}
编写测试类
测试类简单看成是一个 service 类(当然,它不完全是),这里需要手动地提交事务和释放资源。
public class EmployeeRepositoryTest {

    private IEmployeeRepository employeeRepository = new EmployeeRepository();

    @Before
    public void startSqlSession() {
        MybatisUtils.startSqlSession();
    }

    @After
    public void endSqlSession() {
        MybatisUtils.close();
    }

    /**
     * 测试根据id查询
     */
    @Test
    public void testGet() {
        String id = "cc6b08506cdb11ea802000fffc35d9fe";

        // 执行,获取员工对象
        Employee employee = employeeRepository.get(id);

        // 打印
        System.out.println(employee);
    }
    /**
     * 测试保存
     */
    @Test
    public void testSave() {
        // 创建用户
        Employee employee = new Employee(UUID.randomUUID().toString().replace("-", ""), "zzs005", true, "zzs005", "admin", "18826****41", "广东", (byte)1, false, "94e2d2e56cd811ea802000fffc35d9fa", new Date(), new Date());

        // 保存
        employeeRepository.save(employee);

        // 提交事务
        MybatisUtils.commit();
    }
}
测试
测试上面两个方法,会在控制台输出了 sql。为了直观点,我这里格式化了一下。
2020-03-30 20:40:11.098 c.z.m.mapper.EmployeeMapper.selectByPrimaryKey -
==>  Preparing:
SELECT e.id, e.`name`, e.gender, e.no, e.password
    , e.phone, e.address, e.status, e.deleted, e.department_id
    , e.gmt_create, e.gmt_modified
FROM demo_employee e
WHERE e.id = ?
2020-03-30 20:40:11.121 c.z.m.mapper.EmployeeMapper.selectByPrimaryKey -
==> Parameters: cc6b08506cdb11ea802000fffc35d9fe(String)
2020-03-30 20:40:11.170 c.z.m.mapper.EmployeeMapper.selectByPrimaryKey -
<==      Total: 1

Employee [id=cc6b08506cdb11ea802000fffc35d9fe, name=zzf001, gender=false, no=zzf001, password=123456, phone=18826****41, address=北京, status=1, deleted=false, departmentId=65684a126cd811ea802000fffc35d9fa, create=Wed Sep 04 21:54:49 CST 2019, modified=Wed Sep 04 21:54:51 CST 2019]

2020-03-30 20:40:48.872 cn.zzs.Mybatis.mapper.EmployeeMapper.insert -
==>  Preparing:
INSERT INTO demo_employee (id, name, gender, no, password
    , phone, address, status, deleted, department_id
    , gmt_create, gmt_modified)
VALUES (?, ?, ?, ?, ?
    , ?, ?, ?, ?, ?
    , ?, ?)
2020-03-30 20:40:48.899 cn.zzs.Mybatis.mapper.EmployeeMapper.insert -
==> Parameters: 517cabff75b24129b54048ce7d3280f9(String), zzs005(String), true(Boolean), zzs005(String), admin(String), 18826****41(String), 广东(String), 1(Byte), false(Boolean), 94e2d2e56cd811ea802000fffc35d9fa(String), 2020-03-30 20:40:47.808(Timestamp), 2020-03-30 20:40:47.808(Timestamp)
2020-03-30 20:40:48.991 cn.zzs.Mybatis.mapper.EmployeeMapper.insert -
<==    Updates: 1
补充--批量新增
这里我再补充下批量新增的实现。只要在上面 insert 语句的基础上增加一个 foreach 标签就可以,非常方便。在本系列第二篇文章中我将说到这些动态 sql 的用法。
        insert into
            demo_employee
        (id, name, gender,no, password, phone,address, status, deleted,department_id, gmt_create, gmt_modified)
        values

            (
                #{item.id},
                #{item.name},
                #{item.gender},
                #{item.no},
                #{item.password},
                #{item.phone},
                #{item.address},
                #{item.status},
                #{item.deleted},
                #{item.departmentId},
                #{item.create},
                #{item.modified}
            )
高级条件查询
还是回到下面这个接口,经过上面的例子,圈红的几个方法,相信大家已经知道如何使用。现在看看高级条件查询。
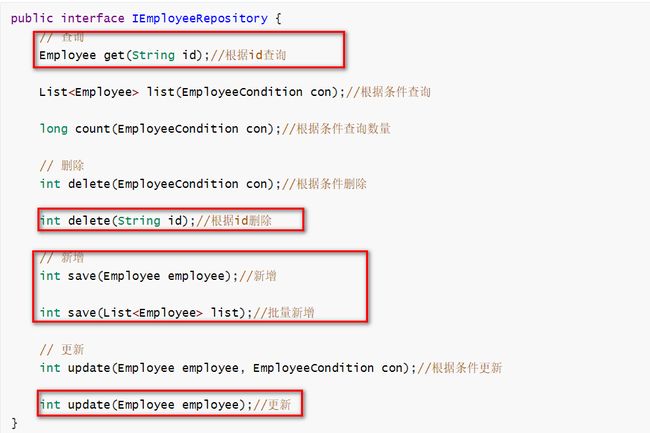
条件类和它的继承体系
在项目中,条件类经常会被用来接收各种查询条件,当业务比较复杂时,条件类会非常臃肿,大部分原因都是写代码不遵循规范。我们的条件封装类的条件由三个部分组成(以员工条件类为例):
- 不同实体都会用到的条件,例如页码页数;
- 对应实体的属性,例如员工性别、电话号码;
- 与对应实体关联的实体属性,例如员工所在部门名。
根据这种结构可以形成以下的继承结构:
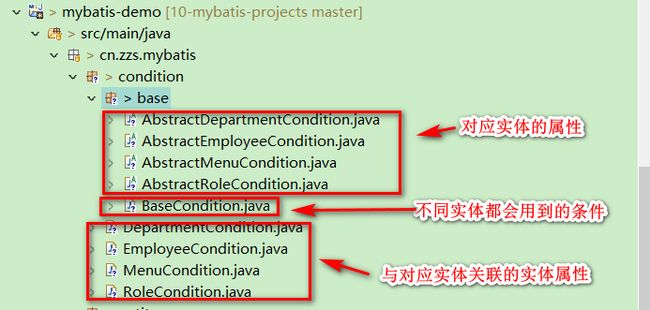
其中,BaseCondition中用于定义一些不同实体都通用的条件,如下:
public class BaseCondition {
    /**
     * 页码
     */
    private Integer pageNum;
    /**
     * 每页记录数
     */
    private Integer pageSize;

    /**
     * 排序语句
     */
    private String orderByClause;

    /**
     * 关键字
     */
    private String searchKeyWord;

    /**
     * 是否去重
     */
    private boolean distinct;

    // 省略setter/getter方法
}
AbstractEmployeeCondition 中定义属于员工类的条件,如下:
public abstract class AbstractEmployeeCondition extends BaseCondition {
    /**
     * 注意,这里不要命名为id
     */
    private String employeeId;

    private String name;

    private Boolean gender;

    private String no;

    private String password;

    private String phone;

    private String address;

    private Byte status;

    private Boolean deleted;

    private String departmentId;

    private Date createStart;

    private Date createEnd;

    private Date modifiedStart;

    private Date modifiedEnd;

    // 省略setter/getter方法
}
接下来是具体实现类 EmployeeCondition,这里用于定义一些关联实体的条件,也就是说使用到这些条件时必须 join 表。
public class EmployeeCondition extends AbstractEmployeeCondition {
    //============部门表============
    /**
     * 部门编号
     */
    private String departmentNo;

    /**
     * 部门名
     */
    private String departmentName;

    /**
     * 是否关联部门表
     */
    private boolean joinDepartment = false;

    public boolean isJoinDepartment() {
        return joinDepartment ? true : (departmentNo != null && !departmentNo.isEmpty()) || (departmentName != null && !departmentName.isEmpty());
    }

    public void setJoinDepartment(boolean joinDepartment) {
        this.joinDepartment = joinDepartment;
    }
    // 省略setter/getter方法
}
编写 mapper xml文件
Mybatis 提供了丰富的动态 sql 语法,以下可以完成高级条件查询的 sql 拼接。
and
e.name = #{con.name}
and
e.gender = #{con.gender}
and
e.no = #{con.no}
and
e.password = #{con.password}
and
e.phone = #{con.phone}
and
e.address = #{con.address}
and
e.status = #{con.status}
and
e.deleted = #{con.deleted}
and
e.gmt_create > #{con.createStart}
and
e.gmt_create < #{con.createEnd}
and
e.gmt_modified > #{con.modifiedStart}
and
e.gmt_modified < #{con.modifiedEnd}
and
d.no = #{con.departmentNo}
and
d.name = #{con.departmentName}
inner join
demo_department d
on
d.id = e.department_id
这里的 sql 将条件分离出来复用,并沿用了条件实体的继承关系,有利于后续项目维护和扩展。注意,千万不要等到项目很臃肿时再进行 sql 的抽取复用。
上面高级条件查询的代码,实际项目中可以通过代码生成器生成,扩展的条件再手动添加就行了。
编写测试方法
其实,这里存在一个问题,排序条件那里 sql 语句渗透到了 service 层,实际项目中,排序规则不会经常变动,我们可以在 xml 里直接使用默认排序条件,条件类增加 userDefaultSort 属性来判断。总之要记住一点,在 service 层中渗透 sql 代码,是非常不应该的!
    /**
     * 测试高级条件查询--嵌套select查询
     */
    @Test
    public void testList() {
        EmployeeCondition con = new EmployeeCondition();
        // 设置条件
        con.setGender(false);
        con.setAddress("北京");
        con.setDeleted(false);
        con.setPhone("18826****41");
        con.setDistinct(true);
        con.setDepartmentNo("202003230002");

        // 设置排序规则
        con.setOrderByClause("e.name desc");// 注意为数据库字段


        // 执行
        List list = employeeRepository.list(con);

        // 遍历结果
        list.forEach(x -> {
            System.out.println(x);
        });
    }
测试
测试以上方法,在控制台打印以下sql,我格式化了下,可以打看到 mybatis 帮我们拼接好了查询条件。
SELECT DISTINCT e.id, e.`name`, e.gender, e.no, e.password
    , e.phone, e.address, e.status, e.deleted, e.department_id
    , e.gmt_create, e.gmt_modified
FROM demo_employee e
    INNER JOIN demo_department d
WHERE 1 = 1
    AND e.gender = ?
    AND e.phone = ?
    AND e.address = ?
    AND e.deleted = ?
    AND d.no = ?
ORDER BY name DESC
关联查询--嵌套 select 查询
以上基本讲完 IEmployeeRepository 中的方法,我前面说过,IEmployeeRepository 接口中的方法可以满足大部分的使用需求,但是,如果我响应给前端的数据中,除了员工的字段,还需要员工所在部门和员工拥有的角色的字段,这时 IEmployeeRepository 的方法不就应付不了了吗?
这种场景涉及到的就是关联查询,我需要在 repository 层查询员工对象时将部门和角色一并查出来,然后在前端转换为具体的 VO 对象。
关联的不同之处是,你需要告诉 MyBatis 如何加载关联。MyBatis 有两种不同的方式加载关联:
-
嵌套 Select 查询:通过执行另外一个 SQL 映射语句来加载期望的复杂类型。
-
嵌套结果映射:使用嵌套的结果映射来处理连接结果的重复子集。
这里先介绍第一种方式:
修改实体类
在员工的实体增加以下两个属性,项目中也可以创建一个 Employee 的子类,将关联的属性放入到子类里,以便于管理。
public class Employee {

    private Department department;

    private List roles = new ArrayList<>();
    //······
}
修改 mapper xml文件
关联查询时,我们不需要修改原来的查询语句,只需要修改 resultMap 就行。
以上增加了两个标签,association 和 collection 分别用于配置一方和多方的关联,其中 property 对应实体中的属性,column 对应执行语句返回的字段(如果没有使用别名的话,一般为列名),select 指向了其他 mapper 语句的 id。
编写测试方法
我调用的还是 IEmployeeRepository 接口的 get 方法,只是增加了部门和角色的打印。
    /**
     * 测试高级条件查询--嵌套select查询
     */
    @Test
    public void testList() {
        EmployeeCondition con = new EmployeeCondition();
        // 设置条件
        con.setGender(false);
        con.setAddress("北京");
        con.setDeleted(false);
        con.setPhone("18826****41");
        con.setDistinct(true);
        con.setDepartmentNo("202003230002");

        // 设置排序规则
        con.setOrderByClause("e.name desc");// 注意为数据库字段


        // 执行
        List list = employeeRepository.list(con);

        // 遍历结果
        list.forEach(x -> {
            System.out.println(x);
            System.out.println(x.getDepartment());
            System.out.println(x.getRoles());
        });
    }
测试
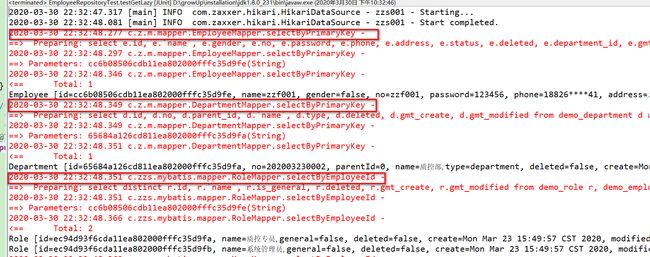
测试上面的方法,可以看到控制台打印了三个查询语句,分别对应员工、部门和角色,这样,我们就可以在前端转换 VO 时,将部门和角色的字段都给到 VO 了。
补充--延迟加载
上面的关联查询存在一个问题:如果我前端的 VO 只想要部门的字段而不需要角色,或者我就只要员工的字段,但是,这个时候还是会把部门和角色统统查出来,将会产生不必要的性能损耗。
这种情况,就需要使用延迟加载了。延迟加载可以保证关联对象只有在用到的时候才去执行数据库查询。
配置延迟加载
Mybatis 延迟加载功能默认是不开启的,但配置开启也很简单,只要在主配置文件中增加:
编写测试方法
还是使用前面的方法,这里我把 role 部分的代码注释掉。
    /**
     * 测试高级条件查询--嵌套select查询
     */
    @Test
    public void testList() {
        EmployeeCondition con = new EmployeeCondition();
        // 设置条件
        con.setGender(false);
        con.setAddress("北京");
        con.setDeleted(false);
        con.setPhone("18826****41");
        con.setDistinct(true);
        con.setDepartmentNo("202003230002");

        // 设置排序规则
        con.setOrderByClause("e.name desc");// 注意为数据库字段


        // 执行
        List list = employeeRepository.list(con);

        // 遍历结果
        list.forEach(x -> {
            System.out.println(x);
            System.out.println(x.getDepartment());
            // System.out.println(x.getRoles());
        });
    }
测试
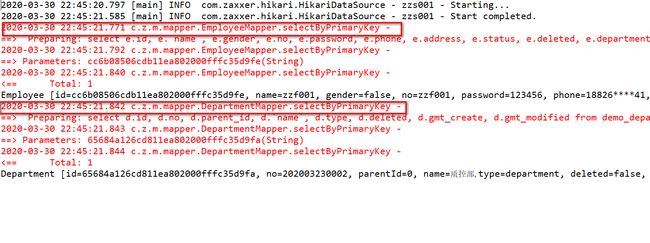
测试上面的方法,可以看到只关联查出了部门,角色并没有查出来,因为我们程序代码中没有触发 getRoles() 或 lazyLoadTriggerMethods 的操作。实际项目中,我们在前端转换 VO 时,如果需要用到关联对象的字段,才会触发查询。
关联查询--嵌套结果映射
像 mybatis 的嵌套 select 查询,使用起来非常方便,但在大型数据集或大型数据表上表现不佳,会遇到 "N+1查询问题"。 因为这种方式 select 语句的数目太多,需要频繁的访问数据库,会在网络传输上浪费大量资源,同时会影响检索性能。 针对这个问题,mybatis 提供了嵌套结果映射的方式。
我只要在上个例子的基础上修改就行:
修改 mapper.xml 文件
这里使用的是左关联查询,resultMap中的调用了 DepartmentMapper 的resultMap。
left join
demo_department d
on
d.id = e.department_id
e.id,
e.`name`,
e.gender,
e.no,
e.password,
e.phone,
e.address,
e.status,
e.deleted,
e.department_id,
e.gmt_create,
e.gmt_modified
,
d.id as d_id,
d.no as d_no,
d.parent_id as d_parent_id,
d.`name` as d_name,
d.type as d_type,
d.deleted as d_deleted,
d.gmt_create as d_gmt_create,
d.gmt_modified as d_gmt_modified
编写测试方法
    /**
     * 测试高级条件查询--嵌套结果查询
     */
    @Test
    public void testList2() {
        EmployeeCondition con = new EmployeeCondition();
        // 设置条件
        con.setGender(false);
        con.setAddress("北京");
        con.setDeleted(false);
        con.setPhone("18826****41");
        con.setDistinct(true);
        //con.setDepartmentNo("202003230002");
        con.setJoinDepartment(true);

        // 设置排序规则
        con.setOrderByClause("e.name desc");// 注意为数据库字段


        // 执行
        List list = employeeRepository.list2(con);

        // 遍历结果
        list.forEach(x -> {
            System.out.println(x);
            System.out.println(x.getDepartment());
        });
    }
测试
这里仅执行了一次 sql 查询,如果是嵌套 select 查询的话,没有触发缓存时需要执行 5 条 sql。相比之下,这种方式性能会更好一些。
2020-04-02 15:22:09.503 c.z.m.mapper.EmployeeMapper.selectByCondition2 -
==>  Preparing:
SELECT DISTINCT e.id, e.`name`, e.gender, e.no, e.password
	, e.phone, e.address, e.status, e.deleted, e.department_id
	, e.gmt_create, e.gmt_modified, d.id AS d_id, d.no AS d_no, d.parent_id AS d_parent_id
	, d.`name` AS d_name, d.type AS d_type, d.deleted AS d_deleted, d.gmt_create AS d_gmt_create, d.gmt_modified AS d_gmt_modified
FROM demo_employee e
	LEFT JOIN demo_department d ON d.id = e.department_id
WHERE 1 = 1
	AND e.gender = ?
	AND e.phone = ?
	AND e.address = ?
	AND e.deleted = ?
ORDER BY e.name DESC
2020-04-02 15:22:09.526 c.z.m.mapper.EmployeeMapper.selectByCondition2 -
==> Parameters: false(Boolean), 18826****41(String), 北京(String), false(Boolean)
2020-04-02 15:22:09.546 c.z.m.mapper.EmployeeMapper.selectByCondition2 -
<==      Total: 4
分页查询
最后再简单查下分页查询,这里使用 pagehelper 插件来实现。
引入插件依赖
在项目 pom.xml 文件中增加以下依赖。
            com.github.pagehelper
            pagehelper
            5.1.10
修改 mybatis 主配置文件
在 mybatis 主配置文件中增加 plugins 元素,并引入分页插件。
编写测试方法
    /**
     * 测试分页插件
     */
    @Test
    public void testlistPage() {
        EmployeeCondition con = new EmployeeCondition();
        // 设置条件
        con.setGender(false);
        con.setAddress("北京");
        con.setDeleted(false);
        con.setPhone("18826****41");
        con.setDistinct(true);

        // 设置分页信息
        PageHelper.startPage(0, 3);

        // 执行查询
        List list = employeeRepository.list(con);
        // 遍历结果
        list.forEach(System.out::println);

        // 封装分页模型
        PageInfo pageInfo = new PageInfo<>(list);

        // 取分页模型的数据
        System.out.println("查询总数" + pageInfo.getTotal());
    }
测试
测试上面的方法,可以看到先进行了总数的查询,再进行分页查询。
2020-03-31 11:06:59.618 c.z.m.m.EmployeeMapper.selectByCondition_COUNT -
==>  Preparing:
SELECT COUNT(0)
FROM (
    SELECT DISTINCT e.id, e.`name`, e.gender, e.no, e.password
        , e.phone, e.address, e.status, e.deleted, e.department_id
        , e.gmt_create, e.gmt_modified
    FROM demo_employee e
    WHERE 1 = 1
        AND e.gender = ?
        AND e.phone = ?
        AND e.address = ?
        AND e.deleted = ?
) table_count
2020-03-31 11:06:59.646 c.z.m.m.EmployeeMapper.selectByCondition_COUNT -
==> Parameters: false(Boolean), 18826****41(String), 北京(String), false(Boolean)
2020-03-31 11:06:59.678 c.z.m.m.EmployeeMapper.selectByCondition_COUNT -
<==      Total: 1
2020-03-31 11:06:59.693 c.z.m.mapper.EmployeeMapper.selectByCondition -
==>  Preparing:
SELECT DISTINCT e.id, e.`name`, e.gender, e.no, e.password
    , e.phone, e.address, e.status, e.deleted, e.department_id
    , e.gmt_create, e.gmt_modified
FROM demo_employee e
WHERE 1 = 1
    AND e.gender = ?
    AND e.phone = ?
    AND e.address = ?
    AND e.deleted = ?
LIMIT ?
2020-03-31 11:06:59.693 c.z.m.mapper.EmployeeMapper.selectByCondition -
==> Parameters: false(Boolean), 18826****41(String), 北京(String), false(Boolean), 3(Integer)
2020-03-31 11:06:59.724 c.z.m.mapper.EmployeeMapper.selectByCondition -
<==      Total: 3
查询总数4
参考资料
Mybatis官方中文文档
相关源码请移步:mybatis-demo
本文为原创文章,转载请附上原文出处链接:https://www.cnblogs.com/ZhangZiSheng001/p/12603885.html
