Ribbon
Ribbon是一个基于HTTP和TCP客户端的负载均衡器。Feign中也使用Ribbon,后续会介绍Feign的使用。
Ribbon可以在通过客户端中配置的ribbonServerList服务端列表去轮询访问以达到均衡负载的作用。
当Ribbon与Eureka联合使用时,ribbonServerList会被DiscoveryEnabledNIWSServerList重写,扩展成从Eureka注册中心中获取服务端列表。同时它也会用NIWSDiscoveryPing来取代IPing,它将职责委托给Eureka来确定服务端是否已经启动。
下面我们通过实例看看如何使用Ribbon来调用服务,并实现客户端的均衡负载
准备工作
- 启动服务注册中心:eureka-server 端口号为8761
- 启动服务提供方:service-hi
- 再新建一个springboot的module,复制当前service-hi的内容,修改端口号为8764并启动
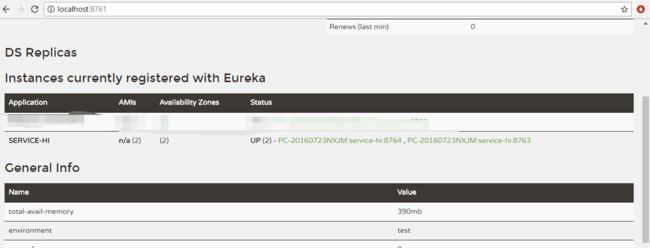
此时访问:http://localhost:8761,可以看到有两个service-hi服务已经注册
使用Ribbon实现客户端负载均衡的消费者
构建一个基本Spring Boot项目,pom.xml内容如下:
    4.0.0

    com.shijie
    service-ribbon
    0.0.1-SNAPSHOT
    jar

    service-ribbon
    Demo project for Spring Boot


        org.springframework.boot
        spring-boot-starter-parent
        1.5.6.RELEASE


        UTF-8
        UTF-8
        1.8
        Dalston.SR2


            org.springframework.cloud
            spring-cloud-starter-ribbon


            org.springframework.cloud
            spring-cloud-starter-eureka


            org.springframework.boot
            spring-boot-starter-web


            org.springframework.boot
            spring-boot-starter-test
            test


                org.springframework.cloud
                spring-cloud-dependencies
                ${spring-cloud.version}
                pom
                import


                org.springframework.boot
                spring-boot-maven-plugin
添加application.yml,内容如下:
eureka:
  client:
    serviceUrl:
      defaultZone: http://localhost:8761/eureka/
server:
  port: 8762
spring:
  application:
    name: ribbon-consumer
在应用主类中,通过@EnableDiscoveryClient注解来添加发现服务能力。创建RestTemplate实例,并通过@LoadBalanced注解开启均衡负载能力。
package com.shijie;

import org.springframework.boot.SpringApplication;
import org.springframework.boot.autoconfigure.SpringBootApplication;
import org.springframework.cloud.client.discovery.EnableDiscoveryClient;
import org.springframework.cloud.client.loadbalancer.LoadBalanced;
import org.springframework.context.annotation.Bean;
import org.springframework.web.client.RestTemplate;

@SpringBootApplication
@EnableDiscoveryClient
public class ServiceRibbonApplication {

    @Bean
    @LoadBalanced
    RestTemplate restTemplate() {
        return new RestTemplate();
    }

    public static void main(String[] args) {
        SpringApplication.run(ServiceRibbonApplication.class, args);
    }
}
新建一个controller包,并创建ConsumerController.java文件,内容如下:
package com.shijie.controller;

import org.springframework.beans.factory.annotation.Autowired;
import org.springframework.web.bind.annotation.RequestMapping;
import org.springframework.web.bind.annotation.RequestMethod;
import org.springframework.web.bind.annotation.RestController;
import org.springframework.web.client.RestTemplate;

/**
 * Created by shijie on 2017/8/24 0024.
 */
@RestController
public class ConsumerController {

    @Autowired
    RestTemplate restTemplate;

    @RequestMapping(value = "/add", method = RequestMethod.GET)
    public String add() {
        return restTemplate.getForEntity("http://service-hi/add?a=10&b=20", String.class).getBody();
    }

}
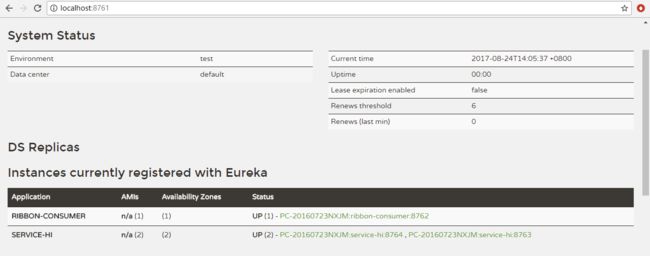
启动该项目,再次访问:http://localhost:8761,效果如下:
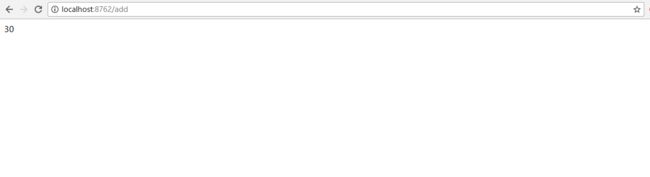
访问:http://localhost:8762/add
控制台效果:

再次访问直到8764端口服务有一下信息:

Feign
Feign是一个声明式的Web Service客户端,它使得编写Web Serivce客户端变得更加简单。我们只需要使用Feign来创建一个接口并用注解来配置它既可完成。它具备可插拔的注解支持,包括Feign注解和JAX-RS注解。Feign也支持可插拔的编码器和解码器。Spring Cloud为Feign增加了对Spring MVC注解的支持,还整合了Ribbon和Eureka来提供均衡负载的HTTP客户端实现。
下面,通过一个例子来展现Feign如何方便的声明对上述service-hi服务的定义和调用。
创建一个Spring Boot工程,配置pom.xml,将上述的配置中的ribbon依赖替换成feign的依赖即可,具体如下:
    4.0.0

    com.shijie
    servicefeign
    0.0.1-SNAPSHOT
    jar

    servicefeign
    Demo project for Spring Boot


        org.springframework.boot
        spring-boot-starter-parent
        1.5.6.RELEASE


        UTF-8
        UTF-8
        1.8
        Dalston.SR2


            org.springframework.cloud
            spring-cloud-starter-feign


            org.springframework.cloud
            spring-cloud-starter-eureka


            org.springframework.boot
            spring-boot-starter-web


            org.springframework.boot
            spring-boot-starter-test
            test


                org.springframework.cloud
                spring-cloud-dependencies
                ${spring-cloud.version}
                pom
                import


                org.springframework.boot
                spring-boot-maven-plugin
application.yml文件内容如下:
eureka:
  client:
    serviceUrl:
      defaultZone: http://localhost:8761/eureka/
server:
  port: 8662
spring:
  application:
    name: feign-consumer
java文件同ribbon项目,只是主应用文件注解有所改变,具体如下:
package com.shijie;

import org.springframework.boot.SpringApplication;
import org.springframework.boot.autoconfigure.SpringBootApplication;
import org.springframework.cloud.client.discovery.EnableDiscoveryClient;
import org.springframework.cloud.netflix.feign.EnableFeignClients;

@SpringBootApplication
@EnableDiscoveryClient
@EnableFeignClients
public class ServiceFeignApplication {

    public static void main(String[] args) {
        SpringApplication.run(ServiceFeignApplication.class, args);
    }
}
同样操作,访问http://localhost8761,可以看到:

请求两次http://localhost:8662/add,可以看到:

