为iptables增加layer7补丁(Linux2.6.25内核)
2008-11-01 TsengYia#126.com
################################################################
系统环境:RHEL5 [ 2.6.18-8.el5xen]
软件环境:
http://www.kernel.org/pub/linux/kernel/v2.6/linux-2.6.25.19.tar.bz2
http://www.netfilter.org/projects/iptables/files/iptables-1.4.2.tar.bz2
http://ie.archive.ubuntu.com/sourceforge/l/l7/l7-filter/netfilter-layer7-v2.20.tar.gz
http://ie.archive.ubuntu.com/sourceforge/l/l7/l7-filter/l7-protocols-2008-10-04.tar.gz
目标功能:
为iptables增加layer7补丁,实现应用层过滤。
################################################################
一、重新编译内核
1、合并kernel+layer7补丁
shell> tar -jxvf linux-2.6.25.19.tar.gz2 -C /usr/src/
shell> tar -zxvf netfilter-layer7-v2.20.tar.gz -C /usr/src/
shell> cd/usr/src/linux-2.6.25.19/
shell> patch -p1
2、配置新内核
shell> cp/boot/config-2.6.18-8.el5 .config //偷个懒,沿用旧的内核配置
shell>[[email protected]]# make menuconfig
make menuconfig
//配置内核时,在“Networking ---> Networking Options ---> Network Packetfiltering framework (Netfilter) ”处主要注意两个地方:
1) ---> Code NetfilterConfiguration
//将“Netfilterconnection tracking suport (NEW)”选择编译为模块(M),需选取此项才能看到layer7支持的配置。
//将layer7、string、state、time、IPsec、iprange、connlimit……等编译成模块,根据需要看着办。
2) ---> IP: Netfilter Configuration
//将“IPv4connection tracking support (require for NAT)”编译成模块。
//将“FullNAT”下的“MASQUERADE target support”和“REDIRECT target support”编译成模块。
3、编译及安装模块、新内核
shell> make &&make modules_install && make install
//编译安装成后后,重启选择使用新的内核(2.6.25.19)引导系统
二、重新编译iptables
控制脚本的巧用
每个rpm包安装的软件包安装的时候都有自己的控制脚本,我们可以巧用一下,原安装的控制脚本
[root@localhost ~]# cp /etc/init.d/iptables /etc/init.d/iptables.bak
1、卸载现有iptables
[root@localhost ~]# rpm -e iptables –-nodeps 强制卸载iptables并取消依赖关系
2、合并iptables+layer7补丁
[root@localhost ~]# tar -jxvf iptables-1.4.2.tar.bz2-C /usr/local/src/
[root@localhost ~]# cd/usr/src/netfilter-layer7-v2.20/iptables-1.4.1.1-for-kernel-2.6.20forward/
[[email protected]]# cp */usr/local/src/iptables-1.4.2/extensions/
[[email protected]]# cd/usr/local/src/iptables-1.4.2/
3、编译安装
[root@localhost iptables-1.4.2]#./configure --prefix=/ --with-ksource=/usr/src/linux-2.6.25.19/
[[email protected]]# make
[[email protected]]# make install
[[email protected]]# cp /etc/init.d/iptables.bak /etc/init.d/iptables
4、安装l7-protocols模式包
[root@localhost ~]# tar -zxvf l7-protocols-2008-10-04.tar.gz-C /etc/
[root@localhost ~]# mv/etc/l7-protocols-2008-10-04/ /etc/ l7-protocols
[root@localhost ~]#chkconfig iptables on
以上就是升级内核所有步骤.
案例
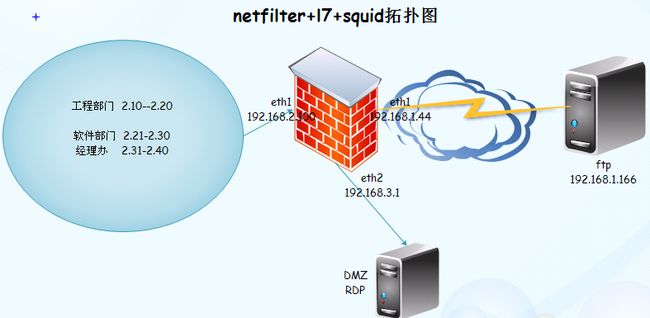
公司有三个部门
工程部门 2.10--2.20
软件部门 2.21-2.30
经理办 2.31-2.40
上班时间 (周一---周五 08:20:00)
工程部门上班时间ftp 【192.168.1.166】{ FORWARD} 不qq{L7}不 允许http{FORWARD} 迅雷{L7} 下班后无限制
软件部门 http 不允许非法站点sina {SQUID},不允许使用迅雷{L7} ,连接数 最多3个{FORWARD,SQUID}不允许聊天 {L7}
不允许看图片{SQUID} 下班后无限制,
经理办公室 http {FORWARD} qq{L7} 都可以,下班后无限制
dmz区域rdp server 服务器进行发布
netfilter+l7+squid
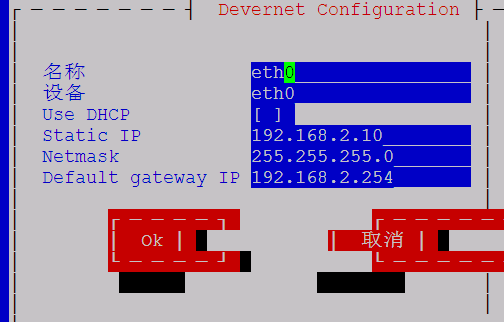
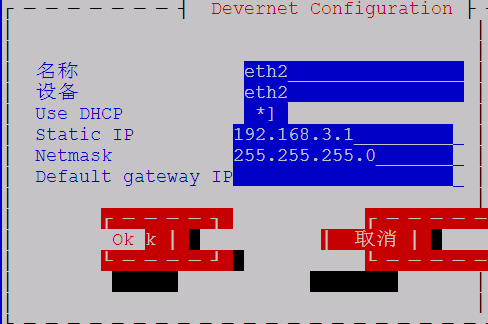
3个网卡的ip地址的设置
[root@localhost ~]#vim /etc/sysctl.conf
[root@localhost ~]# sysctl –p
1.首先内网用户和dmz区域的都需要通过防火墙去链接网络,我们只需做SNAT转换即可
2.[root@localhost~]# iptables -t nat -A POSTROUTING -o eth1 -j MASQUERADE
3.把默认策略更改成成拒绝所有,在此之前因为我们是通过ssh链接上去的,首先先把自己网卡地址加入到规则表里面(网卡192.168.2.1)
4.[root@localhost~]# iptables -t filter -A INPUT -s 192.168.2.1 -p tcp --dport 22 -j ACCEPT
5.[root@localhost~]# iptables -t filter -A OUTPUT -d 192.168.2.1 -p tcp --sport 22 -m state--state ESTABLISHED -j ACCEPT
6.[root@localhost~]# iptables –P INPUT DROP
7.[root@localhost~]# iptables –P OUTPUT DROP
8.[root@localhost~]# iptables -P FORWARD DROP
工程部192.168.2.10—2.20
上班时间可以使用ftp 192.168.1.166,不可以上QQ,不允许http,不允许使用迅雷下载,下班后无限制
[root@localhost ~]#iptables -t filter -A FORWARD -m time--timestart 08:00 --timestop 20:00 --weekdays Mon,Tue,Wed,Thu,Fri -p tcp --dport21 –d 192.168.1.166 -j ACCEPT
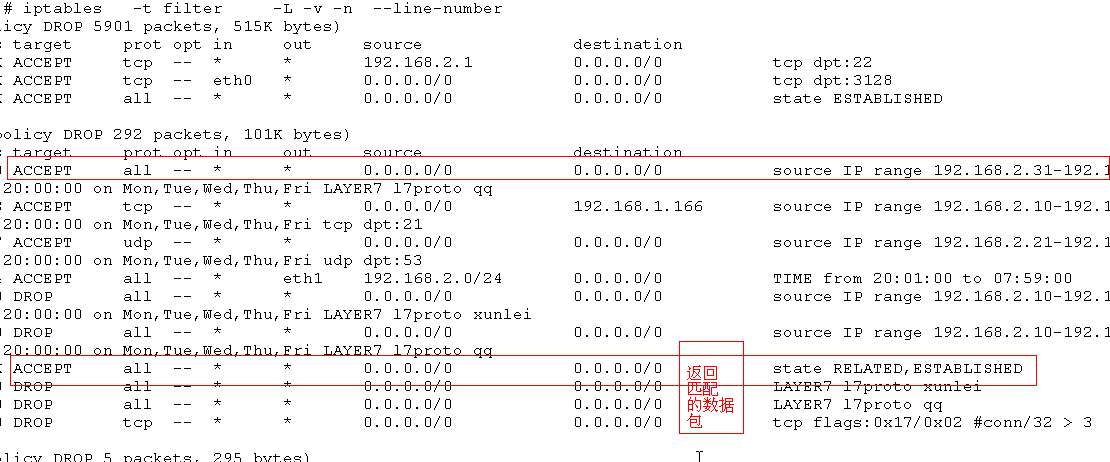
[root@localhost ~]#iptables -t filter -A FORWARD -m state --state ESTABLISHED,RELATED -j ACCEPT(允许所有返回的数据包)
[root@localhost ~]#modprobe ip_nat_ftp (加载ftp模块)
[root@localhost ~]#iptables -t filter -A FORWARD -m iprange --src-range 192.168.2.10-192.168.2.20 -m time --timestart 08:00 --timestop 20:00 --weekdays Mon,Tue,Wed,Thu,Fri -m layer7 --l7 proto qq -j DROP(上班时间不允许上QQ)
[root@localhost ~]#iptables -t filter -A FORWARD -m iprange --src-range 192.168.2.10-192.168.2.20 -m time --timestart 08:00--timestop 20:00 --weekdays Mon,Tue,Wed,Thu,Fri -m layer7 --l7 protoxunlei -j DROP(不允许使用迅雷下载)
[root@localhost ~]#iptables -t filter -I FORWARD 2 -s192.168.2.0/24 -o eth1 -m time --timestart 20:01 --timestop 07:59 -j ACCEPT(针对所有部门下班后可无限制)
软件部门
[root@localhost ~]#rpm -ivh /mnt/cdrom/Server/squid-2.6.STABLE21-3.el5.i386.rpm
[root@localhost ~]#service squid start
[root@localhost ~]#chkconfig squid on
[root@localhost ~]#iptables -t filter -I FORWARD 2 -m iprange --src-range192.168.2.21-192.168.2.40 -m time --timestart 08:00 --timestop 20:00 --weekdaysMon,Tue,Wed,Thu,Fri -p udp --dprot 53 -j ACCEPT(上班时间DNS通过)
[root@localhost ~]#iptables -t nat -A PREROUTING -i eth0 -ptcp --dport 80 -j REDIRECT --to-ports3128(只要用户通过eth0接口tcp协议访问的是80端口,就重定向到3128端口)
[root@localhost ~]#vim /etc/squid/squid.conf
图8
图11
图12
[root@localhost ~]#squid -k parse(进行语法测试)
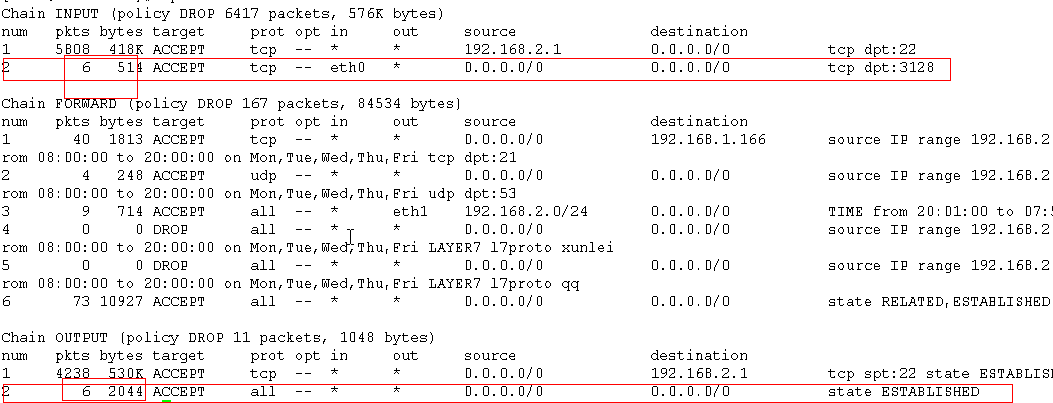
[root@localhost ~]#iptables -t filter -A INPUT -i eth0 -ptcp --dport 3128 -j ACCEPT(squid目标端口为3128端口,允许通过)
[root@localhost ~]#iptables -t filter -A OUTPUT -m state --state ESTABLISHED -j ACCEPT(squid返回包)
图10
Squid工作原理:当访问http服务器的时候,发现自己的缓存里面存在数据,则返回给用户,没有则向服务器索要。(发的时候需要走OUTPUT这个链表,返回的时候需要允许INPUT)
[root@localhost ~]#iptables -t filter -A OUTPUT -o eth1 -p tcp --dport 80 -j ACCEPT
[root@localhost ~]# iptables -t filter -AINPUT -m state --state ESTABLISHED -jACCEPT
[root@localhost ~]#iptables -t filter -A OUTPUT -p udp --dport 53 -j ACCEPT(squid需要做DNS解析)
[[email protected]]# vim /etc/squid/squid.conf
不能浏览图片
图13
不能访问sina站点
图14
限制最大连接数
图15
[root@localhost ~]#service squid restart
拒绝用户使用迅雷下载和QQ
[root@localhost ~]#iptables -t filter -A FORWARD -m layer7 --l7proto xunlei -j DROP
[root@localhost ~]#iptables -t filter -A FORWARD -m layer7 --l7proto qq -j DROP
经理办公室
[[email protected]]# vim /etc/squid/squid.conf
图16
[root@localhost ~]#service squid restart
允许经理办公室周一到周五上班的时候可以上QQ
[root@localhost ~]#iptables -t filter -I FORWARD 1 -miprange --src-range 192.168.2.31-192.168.2.40 -m time --timestart 08:00--timestop 20:00 --weekdays Mon,Tue,Wed,Thu,Fri -m layer7 --l7proto qq -jACCEPT
图17
DMZ区域
[root@localhost ~]#iptables -t nat -A PREROUTING -d 192.168.1.44 -p tcp --dport 3389 -j DNAT --to192.168.3.100 (做DNAT装换)
[root@localhost ~]#iptables -t filter -I FORWARD 1 -i eth1 -d 192.168.3.100 -p tcp --dport 3389 -jACCEPT

