一、NFS服务耦合度
nfs耦合度:
是指nfs客户端和服务端关系过于紧密,当nfs服务没有正常启动的情况下,会使客户端一直向服务端发送请求,而不会因服务没有启动而终止的现象
解决办法:autofs分布式存储(自动挂载--按需挂载)
部署位置:nfs服务客户端
部署过程:
1.确认是否安装服务软件
yum install -y autofs
2.部署配置文件
第一里程
vim /etc/auto.master ==>主配置文件
挂载点 扩展配置文件路径 -timeout n (单位:s)
如:/mnt /etc/nfs.mount -timeout 60
第二里程
vim /etc/nfs.mount ==>扩展配置文件(这里的文件路径不固定,根据主配置文件中设定的扩展配置文件)
格式:
切入点目录 指定挂载类型 nfs服务私网IP地址:共享目录
切入点目录就是指,当进入该目录时,再进行自动挂载
如:
nfsdata -fstype=nfs 172.16.1.31:/data
第三里程
vim /etc/sysconfig/autofs ==>闲置时间设置
TIMEOUT=n(单位:s)
改配置可在主配置文件中进行,也可再配置文件中编辑
第四里程:
systemctl start autof
3.检查
进入指定切入点目录,激活自动挂载操作,当达到闲置时间不适用时则自动卸载,解决耦合度过高的问题
二、完善全网备份脚本
1.客户端主机没有发送数据时,也可以让运维人员得知
思路一: 根据客户端传输数据结果
rsync -az /etc/hosts [email protected]::backup --password-file=/etc/rsync.password
if [ (hostname -i) backup is failed" | mail -s "result" 邮箱
fi
ps:想要发送邮件成功,需现在本地服务器配置邮箱文件
思路二: 根据服务端传输数据结果
a. 判断传输过来数据文件名称信息(日期信息)
b. 判断相应主机备份目录中是否有finger指纹文件
没有: 报响应主机传输数据失败
有: 显示传输OK 数据传输不完成 数据文件不存在
2.让邮件信息按照指定格式内容发送
awk -F "[:/ ]+" '{print 5,$6}' /tmp/check_data.txt(校验结果文件) | mail -s "result" [email protected](邮箱)
三、网站实时同步服务:
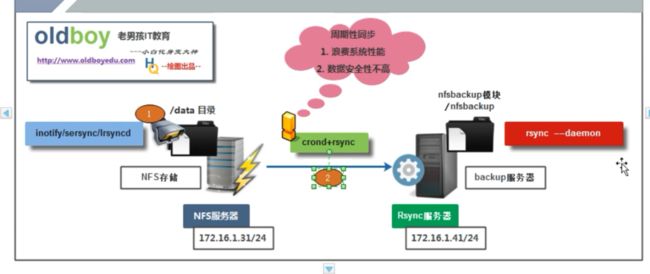
数据备份方法:实时备份和定时备份
区别:
定时任务备份数据:由内部人员备份数据且备份数据最短周期1分钟
实时同步备份数据:由外部人员备份数据(用户)且没有同步等待时间
实时同步数据原理:
第一步:监视存储服务器上指定目录的数据信息变化
使用inotify监控软件
第二步:利用同步传输数据软件,将变化数据进行传输,主要使用rsync软件进行传输数据
第三步:实现实时传输数据,结合监控软件和同步软件即inotify+rsync实现实时同步过程
四、数据监控软件 ==>inotify
作用: 监控目录中数据信息变化
安装部署过程
第一个里程: 部署安装软件
yum install -y inotify-tools
ps:保证系统中epel源是否优化,否则无法正常安装
prm -ql inotify-tools 查看该服务软件内容
/usr/bin/inotifywait(重要) --- 监控目录数据信息变化命令即修改、创建、删除、移动
/usr/bin/inotifywatch(了解) --- 统计目录产生变化的信息即修改多少次、创建多少次、删除多少次、移动多少次
第二个里程: 掌握inotifywait监控命令用法:
--exclude
--excludei
-m|--monitor --- 一直对指定目录进行监控
-r|--recursive --- 递归监控目录中数据变化
--format
--timefmt
-q|--quiet --- 将某些信息不要进行显示输出,类似于>/dev/null
-qq ---不显示任何信息
-s|--syslog ---发错错误信息到日志文件中
-e|--event --- 指定监控的事件信息
inotify所有事件信息:
access ==> file or directory contents were read
文件或目录内容被读取
modify ==> file or directory contents were written
文件或目录内容被写入
attrib ==> file or directory attributes changed
文件或目录属性信息改变
close_write ==> file or directory closed, after being opened in writeable mode
文件或目录被关闭, 在文件打开后写入新的信息后关闭了文件或目录
开发: 程序修改数据信息>逻辑过程: 打开文件 --- 编辑文件 --- 关闭文件
close_nowrite ==> file or directory closed, after being opened in read-only mode
文件或目录被关闭, 在文件打开后没有写入新的信息后关闭了文件或目录
close ==> file or directory closed, regardless of read/write mode
文件或目录被关闭, 不管文件是否是读或是写
open ==> file or directory opened
文件或目录被打开
moved_to ==> file or directory moved to watched directory
文件或目录被移动到监控目录中;其他目录数据 --> 监控目录(参照目录)>拉取
moved_from ==> file or directory moved from watched directory
文件或目录被移动出监控目录;监控目录(参照目录)数据 --> 其他目录中>推送
move ==> file or directory moved to or from watched directory
只要监控目录中,有数据移动操作
create ==> file or directory created within watched directory
在监控目录中,有文件或目录数据信息创建操作
delete ==> file or directory deleted within watched directory
在监控目录中,有文件或目录数据信息删除操作
inotifywait参数用法示例
inotifywait -mr /data --format "%T %w %f %e" --timefmt "%F %T" -e create,delete,move,close_write
Setting up watches.  Beware: since -r was given, this may take a while!
Watches established.
2019-08-19 17:07:22 /data/oldboy100/ oldboy06.txt CREATE
2019-08-19 17:07:22 /data/oldboy100/ oldboy06.txt CLOSE_WRITE,CLOSE
ps:①、--timefmt定义时间格式参数无法单独使用,必须将定义好的格式给--format参数进行调用,将时间格式进行显示输出
②、常见的时间类型信息为:增、删、移、改即在“-e”指定监控时间信息时主要显示的有:create/delete/move/close_write四种
③、inotify监控数据变化命令 -- 实现数据变化实时同步
inotifywait -mrq /data --format "%w%f" -e create,delete,move,close_write
五、实现实时同步数据过程:
方法一: 编写脚本
- 监控目录数据信息变化
inotifywait -mrq /data --format "%w%f" -e create,delete,move,close_write|
while read line(意思为:将监控结果一直输送,即死循环故用while,while read就是将监控数据信息一直不断读取,并赋值给line) - 将变化数据进行实时同步
rsync -avz $line [email protected]::backup --password-file=/etc/rsync.password
脚本信息:
#!/bin/bash
inotifywait -mrq /data --format "%w%f" -e create,delete,move,close_write|\
while read line=oldboy03.txt
do
  rsync -avz --delete $line  [email protected]::backup --password-file=/etc/rsync.password
done
扩展完善
- 如何让脚本文件始终运行
nohup sh /server/scripts/inotify.sh & - 利用脚本数据同步完毕后, 脚本会依旧持续运行?
cd /data && rsync -az -R "./oldboy02.txt" [email protected]::backup --password-file=/etc/rsync.password
cd /data && rsync -az -R --delete ./ --include="oldboy01.txt" --exclude=* [email protected]::backup --password-file=/etc/rsync.password
在进行无差异同步时,通过--include参数指定无差异同步的数据信息,再通过--exclude将不需要的无差别同步到信息进行排除
补充:
脚本循环用法:
- for 循环 for 变量 in 循环信息;do 操作命令;done 有限制循环
- while 循环 while 条件表达式; do 操作命令;done 死循环 当条件满足时, 条件为真
- until 循环 until 条件表达式; do 操作命令;done 死循环 当条件不满足, 条件为假
参数:
1.$#:代表传参的个数信息,有多少传参就代表几个
2.shift:代表将后一个传参向前逐个移动
3.$*:将传参参数进行显示
方式二: 利用软件 二进制软件
第一个里程: 下载部署实时同步软件 sersync ==>inotify+rsync
指定下载地址:https://github.com/wsgzao/sersync(无法通过yum正常下载)
mkdir /server/tools -p ==>将软件保存在此目录中
rz -y ==>选择路径,通过Windows下载到Linux中
解压:unzip sersync_installdir_64bit.zip
检查:cd /server/tools/sersync_installdir_64bit
第二个里程: 将解压好目录保存到指定目录中
mv sersync/ /usr/local/
第三个里程: 修改软件配置信息
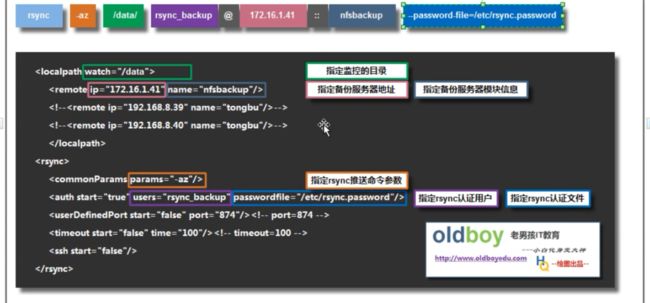
vim /usr/local/sersync/conf/confxml.xml
定义 在同步传输数据时,哪些数据不要进行传输同步
6
7
8
9
10
11
定义监控事件信息
12
13
14
15
16
17
18
19
20
21
配置文件说明
24
25
26
27
ps: 26和27行为需要多个模块进行备份时,可启动的配置信息,将!--去除即可
28
29
30
31
ps:start配置参数需要更改为true,后续参数才能正常使用
32
ps:sersync软件默认断楼为873,当修改默认端口号为其他时,如:874则将start配置参数修改为true,并将后续port修改为修改后的端口号,否则默认情况下,start设置为false即可
配置文件颜色与命令颜色对应处为修改处
第四个里程: sersync服务如何启动
cd /usr/local/sersync/bin/
chmod +x sersync
./sersync -dro /usr/local/sersync/conf/confxml.xml
-d:启用守护进程模式,让此软件一直运行
-r:监控前,将监控目录与远程主机用rsync命令进行检验一次
-o:指定监控分配置文件,且该参数为所有参数的最后位置,接指定的配配置文件;该参数的主要目的就是使针对不同服务器集群时,做好相应的指定同步工作
显示数据同步过程方法:
修改配置文件:vim /usr/local/sersync/conf/confxml.xml
4
修改为true
六、实现脚本重启sersync服务
编写脚本思路:
第一步: 如何关闭和启动服务
启动:sersync -dro /usr/local/sersync/conf/confxml.xml
停止:killall sersync
第二步:编写脚本信息
vim /server/scripts/sersync.sh
#!/bin/bash
    export PATH=$PATH:/usr/local/sersync/bin/

    # 启动服务
    if [ "$1" == "start" ]
    then
       sersync -dro /usr/local/sersync/conf/confxml.xml
    elif [ "$1" == "stop" ]
    then
       killall sersync
       sleep 1
       killall sersync
    elif [ "$1" == "restart" ]
    then
       killall sersync
       sleep1
       sersync -dro /usr/local/sersync/conf/confxml.xml
    else
       echo "pls input: start|stop|restart"
    fi
第三步:赋予权限信息
chmod +x server/scripts/sersync.sh
第四步:检查
sh sersync/scripts/sersync.sh stop/start/restart
补充:杀进程的三种方式
1.kill
用法: kill pid --- 进程杀死会有提示信息
- killall(推荐)
用法: killall 进程名称 --- 进程杀死会有提示信息 推荐
安装kallall时直接使用yum install -y killall无法正常安装
需先确认killall属于哪个软件中的相应命令
yum provides killall,通过次方式查找相关软件包,再次安装该命令 - pkill
用法: pkill 进程名 --- 模糊匹配进程名称(杀死类似名称的进程全部杀死)
4.特殊用法:
kill -9 进程号 --- 强制杀死进程


