1.问题描述
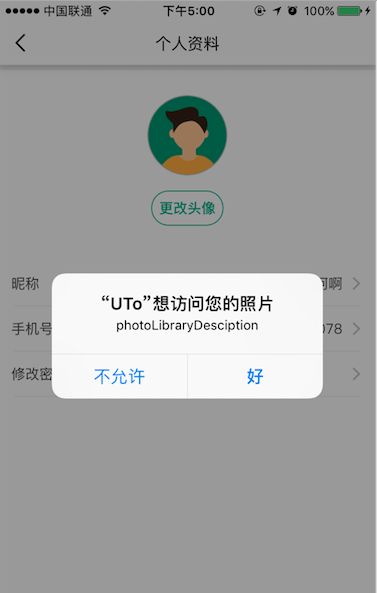
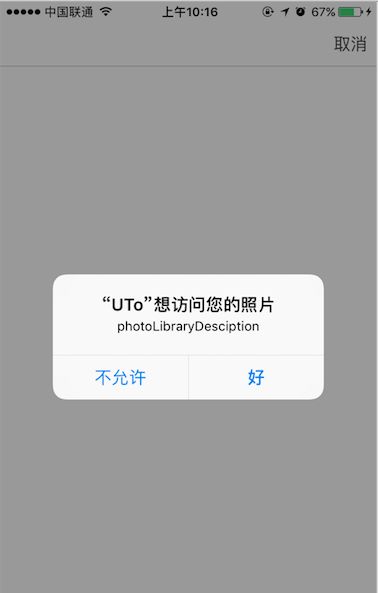
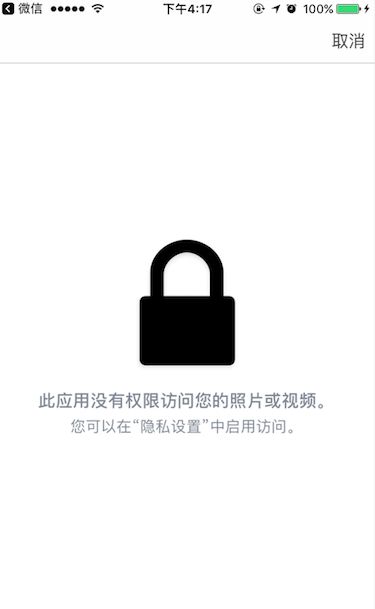
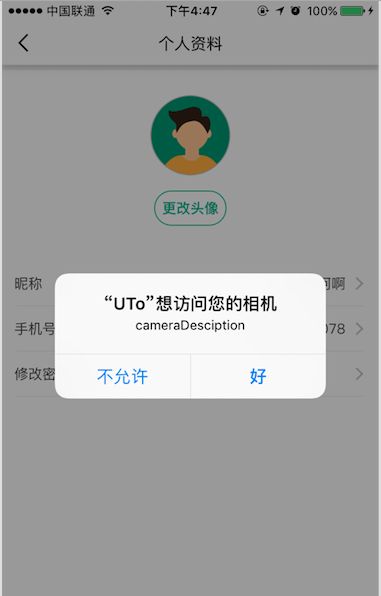
1.访问相机和相册的时候,如果用户拒绝访问,则进入显示系统的页面,想改里面的导航拦右边的取消按钮的颜色
2.初次下载app时相机和相册的访问权限的设置操作(注意分为:根据状态来判断 || 根据允许和不允许的操作回调来判断)
2.解决
- 改变颜色
[[UINavigationBar appearance] setBarTintColor: [UToColor whiteColor]];
[[UINavigationBar appearance] setTintColor:[UToColor blackColor]];
[[UINavigationBar appearance] setTitleTextAttributes:@{NSForegroundColorAttributeName:[UToColor blackColor],NSFontAttributeName:[UToFont defaultAdaptationFontWithSize:16.0]}];
- 权限设置问题
1.根据按钮的回调方法来判断:(即用户还没有点击过允许和不允许,现在进行点击来获取相应展示)
// 相机
[_selectHeadImgView camerBtnClick:^(UIButton *sender){// 相机

    if ([UIImagePickerController isSourceTypeAvailable:UIImagePickerControllerSourceTypeCamera]) {

          [AVCaptureDevice requestAccessForMediaType:AVMediaTypeVideo completionHandler:^(BOOL granted) {//相机权限

             if (granted) {

                    UIImagePickerController *imagePickerVC = [[UIImagePickerController alloc] init];
                    imagePickerVC.sourceType = UIImagePickerControllerSourceTypeCamera;
                    imagePickerVC.modalPresentationStyle = UIModalPresentationCurrentContext;
                    [[UINavigationBar appearance] setBarTintColor: [UToColor whiteColor]];
                    [[UINavigationBar appearance] setTintColor:[UToColor blackColor]];
                    [[UINavigationBar appearance] setTitleTextAttributes:@{NSForegroundColorAttributeName:[UToColor blackColor],NSFontAttributeName:[UToFont defaultAdaptationFontWithSize:16.0]}];
                    imagePickerVC.allowsEditing = YES;
                    imagePickerVC.delegate = self;

                    dispatch_after(dispatch_time(DISPATCH_TIME_NOW, (int64_t)(0.3 * NSEC_PER_SEC)), dispatch_get_main_queue(), ^{

                        [self presentViewController:imagePickerVC animated:YES completion:NULL];
                    });
                } else {

                    UToAlert *aler =[UToAlert AlertTitle:@"无法使用相机" content:@"请在iPhone的“设置-隐私-相机”中允许访问相机。" cancelButton:@"" okButton:@"确定" complete:nil];
                    [aler showAlertWithController:self];
                }
            }];
        }
    }];

// 相册
    [_selectHeadImgView photoBtnClick:^(UIButton *sender){// 照片

        if ([UIImagePickerController isSourceTypeAvailable:UIImagePickerControllerSourceTypePhotoLibrary]) {

            [PHPhotoLibrary requestAuthorization:^(PHAuthorizationStatus status) {

                if (status == PHAuthorizationStatusAuthorized) {

                } else {

                }
                UIImagePickerController * imagePickerVC = [[UIImagePickerController alloc]init];
                imagePickerVC.sourceType = UIImagePickerControllerSourceTypePhotoLibrary;
                [[UINavigationBar appearance] setBarTintColor: [UToColor whiteColor]];
                [[UINavigationBar appearance] setTintColor:[UToColor blackColor]];
                [[UINavigationBar appearance] setTitleTextAttributes:@{NSForegroundColorAttributeName:[UToColor blackColor],NSFontAttributeName:[UToFont defaultAdaptationFontWithSize:16.0]}];
                imagePickerVC.allowsEditing = YES;
                imagePickerVC.modalPresentationStyle = UIModalPresentationCurrentContext;
                imagePickerVC.delegate = self;

                dispatch_after(dispatch_time(DISPATCH_TIME_NOW, (int64_t)(0.3 * NSEC_PER_SEC)), dispatch_get_main_queue(), ^{

                    [self presentViewController:imagePickerVC animated:YES completion:NULL];
                });
            }];
        }
    }];
2.根据状态来判断:(即用户已经做过允许与不允许的操作之后,再根据这个用户的反馈状态来判断展示)
3.访问相机、相册的普通用法
3.1 先引入头文件
#import
#import
3.2 引入协议
UIImagePickerControllerDelegate,
UINavigationControllerDelegate,
UIActionSheetDelegate
3.3 例如创建一个上传更改头像的按钮
_headBtn = [[UIButton alloc]init];
[self.view addSubview:_headBtn];
[_headBtn setTitle:@"点击上传" forState:0];
_headBtn.titleLabel.font = [UToFont defaultAdaptationFontWithSize:12];
_headBtn.backgroundColor = [UToColor orangeColor];
[_headBtn addTarget:self action:@selector(changeheadImgClicked:) forControlEvents:UIControlEventTouchUpInside];
[_headBtn mas_makeConstraints:^(MASConstraintMaker *make) {

     make.top.mas_equalTo(15);
     make.centerX.mas_equalTo(_topBgView);
     make.width.height.mas_equalTo(60);
}];
[_headBtn layoutIfNeeded];
_headBtn.layer.cornerRadius = 30;
_headBtn.layer.masksToBounds = YES;
3.4 选择照片/相机的回调
// 选择头像回调
- (void)changeheadImgClicked:(UIButton *)sender {

    _selectHeadImgView = [[UToSelectHeadImgView alloc]init];// 弹框的视图
    [self.view.window addSubview:_selectHeadImgView];

    [_selectHeadImgView mas_makeConstraints:^(MASConstraintMaker *make) {

        make.left.mas_equalTo(0);
        make.right.mas_equalTo(0);
        make.top.mas_equalTo(0);
        make.bottom.mas_equalTo(0);
    }];

    [_selectHeadImgView camerBtnClick:^(UIButton *sender){// 相机

        if ([UIImagePickerController isSourceTypeAvailable:UIImagePickerControllerSourceTypeCamera]) {

            [AVCaptureDevice requestAccessForMediaType:AVMediaTypeVideo completionHandler:^(BOOL granted) {//相机权限

                if (granted) {

                    UIImagePickerController *imagePickerVC = [[UIImagePickerController alloc] init];
                    imagePickerVC.sourceType = UIImagePickerControllerSourceTypeCamera;
                    imagePickerVC.modalPresentationStyle = UIModalPresentationCurrentContext;
                    [[UINavigationBar appearance] setBarTintColor: [UToColor whiteColor]];
                    [[UINavigationBar appearance] setTintColor:[UToColor blackColor]];
                    [[UINavigationBar appearance] setTitleTextAttributes:@{NSForegroundColorAttributeName:[UToColor blackColor],NSFontAttributeName:[UToFont defaultFontWithSize:18.0]}];
                    imagePickerVC.allowsEditing = YES;
                    imagePickerVC.delegate = self;

                    dispatch_after(dispatch_time(DISPATCH_TIME_NOW, (int64_t)(0.3 * NSEC_PER_SEC)), dispatch_get_main_queue(), ^{

                        [self presentViewController:imagePickerVC animated:YES completion:NULL];
                    });
                } else {

                    UToAlert *aler =[UToAlert AlertTitle:@"无法使用相机" content:@"请在iPhone的“设置-隐私-相机”中允许访问相机。" cancelButton:nil okButton:@"确定" complete:nil];
                    [aler showAlertWithController:self];
                }
            }];
        }
    }];

    [_selectHeadImgView photoBtnClick:^(UIButton *sender){// 照片

        if ([UIImagePickerController isSourceTypeAvailable:UIImagePickerControllerSourceTypePhotoLibrary]) {

            [PHPhotoLibrary requestAuthorization:^(PHAuthorizationStatus status) {

                if (status == PHAuthorizationStatusAuthorized) {

                } else {

                }
                UIImagePickerController * imagePickerVC = [[UIImagePickerController alloc]init];
                imagePickerVC.sourceType = UIImagePickerControllerSourceTypePhotoLibrary;
                [[UINavigationBar appearance] setBarTintColor: [UToColor whiteColor]];
                [[UINavigationBar appearance] setTintColor:[UToColor blackColor]];
                [[UINavigationBar appearance] setTitleTextAttributes:@{NSForegroundColorAttributeName:[UToColor blackColor],NSFontAttributeName:[UToFont defaultFontWithSize:18.0]}];
                imagePickerVC.allowsEditing = YES;
                imagePickerVC.modalPresentationStyle = UIModalPresentationCurrentContext;
                imagePickerVC.delegate = self;

                dispatch_after(dispatch_time(DISPATCH_TIME_NOW, (int64_t)(0.3 * NSEC_PER_SEC)), dispatch_get_main_queue(), ^{

                    [self presentViewController:imagePickerVC animated:YES completion:NULL];
                });
            }];
        }
    }];
}
3.5 选完照片回调
// 选完照片回调
- (void)imagePickerController:(UIImagePickerController *)picker didFinishPickingMediaWithInfo:(NSDictionary *)info {

    [picker dismissViewControllerAnimated:YES completion:nil];

    if ([info[UIImagePickerControllerMediaType]isEqualToString:(NSString *)kUTTypeImage]) {

        UIImage *image = [info objectForKey:UIImagePickerControllerEditedImage];
//        UToImageDataModel * model = [[UToImageDataModel alloc]initWithUToRequestType:UToRequestTypeClientPhotoAlter parmeter:nil];
//        model.data =  UIImageJPEGRepresentation(image, 0.1);
//        [self.netWork request:model userToken:[UToUser sharedUToUser].token Identifier:AlterPhotoInfoIdentifier];
//        _headImgView.image = image;
        [_headBtn setImage:image forState:0];
//        [self.hud hideAnimated:NO];
//        self.hud = [MBProgressHUD showHUDAddedTo:self.view animated:YES];
//        self.hud.mode = MBProgressHUDModeDeterminateHorizontalBar;
//        self.hud.delegate = self;
//        self.hud.label.text = NSLocalizedStringEx(@"LOADING", nil);
    }
}
3.6 其他相关
- (UIImage *)fixOrientation:(UIImage *)aImage {

    // No-op if the orientation is already correct
    if (aImage.imageOrientation == UIImageOrientationUp)
        return aImage;

    // We need to calculate the proper transformation to make the image upright.
    // We do it in 2 steps: Rotate if Left/Right/Down, and then flip if Mirrored.
    CGAffineTransform transform = CGAffineTransformIdentity;

    switch (aImage.imageOrientation) {
        case UIImageOrientationDown:
        case UIImageOrientationDownMirrored:
            transform = CGAffineTransformTranslate(transform, aImage.size.width, aImage.size.height);
            transform = CGAffineTransformRotate(transform, M_PI);
            break;

        case UIImageOrientationLeft:
        case UIImageOrientationLeftMirrored:
            transform = CGAffineTransformTranslate(transform, aImage.size.width, 0);
            transform = CGAffineTransformRotate(transform, M_PI_2);
            break;

        case UIImageOrientationRight:
        case UIImageOrientationRightMirrored:
            transform = CGAffineTransformTranslate(transform, 0, aImage.size.height);
            transform = CGAffineTransformRotate(transform, -M_PI_2);
            break;
        default:
            break;
    }

    switch (aImage.imageOrientation) {
        case UIImageOrientationUpMirrored:
        case UIImageOrientationDownMirrored:
            transform = CGAffineTransformTranslate(transform, aImage.size.width, 0);
            transform = CGAffineTransformScale(transform, -1, 1);
            break;

        case UIImageOrientationLeftMirrored:
        case UIImageOrientationRightMirrored:
            transform = CGAffineTransformTranslate(transform, aImage.size.height, 0);
            transform = CGAffineTransformScale(transform, -1, 1);
            break;
        default:
            break;
    }

    // Now we draw the underlying CGImage into a new context, applying the transform
    // calculated above.
    CGContextRef ctx = CGBitmapContextCreate(NULL, aImage.size.width, aImage.size.height,
                                             CGImageGetBitsPerComponent(aImage.CGImage), 0,
                                             CGImageGetColorSpace(aImage.CGImage),
                                             CGImageGetBitmapInfo(aImage.CGImage));
    CGContextConcatCTM(ctx, transform);
    switch (aImage.imageOrientation) {
        case UIImageOrientationLeft:
        case UIImageOrientationLeftMirrored:
        case UIImageOrientationRight:
        case UIImageOrientationRightMirrored:
            // Grr...
            CGContextDrawImage(ctx, CGRectMake(0,0,aImage.size.height,aImage.size.width), aImage.CGImage);
            break;

        default:
            CGContextDrawImage(ctx, CGRectMake(0,0,aImage.size.width,aImage.size.height), aImage.CGImage);
            break;
    }

    // And now we just create a new UIImage from the drawing context
    CGImageRef cgimg = CGBitmapContextCreateImage(ctx);
    UIImage *img = [UIImage imageWithCGImage:cgimg];
    CGContextRelease(ctx);
    CGImageRelease(cgimg);
    return img;
}
- (void)viewDidLoad {
    [super viewDidLoad];
    [self resetNavgationBarTitle:@"个人资料"];
    self.view.backgroundColor = [UToColor backGrayColor];
   // 头像上传成功通知
    [[NSNotificationCenter defaultCenter] addObserver:self selector:@selector(userUpdateComplete) name:UToUpdateInfoSuccessNotification object:nil];
}
// 头像上传成功的通知回调
- (void)userUpdateComplete {

    [_headImgView sd_setImageWithURL:[NSURL URLWithString:[UToUser sharedUToUser].avatarPath] placeholderImage:[UIImage imageNamed:@"pople"] options:SDWebImageRetryFailed];
    [_personMessageTableView reloadData];
}


