swift整合版详见-->swift4.0+xCode9.1+Unity5.4
1、项目准备
1.1 首先要有一个Unity工程和IOS工程
1.2 Unity导出时可选 模拟器模式 和 真机模式,导出后只能在对应的设备运行
1.3 确保导出的unity可以直接运行
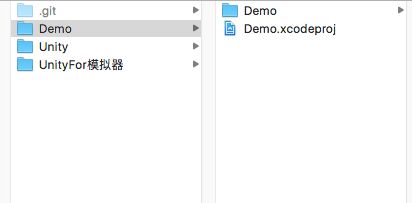
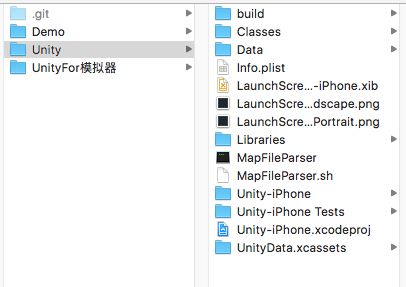
1.4 建议在将Unity和IOS放在同一目录下
2.导入
2.1 在xcode中创建一个group,例如“Unity”,主要便于分类
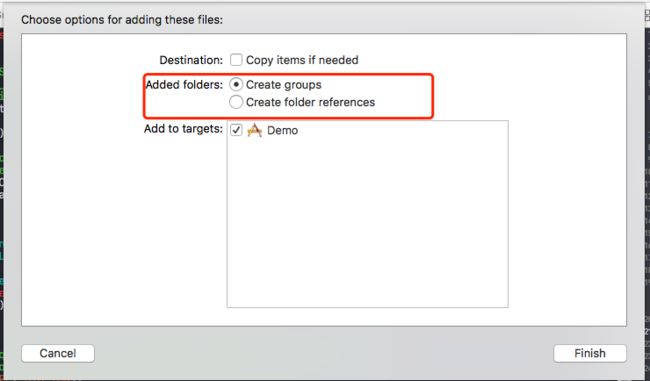
2.2 拖入操作有三个选项,是否复制、创建组或者关联、添加到目标
建议都不要复制(复制会将内容添加到IOS项目中,后续替换起来麻烦)
而参见1.4操作,更新时,每次替换Unity目录即可
2.3 Classes和Libraries 选择groups
Data文件选择reference
网上很多教程要删除Unity下的一些.h文件,不删也没关系(因为头文件太多,每次删都要好久,只要你不点开,这个只会对你的xcodeproj文件大小有一点点很小的影响)
2.4 特别的,如果使用VR功能,Data文件夹下Raw文件夹中的QCAR和Vuforia要再拖一次放在根目录(原因不明),如下图
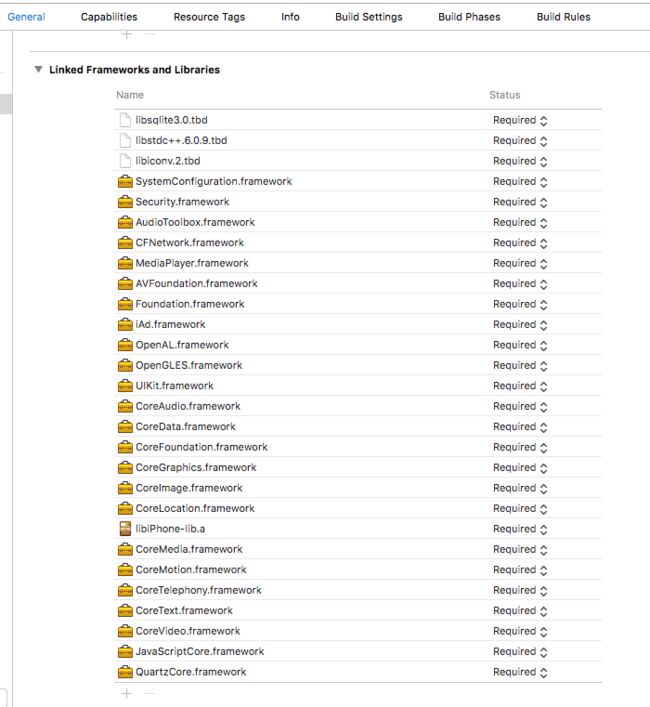
3 添加framework
3.1 就是这么多。。。大家也可以参照导出的Unity工程下的Framework进行添加
4 配置
打开Building Setting
 Build Optons
      Enable Bitcode    NO
 Linking
     Other Linker Flags
          -weak_framework
          CoreMotion
          -weak-lSystem
          -Wl,-undefined,dynamic_lookup **可以不加,如果报metal相关的错误可以加一下**
Other C Flags
      -DINIT_SCRIPTING_BACKEND=1
C Language Dialect
        选择 C99
C++ Language Dialect
        选择 C++ 11
4.1 Search Path
添加头文件路径和库文件路径
这里不用手打,可以直接拖进去添加
4.2 库路径
如果导出的Unity下有 plugin/ios 也添加进去
4.3 如果报头文件找不到之类的错误,看这里是否把包含头文件的路径都添加进去了
4.4 如果报link错误,看库路径是否都添加完整
4.5 其他配置
**关于配置部分比较麻烦,有两个方式参考:
1、参照导出的Unity项目的Building Setting
2、参照nerd (大神?)的视频教程, 原地址https://vimeo.com/145572230 (不太稳定)
**
5. 文件修改
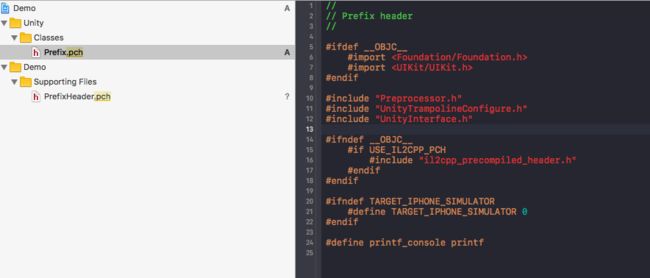
5.1 修改pch
创建一个新的pch文件,找到原有的pch文件,复制到自定义的pch文件,并添加一行,如下图
5.2 Building Setting中修改
5.3 修改main文件
找到Unity的main.mm文件,直接复制到ios的main.m文件中(原有内容注释或者删除),并将文件名改为main.mm
找到const char* AppControllerClassName = "UnityAppController";替换为
const char* AppControllerClassName = "AppDelegate";5.4 打开Build Phases 搜索main.mm会有两个文件,删除Unity下的main.mm(否则会编译冲突)
(如果报错,duplicate xxx 多半是因为这个文件重复)
6 工程文件修改
6.1 APPDelegate.h
#import

@interface AppDelegate : UIResponder
@property (strong, nonatomic) UIWindow *window;
@property (strong,nonatomic) UnityAppController *unityAppController;
//@property (nonatomic,strong) UINavigationController *navVC;
@property (nonatomic, strong) UIWindow *unityWindow;
- (void)hideUnityWindow;
- (void)showUnityWindow;
@end
6.2 APPDelegate.m
#import "AppDelegate.h"

@interface AppDelegate ()

@end

@implementation AppDelegate

// Unity相关方法
- (UIWindow *)unityWindow{
    return UnityGetMainWindow();
}

- (void)showUnityWindow{
    UIButton *backButton = [UIButton buttonWithType:UIButtonTypeCustom];
    [backButton setImage:[UIImage imageNamed:@"close.png"] forState:UIControlStateNormal];
    [backButton setAlpha:0.4];
    [backButton setFrame:CGRectMake(self.unityWindow.frame.size.width-60, 10, 50, 50)];
    [backButton addTarget:self action:@selector(hideUnityWindow) forControlEvents:UIControlEventTouchUpInside];

    [self.unityWindow addSubview:backButton];
    [self.unityWindow makeKeyAndVisible];
}

- (void)hideUnityWindow{
    [self.window makeKeyAndVisible];
}


- (BOOL)application:(UIApplication *)application didFinishLaunchingWithOptions:(NSDictionary *)launchOptions {
    self.unityAppController=[[UnityAppController alloc] init];
    [self.unityAppController application:application didFinishLaunchingWithOptions:launchOptions];

    return YES;
}


- (void)applicationWillResignActive:(UIApplication *)application {

    [self.unityAppController applicationWillResignActive:application];
}


- (void)applicationDidEnterBackground:(UIApplication *)application {
    [self.unityAppController applicationDidEnterBackground:application];
}


- (void)applicationWillEnterForeground:(UIApplication *)application {
    [self.unityAppController applicationWillEnterForeground:application];
}


- (void)applicationDidBecomeActive:(UIApplication *)application {
    [self.unityAppController applicationDidBecomeActive:application];
}


- (void)applicationWillTerminate:(UIApplication *)application {
    [self.unityAppController applicationWillTerminate:application];
}


@end
6.3 UnityAppController.h
两个地方
@class UnityViewControllerBase;#import "AppDelegate.h" inline UnityAppController* GetAppController(){ AppDelegate *delegate = (AppDelegate*)[UIApplication sharedApplication].delegate; return delegate.unityAppController; }
#pragma once

#import

#include "PluginBase/RenderPluginDelegate.h"

@class UnityView;
@class UnityViewControllerBase;
@class DisplayConnection;

@interface UnityAppController : NSObject
{
    UnityView*          _unityView;
    CADisplayLink*      _displayLink;

    UIWindow*           _window;
    UIView*             _rootView;
    UIViewController*   _rootController;
    UIView*             _snapshotView;

    DisplayConnection*  _mainDisplay;

    // we will cache view controllers for fixed orientation
    // auto-rotation view contoller goes to index=0
    UnityViewControllerBase* _viewControllerForOrientation[5];
#if !UNITY_TVOS
    UIInterfaceOrientation  _curOrientation;
#endif

    id    _renderDelegate;
}

// override it to add your render plugin delegate
- (void)shouldAttachRenderDelegate;

// this one is called at the very end of didFinishLaunchingWithOptions:
// after views have been created but before initing engine itself
// override it to register plugins, tweak UI etc
- (void)preStartUnity;

// this one is called at first applicationDidBecomeActive
// NB: it will be started with delay 0, so it will run on next run loop iteration
// this is done to make sure that activity indicator animation starts before blocking loading
- (void)startUnity:(UIApplication*)application;

// this is a part of UIApplicationDelegate protocol starting with ios5
// setter will be generated empty
@property (retain, nonatomic) UIWindow* window;

@property (readonly, copy, nonatomic) UnityView*            unityView;
@property (readonly, copy, nonatomic) CADisplayLink*        unityDisplayLink;

@property (readonly, copy, nonatomic) UIView*               rootView;
@property (readonly, copy, nonatomic) UIViewController*     rootViewController;
@property (readonly, copy, nonatomic) DisplayConnection*    mainDisplay;

#if !UNITY_TVOS
@property (readonly, nonatomic) UIInterfaceOrientation      interfaceOrientation;
#endif

@property (nonatomic, retain) id                            renderDelegate;
@property (nonatomic, copy)                                 void(^quitHandler)();

@end

// Put this into mm file with your subclass implementation
// pass subclass name to define

#define IMPL_APP_CONTROLLER_SUBCLASS(ClassName) \
@interface ClassName(OverrideAppDelegate)       \
{                                               \
}                                               \
+(void)load;                                    \
@end                                            \
@implementation ClassName(OverrideAppDelegate)  \
+(void)load                                     \
{                                               \
    extern const char* AppControllerClassName;  \
    AppControllerClassName = #ClassName;        \
}                                               \
@end

#import "AppDelegate.h"

inline UnityAppController*  GetAppController()
{
    AppDelegate *delegate = (AppDelegate*)[UIApplication sharedApplication].delegate;
    return delegate.unityAppController;
}

#define APP_CONTROLLER_RENDER_PLUGIN_METHOD(method)                         \
do {                                                                        \
    id delegate = GetAppController().renderDelegate;  \
    if([delegate respondsToSelector:@selector(method)])                     \
        [delegate method];                                                  \
} while(0)

#define APP_CONTROLLER_RENDER_PLUGIN_METHOD_ARG(method, arg)                \
do {                                                                        \
    id delegate = GetAppController().renderDelegate;  \
    if([delegate respondsToSelector:@selector(method:)])                    \
        [delegate method:arg];                                              \
} while(0)


// these are simple wrappers about ios api, added for convenience
void AppController_SendNotification(NSString* name);
void AppController_SendNotificationWithArg(NSString* name, id arg);

void AppController_SendUnityViewControllerNotification(NSString* name);
主要参照了the-nerd的文章
https://the-nerd.be/2015/11/13/integrate-unity-5-in-a-native-ios-app-with-xcode-7/
视频参见:https://vimeo.com/145572230 (经常无法解析)
重新在b站传了一份,参见:https://www.bilibili.com/video/av13740194/
以上,是使用两个window交互显示的方式,可以用最基本的Unitydemo测试一下,OK在导入完整的Unity项目。
至于如何在某个页面的某个View上显示Unity,下一篇再说
