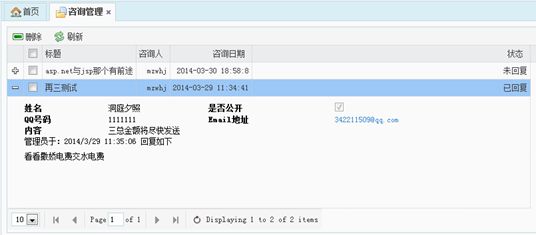
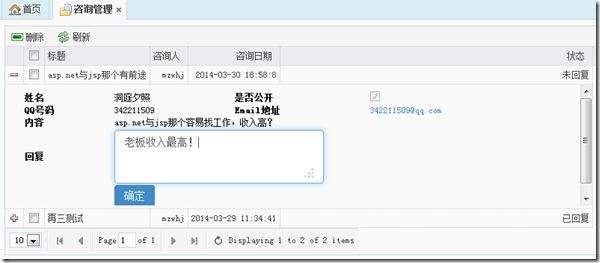
ASP.NET MVC5 网站开发实践(二) Member区域–管理列表、回复及删除
本来想接着上次把这篇写完的,没想到后来工作的一些事落下了,放假了赶紧补上。
目录:
ASP.NET MVC5 网站开发实践(一) - 框架(续) 模型、数据存储、业务逻辑
ASP.NET MVC5 网站开发实践(二) - 用户部分(1)用户注册
ASP.NET MVC5 网站开发实践(二) - 用户部分(2)用户登录、注销
ASP.NET MVC5 网站开发实践(二) - 用户部分(3)修改资料、修改密码
ASP.NET MVC5 网站开发实践(二) Member区域 - 文章管理架构
ASP.NET MVC5 网站开发实践(二) Member区域 - 添加文章
ASP.NET MVC5 网站开发实践(二) Member区域 - 全部文章列表
ASP.NET MVC5 网站开发实践(二) Member区域 - 修改及删除文章
ASP.NET MVC5 网站开发实践(二) Member区域 - 咨询管理的架构
ASP.NET MVC5 网站开发实践(二) Member区域–我的咨询列表及添加咨询
一、管理列表
跟上次我的列表相似,直接贴代码了。
首先打开Consultation控制器,添加ManageList方法
/// <summary>

        /// 咨询管理

        /// </summary>

        /// <returns></returns>

        public ActionResult ManageList()

        {

            return View();

        }
添加返回json数据的ManageJsonList
public JsonResult ManageJsonList(int pageIndex = 1, int pageSize = 20)

        {

            int _total;

            var _list = commonModelService.FindPageList(out _total, pageIndex, pageSize, "Consultation", string.Empty, 0, string.Empty, null, null, 0).ToList().Select(

                cm => new Ninesky.Web.Models.CommonModelViewModel()

                {

                    CategoryID = cm.CategoryID,

                    CategoryName = cm.Category.Name,

                    DefaultPicUrl = cm.DefaultPicUrl,

                    Hits = cm.Hits,

                    Inputer = cm.Inputer,

                    Model = cm.Model,

                    ModelID = cm.ModelID,

                    ReleaseDate = cm.ReleaseDate,

                    Status = cm.Status,

                    Title = cm.Title

                });

            return Json(new { total = _total, rows = _list.ToList() });

        }
右键为ManageList添加试图
@{

    ViewBag.Title = "咨询管理";

}


<div id="toolbar">

    <div>

        <a href="#" class="easyui-linkbutton" data-options="iconCls:'icon-remove',plain:true" onclick="del()">删除</a>

        <a href="#" class="easyui-linkbutton" data-options="iconCls:'icon-reload',plain:true" onclick="$('#Consultation_List').datagrid('reload');">刷新</a>

    </div>

</div>


<table id="Consultation_List"></table>


<script src="~/Scripts/Common.js"></script>

<script src="~/Scripts/jquery.easyui.datagrid.detailview.js"></script>

<script type="text/javascript">

    $("#Consultation_List").datagrid({

        loadMsg: '加载中……',

        fitColumns: true,

        pagination: true,

        url: '@Url.Action("ManageJsonList", "Consultation")',

        columns: [[

            { field: 'ModelID', title: 'ID', checkbox: true },

            { field: 'Title', title: '标题' },

            { field: 'Inputer', title: '咨询人', align: 'right' },

            { field: 'ReleaseDate', title: '咨询日期', align: 'right', formatter: function (value, row, index) { return jsonDateFormat(value); } },

            { field: 'StatusString', title: '状态', width: 100, align: 'right' }

        ]],

        toolbar: '#toolbar',

        idField: 'ModelID',

        view: detailview,

        detailFormatter: function (rowIndex, rowData) { return '<div class="detail" style="width:100%,padding:5px 0"></div>'; },

        onExpandRow: function (index, row) {

            var detail = $(this).datagrid('getRowDetail', index).find('div.detail');

            $(detail).html("<iframe frameborder='0' marginwidth='0' height='160px' width='100%' src='@Url.Action("Reply", "Consultation")/" + row.ModelID + "'></iframe>");

            $('#Consultation_List').datagrid('fixDetailRowHeight', index);

        }

    });


</script>
二、回复评论
ManageList添加datagrid详细视图使用类框架(("<iframe frameborder='0' marginwidth='0' height='160px' width='100%' src='@Url.Action("Reply", "Consultation")/" + row.ModelID + "'></iframe>")。“Consultation/Reply”就是我们回复的视图。
在Consultation控制器,添加Reply方法
/// <summary>

        /// 回复

        /// </summary>

        /// <param name="id">id</param>

        /// <returns></returns>

        public ActionResult Reply(int id)

        {

            return View(commonModelService.Find(id).Consultation);

        }
右键添加视图
@model Ninesky.Models.Consultation

@using (Html.BeginForm())

{

    @Html.AntiForgeryToken()

    <table style="width:100%;font-size:12px;">

        <tr>

            <th>@Html.DisplayNameFor(model => model.Name)</th>

            <td>@Html.DisplayFor(model => model.Name)</td>

            <th>@Html.DisplayNameFor(model => model.IsPublic)</th>

            <td>@Html.DisplayFor(model => model.IsPublic)</td>

        </tr>

        <tr>

            <th>@Html.DisplayNameFor(model => model.QQ)</th>

            <td>@Html.DisplayFor(model => model.QQ)</td>

            <th>@Html.DisplayNameFor(model => model.Email)</th>

            <td>@Html.DisplayFor(model => model.Email)</td>

        </tr>

        <tr>

            <th>@Html.DisplayNameFor(model => model.Content)</th>

            <td colspan="3">@Html.DisplayFor(model => model.Content)</td>

        </tr>

        @if (Model.ReplyTime != null)

        {

            <tr>

                <td colspan="4">


                    <span>管理员于:@Model.ReplyTime 回复如下</span>

                    <br />

                    <p style=" margin-top:8px">

                        @Model.ReplyContent

                    </p>


                </td>

            </tr>

        }

        else

        {

            <tr>

                <th>

                    回复 @Html.HiddenFor(model => model.ConsultationID)

                    @Html.ValidationMessageFor(model=>model.ConsultationID)

                </th>

                <td colspan="3">

                    @Html.TextAreaFor(model => model.ReplyContent, new { @class = "form-control" })

                    @Html.ValidationMessageFor(model=>model.ReplyContent)

                </td>

            </tr>

            <tr>

                <th>


                </th>

                <td colspan="3">

                    <input type="submit" class="btn_reply btn btn-primary" value="确定" />

                </td>

            </tr>

        }

    </table>

}
添加接收处理的方法。
[HttpPost]

        [ValidateAntiForgeryToken]

        public ActionResult Reply()

        {

            CommonModel _commonModel = null;

            if (RouteData.Values.ContainsKey("id"))

            {

                int _modelId = int.Parse(RouteData.Values["id"].ToString());

                _commonModel = commonModelService.Find(_modelId);

                if (string.IsNullOrEmpty(Request.Form["ReplyContent"])) ModelState.AddModelError("ReplyContent", "必须输入回复内容!");

                else

                {

                    _commonModel.Consultation.ReplyContent = Request.Form["ReplyContent"];

                    _commonModel.Consultation.ReplyTime = System.DateTime.Now;

                    _commonModel.Status = 29;

                    commonModelService.Update(_commonModel);

                }

            }

            return View(_commonModel.Consultation);

        }
过程是:
1、接收路由中的id参数(RouteData.Values.ContainsKey("id"))
2、查找该ID的CommonModel,并获取客户端传过来的ReplyContent,设置其他参数(ReplyTime,Status)并保存到数据库
3、返回视图
三、删除评论
在Consultation控制器,添加Delete方法
/// <summary>

        /// 删除评论

        /// </summary>

        /// <param name="id">公共模型ID</param>

        /// <returns></returns>

        public ActionResult Delete(int id)

        {

            var _commonModel = commonModelService.Find(id);

            if (_commonModel == null) return Json(false);


            if (commonModelService.Delete(_commonModel)) return Json(true);

            else return Json(false);

        }
然后打开ManageList视图,添加删除js代码
//删除

    function del() {

        var rows = $("#Consultation_List").datagrid("getSelections");

        if (!rows || rows.length < 1) {

            $.messager.alert("提示", "未选择任何行!");

            return;

        }

        else if (rows.length > 0) {

            $.messager.confirm("确认", "您确定要删除所选行吗?", function (r) {

                if (r) {

                    $.messager.progress();

                    $.each(rows, function (index, value) {

                        $.ajax({

                            type: "post",

                            url: "@Url.Action("Delete", "Consultation")",

                            data: { id: value.ModelID },

                            async: false,

                            success: function (data) {

                            }

                        });

                    });

                    $.messager.progress('close');

                    //清除选择行

                    rows.length = 0;

                    $("#Consultation_List").datagrid('reload');

                }

            });

            return;

        }
四、总结
这次的内容比较重复,管理列表类似与我的咨询列表,删除、回复与文章的代码很类似。终于写完,下次开始写后台管理区域。
==========================================

