vscode c++ 环境配置
第一步:下载安装
下载MinGW-W64 GCC-8.1.0编译器(32和64版本都有)
MinGW-W64 GCC下载地址:https://sourceforge.net/projects/mingw-w64/files/Toolchains targetting Win32/Personal Builds/mingw-builds/installer/mingw-w64-install.exe
离线下载地址:https://sourceforge.net/projects/mingw-w64/files/mingw-w64/mingw-w64-release/
安装选项为 x86_64-win32-seh
第二步:环境配置
打开你的mingw-w64安装目录,我是默认安装的在C:\Program Files (x86),里面的MinGW-W64就是安装的编译器了,将里面的bin文件夹加入路径,我的就是C:\Program Files (x86)\mingw64\bin,将这个
加入路径即可。
路径加入方法:
加入后,建议重启一下电脑
第三步 下载安装VSCode(已经装好了请跳到第四步)
- vscode请到官网下载最新版(推荐管理权限64位版本)
- 下载地址:https://code.visualstudio.com/#alt-downloads
第四步:安装VSCode cpp相关的插件
- vscode设置中文环境教程http://www.chuancn.cn/post/将VSCode设置成中文语言环境
- c++插件
-重启vscode软件
第五步:配置c++的.vscode文件
- 在你写代码的地方新建文件夹和里面新建一个文件夹
- 然后在文件夹里面创建一个.vscode文件夹
然后在.vscode文件夹里面创建如上图所示的四个文件,文件名如下
c_cpp_properties.json
launch.json
tasks.json
请根据安装的位置来修改文件路径(如果跟我一样可以不要修改)
launch.json
{
 "version": "0.2.0",
 "configurations": [
 {
 "name": "(gdb) Launch", // 配置名称,将会在启动配置的下拉菜单中显示
 "type": "cppdbg", // 配置类型,这里只能为cppdbg
 "request": "launch", // 请求配置类型,可以为launch(启动)或attach(附加)
 "program": "${workspaceFolder}/${fileBasenameNoExtension}.exe", // 将要进行调试的程序的路径
 "args": [], // 程序调试时传递给程序的命令行参数,一般设为空即可
 "stopAtEntry": false, // 设为true时程序将暂停在程序入口处,一般设置为false
 "cwd": "${workspaceFolder}", // 调试程序时的工作目录,一般为${workspaceRoot}即代码所在目录 workspaceRoot已被弃用,现改为workspaceFolder
 "environment": [],
 "externalConsole": true, // 调试时是否显示控制台窗口,一般设置为true显示控制台
 "MIMode": "gdb",
 "miDebuggerPath": "C:/Program Files (x86)/mingw64/bin/gdb.exe", // miDebugger的路径,注意这里要与MinGw的路径对应
 "preLaunchTask": "g++", // 调试会话开始前执行的任务,一般为编译程序,c++为g++, c为gcc
 "setupCommands": [
 {
 "description": "Enable pretty-printing for gdb",
 "text": "-enable-pretty-printing",
 "ignoreFailures": false
 }
 ]
 }
 ]
}
tasks.json
如果遇到找不到文件 比如这样:
把 "${workspaceFolder}"替换为 "\\"或 "//"
{
 "version": "2.0.0",
 "command": "g++",
 "args": [
 "-g",
 "${file}",
 "-o",
 "${fileBasenameNoExtension}.exe"
 ], // 编译命令参数
 "problemMatcher": {
 "owner": "cpp",
 "fileLocation": [
 "relative",
 "${workspaceFolder}"
 ],
 "pattern": {
 "regexp": "^(.*):(\\d+):(\\d+):\\s+(warning|error):\\s+(.*)$",
 "file": 1,
 "line": 2,
 "column": 3,
 "severity": 4,
 "message": 5
 }
 }
}
c_cpp_properties.json
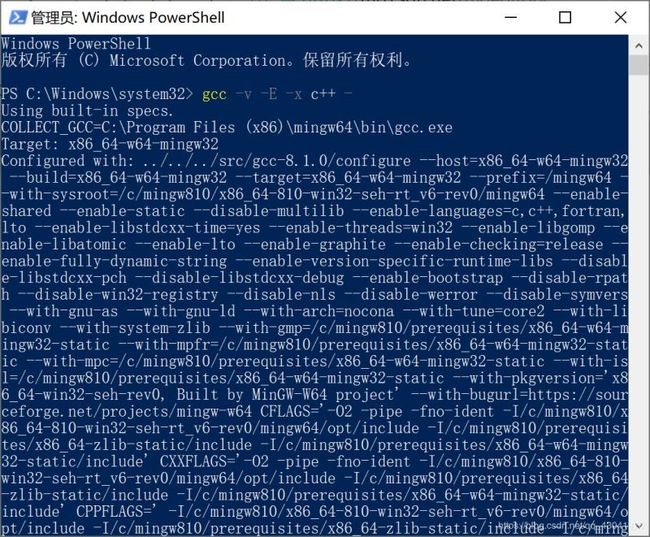
"includepath"设置问题 路径获取获取方法为:cmd——》gcc -v -E -x c++ -
如果第一种出错请使用第二种
{
 "configurations": [
 {
 "name": "Win32",
 "includePath": [
 "${workspaceRoot}",
 "C:/Program Files (x86)/mingw64/include/**",
 "C:/Program Files (x86)/mingw64/bin/../lib/gcc/x86_64-w64-mingw32/8.1.0/include/c++",
 "C:/Program Files (x86)/mingw64/bin/../lib/gcc/x86_64-w64-mingw32/8.1.0/include/c++/x86_64-w64-mingw32",
 "C:/Program Files (x86)/mingw64/bin/../lib/gcc/x86_64-w64-mingw32/8.1.0/include/c++/backward",
 "C:/Program Files (x86)/mingw64/bin/../lib/gcc/x86_64-w64-mingw32/8.1.0/include",
 "C:/Program Files (x86)/mingw64/bin/../lib/gcc/x86_64-w64-mingw32/8.1.0/include-fixed",
 "C:/Program Files (x86)/mingw64/bin/../lib/gcc/x86_64-w64-mingw32/8.1.0/../../../../x86_64-w64-mingw32/include"
 ],
 "defines": [
 "_DEBUG",
 "UNICODE",
 "__GNUC__=6",
 "__cdecl=__attribute__((__cdecl__))"
 ],
 "intelliSenseMode": "msvc-x64",
 "browse": {
 "limitSymbolsToIncludedHeaders": true,
 "databaseFilename": "",
 "path": [
 "${workspaceRoot}",
 "C:/Program Files (x86)/mingw64/include/**",
 "C:/Program Files (x86)/mingw64/bin/../lib/gcc/x86_64-w64-mingw32/8.1.0/include/c++",
 "C:/Program Files (x86)/mingw64/bin/../lib/gcc/x86_64-w64-mingw32/8.1.0/include/c++/x86_64-w64-mingw32",
 "C:/Program Files (x86)/mingw64/bin/../lib/gcc/x86_64-w64-mingw32/8.1.0/include/c++/backward",
 "C:/Program Files (x86)/mingw64/bin/../lib/gcc/x86_64-w64-mingw32/8.1.0/include",
 "C:/Program Files (x86)/mingw64/bin/../lib/gcc/x86_64-w64-mingw32/8.1.0/include-fixed",
 "C:/Program Files (x86)/mingw64/bin/../lib/gcc/x86_64-w64-mingw32/8.1.0/../../../../x86_64-w64-mingw32/include"
 ]
 }
 }
 ],
 "version": 4
}
第二种
{
 "configurations": [
 {
 "name": "Win32",
 "includePath": [
 "C:/Program Files (x86)/mingw64/include/**",
 "C:/Program Files (x86)/mingw64/bin/../lib/gcc/x86_64-w64-mingw32/8.1.0/include/c++",
 "C:/Program Files (x86)/mingw64/bin/../lib/gcc/x86_64-w64-mingw32/8.1.0/include/c++/x86_64-w64-mingw32",
 "C:/Program Files (x86)/mingw64/bin/../lib/gcc/x86_64-w64-mingw32/8.1.0/include/c++/backward",
 "C:/Program Files (x86)/mingw64/bin/../lib/gcc/x86_64-w64-mingw32/8.1.0/include",
 "C:/Program Files (x86)/mingw64/bin/../lib/gcc/x86_64-w64-mingw32/8.1.0/include-fixed",
 "C:/Program Files (x86)/mingw64/bin/../lib/gcc/x86_64-w64-mingw32/8.1.0/../../../../x86_64-w64-mingw32/include"
 ],
 "browse": {
 "limitSymbolsToIncludedHeaders": true,
 "databaseFilename": ""
 }
 }
 ],
 "version": 4
}
第六步:配置c语言的.vscode文件
- 在你写代码的地方新建文件夹和里面新建一个文件夹
- 然后在文件夹里面创建一个.vscode文件夹
- 然后在.vscode文件夹里面创建如上图所示的四个文件,文件名如下
- launch.json
- tasks.json
- launch.json
{
 "version": "0.2.0",
 "configurations": [
 {
 "name": "(gdb) Launch", // 配置名称,将会在启动配置的下拉菜单中显示
 "type": "cppdbg", // 配置类型,这里只能为cppdbg
 "request": "launch", // 请求配置类型,可以为launch(启动)或attach(附加)
 "program": "${workspaceFolder}/${fileBasenameNoExtension}.exe", // 将要进行调试的程序的路径
 "args": [], // 程序调试时传递给程序的命令行参数,一般设为空即可
 "stopAtEntry": false, // 设为true时程序将暂停在程序入口处,一般设置为false
 "cwd": "${workspaceFolder}", // 调试程序时的工作目录,一般为${workspaceRoot}即代码所在目录 workspaceRoot已被弃用,现改为workspaceFolder
 "environment": [],
 "externalConsole": true, // 调试时是否显示控制台窗口,一般设置为true显示控制台
 "MIMode": "gdb",
 "miDebuggerPath": "C:/Program Files (x86)/mingw64/bin/gdb.exe", // miDebugger的路径,注意这里要与MinGw的路径对应
 "preLaunchTask": "gcc", // 调试会话开始前执行的任务,一般为编译程序,c++为g++, c为gcc
 "setupCommands": [
 {
 "description": "Enable pretty-printing for gdb",
 "text": "-enable-pretty-printing",
 "ignoreFailures": false
 }
 ]
 }
 ]
}
tasks.json
{
 "version": "2.0.0",
 "command": "gcc",
 "args": [
 "-g",
 "${file}",
 "-o",
 "${fileBasenameNoExtension}.exe"
 ]
}
参考文章:
https://www.jb51.net/article/186531.htm
http://www.chuancn.cn/post/将VSCode设置成中文语言环境
总结
到此这篇关于vscode 配置 C/C++ 编译环境的详细图文教程的文章就介绍到这了,更多相关vscode 配置 C/C++ 编译环境内容请搜索脚本之家以前的文章或继续浏览下面的相关文章希望大家以后多多支持脚本之家!


