一般情况下每个spring boot工程启动都有固定的端口,但是固定端口不利用服务的动态扩容,如果在一台服务器上需要对同一个服务进行多实例部署,很容易出现端口冲突,那么怎么解决这个问题呢?
random随机端口
在spring boot中,可以通过${random}来生成随机数字,我们可以在配置文件中,这么设置端口:
server.port=${random.int(2000,8000)}
通过random.int方法,指定生成2000~8000的随机端口。这样每次启动的端口都不一样。
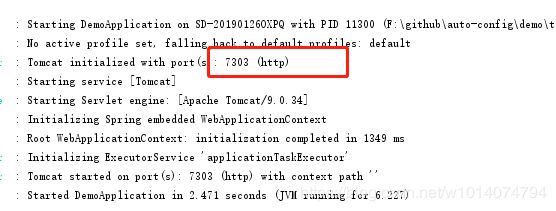
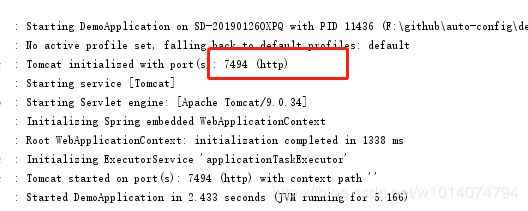
多次启动,发现每次的端口都不一致说明配置成功。
注意事项:
这里需要注意spring boot项目启动属性文件的加载顺序,spring boot的属性是由里向外加载,所以最外层的最后被加载,会覆盖里层的属性。
所以如果主动在启动命令中使用–server.port配置了项目的端口号,那么属性文件中配置的随机端口属性就不会生效。
通过System.setProperty设置有效随机端口
上面的方法虽然暂时达到了想要的效果,但是有个问题:如果生成的这个随机端口已经被使用了,那么项目启动就会出现端口冲突。
那么,我们能否通过一个检测机制,让生成的随机端口一定是一个没有被占用的有效的随机端口呢?
有效端口检测原理:
通过建立socket连接,Socket socket = new Socket(Address,port);#address代表主机的IP地址,port代表端口号
如果对该主机的特定端口号能建立一个socket,则说明该主机的该端口在使用。
Socket socket = new Socket(Address,port);#address代表主机的IP地址,port代表端口号
如果对该主机的特定端口号能建立一个socket,则说明该主机的该端口在使用。
实现思路:
通过在项目启动前,获取有效的随机端口并通过System.setProperty将变量设置到系统的全局变量中,这样项目启动时就可以从全局变量中获取到server.port变量的值。
这里的system,系统指的是 JRE (runtime)system,即设置jvm运行时的全局变量。
工具类:
@Slf4j
public class NetUtils {

  /**
   * 测试本机端口是否被使用
   * @param port
   * @return
   */
  public static boolean isLocalPortUsing(int port){
    boolean flag = true;
    try {
      //如果该端口还在使用则返回true,否则返回false,127.0.0.1代表本机
      flag = isPortUsing("127.0.0.1", port);
    } catch (Exception e) {
    }
    return flag;
  }
  /***
   * 测试主机Host的port端口是否被使用
   * @param host
   * @param port
   * @throws UnknownHostException
   */
  public static boolean isPortUsing(String host,int port) {
    boolean flag = false;
    try {
      InetAddress Address = InetAddress.getByName(host);
      Socket socket = new Socket(Address,port); //建立一个Socket连接
      flag = true;
    } catch (IOException e) {
      //log.info(e.getMessage(),e);
    }
    return flag;
  }

  //start--end是所要检测的端口范围
  static int start=0;
  static int end=1024;

  /**
   * 由于本机上安装了mysql,采用3306端口去验证
   * @param args
   */
  public static void main(String args[]){
      int testPost =3306;
      if(isLocalPortUsing(testPost)){
        System.out.println("端口 "+testPost+" 已被使用");
      }else{
        System.out.println("端口 "+testPost+"未使用");
      }
  }
}
 public class ServerPortUtils {

  /**
   * 获取可用端口
   * @return
   */
  public static int getAvailablePort(){
     int max = 65535;
     int min = 2000;

     Random random = new Random();
     int port = random.nextInt(max)%(max-min +1) + min;
     boolean using = NetUtils.isLocalPortUsing(port);
     if(using){
       return getAvailablePort();
     }else{
       return port;
     }
  }

}
项目启动前设置server.port环境变量
/**
 * 开始命令
 */
@Slf4j
public class StartCommand {

  public StartCommand(String[] args){
     Boolean isServerPort = false;
     String serverPort = "";
     if(args != null){
       for (String arg:args){
          if(StringUtils.hasText(arg) &&
              arg.startsWith("--server.port")
          ){
            isServerPort = true;
            serverPort = arg;
            break;
          }
       }
     }

     //没有指定端口,则随机生成一个可用的端口
    if(!isServerPort){
       int port = ServerPortUtils.getAvailablePort();
       log.info("current server.port=" + port);
       System.setProperty("server.port",String.valueOf(port));
    }else{//指定了端口,则以指定的端口为准
      log.info("current server.port=" + serverPort.split("=")[1]);
      System.setProperty("server.port",serverPort.split("=")[1]);
    }
  }

}
启动类调用方法:
@SpringBootApplication
@EnableUserClient
@RestController
public class DemoApplication {
  @Autowired
  Environment environment;

  public static void main(String[] args) {
    new StartCommand(args);
    SpringApplication.run(DemoApplication.class, args);
  }
}
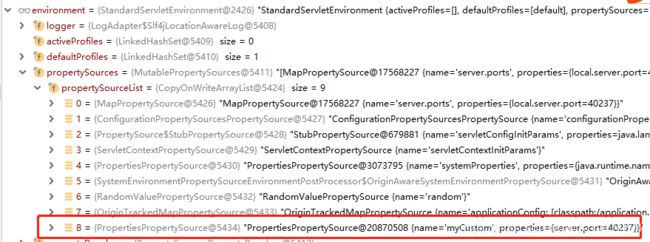
通过自定义PropertiesPropertySource属性源实现
public class MyEnvironmentPostProcessor implements EnvironmentPostProcessor {

  @Override
  public void postProcessEnvironment(ConfigurableEnvironment environment, SpringApplication application) {
    //MapPropertySource
    Properties properties = new Properties();
    properties.put("server.port", ServerPortUtils.getAvailablePort());
    System.out.println(properties.get("server.port"));
    PropertiesPropertySource source = new PropertiesPropertySource("myCustom", properties);
    environment.getPropertySources().addLast(source);
    //environment.getPropertySources().addAfter();
  }
}
通过配置在resources/META-INF/spring.factories文件中使用全名注册
org.springframework.boot.env.EnvironmentPostProcessor=com.laowan.demo.command.MyEnvironmentPostProcessor
这样在项目启动后,就会将该属性源加载到Environment中。
总结
1、为什么要设置随机端?主要是为了解决动态扩容时出现端口冲突的问题。
2、怎么获取一个有效的随机端口号
3、spring boot下实现随机端口的三种方式。关于方式三的自定义属性源的实现方式可以多多品味,实践一下,更好的体会属性文件的加载顺序。
到此这篇关于Spring boot随机端口你都不会还怎么动态扩容的文章就介绍到这了,更多相关Spring boot随机端口内容请搜索脚本之家以前的文章或继续浏览下面的相关文章希望大家以后多多支持脚本之家!


