1、什么是粘包/拆包
一般所谓的TCP粘包是在一次接收数据不能完全地体现一个完整的消息数据。TCP通讯为何存在粘包呢?主要原因是TCP是以流的方式来处理数据,再加上网络上MTU的往往小于在应用处理的消息数据,所以就会引发一次接收的数据无法满足消息的需要,导致粘包的存在。处理粘包的唯一方法就是制定应用层的数据通讯协议,通过协议来规范现有接收的数据是否满足消息数据的需要。
1.1 http协议怎么解决TCP粘包:
(1)请求:
请求头以特定的符号("\r\n")结束,符合策略2,如果有请求体,则请求头中会有表示请求体的长度,符合策略3
http请求协议主要包括请求头,请求行、空行、请求体
请求头中若请求体不为空,需要指定请求体长度
(2)响应:
Content-Length用于描述HTTP消息实体的传输长度the transfer-length of the message-body。在HTTP协议中,消息实体长度和消息实体的传输长度是有区别,比如说gzip压缩下,消息实体长度是压缩前的长度,消息实体的传输长度是gzip压缩后的长度。
在具体的HTTP交互中,客户端是如何获取消息长度的呢,主要基于以下几个规则:
响应为1xx,204,304相应或者head请求,则直接忽视掉消息实体内容。
如果有Transfer-Encoding,则优先采用Transfer-Encoding里面的方法来找到对应的长度。比如说Chunked模式。
“如果head中有Content-Length,那么这个Content-Length既表示实体长度,又表示传输长度。如果实体长度和传输长度不相等(比如说设置了Transfer-Encoding),那么则不能设置Content-Length。如果设置了Transfer-Encoding,那么Content-Length将被忽视”。这句话翻译的优点饶,其实关键就一点:有了Transfer-Encoding,则不能有Content-Length。
Range传输。不关注,没详细看了:)
通过服务器关闭连接能确定消息的传输长度。(请求端不能通过关闭连接来指明请求消息体的结束,因为这样可以让服务器没有机会继续给予响应)。这种情况主要对应为短连接,即非keep-alive模式。
HTTP1.1必须支持chunk模式。因为当不确定消息长度的时候,可以通过chunk机制来处理这种情况。
在包含消息内容的header中,如果有content-length字段,那么该字段对应的值必须完全和消息主题里面的长度匹配。
“The entity-length of a message is the length of the message-body before any transfer-codings have been applied”
也就是有chunk就不能有content-length 。
其实后面几条几乎可以忽视,简单总结后如下:
a1、Content-Length如果存在并且有效的话,则必须和消息内容的传输长度完全一致。(经过测试,如果过短则会截断,过长则会导致超时。)
a2、如果存在Transfer-Encoding(重点是chunked),则在header中不能有Content-Length,有也会被忽视。
a3、如果采用短连接,则直接可以通过服务器关闭连接来确定消息的传输长度。(这个很容易懂)
结合HTTP协议其他的特点,比如说Http1.1之前的不支持keep alive。那么可以得出以下结论:
b1、在Http 1.0及之前版本中,content-length字段可有可无。
b2、在http1.1及之后版本。如果是keep alive,则content-length和chunk必然是二选一。若是非keep alive,则和http1.0一样。content-length可有可无。
2、解决办法
2.1、消息定长,报文大小固定长度,不够空格补全,发送和接收方遵循相同的约定,这样即使粘包了通过接收方编程实现获取定长报文也能区分。
2.2、包尾添加特殊分隔符,例如每条报文结束都添加回车换行符(例如FTP协议)或者指定特殊字符作为报文分隔符,接收方通过特殊分隔符切分报文区分。
2.3、将消息分为消息头和消息体,消息头中包含表示信息的总长度(或者消息体长度)的字段
3、自定义协议,来实现TCP的粘包/拆包问题
3.0 自定义协议,开始标记

3.1 自定义协议的介绍

3.2 自定义协议的类的封装

3.3 自定义协议的编码器

3.4 自定义协议的解码器
4、协议相关的实现
4.1 协议的封装
[java] view plain copy
- import java.util.Arrays;
- /**
- *
- * 自己定义的协议
- * 数据包格式
- * +——----——+——-----——+——----——+
- * |协议开始标志| 长度 | 数据 |
- * +——----——+——-----——+——----——+
- * 1.协议开始标志head_data,为int类型的数据,16进制表示为0X76
- * 2.传输数据的长度contentLength,int类型
- * 3.要传输的数据
- *
- */
- public class SmartCarProtocol {
- /**
- * 消息的开头的信息标志
- */
- private int head_data = ConstantValue.HEAD_DATA;
- /**
- * 消息的长度
- */
- private int contentLength;
- /**
- * 消息的内容
- */
- private byte[] content;
- /**
- * 用于初始化,SmartCarProtocol
- *
- * @param contentLength
- * 协议里面,消息数据的长度
- * @param content
- * 协议里面,消息的数据
- */
- public SmartCarProtocol(int contentLength, byte[] content) {
- this.contentLength = contentLength;
- this.content = content;
- }
- public int getHead_data() {
- return head_data;
- }
- public int getContentLength() {
- return contentLength;
- }
- public void setContentLength(int contentLength) {
- this.contentLength = contentLength;
- }
- public byte[] getContent() {
- return content;
- }
- public void setContent(byte[] content) {
- this.content = content;
- }
- @Override
- public String toString() {
- return "SmartCarProtocol [head_data=" + head_data + ", contentLength="
- + contentLength + ", content=" + Arrays.toString(content) + "]";
- }
- }
4.2 协议的编码器
[java] view plain copy
- /**
- *
- * 自己定义的协议
- * 数据包格式
- * +——----——+——-----——+——----——+
- * |协议开始标志| 长度 | 数据 |
- * +——----——+——-----——+——----——+
- * 1.协议开始标志head_data,为int类型的数据,16进制表示为0X76
- * 2.传输数据的长度contentLength,int类型
- * 3.要传输的数据
- *
- */
- public class SmartCarEncoder extends MessageToByteEncoder
{ - @Override
- protected void encode(ChannelHandlerContext tcx, SmartCarProtocol msg,
- ByteBuf out) throws Exception {
- // 写入消息SmartCar的具体内容
- // 1.写入消息的开头的信息标志(int类型)
- out.writeInt(msg.getHead_data());
- // 2.写入消息的长度(int 类型)
- out.writeInt(msg.getContentLength());
- // 3.写入消息的内容(byte[]类型)
- out.writeBytes(msg.getContent());
- }
- }
4.3 协议的解码器
[java] view plain copy
- import java.util.List;
- import io.netty.buffer.ByteBuf;
- import io.netty.channel.ChannelHandlerContext;
- import io.netty.handler.codec.ByteToMessageDecoder;
- /**
- *
- * 自己定义的协议
- * 数据包格式
- * +——----——+——-----——+——----——+
- * |协议开始标志| 长度 | 数据 |
- * +——----——+——-----——+——----——+
- * 1.协议开始标志head_data,为int类型的数据,16进制表示为0X76
- * 2.传输数据的长度contentLength,int类型
- * 3.要传输的数据,长度不应该超过2048,防止socket流的攻击
- *
- */
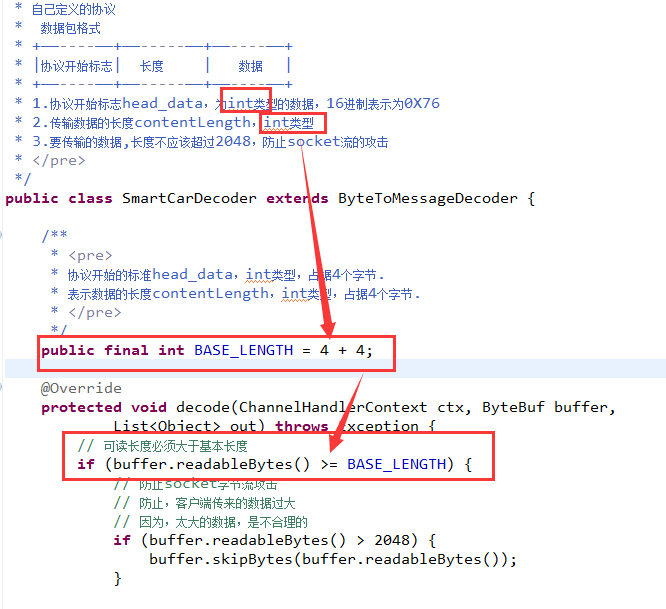
- public class SmartCarDecoder extends ByteToMessageDecoder {
- /**
- *
- * 协议开始的标准head_data,int类型,占据4个字节.
- * 表示数据的长度contentLength,int类型,占据4个字节.
- *
- */
- public final int BASE_LENGTH = 4 + 4;
- @Override
- protected void decode(ChannelHandlerContext ctx, ByteBuf buffer,
- List
- // 可读长度必须大于基本长度
- if (buffer.readableBytes() >= BASE_LENGTH) {
- // 防止socket字节流攻击
- // 防止,客户端传来的数据过大
- // 因为,太大的数据,是不合理的
- if (buffer.readableBytes() > 2048) {
- buffer.skipBytes(buffer.readableBytes());
- }
- // 记录包头开始的index
- int beginReader;
- while (true) {
- // 获取包头开始的index
- beginReader = buffer.readerIndex();
- // 标记包头开始的index
- buffer.markReaderIndex();
- // 读到了协议的开始标志,结束while循环
- if (buffer.readInt() == ConstantValue.HEAD_DATA) {
- break;
- }
- // 未读到包头,略过一个字节
- // 每次略过,一个字节,去读取,包头信息的开始标记
- buffer.resetReaderIndex();
- buffer.readByte();
- // 当略过,一个字节之后,
- // 数据包的长度,又变得不满足
- // 此时,应该结束。等待后面的数据到达
- if (buffer.readableBytes() < BASE_LENGTH) {
- return;
- }
- }
- // 消息的长度
- int length = buffer.readInt();
- // 判断请求数据包数据是否到齐
- if (buffer.readableBytes() < length) {
- // 还原读指针
- buffer.readerIndex(beginReader);
- return;
- }
- // 读取data数据
- byte[] data = new byte[length];
- buffer.readBytes(data);
- SmartCarProtocol protocol = new SmartCarProtocol(data.length, data);
- out.add(protocol);
- }
- }
- }
4.4 服务端加入协议的编/解码器
4.5 客户端加入协议的编/解码器

5、服务端的实现
[java] view plain copy
- import io.netty.bootstrap.ServerBootstrap;
- import io.netty.channel.ChannelFuture;
- import io.netty.channel.ChannelInitializer;
- import io.netty.channel.ChannelOption;
- import io.netty.channel.EventLoopGroup;
- import io.netty.channel.nio.NioEventLoopGroup;
- import io.netty.channel.socket.SocketChannel;
- import io.netty.channel.socket.nio.NioServerSocketChannel;
- import io.netty.handler.logging.LogLevel;
- import io.netty.handler.logging.LoggingHandler;
- public class Server {
- public Server() {
- }
- public void bind(int port) throws Exception {
- // 配置NIO线程组
- EventLoopGroup bossGroup = new NioEventLoopGroup();
- EventLoopGroup workerGroup = new NioEventLoopGroup();
- try {
- // 服务器辅助启动类配置
- ServerBootstrap b = new ServerBootstrap();
- b.group(bossGroup, workerGroup)
- .channel(NioServerSocketChannel.class)
- .handler(new LoggingHandler(LogLevel.INFO))
- .childHandler(new ChildChannelHandler())//
- .option(ChannelOption.SO_BACKLOG, 1024) // 设置tcp缓冲区 // (5)
- .childOption(ChannelOption.SO_KEEPALIVE, true); // (6)
- // 绑定端口 同步等待绑定成功
- ChannelFuture f = b.bind(port).sync(); // (7)
- // 等到服务端监听端口关闭
- f.channel().closeFuture().sync();
- } finally {
- // 优雅释放线程资源
- workerGroup.shutdownGracefully();
- bossGroup.shutdownGracefully();
- }
- }
- /**
- * 网络事件处理器
- */
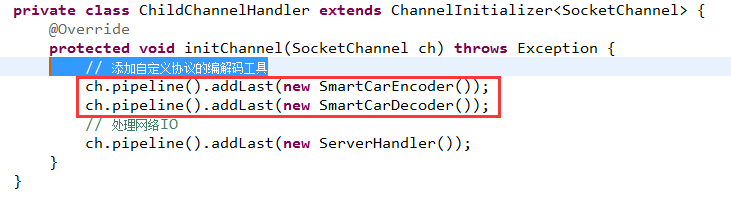
- private class ChildChannelHandler extends ChannelInitializer
{ - @Override
- protected void initChannel(SocketChannel ch) throws Exception {
- // 添加自定义协议的编解码工具
- ch.pipeline().addLast(new SmartCarEncoder());
- ch.pipeline().addLast(new SmartCarDecoder());
- // 处理网络IO
- ch.pipeline().addLast(new ServerHandler());
- }
- }
- public static void main(String[] args) throws Exception {
- new Server().bind(9999);
- }
- }
6、服务端Handler的实现
[java] view plain copy
- import io.netty.channel.ChannelHandlerAdapter;
- import io.netty.channel.ChannelHandlerContext;
- public class ServerHandler extends ChannelHandlerAdapter {
- // 用于获取客户端发送的信息
- @Override
- public void channelRead(ChannelHandlerContext ctx, Object msg)
- throws Exception {
- // 用于获取客户端发来的数据信息
- SmartCarProtocol body = (SmartCarProtocol) msg;
- System.out.println("Server接受的客户端的信息 :" + body.toString());
- // 会写数据给客户端
- String str = "Hi I am Server ...";
- SmartCarProtocol response = new SmartCarProtocol(str.getBytes().length,
- str.getBytes());
- // 当服务端完成写操作后,关闭与客户端的连接
- ctx.writeAndFlush(response);
- // .addListener(ChannelFutureListener.CLOSE);
- // 当有写操作时,不需要手动释放msg的引用
- // 当只有读操作时,才需要手动释放msg的引用
- }
- @Override
- public void exceptionCaught(ChannelHandlerContext ctx, Throwable cause)
- throws Exception {
- // cause.printStackTrace();
- ctx.close();
- }
- }
7、客户端的实现
[java] view plain copy
- import io.netty.bootstrap.Bootstrap;
- import io.netty.channel.ChannelFuture;
- import io.netty.channel.ChannelInitializer;
- import io.netty.channel.ChannelOption;
- import io.netty.channel.EventLoopGroup;
- import io.netty.channel.nio.NioEventLoopGroup;
- import io.netty.channel.socket.SocketChannel;
- import io.netty.channel.socket.nio.NioSocketChannel;
- public class Client {
- /**
- * 连接服务器
- *
- * @param port
- * @param host
- * @throws Exception
- */
- public void connect(int port, String host) throws Exception {
- // 配置客户端NIO线程组
- EventLoopGroup group = new NioEventLoopGroup();
- try {
- // 客户端辅助启动类 对客户端配置
- Bootstrap b = new Bootstrap();
- b.group(group)//
- .channel(NioSocketChannel.class)//
- .option(ChannelOption.TCP_NODELAY, true)//
- .handler(new MyChannelHandler());//
- // 异步链接服务器 同步等待链接成功
- ChannelFuture f = b.connect(host, port).sync();
- // 等待链接关闭
- f.channel().closeFuture().sync();
- } finally {
- group.shutdownGracefully();
- System.out.println("客户端优雅的释放了线程资源...");
- }
- }
- /**
- * 网络事件处理器
- */
- private class MyChannelHandler extends ChannelInitializer
{ - @Override
- protected void initChannel(SocketChannel ch) throws Exception {
- // 添加自定义协议的编解码工具
- ch.pipeline().addLast(new SmartCarEncoder());
- ch.pipeline().addLast(new SmartCarDecoder());
- // 处理网络IO
- ch.pipeline().addLast(new ClientHandler());
- }
- }
- public static void main(String[] args) throws Exception {
- new Client().connect(9999, "127.0.0.1");
- }
- }
8、客户端Handler的实现
[java] view plain copy
- import io.netty.channel.ChannelHandlerAdapter;
- import io.netty.channel.ChannelHandlerContext;
- import io.netty.util.ReferenceCountUtil;
- //用于读取客户端发来的信息
- public class ClientHandler extends ChannelHandlerAdapter {
- // 客户端与服务端,连接成功的售后
- @Override
- public void channelActive(ChannelHandlerContext ctx) throws Exception {
- // 发送SmartCar协议的消息
- // 要发送的信息
- String data = "I am client ...";
- // 获得要发送信息的字节数组
- byte[] content = data.getBytes();
- // 要发送信息的长度
- int contentLength = content.length;
- SmartCarProtocol protocol = new SmartCarProtocol(contentLength, content);
- ctx.writeAndFlush(protocol);
- }
- // 只是读数据,没有写数据的话
- // 需要自己手动的释放的消息
- @Override
- public void channelRead(ChannelHandlerContext ctx, Object msg)
- throws Exception {
- try {
- // 用于获取客户端发来的数据信息
- SmartCarProtocol body = (SmartCarProtocol) msg;
- System.out.println("Client接受的客户端的信息 :" + body.toString());
- } finally {
- ReferenceCountUtil.release(msg);
- }
- }
- @Override
- public void exceptionCaught(ChannelHandlerContext ctx, Throwable cause)
- throws Exception {
- ctx.close();
- }
- }