*不定期更新 ~
好久没用了,这次自己重新熟悉下;有不对的地方或错误,希望大家多指正*
快速构建
使用 create-react-app 快速构建 React 开发环境
     cnpm install -g create-react-app
     create-react-app my-app
     cd my-app/
     npm start
到这里项目就已经启动了 : 默认会访问 http://localhost:3000/,这里不多阐述了
项目结构
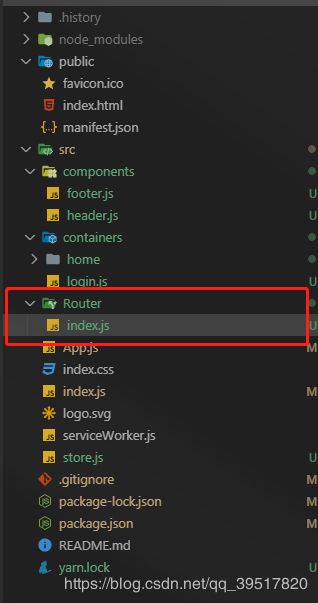
这里src下新增几个文件夹,后面会一一阐述
components - 组件
containers - 页面
Router - 路由
utils - 封装工具类
store - react-redux
路由配置
项目构建出来默认是没有路由文件的,这里需要我们自己手动建一个
import React from 'react'
import { BrowserRouter as Router, Route } from "react-router-dom";
import Login from './../containers/login';
import Home from './../containers/home';

function router() {
    return (


        );
}

export default router;
然后需要到 src下index.js 引入路由 并挂载
import React from 'react';
import { render } from 'react-dom';
// 由于 antd 组件的默认文案是英文,所以需要修改为中文
import moment from 'moment';
import 'moment/locale/zh-cn';
import 'antd/dist/antd.css';
import './index.css';
import Router from './Router/index'
moment.locale('zh-cn');
render(到这里我们就可以访问 http://localhost:3000/login
组件使用
Home页面引用并导入 Header Footer
import React from 'react';
import Header from './../../components/header'
import Footer from './../../components/footer'
const Home = () => {
return (
header demo
import React from 'react';

const Header = () => {
    return (

            header

    );
};
export default Header;
utils工具类
const Utils = {
    // 时间相关处理
    time: {
        // 获取当前日期: yyyy-MM-dd
        getCurrentDate() {
            const time = new Date()
            let yyyy = time.getFullYear()
            let MM = time.getMonth() + 1 < 10 ? '0' + (time.getMonth() + 1) : time.getMonth() + 1
            let dd = time.getDate()
            return yyyy + '-' + MM + '-' + dd
        },
        // 时间戳转化为标准时间显示
        timeStampTransform(timeStamp) {
            const time = new Date(timeStamp)
            let yyyy = time.getFullYear()
            let MM = time.getMonth() + 1 < 10 ? '0' + (time.getMonth() + 1) : time.getMonth() + 1
            let dd = time.getDate()
            let HH = time.getHours()
            let mm = time.getMinutes()
            let ss = time.getSeconds()
            return yyyy + '-' + MM + '-' + dd + ' ' + HH + ':' + mm + ':' + ss
        },
    }
}
export default Utils
上面我们写了一个时间转换的工具,
在使用前我们需要在src的index.js中引用挂载
import React from 'react';
import { render } from 'react-dom';
// 由于 antd 组件的默认文案是英文,所以需要修改为中文
import 'moment/locale/zh-cn';
import 'antd/dist/antd.css';
import './index.css';
import Router from './Router/index'
import Utils from './utils'
import moment from 'moment';
moment.locale('zh-cn');
React.$Utils = Utils;
render(在 home.js中使用如下
import React, { Component } from 'react';
import Header from './../../components/header'
import Footer from './../../components/footer'
class Home extends Component {
constructor(props) {
super(props);
this.state = {
data: "js是世界上最好的语言"
};
}
componentDidMount() {
console.log(React.$Utils.time.getCurrentDate(''))
}
render() {
return (
{this.state.data}
{React.$Utils.time.getCurrentDate('')}
)
}
}
export default Home此处需要注意的是我们要用到 react 的 Component 以及生命周期,这里不懂的小伙伴可以移步官方文档查看哦。
页面效果如下
这次先更新到这里,后面会更新一下store的用法
