SpannableString
http://blog.csdn.net/fengkuanghun/article/details/7904284
背景介绍
在开发应用过程中经常会遇到显示一些不同的字体风格的信息犹如默认的LockScreen上面的时间和充电信息。对于类似的情况,可能第一反应就是用不同的多个TextView来实现,对于每个TextView设置不同的字体风格以满足需求。
这里推荐的做法是使用android.text.*;和 android.text.style.*;下面的组件来实现RichText:也即在同一个TextView中设置不同的字体风格。对于某些应用,比如文本编辑,记事本,彩信,短信等地方,还必须使用这些组件才能达到想到的显示效果。
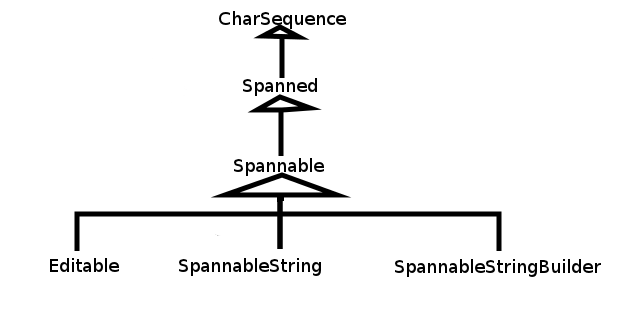
主要的基本工具类有android.text.Spanned; android.text.SpannableString; android.text.SpannableStringBuilder;使用这些类来代替常规String。SpannableString和 SpannableStringBuilder可以用来设置不同的Span,这些Span便是用于实现Rich Text,比如粗体,斜体,前景色,背景色,字体大小,字体风格等等,android.text.style.*中定义了很多的Span类型可供使用。
这是相关的API的Class General Hierarchy:
因为Spannable等最终都实现了CharSequence接口,所以可以直接把SpannableString和SpannableStringBuilder通过TextView.setText()设置给TextView。
使用方法
当要显示Rich Text信息的时候,可以使用创建一个SpannableString或SpannableStringBuilder,它们的区别在于 SpannableString像一个String一样,构造对象的时候传入一个String,之后再无法更改String的内容,也无法拼接多个 SpannableString;而SpannableStringBuilder则更像是StringBuilder,它可以通过其append()方法来拼接多个String:
SpannableString word = new SpannableString("The quick fox jumps over the lazy dog");


SpannableStringBuilder multiWord = new SpannableStringBuilder();

multiWord.append("The Quick Fox");

multiWord.append("jumps over");

multiWord.append("the lazy dog");
创建完Spannable对象后,就可以为它们设置Span来实现想要的Rich Text了,常见的Span有:
- AbsoluteSizeSpan(int size) ---- 设置字体大小,参数是绝对数值,相当于Word中的字体大小
- RelativeSizeSpan(float proportion) ---- 设置字体大小,参数是相对于默认字体大小的倍数,比如默认字体大小是x, 那么设置后的字体大小就是x*proportion,这个用起来比较灵活,proportion>1就是放大(zoom in), proportion<1就是缩小(zoom out)
- ScaleXSpan(float proportion) ---- 缩放字体,与上面的类似,默认为1,设置后就是原来的乘以proportion,大于1时放大(zoon in),小于时缩小(zoom out)
- BackgroundColorSpan(int color) ----背景着色,参数是颜色数值,可以直接使用android.graphics.Color里面定义的常量,或是用Color.rgb(int, int, int)
- ForegroundColorSpan(int color) ----前景着色,也就是字的着色,参数与背景着色一致
- TypefaceSpan(String family) ----字体,参数是字体的名字比如“sans", "sans-serif"等
- StyleSpan(Typeface style) -----字体风格,比如粗体,斜体,参数是android.graphics.Typeface里面定义的常量,如Typeface.BOLD,Typeface.ITALIC等等。
- StrikethroughSpan----如果设置了此风格,会有一条线从中间穿过所有的字,就像被划掉一样
对于这些Sytle span在使用的时候通常只传上面所说明的构造参数即可,不需要设置其他的属性,如果需要的话,也可以对它们设置其他的属性,详情可以参见文档。
SpannableString和SpannableStringBuilder都有一个设置上述Span的方法:
/**

 * Set the style span to Spannable, such as SpannableString or SpannableStringBuilder

 * @param what --- the style span, such as StyleSpan

 * @param start --- the starting index of characters to which the style span to apply

 * @param end --- the ending index of characters to which the style span to apply

 * @param flags --- the flag specified to control

 */

setSpan(Object what, int start, int end, int flags);
其中参数what是要设置的Style span,start和end则是标识String中Span的起始位置,而 flags是用于控制行为的,通常设置为0或Spanned中定义的常量,常用的有:
- Spanned.SPAN_EXCLUSIVE_EXCLUSIVE --- 不包含两端start和end所在的端点
- Spanned.SPAN_EXCLUSIVE_INCLUSIVE --- 不包含端start,但包含end所在的端点
- Spanned.SPAN_INCLUSIVE_EXCLUSIVE --- 包含两端start,但不包含end所在的端点
- Spanned.SPAN_INCLUSIVE_INCLUSIVE--- 包含两端start和end所在的端点
这里理解起来就好像数学中定义区间,开区间还是闭区间一样的。还有许多其他的Flag,可以参考这里。这里要重点说明下关于参数0,有很多时候,如果设置了上述的参数,那么Span会从start应用到Text结尾,而不是在start和end二者之间,这个时候就需要使用Flag 0。
Linkify
另外,也可以对通过TextView.setAutoLink(int)设置其Linkify属性,其用处在于,TextView会自动检查其内容,会识别出phone number, web address or email address,并标识为超链接,可点击,点击后便跳转到相应的应用,如Dialer,Browser或Email。Linkify有几个常用选项,更多的请参考文档:
- Linkify.EMAIL_ADDRESS -- 仅识别出TextView中的Email在址,标识为超链接,点击后会跳到Email,发送邮件给此地址
- Linkify.PHONE_NUMBERS -- 仅识别出TextView中的电话号码,标识为超链接,点击后会跳到Dialer,Call这个号码
- Linkify.WEB_URLS-- 仅识别出TextView中的网址,标识为超链接,点击后会跳到Browser打开此URL
- Linkify.ALL -- 这个选项是识别出所有系统所支持的特殊Uri,然后做相应的操作
权衡选择
个人认为软件开发中最常见的问题不是某个技巧怎么使用的问题,而是何时该使用何技巧的问题,因为实现同一个目标可能有N种不同的方法,就要权衡利弊,选择最合适的一个,正如常言所云,没有最好的,只有最适合的。如前面所讨论的,要想用不同的字体展现不同的信息可能的解法,除了用Style Span外还可以用多个TextView。那么就需要总结下什么时候该使用StyleSpan,什么时候该使用多个TextView:
- 如果显示的是多个不同类别的信息,就应该使用多个TextView,这样也方便控制和改变各自的信息,例子就是默认LockScreen上面的日期和充电信息,因为它们所承载不同的信息,所以应该使用多个TextView来分别呈现。
- 如果显示的是同一类信息,或者同一个信息,那么应该使用StyleSpan。比如,短信息中,要把联系人的相关信息突出显示;或是想要Highlight某些信息等。
- 如果要实现Rich text,没办法,只能使用Style span。
- 如果要实现某些特效,也可以考虑使用StyleSpan。设置不同的字体风格只是Style span的初级应用,如果深入研究,可以发现很多奇妙的功效。
Spannable与ImageSapn结合使用可实现在EditText中实现图文混排的效果
http://blog.csdn.net/ah200614435/article/details/7914459
下面是一些实例代码
- /**
- * 超链接
- */
- private void addUrlSpan() {
- SpannableString spanString = new SpannableString("超链接");
- URLSpan span = new URLSpan("tel:0123456789");
- spanString.setSpan(span, 0, 3, Spannable.SPAN_EXCLUSIVE_EXCLUSIVE);
- tv.append(spanString);
- }
- /**
- * 文字背景颜色
- */
- private void addBackColorSpan() {
- SpannableString spanString = new SpannableString("颜色2");
- BackgroundColorSpan span = new BackgroundColorSpan(Color.YELLOW);
- spanString.setSpan(span, 0, 3, Spannable.SPAN_EXCLUSIVE_EXCLUSIVE);
- tv.append(spanString);
- }
- /**
- * 文字颜色
- */
- private void addForeColorSpan() {
- SpannableString spanString = new SpannableString("颜色1");
- ForegroundColorSpan span = new ForegroundColorSpan(Color.BLUE);
- spanString.setSpan(span, 0, 3, Spannable.SPAN_EXCLUSIVE_EXCLUSIVE);
- tv.append(spanString);
- }
- /**
- * 字体大小
- */
- private void addFontSpan() {
- SpannableString spanString = new SpannableString("36号字体");
- AbsoluteSizeSpan span = new AbsoluteSizeSpan(36);
- spanString.setSpan(span, 0, 5, Spannable.SPAN_EXCLUSIVE_EXCLUSIVE);
- tv.append(spanString);
- }
- /**
- * 粗体,斜体
- */
- private void addStyleSpan() {
- SpannableString spanString = new SpannableString("BIBI");
- StyleSpan span = new StyleSpan(Typeface.BOLD_ITALIC);
- spanString.setSpan(span, 0, 2, Spannable.SPAN_EXCLUSIVE_EXCLUSIVE);
- tv.append(spanString);
- }
- /**
- * 删除线
- */
- private void addStrikeSpan() {
- SpannableString spanString = new SpannableString("删除线");
- StrikethroughSpan span = new StrikethroughSpan();
- spanString.setSpan(span, 0, 3, Spannable.SPAN_EXCLUSIVE_EXCLUSIVE);
- tv.append(spanString);
- }
- /**
- * 下划线
- */
- private void addUnderLineSpan() {
- SpannableString spanString = new SpannableString("下划线");
- UnderlineSpan span = new UnderlineSpan();
- spanString.setSpan(span, 0, 3, Spannable.SPAN_EXCLUSIVE_EXCLUSIVE);
- tv.append(spanString);
- }
- /**
- * 图片
- */
- private void addImageSpan() {
- SpannableString spanString = new SpannableString(" ");
- Drawable d = getResources().getDrawable(R.drawable.ic_launcher);
- d.setBounds(0, 0, d.getIntrinsicWidth(), d.getIntrinsicHeight());
- ImageSpan span = new ImageSpan(d, ImageSpan.ALIGN_BASELINE);
- spanString.setSpan(span, 0, 1, Spannable.SPAN_EXCLUSIVE_EXCLUSIVE);
- tv.append(spanString);
- }
- }
