浅入Vue.js
1. 内容概要
- MVVM
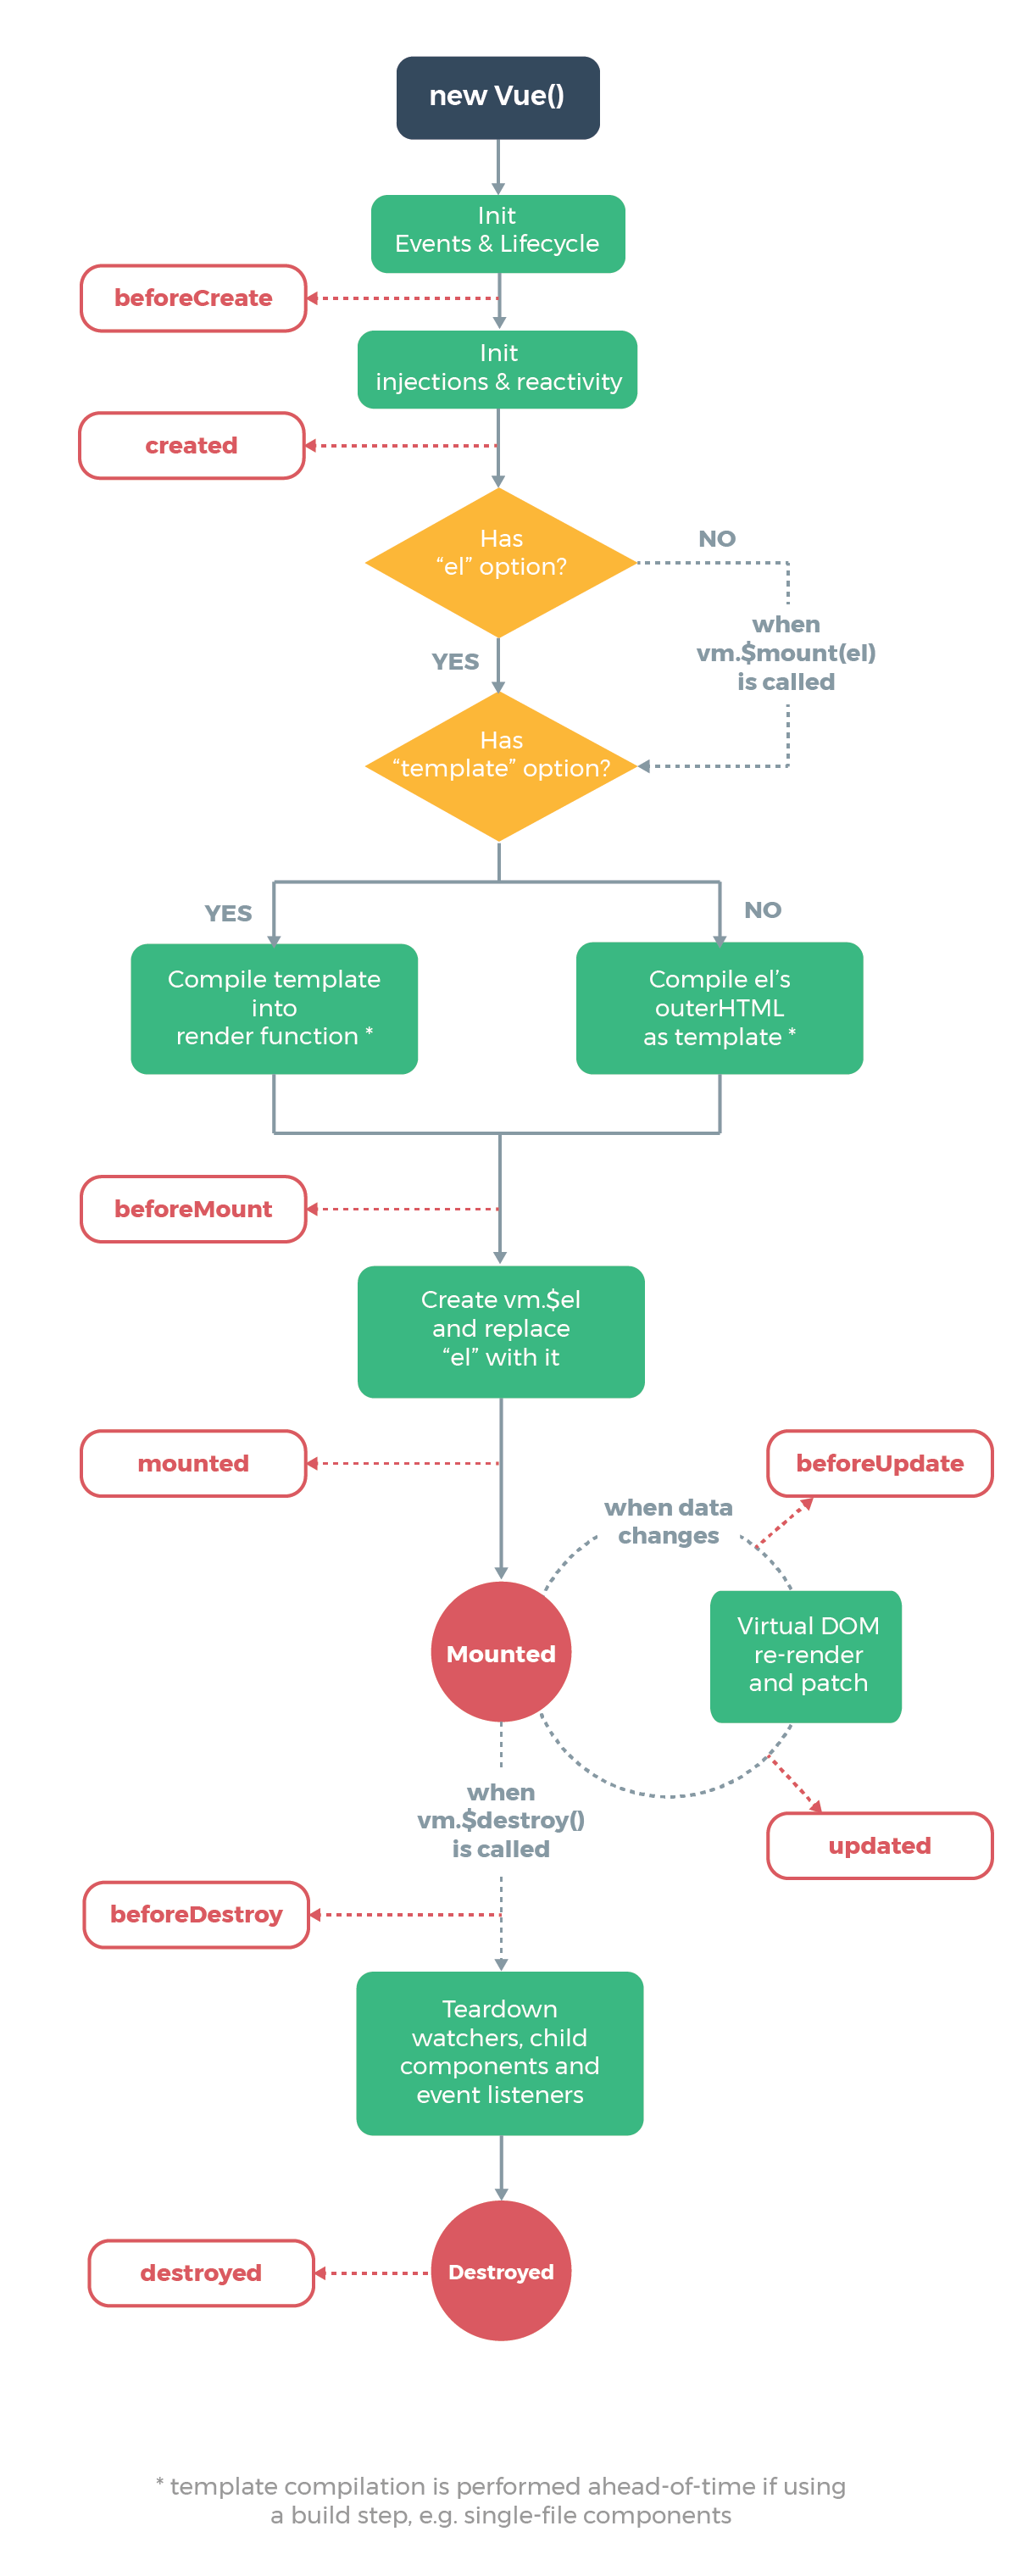
- 理解Vue实例的整个生命周期,会使用生命周期钩子函数
- 创建Vue实例、指令、插值表达式、计算属性、过滤器
- 组件化
- 组件间的通信
- 父子组件间的访问
- 插槽
2. 介绍
Vue高级功能
- 解耦视图和数据
- 可复用的组件
- 生产文件打包Vue-CLI
- 前端路由技术Vue-router
- 状态管理Vuex
- 虚拟DOM
MVVM
3. 生命周期
- 通过上图理解Vue实例的生命周期比较轻松。图中红色框中指的是Vue实例生命周期的不同阶段,且有与之对应的钩子函数;
- 通过生命周期的钩子函数可以在Vue实例生命周期的某个阶段做数据的处理;
- 用处多多-------一定要理解的
4. 语法
创建第一个Vue实例
<body>
  <div id="app">

      <p>{{msg}}p>
  div>

  <script>
    new Vue({
      // 这里的#app与html标签中id对应(理解成vue声明自己的作用域)
      el:'#app',
        data:{
          msg: 'hello'
        }
    })
  script>
body>
插值表达式(mustache语法)
使用插值表达式可以在标签中展示数据,且可以做简单的运算
<p>{{ msg }}p>
使用插值表达式在页面加载的时候内容会出现抖动现象,可以使用v-cloak解决抖动现象
<p v-cloak>{{ msg }}p>
指令
在Vue中提了14个指令,接下来一一介绍
- v-text
- 功能同插值语法一样,区别在于使用v-text不会出现抖动现象
- v-text是写在标签内的
- 使用v-text在页面中不能解析html代码
<p v-text>p>
- v-html
- 使用v-html插入html代码在页面中可以被解析
- 这个功能慎用,在页面动态渲染任意的HTMl代码是不安全的,容易导致XSS攻击
<div v-html='hello
'>div>
- v-show
- 根据v-show的值为true或false,控制元素的display属性,达到显示和隐藏元素的目的
- 使用了v-show的元素,即使未显示,元素也是加载了的
- 在需要频繁切换的位置使用,注意与v-if的区别
<p v-show>hellop>

hellop>

p>
- v-if/v-else/v-else-if
- 这三个指令通常搭配使用,用法类似javascript的if/else/else-if
- 通过条件判断页面上应该显示什么内容
- 与v-show的区别在于对于不满足条件的内容不会加载
- 在不需要频繁切换的位置使用,或者只需要切换一次的位置,注意与v-show的区别
1span>
2span>
<span v-else>3span>
new Vue({
  el: '#app',
  data() {
    return {
      num: 2
    }
  }
})
- v-for
- 作用同javaScript中for的作用类似用来遍历数组、对象
- 在使用v-for的时候需要绑定一个key值,这样做可以提高效率
- 绑定的key值要有一一对应的关系才能达到提高性能的目的
- 绑定key值不要是数组的下标,这样做不会对效率提升有帮助

{{item}}p>
data() {
  return {
    msg: [1,2,3,4]
  }
}
- v-on
- 使用v-on可以直接给页面中的元素绑定事件监听
- 帮定的事件监听在Vue实例的methods属性中做实现
- v-on可以简写成@(这是一个语法糖)
- 事件函数中允许传递参数,默认情况下会传递一个事件对象event
- 若事件函数中有多个参数需要传递,可以通过$event拿到事件对象
<p>{{ num }}p>
<button v-on:click='add'>点击+1button>
Vue实例中
methods: {
  add() {
    this.num++
  }
}
- 在Vue的事件监听中提供了修饰符,来简化我们的操作,常用的修饰符如下
- stop阻止事件冒泡
- prevent阻止默认事件
- {keyCode | keyAlias}只当事件是从特定键触发时才触发回调
- native监听组件根元素的原生事件
- once只触发一次回调
- v-bind
- v-bind动态绑定一个或多个属性,在父组件向子组件传递数据也有用到
- v-bind简写
:,这只是一个语法糖 - 重点class绑定和style绑定
- class、style属性绑定有对象语法和数组语法
class属性绑定
<style>
.current {
color: #f00;
}
.box {
width: 100px;
height: 100px;
margin-top: 5px;
background-color: pink;
}
style>
<body>
<div id="app">
class属性绑定数组语法div>
class属性绑定对象语法div>
div>
<script>
new Vue({
el: '#app',
data() {
return {
isCurrent: true
}
},
})
script>
body>
style属性绑定
<body>
<div id="app">
<div :style='boxStyle'>style属性绑定对象语法div>
<div :style='[currentStyle, boxStyle]'>style属性绑定数组语法div>
div>
<script>
new Vue({
el: '#app',
data() {
return {
currentStyle: {
color: 'red'
},
boxStyle: {
width: '100px',
height: '100px',
marginTop: '5px',
backgroundColor: 'pink'
}
}
},
})
script>
body>
- v-model
- 一般常用在表单控件中,实现了数据的双向绑定
- v-model实质是v-on:input和v-bind:value的组合
<body>
<div id="app">
<input type="text" v-on:input = 'input' v-bind:value = 'msg'>
<h2>{{ msg }}</h2>
</div>
<script>
new Vue({
el: '#app',
data() {
return {
msg: 123
}
},
methods: {
input(event){
//v-on中会默认传一个事件对象,通过事件对象event.target.value获得输入框中的内容
this.msg = event.target.value
}
}
})
</script>
</body>
- 在单选框中,如果v-model绑定的是同一个 值,也可以实现选项的互斥关系
- 修饰符
- lazy失去焦点显示输入内容
- number 字符串转为有效的数字
- trim 去掉输入内容首尾的空格
<body>
<div id="app">
<h2>{{ msg }}h2>
div>
<script>
new Vue({
el: '#app',
data() {
return {
msg: 123
}
}
})
script>
body>
-
v-pre值中的字符串在页面中不会编译而是直接显示出来
-
v-cloak 解决了插值语法闪动的问题
<p v-cloak>{{ msg }}<p>
- v-once 页面中的元素之渲染一次,之后即使数据发生变化,使用了v-once的部分也将不再重新加载,这可以用来性能优化
- v-slot 用在插槽中,在插槽部分详细说明
计算属性computed
-
计算属性的本质是一个属性,主要是用来做计算的,代替在插值语法中的复杂运算
-
计算属性中有setter和getter,默认只有getter
-
计算属性会缓存计算结果,只有在数据发生变化后才会重新计算,这区别于methods每次调用都会重新计算,这样做可以提升性能,watcher也是在数据发生变化后重新计算一般执行的是开销大的操作和异步操作
-
计算属性中函数的this指向的是当前的Vue实例,但是使用箭头函数this指向的不再是Vue实例
注意如果你为一个计算属性使用了箭头函数,则 this 不会指向这个组件的实例,不过你仍然可以将其实例作为函数的第一个参数来访问。
new Vue({
el: '#app',
data: {
msg: 'hello'
},
computed: {
//将当前实例vm以参数的形式传入
changeMsg: (vm) =>{
vm.msg = 'hi'//在页面上打印的是'hi'
console.log(vm);//输出的是vue对象
return vm.msg
}
},
})
过滤器filters
- 过滤器是用来格式化数据的,分为全局过滤器和局部过滤器,当全局过滤器和局部过滤器重名的时候会使用局部过滤器
- 过滤器只被允许使用在插值表达式和v-bind中,使用管道符号
|与前一个表达式连接,过滤器接收前一个表达式的返回值作为参数
- 过滤器在定义的时候允许传入参数,但是在执行的时候内部会将上一个表达式的返回值作为过滤器的第一个参数
5. 组件化
- 组件化的思想是将复杂的问题分块处理,每一个块完成一个功能,最后将这些块组合起来,同时还便于后期的管理和维护
- Vue中组件分为全局组件和局部组件,全局组件可以在多个实例中使用,局部组件只能在当前组件通过
components注册后才可以使用
- 组件的使用分为注册组件和使用组件,通过
Vue.component注册全局组件
<template id="info">
<div>
<p>你好:{{name}}p>
div>
template>
//注册一个全局组件info
//可以使用
//注册一个局部组件info1
const info1 = {
template: '#info',
data() {
return {
name: 'Jerry'
}
},
}
new Vue({
components: {
//可以使用
- 通过注册组件时使用的名字,在HTML中使用该名字的标签就可以使用组件
<div id="app">
<info/>
<info1/>
div>
6. 组件间的通信
父子组件间的通信
[外链图片转存失败,源站可能有防盗链机制,建议将图片保存下来直接上传(img-7XmqVQRN-1592274418185)(C:\Users\Administrator\AppData\Roaming\Typora\typora-user-images\image-20200611105101435.png)]
父组件向子组件传递数据(props属性)
const info1 = {
template: '#info',
//在子组件的props中接收父组件传递的参数,props可以是字符串数组或者对象
props: ['name']
}
//vue实例,也是父组件
new Vue({
data: {
name: 'Jerry'
},
components: {
info1
}
}).$mount('#app')
<div id="app">
<info1 :name='name'>info1>
div>
子组件向父组件传递数据
<div id="app">
<p>你好:{{name}}p>
<info1 @get-info='getInfo'>info1>
div>
<template id="info">
<div>
<button @click="btnClick">点击一下button>
div>
template>
const info1 = {
template: '#info',
data() {
return {
name: 'Jerry'
}
},
methods: {
btnClick() {
//使用$emit自定义一个事件get-info,并携带参数name
this.$emit('get-info', this.name)
}
}
}
new Vue({
data() {
return {
name: 'Tom'
}
},
components: {
info1
},
methods: {
//处理给Info事件,将传递过来的name保存到父组件的数据中
getInfo(name) {
this.name = name
}
}
}).$mount('#app')
事件总线的方式实现跨组件间的通信
事件总线可以跨组件间通信,不局限于父子组件
<div id="app">
<p>你好:{{name}}p>
<info>info>
div>
<template id="info">
<div>
<button @click="btnClick">点击一下button>
div>
template>
// 在vue的原型上添加$bus作为事件总线,$bus实质是一个vue实例
Vue.prototype.$bus = new Vue()
const info = {
template: '#info',
data() {
return {
name: 'Jerry'
}
},
methods: {
btnClick() {
// 在事件总线上注册一个get-info事件,并传递数据
this.$bus.$emit('get-info', this.name)
}
},
}
new Vue({
data() {
return {
name: 'Tom'
}
},
components: {
info
},
mounted() {
// 在mounted生命周期函数中使用$bus.$on拿到get-info中的数据
this.$bus.$on('get-info', name => {
this.name = name
})
},
}).$mount('#app')
7. 父子组件间的访问
父组件访问子组件
通过$children访问子组件
<div id="app">
<p>{{name}}----{{age}}p>
<son>son>
<button @click='btnClick'>点击button>
div>
<template id="son">
<div>
<p>{{name}}----{{age}}p>
div>
template>
const son = {
template: '#son',
data() {
return {
name: 'son',
age: 18
}
}
}
new Vue({
el: '#app',
data: {
name: 'father',
age: 48
},
components: {
son,
},
methods: {
btnClick() {
//$children获取的是子组件构成的数组,这会在成不必要的麻烦
this.name = this.$children[0].name
this.age = this.$children[0].age
}
},
})
通过$refs访问子组件
<div id="app">
<p>{{name}}----{{age}}p>
<son ref="son">son>
<button @click='btnClick'>点击button>
div>
<template id="son">
<div>
<p>{{name}}----{{age}}p>
div>
template>
const son = {
template: '#son',
data() {
return {
name: 'son',
age: 18
}
}
}
new Vue({
el: '#app',
data: {
name: 'father',
age: 48
},
components: {
son,
},
methods: {
btnClick() {
//使用$refs访问son组件,可以精确定位到组件,这就比$children要好用
this.name = this.$refs.son.name
this.age = this.$refs.son.age
}
},
})
子组件访问父组件
<div id="app">
<p>{{name}}----{{age}}p>
<son>son>
div>
<template id="son">
<div>
<p>{{name}}----{{age}}p>
<button @click='btnClick'>点击button>
div>
template>
const son = {
template: '#son',
data() {
return {
name: 'son',
age: 18
}
},
methods: {
btnClick() {
//使用$parent直接访问父组件
this.name = this.$parent.name
this.age = this.$parent.age
}
},
}
new Vue({
el: '#app',
data: {
name: 'father',
age: 48
},
components: {
son,
},
})
通过$root访问根组件
通过$root访问根组件,使用方法类似$parent,使用的频率比较少,不做赘述。
8. 插槽
- 为了让封装的组件更具扩展性,可以让使用者决定组件中展示的内容,就需要使用到插槽
- 在封装组件是将共性封装为组件,不同之处使用
slot暴露为插槽
- 插槽分为普通插槽、具名插槽和作用域插槽,他们各自有各自的作用
普通插槽
<div id="app">
<son>
<p>{{name}}----{{age}}p>
son>
div>
<template id="son">
<div>
<slot>slot>
div>
template>
具名插槽
<div id="app">
<son>
<template v-slot:con>
<div>
<p>{{name}}----{{age}}p>
div>
template>
son>
div>
<template id="son">
<div>
<slot name="con">slot>
div>
template>
作用插槽
<div id="app">
<son>
<template v-slot:con="son_name">
<div>
<p>{{son_name.son_name}}p>
div>
template>
son>
div>
<template id="son">
<div>
<slot name="con" :son_name='name'>slot>
div>
template>
作用域插槽的就是在子组件的具名插槽中使用属性绑定将子组件数据绑定到插槽上,在父组件中使用v-slot去定义一个变量接收对应具名插槽传过来的数据,实现跨编译作用域去使用数据。

