通过案例来了解React的基本开发思想
Warning:本文默认读者已会ES6和基本的jsx、React语法
前言
这次要完成的案例是一个分组列表,相信很多小伙伴在学习js的时候就已经做过类似的练习了,而这次我们要用React来完成开发,而用React开发最重要的就是组件化的思想了。
什么是组件化?
在生活中,我们所接触到的手机、电脑等各电子产品都是由许多个零件组装拼接而成,就算是车辆、房子这样比较巨型、又比较复杂的东西也是由很多个基本的零件组装而成。同理,React开发中通过将各个功能、模块组装成一个组件,再将各个组件组装成一个项目。
组件化有什么作用?
如果自己的手机屏幕摔破了,我相信许多人的反应是去换一个新的屏幕而不是换一台手机。同样,对于一个由各个组件组装起来的项目,后期对于项目的更新、维护都极为方便。如果你要更新某个区域,那你只需要到相应的组件进行更改即可。同时,后期改bug也会方便许多,组件化允许开发者能更快地精准定位到bug的位置。
具体项目
首先看一下成品是个什么样子
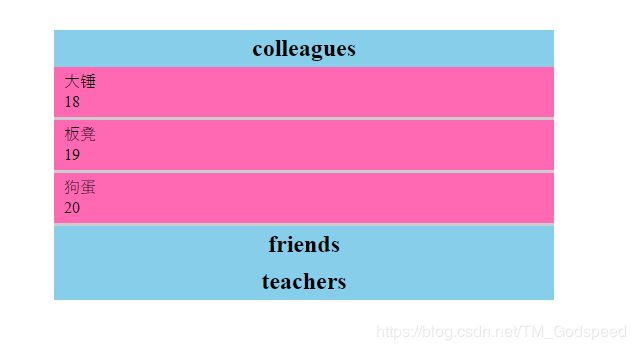
在这个案例中,点击一个分组会自动合并其他分组,点击自己则合并自己,初始展开第一分组
PS:在本案例中没有使用脚手架,而是手动运用了babel;本案例重点是为了理解React的开发思想而不是搭建一个企业级项目。
材料
自制模拟后台传输过来的json数据
const dataList = {
    "colleagues":[
        {
            name: "大锤"
            , age: 18
            , id: Math.random()
        }
        ,{
            name: "板凳"
            , age: 19
            , id: Math.random()
        }
        ,{
            name: "狗蛋"
            , age: 20
            , id: Math.random()
        }
    ]
    ,"friends":[
        {
            name: "kris"
            , age: 18
            , id: Math.random()
        }
        ,{
            name: "kara"
            , age: 18
            , id: Math.random()
        }
        ,{
            name: "Catherine"
            , age: 18
            , id: Math.random()
        }
    ]
    ,"teachers":[
        {
            name: "T1"
            , age: 18
            , id: Math.random()
        }
        ,{
            name: "T2"
            , age: 18
            , id: Math.random()
        }
        ,{
            name: "T3"
            , age: 18
            , id: Math.random()
        }
        ,{
            name: "T4"
            , age: 18
            , id: Math.random()
        }
    ]
}

export default dataList
组件
App Group
总体结构
App组件作用
- 定义状态 决定初始组展开状态 (在state中定义一个数组)
- 通过遍历数据渲染子组件
- 定义一个改变状态的函数 handleChange,传给子组件Group
- 给子组件传值
- 每一组的数据(详细格式请看数据格式)
- 每组是否展开的决定因素(state中的数组)
- 第几个渲染的组件(index)
- 改变App组件中state状态的函数
App组件具体代码
class App extends React.Component{
state = {
onOff : [true, false, false]
}
handleChange = (Index)=>{
const onOff = this.state.onOff.map((item, index)=>{
if(index === Index) return true
return false
})
this.setState({
onOff
})
// console.log(this.state.onOff);
}
render() {
return (
{
// console.log(Object.keys(data))
Object.keys(data).map((item, index)=>{
return(
Group组件作用
- 定义一个函数来渲染列表
根据父组件传过来的值决定列表中的组是否展开
结合生命周期中的componentDidMount函数来完成初始渲染 - 定义改变展开组状态的函数(点击事件),通过点击每组的标题改变当前组件状态,再通过父组件传过来的可以改变父组件状态的函数来改变父组件的状态
- 通过生命周期函数 shouldComponentUpdate 来完成本组件的更新,同时根据新数据来渲染列表
Group组件具体代码
class Group extends React.Component{
constructor(){
super(...arguments)
// console.log(this.props);
this.state = {
data : this.props.data_item
,ifShow : this.props.data_show
,_index : this.props.data_index
}
}
// 父组件更新时本组件也跟着更新
shouldComponentUpdate(nextProps, nextState) {
// console.log(nextProps, nextState);
// 这里的组件更新和handleClick函数中的更新不一样,这里针对的是除被点击组的其他组,而handleClick中的更新是针对被点击组本身的
if(this.state.ifShow !== nextProps.data_show){
this.setState({
ifShow: nextProps.data_show
})
}
if(this.state.ifShow !== nextState.ifShow){
this.toggleList(nextState.ifShow)
}
return true
}
// 组件完成渲染时实现第一次数据渲染
componentDidMount() {
this.toggleList(this.state.ifShow)
}
// 根据父组件传过来的值决定是否展开
toggleList = (ifShow)=>{
const ele = this._list
ifShow ?
(ele.style.height = ele.scrollHeight + "px")
:(ele.style.height = 0)
}
// 根据点击组来改变当前组状态,并通过父组件传过来的函数来改变父组件的状态
handleClick = (index)=>{
const ifShow = !this.state.ifShow
this.setState({
ifShow
})
// 这个函数执行后会使父组件状态更新,从而触发本组件的shouldComponentUpdate函数
this.props.change(this.state._index)
}
render(){
return(
{
this.handleClick(this.state._index)
}}
>
{
this.state.data
}
this._list=list}
>
{/*
当然这里的ul是可以单独分离成一个组件的,想学得更扎实的小伙伴可以自己尝试一下
*/}
{
data[this.state.data].map((item, index)=>{
return(
-
{item.name}
{item.age}
)
})
}
)
}
}
CSS样式
#app{
    width: 500px;
    margin: 100px auto;
}

.group{
    background-color: #ccc;
}

h2{
    padding: 5px;
    margin: 0;
    text-align: center;
    background-color: skyblue;
    cursor: pointer;
    user-select: none;
}

ul{
    padding: 0;
    margin: 0;
    list-style: none;
}

li{
    padding: 5px;
    margin-bottom: 3px;
    background-color: hotpink;
}

li:hover{
    transform: translateX(2px);
}

li p{
    padding: 5px;
    margin: 0;
    line-height: 10px;
    cursor: pointer;
}

.list{
    height: 0;
    overflow: hidden;
    transition: 0.5s;
}
最后补充一下
用React开发时一定要清楚各层级间的关系,同时灵活运用生命周期函数,不清楚的地方多console.log
希望这篇文章会对你有帮助
Wish you godspeed!