大数据学习之Flume——02Flume安装及配置文件
一. flume安装:
- 将flume安装包解压并到指定目录
- flume-env.sh.template重命名为flume-env.sh
- flume-env.sh文件中,配置JAVA_HOME的路径
- 配置flume的环境变量
- 验证:
执行flume-ng version:如果显示flume的版本信息,则说明flume就安装成功了
二. 单节点配置
1. 单节点的配置文件
- 将配置信息写到node02节点的 ~/dirflume目录下的option文件中:
# example.conf: A single-node Flume configuration

# Name the components on this agent
# 设置上组件的名称
a1.sources = r1
a1.sinks = k1
a1.channels = c1

# Describe/configure the source
# 配置source源信息
# 可以通过netcat方式给node02的44444端口发送信息
a1.sources.r1.type = netcat
a1.sources.r1.bind = node02
a1.sources.r1.port = 44444

# Describe the sink
# sink类型为log
a1.sinks.k1.type = logger

# Use a channel which buffers events in memory
# 时间缓存在内存中
a1.channels.c1.type = memory
# 容量为1000数据
a1.channels.c1.capacity = 1000
# 每次拿去100条数据
a1.channels.c1.transactionCapacity = 100

# Bind the source and sink to the channel
a1.sources.r1.channels = c1
a1.sinks.k1.channel = c1
2. 启动
-
在node02上启动监听:端口号设置为44444
flume-ng agent --conf-file ~/dirflume/option --name a1 -Dflume.root.logger=INFO,console -
在另一台机器上启动telnet, 用于监听
- 如果没有安装telnet:
yum install telnet -y - 这里监听的端口号, 需要和option配置文件中设置的一样
a1.sources.r1.port = 44444
telnet node02 44444 - 如果没有安装telnet:
-
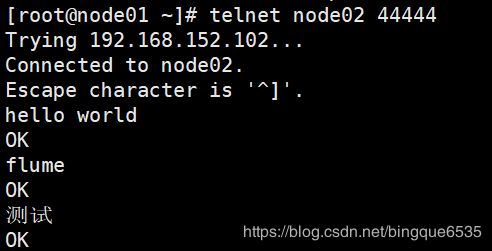
此时, 输入的内容就能被node02监听了
3. 结果
三. 双节点配置
1. 配置文件
要求:在node03节点上发送内容到node02, 然后node02转发到node01节点:
-
node01:将配置信息写到 ~/dirflume目录下的option3文件中:
# example.conf: A single-node Flume configuration # Name the components on this agent # 设置上组件的名称 a1.sources = r1 a1.sinks = k1 a1.channels = c1 # Describe/configure the source # 配置source源信息 a1.sources.r1.type = avro a1.sources.r1.bind = node01 a1.sources.r1.port = 10086 # Describe the sink # sink类型为log a1.sinks.k1.type = logger # Use a channel which buffers events in memory # 时间缓存在内存中 a1.channels.c1.type = memory # 容量为1000数据 a1.channels.c1.capacity = 1000 # 每次拿去100条数据 a1.channels.c1.transactionCapacity = 100 # Bind the source and sink to the channel a1.sources.r1.channels = c1 a1.sinks.k1.channel = c1 -
node02:将配置信息写到 ~/dirflume目录下的option2文件中:
# example.conf: A single-node Flume configuration

# Name the components on this agent
# 设置上组件的名称
a1.sources = r1
a1.sinks = k1
a1.channels = c1

# Describe/configure the source
# 配置source源信息
# 可以通过netcat方式给node02的44444端口发送信息
a1.sources.r1.type = netcat
a1.sources.r1.bind = node02
a1.sources.r1.port = 44444

# Describe the sink
a1.sinks.k1.type = avro
a1.sinks.k1.hostname = node01
a1.sinks.k1.port = 10086

# Use a channel which buffers events in memory
# 时间缓存在内存中
a1.channels.c1.type = memory
# 容量为1000数据
a1.channels.c1.capacity = 1000
# 每次拿去100条数据
a1.channels.c1.transactionCapacity = 100

# Bind the source and sink to the channel
a1.sources.r1.channels = c1
a1.sinks.k1.channel = c1
3. 启动
-
启动node01上的flume:
flume-ng agent --conf-file ~/dirflume/option3 --name a1 -Dflume.root.logger=INFO,console -
启动node02:
flume-ng agent --conf-file ~/dirflume/option2 --name a1 -Dflume.root.logger=INFO,console因为node02节点接收到内容后需要传递给node01节点, 所以需要先启动node01节点, 然后再启动node02节点; 否则会报错!!!
-
启动node03:
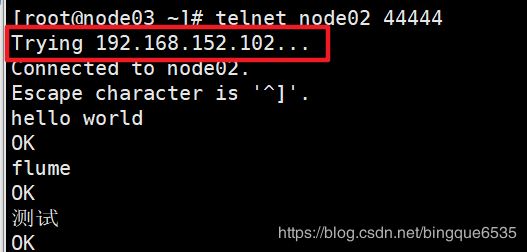
telnet node02 44444
2. 结果
四:监控文件中内容:
1. 配置文件
- 将配置信息写到node02 ~/dirflume目录下的option4文件中:
# example.conf: A single-node Flume configuration

# Name the components on this agent
# 设置上组件的名称
a1.sources = r1
a1.sinks = k1
a1.channels = c1

# Describe/configure the source
# 配置source源信息
a1.sources.r1.type = exec
# 监听的文件路径
a1.sources.r1.command = tail -F /root/log.txt

# Describe the sink
# sink类型为log
a1.sinks.k1.type = logger

# Use a channel which buffers events in memory
# 时间缓存在内存中
a1.channels.c1.type = memory
# 容量为1000数据
a1.channels.c1.capacity = 1000
# 每次拿去100条数据
a1.channels.c1.transactionCapacity = 100

# Bind the source and sink to the channel
a1.sources.r1.channels = c1
a1.sinks.k1.channel = c1
2. 启动
-
启动flume:
flume-ng agent --conf-file ~/dirflume/option4 --name a1 -Dflume.root.logger=INFO,console -
文件中追加内容
echo "hello world" >> log.txt
3. 运行
五. 监控文件目录
1. 配置文件
-
将配置信息写到node02 ~/dirflume目录下的option5文件中:
# example.conf: A single-node Flume configuration

# Name the components on this agent
# 设置上组件的名称
a1.sources = r1
a1.sinks = k1
a1.channels = c1

# Describe/configure the source
# 配置source源信息
a1.sources.r1.type = spooldir
# 监听的目录
a1.sources.r1.spoolDir = /root/log
a1.sources.r1.fileHeader = false

# Describe the sink
# sink类型为log
a1.sinks.k1.type = logger

# Use a channel which buffers events in memory
# 时间缓存在内存中
a1.channels.c1.type = memory
# 容量为1000数据
a1.channels.c1.capacity = 1000
# 每次拿去100条数据
a1.channels.c1.transactionCapacity = 100

# Bind the source and sink to the channel
a1.sources.r1.channels = c1
a1.sinks.k1.channel = c1
2. 启动
- 启动flume
flume-ng agent --conf-file ~/dirflume/option5 --name a1 -Dflume.root.logger=INFO,console - 复制文件到监听目录(
/root/log)
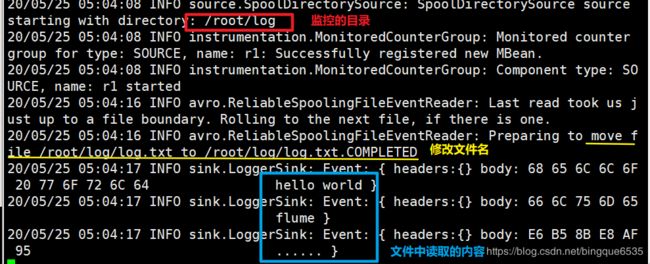
3.结果
六. 文件保存到hdfs
1. 配置文件
- 将配置信息写到node02 ~/dirflume目录下的option6文件中:
# example.conf: A single-node Flume configuration

# Name the components on this agent
# 设置上组件的名称
a1.sources = r1
a1.sinks = k1
a1.channels = c1

# Describe/configure the source
# 配置source源信息
a1.sources.r1.type = spooldir
a1.sources.r1.spoolDir = /root/log
a1.sources.r1.fileHeader = false

# Describe the sink
# sink类型为log
a1.sinks.k1.type = hdfs
a1.sources = r1
a1.sinks = k1
a1.channels = c1

# Describe/configure the source
# 配置source源信息
a1.sources.r1.type = spooldir
a1.sources.r1.spoolDir = /root/log
a1.sources.r1.fileHeader = false

# Describe the sink
# sink类型为log
a1.sinks.k1.type = hdfs
# 按指定格式生成目录
a1.sinks.k1.hdfs.path = /flume/events/%y-%m-%d/%H%M/%S
a1.sinks.k1.hdfs.filePrefix = events-
# 每5s生成一个目录
a1.sinks.k1.hdfs.round = true
a1.sinks.k1.hdfs.roundValue = 5
a1.sinks.k1.hdfs.roundUnit = second
a1.sinks.k1.hdfs.useLocalTimeStamp=true
# 如果60s还没执行完, 会报错
a1.sinks.k1.hdfs.callTimeout = 60000
# Use a channel which buffers events in memory
# 时间缓存在内存中
a1.channels.c1.type = memory
# 容量为1000数据
a1.channels.c1.capacity = 1000
# 每次拿去100条数据
a1.channels.c1.transactionCapacity = 100

# Bind the source and sink to the channel
a1.sources.r1.channels = c1
a1.sinks.k1.channel = c1
2. 启动
- 启动flume
flume-ng agent --conf-file ~/dirflume/option6 --name a1 -Dflume.root.logger=INFO,console - 复制文件到监听目录(
/root/log)
3. 结果
七. 直接将日志信息写入hdfs
1. 配置文件
# example.conf: A single-node Flume configuration

# Name the components on this agent
# 设置上组件的名称
a1.sources = r1
a1.sinks = k1
a1.channels = c1

# Describe/configure the source
# 配置source源信息
a1.sources.r1.type = exec
# 日志目录
a1.sources.r1.command = tail -F /root/data/access.log

# Describe the sink
# sink类型为log
a1.sinks.k1.type = hdfs
a1.sinks.k1.hdfs.path = /log/%Y%m%d
a1.sinks.k1.hdfs.filePrefix = events-

# 多少时间就新建一个文件? 0表示不生效
a1.sinks.k1.hdfs.rollInterval = 0
# 文件大小达到10M时新建一个文件
a1.sinks.k1.hdfs.rollSize = 10240
# 多少条数据时新建一个文件? 设置为0表示,该条件不生效
a1.sinks.k1.hdfs.rollCount = 0

# 如果连续多少秒没有写入, 就新建一个文件
a1.sinks.k1.hdfs.idleTimeout = 10

a1.sinks.k1.hdfs.useLocalTimeStamp=true
# 如果60s还没执行完, 会报错
a1.sinks.k1.hdfs.callTimeout = 60000
# 设置文件类型
a1.sinks.k1.hdfs.fileType = DataStream

# Use a channel which buffers events in memory
# 时间缓存在内存中
a1.channels.c1.type = memory
# 容量为1000数据
a1.channels.c1.capacity = 1000
# 每次拿去100条数据
a1.channels.c1.transactionCapacity = 100

# Bind the source and sink to the channel
a1.sources.r1.channels = c1
a1.sinks.k1.channel = c1


