基于XML的Spring
一、概述
Spring是一个轻量级开源框架
两大核心
- 控制反转(IoC)
- 面向切面编程(AOP)
1.1Spring的优势
- 方便解耦:提供IoC容器管理对象,避免程序过度耦合
- AOP编程支持:方便进行面向切面的编程
- 声明式事务的支持:从单调烦闷的事务代码中解脱,通过声明方式对事务进行管理,提高开发效率和质量
- 集成各种框架:Spring 整合各种框架,降低框架的使用难度
- 方便测试:简化测试的代码
- 源码学习:Spring 的源代码设计精妙,对 Java 设计模式灵活运用,是 Java 技术的最佳实践的范例
MVC架构图:
Spring可以用于表现层、业务层、持久层

1.2 耦合
1.2.1什么是耦合
程序的耦合:程序间的依赖关系
包括:
-
类之间的依赖 -
方法间的依赖
解耦:
-
降低程序间的依赖关系 -
编译期不依赖,运行时才依赖
解耦的思路:
-
第一步:使用反射来创建对象,而避免使用new关键字 -
第二步:通过读取配置文件来获取要创建的对象全限定类名
开发中力争做到高内聚低耦合
public static void main(String[] args) throws Exception {
        //1、加载驱动
        DriverManager.deregisterDriver(new com.mysql.cj.jdbc.Driver());
        //2、获取连接
        Connection connection =
                DriverManager.getConnection("jdbc:mysql://127.0.0.1:3306/spring?serverTimezone=UTC&useUnicode=true&characterEncoding=utf-8&useSSL=true"
                        , "root", "root123");
        //3、获取操作表对象
        String sql = "select `name` from `account`";
        PreparedStatement ps = connection.prepareStatement(sql);
        //4、执行SQL语句
        ResultSet rs = ps.executeQuery();
        //5、遍历结果集
        while (rs.next()){
           String name = (String) rs.getObject("name");
            System.out.println(name);
        }
        //6、关闭资源
        rs.close();
        ps.close();
        connection.close();
    }
上述代码:
依赖了数据库的具体驱动类(MySQL),如果这时候更换了数据库品牌(比如 Oracle),需要修改源码来重新数据库驱动。若是没有这个驱动类,编程时就会报错,所以耦合很强
1.2.2 程序解耦的思路
解决耦合:
Class.forName("com.mysql.cj.jdbc.Driver");
使用反射来加载驱动。此时,需要的只是一个字符串,不再依赖一个具体的驱动类,就算删除 mysql 的驱动 jar 包,依然可以编译
1.2.3 工厂模式解耦
Class.forName(“com.mysql.cj.jdbc.Driver”)中驱动的全限定类名在程序中写死的,一旦要改还是要修改源码,引出工厂模式解决,通过读取配置文件路径读取驱动名,然后反射加载驱动
工厂模式:
在实际开发中,可以把三层的对象都使用配置文件配置起来,当程序运行时,让一个工具类通过读取配置文件,把这些对象创建出来并存起来。在接下来的使用的时候,直接拿过来用就好了。
那么,这个读取配置文件,创建和获取三层对象的工具类就是工厂
properties文件
accountService=com.json.service.AccountService
accountDao=com.json.dao.AccountDao
工厂模式创建对象
/*
 *	 一、需要一个配置文件来配置我们的service和dao
 *           配置的内容:唯一标识=全限定类名(key=value)
 *   二、通过读取配置文件中配置的内容,反射创建对象
 *
 *   配置文件可以是xml也可以是properties
*/

public class BeanFactories {

    private static Properties properties ;
   // 定义一个Map,用于存放我们要创建的对象。我们把它称之为容器
    private static Map<String,Object> beans ;

    static {
        try {
        	properties = new Properties() ;
        	beans = new HashMap<String, Object>();
       		InputStream in = BeanFactories.class.getClassLoader().getResourceAsStream("bean.properties");
        	//加载properties配置文件
            properties.load(in);
            //取出配置文件中所有的Key
            Enumeration<Object> keys = properties.keys();
            while(keys.hasMoreElements()){
                //取出每个Key
                String beanName = (String) keys.nextElement();
                //根据key获取value
                String beanPath = properties.getProperty(beanName);
                //反射创建对象
                Object bean = Class.forName(beanPath).newInstance();
                //把key和value存入容器中
                beans.put(beanName, bean);
            }
        } catch (Exception e) {
            throw new ExceptionInInitializerError("创建工厂失败");
        }
    }

    //根据bean的名称获取对象
    public static Object getBean(String beanName){
        return beans.get(beanName);
    }
}
模拟表现层
public class AccountController {

    /**
     * 模拟保存账号的表现层
     * @param args
     */
    public static void main(String[] args) {
        AccountService accountService = (AccountService) BeanFactories.getBean("accountService");
        accountService.save();
    }
}
模拟业务层
public class AccountService {

    private AccountDao accountDao = (AccountDao) BeanFactories.getBean("accountDao");

    public void save(){
        accountDao.saveAccount();
    }
}
模拟持久层
public class AccountDao {

    public void saveAccount(){
        System.out.println("模拟保存账号");
    }
}
如此,service、dao获取对象则不再依赖一个具体的类,而是通过唯一标识的字符串,通过反射创建对象
二、控制反转
由于需要存储很多对象,需要利用集合Map和List,选择Map或List在于是否有查找需求,有查找需求,选Map
在程序运行时,创建一个Map存放对象,称之为容器
获取对象的方式:
- 常规:获取对象时,都是采用new的方式,是主动的
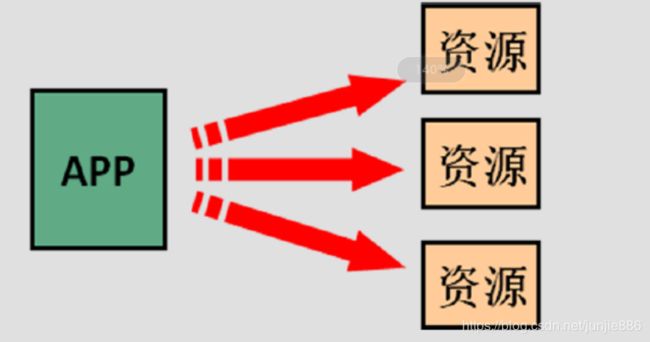
- 控制反转:利用工厂从容器中获取指定的对象,这时获取对象的方式发生了改变,是被动的
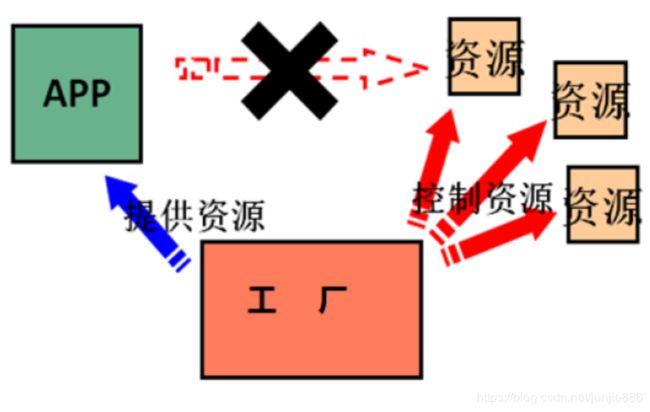
这种被动的获取对象的思想就是控制反转
控制反转(Inversion of Control):
- 依赖注入(Dependency Injection)
- 依赖查找(Dependency Lookup)
IoC的作用:削减程序中的耦合(解除代码中的依赖关系)
三、IOC容器
基于XML的配置步骤开发
-
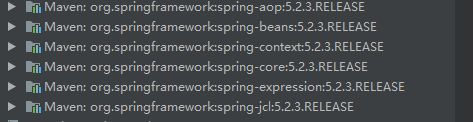
导入Spring的核心jar
-
创建XML文件(application.xml)放在类路径下
<beans xmlns="http://www.springframework.org/schema/beans" xmlns:xsi="http://www.w3.org/2001/XMLSchema-instance" xsi:schemaLocation="http://www.springframework.org/schema/beans http://www.springframework.org/schema/beans/spring-beans.xsd"> <bean id="accountDao" class="com.json.dao.AccountDao">bean> <bean id="accountService" class="com.json.service.AccountService">bean> beans> -
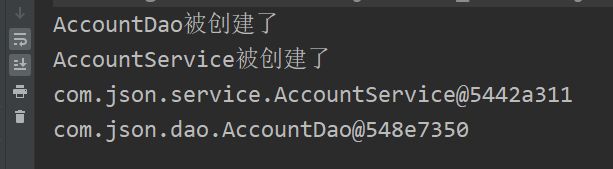
测试是否配置成功
public static void main(String[] args) { //ApplicationContext对象为上下文对象(可以认为该对象为IOC容器),用于连接xml配置文件与java代码 ApplicationContext context = new ClassPathXmlApplicationContext("application.xml"); //根据id获取Bean对象(方式一) AccountService accountService = (AccountService) context.getBean("accountService") ; //根据id获取Bean对象(方式二) AccountDao accountDao = context.getBean("accountDao",AccountDao.class); } -
运行结果
 g)]
g)]
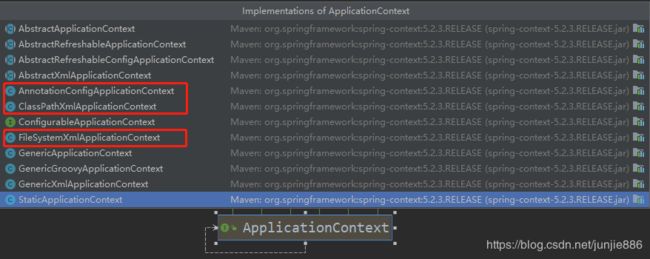
3.1 ApplicationContext对象
一般称BeanFactory为IoC容器,而称ApplicationContext为应用上下文 ,ApplicationContext是连接xml配置文件与程序的对象
可以解析xml配置文件,获取IOC容器中的对象供程序使用
ApplicationContext的三个常用实现类:
- ClassPathXmlApplicationContext
- 加载类路径下的配置文件,要求配置文件必须在类路径下(推荐使用)
- FileSystemXmlApplicationContext
- 加载磁盘任意路径下的配置文件(必须有访问权限)
- AnnotationConfigApplicationContext:
- 用于读取注解(配置类)创建容器
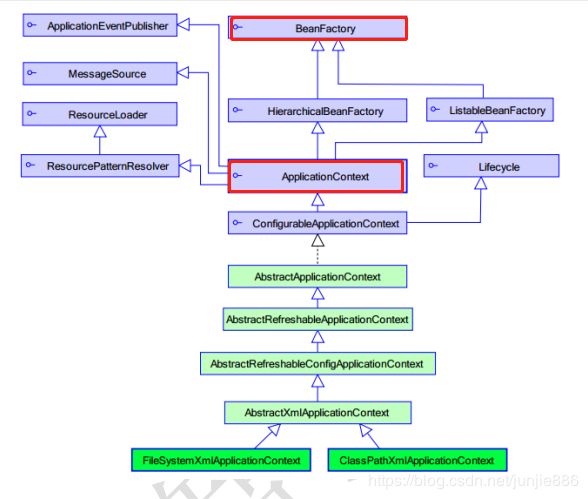
3.2 BeanFactory对象
- BeanFactory和ApplicationContext是Spring的两大核心接口,而其中ApplicationContext是BeanFactory的子接口,它们都可以当做Spring的容器,Spring容器是生成Bean实例的工厂,并管理容器中的Bean
- 一般称BeanFactory为IOC容器,而称ApplicationContext为应用上下文
- BeanFactory是Spring最底层的接口,提供了最简单的容器的功能,只提供了实例化对象和获取对象的功能
BeanFactory与ApplicationContext的区别
| BeanFactory | ApplicationContext | |
|---|---|---|
| 功能 | 实例化对象、获取对象 | 国际化、访问资源,如URL和文件、消息发送、响应机制、AOP(拦截器)、实例化对象、获取对象 |
| 创建对象方 式 | 延迟加载(获取对象时才创建) | 立即加载(读取完配置文件马上就创建) |
| 单例/多例 | 多例对象 | 单例对象 |
	public static void main(String[] args) {
       //加载配置文件时,立即创建所有的Bean对象实例 ,且每个Bean对象默认是单例
       ApplicationContext context = new ClassPathXmlApplicationContext("application.xml");
       AccountService accountService = (AccountService) context.getBean("accountService") ;


        Resource resource = new ClassPathResource("application.xml");
        BeanFactory beanFactory = new XmlBeanFactory(resource);
        //只要获取Bean时,才创建对应的Bean,且为多例
        AccountDao accountDao = beanFactory.getBean("accountDao",AccountDao.class);
    }
3.3 Bean
作用:用于配置对象让 Spring 来创建的。默认情况下调用无参构造函数。如果没有无参构造函数则不能创建成功
3.3.1 bean标签
属性:
- id:给对象在容器中提供一个唯一标识,用于获取对象
- class:类的全限定类名,用于反射创建对象。默认情况下调用无参构造函数
- scope:对象的生命周期
- singleton:默认值,单例(容器创建就创建Bean)
- prototype:原型,多例(具体获取时才创建Bean)
- request:Spring 创建一个 Bean 的对象,将对象存入到 request 域中
- session:创建一个 Bean 的对象,将对象存入到 session 域中
- global-session:创建一个 Bean 的对象,存放于Context域中
- init-method:指定类中的初始化时执行的方法
- destroy-method:指定类中的销毁时执行方法(销毁容器时才执行)
- lazy-init:懒加载(具体获取时才创建Bean)
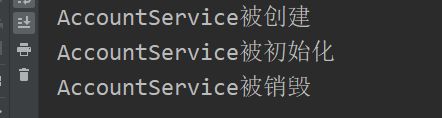
创建、初始化、销毁
public class AccountService {

   public AccountService(){
       System.out.println("AccountService被创建");
   }

   public void init(){
       System.out.println("AccountService被初始化");
   }
   public void destroy(){
       System.out.println("AccountService被销毁");
   }

}
   public static void main(String[] args) {
       ClassPathXmlApplicationContext context = new ClassPathXmlApplicationContext("application.xml");
       AccountService accountService = (AccountService) context.getBean("accountService") ;
       //销毁容器
   	context.close();
   }
先创建,再初始化,最后销毁
- 关闭容器则无法再获取Bean(context.close() )
![[外链图片转存失败,源站可能有防盗链机制,建议将图片保存下来直接上传(img-FEB7MEuv-1589725573548)(C:\Users\333\AppData\Roaming\Typora\typora-user-images\1585029140648.png)]](http://img.e-com-net.com/image/info8/764de6837a2d4878bb79191fa9afeffd.jpg)
- 刷新容器可重新获取Bean(context.refresh() )
   public static void main(String[] args) {
        ClassPathXmlApplicationContext context = new ClassPathXmlApplicationContext("application.xml");
        AccountService accountService = (AccountService) context.getBean("accountService") ;

       //关闭容器
        context.close();
       //刷新容器
    	context.refresh();

        AccountDao accountDao = context.getBean("accountDao",AccountDao.class);

        System.out.println(accountDao);
    }
3.3.2 bean的作用范围和生命周期
- 单例对象:scope=“singleton”
- 程序只有一个对象的实例,作用范围就是整个程序
- 生命周期:
- 对象创建:创建容器时,对象就被创建了
- 对象存在:只要容器在,对象一直存在
- 对象销毁:销毁容器时,对象就被销毁
- 多例对象:scope=“prototype”
- 每次访问对象时,都会重新创建对象实例
- 生命周期:
- 对象创建:当使用对象时,才创建新的对象实例
- 对象存在:只要对象在使用中,就存在(销毁容器依然存在)
- 对象销毁:当对象长时间不用时,被 java 的垃圾回收器回收
		ClassPathXmlApplicationContext context = new ClassPathXmlApplicationContext("application.xml");
        AccountService accountService = (AccountService) context.getBean("accountService") ;
        System.out.println(accountService);
        //singleton模式关闭容器
		context.close();

		//实例依然存在,因为有accountService的对象的引用,但无法再从容器中getBean
        accountService.save();
3.3.3 创建Bean的方式
创建Bean有三种方式:
-
使用默认构造函数创建
<beans xmlns="http://www.springframework.org/schema/beans" xmlns:xsi="http://www.w3.org/2001/XMLSchema-instance" xsi:schemaLocation="http://www.springframework.org/schema/beans http://www.springframework.org/schema/beans/spring-beans.xsd"> <bean id="accountService" class="com.json.service.AccountService" >bean> beans> -
使用某个类中的方法创建对象
public class BeanFactory { public AccountService getAccountService(){ return new AccountService() ; } }<beans xmlns="http://www.springframework.org/schema/beans" xmlns:xsi="http://www.w3.org/2001/XMLSchema-instance" xsi:schemaLocation="http://www.springframework.org/schema/beans http://www.springframework.org/schema/beans/spring-beans.xsd"> <bean id="factory" class="com.json.factory.BeanFactory" >bean> <bean id="accountService" factory-bean="factory" factory-method="getAccountService">bean> beans> -
使用某个类中的静态方法创建对象
public class BeanFactory { public static AccountService getAccountService(){ return new AccountService() ; } }<beans xmlns="http://www.springframework.org/schema/beans" xmlns:xsi="http://www.w3.org/2001/XMLSchema-instance" xsi:schemaLocation="http://www.springframework.org/schema/beans http://www.springframework.org/schema/beans/spring-beans.xsd"> <bean id="accountService" class="com.json.factory.BeanFactory" factory-method="getAccountService" >bean> beans>由于可能需要创建第三方jar中的对象,可能无法通过直接使用默认构造函数创建对象(无法修改源代码),但jar中某一个类提供了方法来创建对象,这时就可以使用第二、三种方式创建Bean
3.4 依赖注入
依赖注入(Dependency Injection):是Spring框架核心IOC的具体实现
开发中通过控制反转,把对象的创建交给了Spring,但是中不可能出现没有依赖的情况,IOC 解耦只是降低依赖关系,不会消除
例如:Service层依然会调用Dao层的方法,那么Service层与Dao层依然存在依赖的关系,在使用 Spring 之后,就让 Spring 来维护了
简单的说:Service层依赖Dao层,不需要手动的去new,而是让Spring注入,称为依赖注入(DI)
3.4.1 依赖注入的数据类型
- 基本类型和String
- 其他bean类型(在配置文件中或者注解配置过的bean)
- 复杂类型/集合类型
3.4.2 依赖注入的方式
-
构造函数注入
- 提供一个对应参数列表的构造函数
- constructor-arg标签的属性
- index:指定参数在构造函数参数列表的索引位置(下标从0开始)
- type:指定参数在构造函数中的数据类型
- name:指定参数在构造函数中的引用名(常用)
- value:赋值是基本数据类型和 String 类型
- ref:赋值是其他 bean 类型,必须得是在配置文件中配置过的 bean
- 注入数据是必须的操作,否则对象无法创建
- 创建对象时,如果用不到这些数据,也必须提供
public class Student { private Integer number ; private String name ; private Date birthday ; public Student(Integer number , String name , Date birthday){ this.number = number ; this.name = name ; this.birthday = birthday ; } }<beans xmlns="http://www.springframework.org/schema/beans" xmlns:xsi="http://www.w3.org/2001/XMLSchema-instance" xsi:schemaLocation="http://www.springframework.org/schema/beans http://www.springframework.org/schema/beans/spring-beans.xsd"> <bean id="student" class="com.json.pojo.Student"> <constructor-arg type="java.lang.Integer" value="001" >constructor-arg> <constructor-arg name="name" value="json">constructor-arg> <constructor-arg index="2" ref="date">constructor-arg> bean> <bean id="date" class="java.util.Date">bean > beans> -
set方法注入(常用)
- 该类必须为注入的成员变量提供set方法
- property标签的属性
- name:用于指定注入时所调用的set方法名称
- value:用于提供基本类型和String类型的数据
- ref:赋值是其他 bean 类型,必须得是在配置文件中配置过的 bean
- 创建对象时没有明确的限制,可以选择注入
- 可以直接使用默认构造函数
public class Student { private Integer number ; private String name ; private Date birthday ; public void setNumber(Integer number) { this.number = number; } public void setName(String name) { this.name = name; } public void setBirthday(Date birthday) { this.birthday = birthday; } }<beans xmlns="http://www.springframework.org/schema/beans" xmlns:xsi="http://www.w3.org/2001/XMLSchema-instance" xsi:schemaLocation="http://www.springframework.org/schema/beans http://www.springframework.org/schema/beans/spring-beans.xsd"> <bean id="student" class="com.json.pojo.Student"> <property name="number" value="001">property> <property name="name" value="json">property> <property name="birthday" ref="date">property> bean> <bean id="date" class="java.util.Date">bean > beans> -
p名称注入(本质还是调用set方法)
-
需要导入p命名空间(xmlns:p=“http://www.springframework.org/schema/p”)
![[外链图片转存失败,源站可能有防盗链机制,建议将图片保存下来直接上传(img-HfHdq22i-1589725573550)(C:\Users\333\AppData\Roaming\Typora\typora-user-images\1585041437062.png)]](http://img.e-com-net.com/image/info8/c67fa8af2578490f816e463078710750.jpg)
-
该类必须为注入的成员变量提供set方法
-
p:propertyName:注入基本类型和String
-
p:propertyName-ref:注入其他 bean 类型,必须得是在配置文件中配置过的 bean
public class Student { private Integer number ; private String name ; private Date birthday ; public void setNumber(Integer number) { this.number = number; } public void setName(String name) { this.name = name; } public void setBirthday(Date birthday) { this.birthday = birthday; } }<beans xmlns="http://www.springframework.org/schema/beans" xmlns:xsi="http://www.w3.org/2001/XMLSchema-instance" xmlns:p="http://www.springframework.org/schema/p" xsi:schemaLocation="http://www.springframework.org/schema/beans http://www.springframework.org/schema/beans/spring-beans.xsd"> <bean id="student" class="com.json.pojo.Student" p:number="001" p:name="json" p:birthday-ref="date">bean> <bean id="date" class="java.util.Date">bean > beans> -
-
注解注入
3.4.3 注入集合类型
集合的类型的注入也是set方法注入的方式,只不过变量的数据类型都是集合
-
数组
-
List
-
Set
-
Map
-
Properties
-
单列集合(数组、List、Set)类型注入
- array标签
- set标签
- list标签
-
映射集合(Map、Properties)类型注入
- map标签
- props标签
结构相同,标签可以互换
给对象注入集合类型数据
public class Student {

    private Object[] arr ;
    private List list ;
    private Set set ;
    private Map<String,Object> map ;
    private Properties props ;

    //需要提供set方法
}
数组(使用array、list、set标签均可)
<beans xmlns="http://www.springframework.org/schema/beans"
       xmlns:xsi="http://www.w3.org/2001/XMLSchema-instance"
       xsi:schemaLocation="http://www.springframework.org/schema/beans http://www.springframework.org/schema/beans/spring-beans.xsd">

    <bean id="student" class="com.json.pojo.Student">
        <property name="arr">
            <array >
                <value >jsonvalue>
                <value >jackvalue>


                <<ref bean="date">ref>
            array>
        property>
    bean>


	<bean id="date" class="java.util.Date">bean>

beans>
List集合(使用array、list、set标签均可)
<beans xmlns="http://www.springframework.org/schema/beans"
       xmlns:xsi="http://www.w3.org/2001/XMLSchema-instance"
       xsi:schemaLocation="http://www.springframework.org/schema/beans http://www.springframework.org/schema/beans/spring-beans.xsd">

    <bean id="student" class="com.json.pojo.Student">
        <property name="list">
            <list >
                <value>jsonvalue>
                <value>jackvalue>


                <<ref bean="date">ref>
            list>
        property>
    bean>


	<bean id="date" class="java.util.Date">bean>

beans>
Set集合(使用array、list、set标签均可)
<beans xmlns="http://www.springframework.org/schema/beans"
       xmlns:xsi="http://www.w3.org/2001/XMLSchema-instance"
       xsi:schemaLocation="http://www.springframework.org/schema/beans http://www.springframework.org/schema/beans/spring-beans.xsd">

    <bean id="student" class="com.json.pojo.Student">
        <property name="set">
            <set>
                <value>jsonvalue>
                <value>jerryvalue>


                <<ref bean="date">ref>
            set>
        property>
    bean>


	<bean id="date" class="java.util.Date">bean>

beans>
Map集合使用(map、propst标签均可)
<beans xmlns="http://www.springframework.org/schema/beans"
       xmlns:xsi="http://www.w3.org/2001/XMLSchema-instance"
       xsi:schemaLocation="http://www.springframework.org/schema/beans http://www.springframework.org/schema/beans/spring-beans.xsd">

    <bean id="student" class="com.json.pojo.Student">
        <property name="map">
            <map>
                <entry key="json" value="json">entry>
                <entry key="jack" value="jack">entry>


                <entry key-ref="key" value-ref="now">entry>
            map>
        property>
    bean>


    <bean id="now" class="java.util.Date">bean>


    <bean id="key" class="java.lang.String">
        <constructor-arg name="original" value="date">constructor-arg>
    bean>
beans>
Properties集合(map、propst标签均可)
<beans xmlns="http://www.springframework.org/schema/beans"
       xmlns:xsi="http://www.w3.org/2001/XMLSchema-instance"
       xsi:schemaLocation="http://www.springframework.org/schema/beans http://www.springframework.org/schema/beans/spring-beans.xsd">

    <bean id="student" class="com.json.pojo.Student">
        <property name="props" >
            <props>
                <prop key="json">jsonprop>
                <prop key="jack">jackprop>
                <prop key="jerry">jerryprop>
            props>
        property>
    bean>

beans>
在注入集合数据时,只要结构相同,标签可以互换
注意:一旦**< property >标签中定义了< array>、< list>、< set>、< map>、**
< props>,则Spring给对应的成员变量注入了对象实例,只是集合中没有元素
<beans xmlns="http://www.springframework.org/schema/beans"
       xmlns:xsi="http://www.w3.org/2001/XMLSchema-instance"
       xsi:schemaLocation="http://www.springframework.org/schema/beans http://www.springframework.org/schema/beans/spring-beans.xsd">

    <bean id="student" class="com.json.pojo.Student">

        <property name="arr">
            <array>array>
        property>

        <property name="list">
            <array >array>
        property>

        <property name="set">
            <set>set>
        property>

        <property name="map">
            <map>map>
        property>

        <property name="props" >
            <props>props>
        property>

    bean>

beans>
结果为:
![[外链图片转存失败,源站可能有防盗链机制,建议将图片保存下来直接上传(img-XixkF109-1589725573551)(C:\Users\333\AppData\Roaming\Typora\typora-user-images\1585044843321.png)]](http://img.e-com-net.com/image/info8/52351799dbf64cf6abff2eaa973c967d.png)
<beans xmlns="http://www.springframework.org/schema/beans"
       xmlns:xsi="http://www.w3.org/2001/XMLSchema-instance"
       xsi:schemaLocation="http://www.springframework.org/schema/beans http://www.springframework.org/schema/beans/spring-beans.xsd">

    <bean id="student" class="com.json.pojo.Student">bean>

beans>
结果为:
![[外链图片转存失败,源站可能有防盗链机制,建议将图片保存下来直接上传(img-t8gE9Ade-1589725573552)(C:\Users\333\AppData\Roaming\Typora\typora-user-images\1585044943053.png)]](http://img.e-com-net.com/image/info8/8e4cbf813ce14869a76ba770ceca7606.png)
四、AOP面向切面编程
4.1 AOP概述
4.1.1 什么是AOP
AOP(Aspect Oriented Programming):面向切面编程,通过动态代理实现程序功能的统一维护的一种技术。利用AOP可以对业务逻辑的各个部分进行隔离,从而使得业务逻辑各部分之间的耦合度降低,提高程序的可重用性,同时提高了开发的效率。
简单的说,把程序中重复的代码抽取出来,在需要执行的时候,使用动态代理技术,在不修改源码基础上,对现有方法进行增强
4.1.2 AOP优势
- 减少重复代码
- 提高开发效率
- 维护方便
4.1.3 AOP实现方式
使用动态代理技术
4.2 动态代理技术
4.3 Spring中的AOP
基于XML配置文件的AOP面向切面编程
4.3.1 AOP相关术语
4.3.2 AOP代理过程
- 开发阶段
- 编写核心业务代码:大部分程序员完成,要求熟悉业务需求
- 抽取公用代码,制作通知(开发阶段最后完成):AOP编程人员完成
- 在配置文件中,声明切入点与通知间的关系,即切面:AOP编程人员完成
- 运行阶段(Spring框架完成)
- Spring框架监控切入点方法的执行
- 一旦监控到切入点方法被运行,使用动态代理机制
- 动态创建目标对象的代理对象
- 根据通知类别,在代理对象的对应位置,将通知对应的功能切入,完成完整的代码逻辑运行
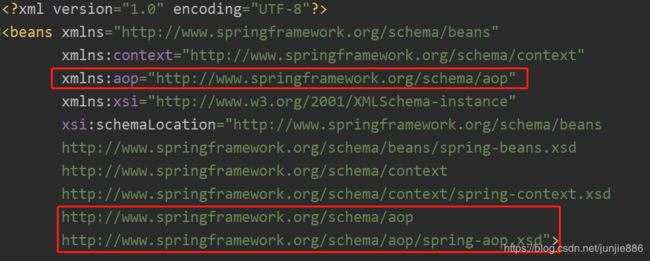
4.3.3 基于XML的AOP配置
-
导入相关的jar(spring-aspects.jar)
-
引入aop的命名空间
- xmlns:aop=“http://www.springframework.org/schema/aop”
- http://www.springframework.org/schema/aop
- http://www.springframework.org/schema/aop/spring-aop.xsd
-
配置Spring的IOC容器
<beans xmlns="http://www.springframework.org/schema/beans" xmlns:context="http://www.springframework.org/schema/context" xmlns:aop="http://www.springframework.org/schema/aop" xmlns:xsi="http://www.w3.org/2001/XMLSchema-instance" xsi:schemaLocation="http://www.springframework.org/schema/beans http://www.springframework.org/schema/beans/spring-beans.xsd http://www.springframework.org/schema/context http://www.springframework.org/schema/context/spring-context.xsd http://www.springframework.org/schema/aop http://www.springframework.org/schema/aop/spring-aop.xsd"> <bean id="accountService" class="com.json.service.impl.AccountServiceImpl"> <property name="accountDao" ref="accountDao">property> bean> <bean id="accountDao" class="com.json.dao.impl.AccountDaoImpl">bean> beans> -
抽取公共代码制作通知
(模拟数据库事务)
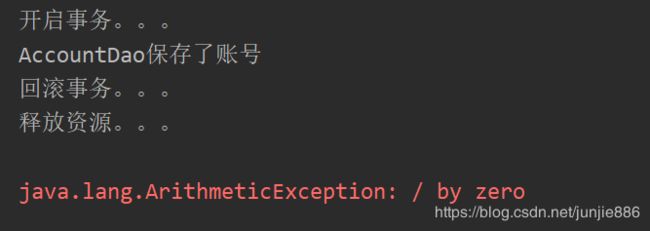
//模拟数据库事务 public class Transactional { public void start(){ System.out.println("开启事务。。。"); } public void execute(){ System.out.println("执行事务。。。"); } public void rollback(){ System.out.println("回滚事务。。。"); } public void commit(){ System.out.println("提交事务。。。"); } public void end(){ System.out.println("释放资源。。。"); } } -
配置AOP
-
将通知类放入Spring的容器中
<bean id="transaction" class="com.json.transactional.Transactional"> bean> -
配置aop
<beans xmlns="http://www.springframework.org/schema/beans" xmlns:aop="http://www.springframework.org/schema/aop" xmlns:xsi="http://www.w3.org/2001/XMLSchema-instance" xsi:schemaLocation="http://www.springframework.org/schema/beans http://www.springframework.org/schema/beans/spring-beans.xsd http://www.springframework.org/schema/aop http://www.springframework.org/schema/aop/spring-aop.xsd"> <bean id="accountService" class="com.json.service.impl.AccountServiceImpl"> <property name="accountDao" ref="accountDao">property> bean> <bean id="accountDao" class="com.json.dao.impl.AccountDaoImpl">bean> <bean id="transaction" class="com.json.transactional.Transactional">bean> <aop:config > <aop:pointcut id="before" expression="execution(public * com.json.service.impl.*.*(..))"/> <aop:aspect ref="transaction"> <aop:before method="start" pointcut-ref="before">aop:before> <aop:after-returning method="commit" pointcut-ref="before" >aop:after-returning> <aop:after-throwing method="rollback" pointcut-ref="before">aop:after-throwing> <aop:after method="end" pointcut-ref="before">aop:after> aop:aspect> aop:config> beans> -
运行程序
@RunWith(SpringJUnit4ClassRunner.class) @ContextConfiguration(locations = "classpath:application.xml") public class SpringTest { @Resource(name = "accountService") private AccountService accountService ; @Test public void testSave(){ accountService.saveAccount(); } } //service层 public class AccountServiceImpl implements AccountService { private AccountDao accountDao ; public void saveAccount() { accountDao.saveAccount(); } public void setAccountDao(AccountDao accountDao) { this.accountDao = accountDao; } } //dao层 public class AccountDaoImpl implements AccountDao { public void saveAccount() { System.out.println("AccountDao保存了账号"); } } -
执行结果
-
正常结果:

-
运行异常结果:
-
-
4.3.4 AOP配置的标签
- < aop:config >
- 作用:声明aop的配置的开始
- < aop:pointcut >
- 作用:用于配置切入点表达式,指定需要增强的方法
- 属性:
- id:于给切入点表达式提供一个唯一标识
- expression:用于定义切入点表达式(定义需要增强的方法)
- < aop:aspect >
- 作用: 用于配置切面
- 属性:
- id:给切面提供一个唯一标识
- ref:引用配置好的通知类 bean 的 id
- < aop:before >
- 作用:用于配置前置通知
- 属性:
- method:用于指定通知类中的增强方法名称
- ponitcut-ref:用于指定切入点的表达式的引用 (切入点id)
- poinitcut:用于指定切入点表达式
- 执行时间:切入点方法执行之前执行
- < aop:after-returning >
- 作用:用于配置后置通知
- 属性:
- method:用于指定通知类中的增强方法名称
- ponitcut-ref:用于指定切入点的表达式的引用 (切入点id)
- poinitcut:用于指定切入点表达式
- returning:后置通知方法执行完返回值
- 执行时间:切入点方法执行之后执行
- < aop:after-throwing >
- 作用:用于配置异常通知
- 属性:
- method:用于指定通知类中的增强方法名称
- ponitcut-ref:用于指定切入点的表达式的引用 (切入点id)
- poinitcut:用于指定切入点表达式
- throwing:异常通知抛出的异常
- 执行时间:切入点方法执行产生异常后执行。它和后置通知只能执行一个
- < aop:after >
- 作用:用于配置异常通知
- 属性:
- method:用于指定通知类中的增强方法名称
- ponitcut-ref:用于指定切入点的表达式的引用 (切入点id)
- poinitcut:用于指定切入点表达式
- 执行时间:无论切入点方法执行时是否有异常,它都会在其后面执行
注意:异常通知与后置通知只能执行一个
- 切入点方法正常执行则执行后置通知
- 切入点方法出现异常未捕获则执行异常通知
4.3.5 切入点表达式说明
expression=“execution(表达式)”
-
表达式语法:
访问修饰符 返回值 包名.包名.包名…类名.方法名(参数列表)
-
标准的表达式写法 :
public void com.json.service.impl.AccountServiceImpl.saveAccout()
-
访问修饰符省略:
void com.json.service.impl.AccountServiceImpl.saveAccount()
-
返回值使用通配符,表示任意返回值
***** com.json.service.impl.AccountServiceImpl.saveAccount()
-
包名可以使用通配符,表示任意包。但是有几级包,就需要写几个*
***** . * . . . AccountServiceImpl.saveAccount()*
-
包名可以使用 . . 表示当前包及其子包(表示任何包,AccountServiceImpl类,saveAccount方法,空参)
***** *** . . AccountServiceImpl.saveAccount()**
-
类名与方法名可以使用 * 来实现通配(表示任何包,任何类,任何方法,空参)
***** *** . . * . * ()**
-
参数列表:
- 可以直接写数据类型
- 基本类型直接写名称:int、double……
- 引用类型写权限定类名:java.lang.String
- 可以使用通配符表示任意类型(必须写参数名)
- 可以使用 . . 表示有无参数均可,有参数可以是任意类型
- 可以直接写数据类型
-
全通配写法(表示任何包,任何类,任何方法,任何参数列表)
***** *** . . * .* ( . . )**
实际开发中切入点表达式的通常写法:
业务层实现类下的所有类,所有方法,任何参数列表
***** com . json . service . impl . * . * ( . . )
4.3.6 环绕通知
环绕通知集成前置通知、后置通知、异常通知、最终通知,控制切入点方法是否执行,或切面通知的方式
配置标签
- < aop:around >
- 作用:用于配置环绕通知
- 属性:
- method:指定通知中方法的名称
- pointcut:定义切入点表达式
- pointcut-ref:指定切入点表达式的引用(id)
- 说明:可以在代码中手动控制增强代码执行的方式、执行的时间,也可以控制被代理对象是否执行方法
环绕通知
public class Transactional {

    public void start(){System.out.println("开启事务。。。");}

    public void rollback(){System.out.println("回滚事务。。。");}

    public void commit(){System.out.println("提交事务。。。");}

    public void release(){System.out.println("释放资源。。。");}

    //环绕通知
    public Object around(ProceedingJoinPoint pj){
        Object returnValue =  null ;
        try {
            //前置通知
            start();

            //切入点执行的方法
            returnValue = pj.proceed();

            //后置通知
            commit();
        } catch (Throwable throwable) {
            //异常通知
            rollback();
            throw new RuntimeException(throwable);
        }finally {
            //最终通知
            release();
        }
        return returnValue ;
    }
}
<aop:config >
        <aop:aspect ref="transaction">

            <aop:around method="around" pointcut="execution(* com.json.service.impl.*.*(..))">aop:around>
        aop:aspect>
    aop:config>
执行结果:

- 环绕通知的切面方法的参数必须定义ProceedingJoinPoint接口,来控制被代理对象的执行
- 环绕通知方法返回值为Object类型
- 该接口中的**proceed()**方法相当于调用切入点方法
- 若不执行该方法,则切入点的方法则不执行
- 使用try…catch…finally控制语句
- 在**proceed()**方法前的语句则为前置通知
- 在**proceed()**方法后的语句则为后置通知
- 在catch中代码块语句则为异常通知
- 在finally中代码块语句则为最终通知
注意:环绕通知方法的返回值为Object类型,可以接收切入点方法的任何类型的返回值(包括void),也可以随意改变切入点方法返回值(慎用)
切入点方法
	public List queryAccount() {
        return accountDao.queryAccount();
    }
环绕通知切面方法
    public Object around(ProceedingJoinPoint pj){
        Object returnValue =  null ;
        try {
            //前置通知
            start();

            //切入点执行的方法,获取切入点方法的返回值returnValue
            returnValue = pj.proceed();

            //任意修改值
            List list = (List) returnValue;
            list.add("String");
            returnValue = list ;

            //后置通知
            commit();
        } catch (Throwable throwable) {
            //异常通知
            rollback();
            throw new RuntimeException(throwable);
        }finally {
            //最终通知
            release();
        }
        return returnValue ;
    }
}
五、基于XML的声明式事务的控制(重点)
环境搭建
-
导入相关的jar(spring-aspects.jar、spring-tx.jar)
-
导入命名空间
-
编写实体类与数据表
-
编写持久层
-
编写业务层
-
XML文件配置bean
-
配置事务管理器bean
-
配置
链接:https://blog.csdn.net/junjie886/article/details/106182820