ELK集群服务搭建
ELK集群服务搭建
搭建ELK平台分析web服务器集群的日志信息
拓扑图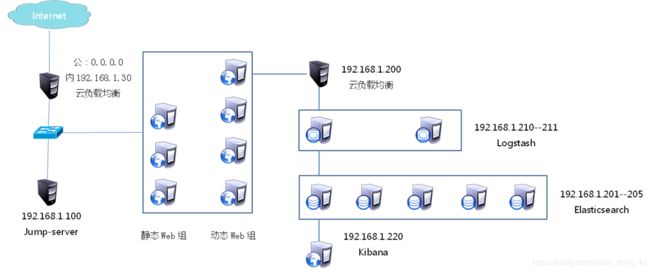
elasticsearch 集群部署
修改本地/etc/hosts 并同步到其他elasticsearch主机
vim /etc/hosts
192.168.1.100   ecs-jump-server
192.168.1.201   es-0001
192.168.1.202   es-0002
192.168.1.203   es-0003
192.168.1.204   es-0004
192.168.1.205   es-0005
192.168.1.220   kibana


192.168.1.210   logstash-0001
192.168.1.211   logstash-0002


192.168.1.51    ecs-web-0001
192.168.1.52    ecs-web-0002
192.168.1.53    ecs-web-0003
192.168.1.54    ecs-web-0004
192.168.1.55    ecs-web-0005
192.168.1.56    ecs-web-0006
192.168.1.57    ecs-web-0007
192.168.1.58    ecs-web-0008

for i in  ecs-jump-server  es-000{1..5} kibana  logstash-000{1..2}  ecs-web-000{1..8}
do
    scp   /etc/hosts   ${i}:/etc/
done
创建独立工作文件
mkdir -p ~/ansible/elk
cd ~/ansible/elk
创建 ansible.cfg 文件
vim ansible.cfg
[defaults]
inventory      = hosts
host_key_checking = False
创建 hosts 文件
vim hosts
[es]
es-0001
es-0002
es-0003
es-0004
es-0005

[kibana]
kibana

[logstash]
logstash-0001
logstash-0002

[web]
ecs-web-0001
ecs-web-0002
ecs-web-0003
ecs-web-0004
ecs-web-0005
ecs-web-0006
ecs-web-0007
ecs-web-0008

#[all:vars]
#ansible_ssh_private_key_file='/root/.ssh/key'
检测ansible文件 和 hosts 是否正常
ansible all --list-hosts
输出如下
  hosts (5):
    192.168.1.201
    192.168.1.202
    192.168.1.203
    192.168.1.204
    192.168.1.205
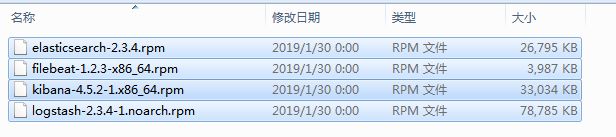
上传 ELK的软件包到 jumpserver的 yum仓库中,并更新
cd /var/ftp/localrepo/
createrepo --update .
上传elasticsearch插件到jumpserver的 ftp下的/plugin文件夹中

准备elasticsearch的配置文件 elasticsearch.yml

修改以下行
17行 cluster.name: my-es-cluster
23行 node.name: {{ansible_hostname}}
54行 network.host: 0.0.0.0
68行 discovery.zen.ping.unicast.hosts: ["es-0001", "es-0002", "es-0003"]
创建playbook文件
vim es_clu_setup.yaml
---
- hosts: es
  remote_user: root
  tasks:
    - name: install elasticsearch
      yum:
        name: "{{item}}"
        state: installed
      with_items:
        - java-1.8.0-openjdk
        - elasticsearch

    - copy:
        src: /etc/hosts
        dest: /etc/hosts
        owner: root
        group: root
        mode: 0644

    - template:
        src: /root/ansible/elk/elasticsearch.yml
        dest: /etc/elasticsearch/elasticsearch.yml
        owner: bin
        group: wheel
        mode: 0644
      notify: reload elasticsearch
      tags: esconf

    - service:
        name: elasticsearch
        enabled: yes
  handlers:
    - name: reload elasticsearch
      service:
        name: elasticsearch
        state: restarted
部署 elasticsearch 集群服务
ansible-playbook es_clu_setup.yaml
安装elasticsearch插件
for i in es-000{1..5}
do
    ssh ${i} "/usr/share/elasticsearch/bin/plugin install ftp://192.168.1.100/plugin/bigdesk-master.zip"
    ssh ${i} "/usr/share/elasticsearch/bin/plugin install ftp://192.168.1.100/plugin/elasticsearch-head-master.zip"
    ssh ${i} "/usr/share/elasticsearch/bin/plugin install ftp://192.168.1.100/plugin/elasticsearch-kopf-master.zip"
done
kibana 服务部署
创建 ansible-playbook 文件kibana_setup.yml
vim kibana_setup.yml
---
- hosts: kibana
  remote_user: root
  tasks:
    - name: install kibana
      yum:
        name: "{{item}}"
        state: installed
      with_items:
        - kibana

    - copy:
        src: ./kibana.yml
        dest: /opt/kibana/config/kibana.yml
        owner: root
        group: root
        mode: 0644
      notify: reload kibana
      tags: kibanaconf

    - service:
        name: kibana
        enabled: yes

  handlers:
    - name: reload kibana
      service:
        name: kibana
        state: restarted
准备kibana的配置文件kibana.yml

修改以下行
2行 server.port: 5601
5行 server.host: "0.0.0.0"
15行 elasticsearch.url: "http://es-0002:9200"
23行 kibana.index: ".kibana"
26行 kibana.defaultAppId: "discover"
53行 elasticsearch.pingTimeout: 1500
57行 elasticsearch.requestTimeout: 30000
64行 elasticsearch.startupTimeout: 5000
部署kibana服务
ansible-playbook kibana_setup.yml
logstash 服务部署
创建 ansible-playbook 文件 logstash_setup.yml
vim logstash_setup.yml
---
- hosts: logstash
  remote_user: root
  tasks:
    - name: install logstash
      yum:
        name: "{{item}}"
        state: installed
      with_items:
        - java-1.8.0-openjdk
        - logstash


    - copy:
        src: logstash.conf
        dest: /etc/logstash/logstash.conf
        owner: root
        group: root
        mode: 0644
创建 logstash的配置文件 logstash.conf
vim logstash.conf

input{
    beats{
         port => 5044
   }
}
filter{
    if [type] == "nginxlog"{
        grok{
            match => ["message", "%{COMBINEDAPACHELOG}"]
        }
    }
}
output{
#      stdout{ codec => "rubydebug" }
      if [type] == "nginxlog"{
           elasticsearch {
                hosts => ["192.168.1.201:9200", "192.168.1.202:9200"]
                index => "nginxlog"
                flush_size => 2000
                idle_flush_time => 10
           }
      }
}
部署两台 logstash 服务
ansible-playbook logstash_setup.yml
远程启动logstash服务,并放入后台
ssh  logstash-0001  "/opt/logstash/bin/logstash -f /etc/logstash/logstash.conf" &
ssh  logstash-0002  "/opt/logstash/bin/logstash -f /etc/logstash/logstash.conf" &
( 或者 在logstash服务上,创建定时任务, 5044 端口不存在,则启动服务)
crontab -e
10 * * * * ss -ntulp | grep 5044 || /opt/logstash/bin/logstash -f /etc/logstash/logstash.conf
在web服务器 上部署 filebeat 服务,用来收集日志文件
准备filebeat的配置文件 filebeat.yml

修改以下行
14行       paths:
15行         - /usr/local/nginx/logs/access.log    //日志的路径,短横线加空格代表yml格式
72行       document_type: nginxlog                 //文档类型
183行   #elasticsearch:                            //加上注释
188行     #hosts: ["localhost:9200"]               //加上注释
278行   logstash:                                  //去掉注释
280行     hosts: ["192.168.1.200:5044"]            //去掉注释,logstash那台主机的ip
创建filebeat的playbook文件 web_filebeat_setup.yaml
vim web_filebeat_setup.yaml
---
- hosts: web
  remote_user: root
  tasks:
    - name: install filebeat
      yum:
        name: "{{item}}"
        state: installed
      with_items:
        - filebeat


    - copy:
        src: filebeat.yml
        dest: //etc/filebeat/filebeat.yml
        owner: root
        group: root
        mode: 0644
      notify: reload filebeat
      tags: filebeatconf


    - service:
        name: filebeat
        enabled: yes
  handlers:
    - name: reload filebeat
      service:
        name: filebeat
        stat: restarted
部署filebeat服务
ansible web_filebeat_setup.yaml