Tengine+Lua+GM图片剪裁
Tengine+Lua+GM图片剪裁
环境:centOS 7
需求:同一个图片需要不同尺寸的缩略图
Tengine:nginx集成了Lua和GM。
Tengine调用lua脚本去操作GM,真正操作图片裁剪图片的是GM。

需要的依赖

1.打开虚拟机,启动centOS,使用finalShell连接虚拟机进行操作。把3个tar包+1个Tengine-master文件夹拖进/opt下:
2.查看文件:cd /opt, ls
安装依赖库:yum -y install readline
完毕,安装开发依赖库:yum -y install readline-devel
3.安装lua
查看并进入lua:在opt下ls,cd lua-5.3.1,ls
装在linux系统下:make linux
安装:make install
4.安装LuaJIT
返回上一级到opt:cd …
解压LuaJIT:tar -zxvf LuaJIT的tar包名称
进入LuaJIT:cd LuaJIT-2.0.5,ls
编译:make
安装:make install
检查版本:lua -v
5.安装Tengine
返回上一级到opt:cd …
进入Tengine:cd tengine-master,ls
(由于Tengine是直接传过来的文件夹,所以没有权限,需要授权。如果是传进来的tar包自己进行解压则有权限)
给配置文件授权(所以权限:777):chmod 777 configure
查看权限:ll
使用配置文件安装:
./configure --prefix=/usr/local/Tengine --dso-path=/usr/local/Tengine/modules --with-http_realip_module --with-http_gzip_static_module --with-http_stub_status_module --with-http_concat_module --with-http_lua_module --http-proxy-temp-path=/var/tmp/Tengine/proxy_temp --http-fastcgi-temp-path=/var/tmp/Tengine/fastcgi_temp --http-uwsgi-temp-path=/var/tmp/Tengine/uwsgi_temp --http-scgi-temp-path=/var/tmp/Tengine/cgi_temp --http-client-body-temp-path=/var/tmp/Tengine/client_body_temp --http-log-path=/var/log/Tengine/access.log --error-log-path=/var/log/Tengine/error.log
如果报错ssl:
./configure: error: SSL modules require the OpenSSL library.
You can either do not enable the modules, or install the OpenSSL library
into the system, or build the OpenSSL library statically from the source
with nginx by using --with-openssl= option.
解决办法:
SSL模块需要OpenSSL库。
执行:yum -y install openssl openssl-devel
配置文件安装完毕后,编译:make
安装:make install
检查Tengine是否安装成功:cd /usr/local/,ls

启动:cd Tengine/ ,ls,sbin/nginx
报错:软连接错误,目录找不到:

解决办法:
指定目录位置:
ln -s /usr/local/lib/libluajit-5.1.so.2 /lib64/libluajit-5.1.so.2
mkdir -p /var/tmp/Tengine
成功后,再次启动:sbin/nginx
到浏览器输入虚拟机IP测试访问:

6.关nginx
访问成功Tengine的前提是关闭nginx

7.装gm依赖库
yum install -y libjpeg libjpeg-devel libpng libpng-devel giflib giflib-devel freetype freetype-devel
8.安装gm
到opt:cd /opt/,ls
解压GraphicsMagick:tar -zxvf GraphicsMagick的tar包名称
进入GraphicsMagick:cd GraphicsMagick-1.3.18,ls
使用configure配置安装路径以及需要安装的模块:
./configure --prefix=/usr/local/GraphicsMagick --enable-shared
编译:make
安装:make install
9.关闭Tengine防止占用进程:

10.GM安装完毕,检查版本:
/usr/local/GraphicsMagick/bin/gm version
有如下版本信息即可

11.进入到/usr/local/Tengine,新建文件夹lua

编辑文本放入lua,ImageResizer.lua文本内容如下:
local command = "/usr/local/GraphicsMagick/bin/gm convert -auto-orient -strip " … ngx.var.request_filepath … " -resize " … ngx.var.width … “x” … ngx.var.height … " +profile “*” " … ngx.var.request_filepath … “_” … ngx.var.width … “x” … ngx.var.height … “.” … ngx.var.ext;
os.execute(command);
ngx.exec(ngx.var.request_uri);
(实际文本内容是两个点)

进入lua文件夹,并给.lua文件授权:

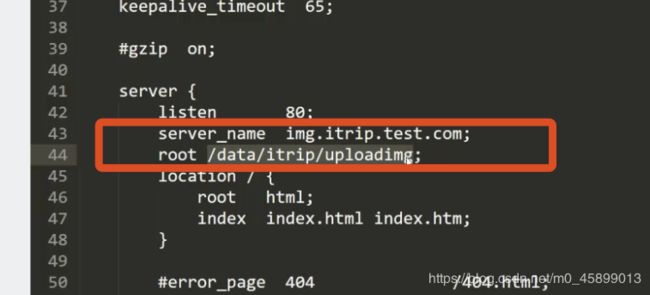
12.Tengine配置(nginx.conf ),并编辑文件 nginx.conf

修改第一处:

修改第二处:

创建图片路径:mkdir -p /data/itrip/uploadimg
修改第三处:

修改第四处,删除一行并增加如下内容:
expires 1h; # 缓存时间
add_header Cache-Control max-age=3600; # 缓存时间
access_log /var/log/Tengine/host_access.log;

创建log日志目录:mkdir -p /var/log/Tengine

修改第五处,增加图片裁剪的相关内容:
(引用时删掉注释)
location ~* ^(.+.(jpg|jpeg|gif|png))_(\d+)x(\d+).(jpg|jpeg|gif|png)$ {
root /data/itrip/uploadimg; #这里必须设置,否则根目录,即 $document_root 会是 Nginx 默认的
if (!-f $request_filename) { #如果文件不存在时才需要裁剪
lua_code_cache on; #在编写外部 Lua脚本时,设置为off Nginx不会缓存 Lua,方便调试
set $request_filepath /data/itrip/uploadimg$1; #设置原始图片路径,如:/document_root/1.gif
set $width $3; # 设置裁剪/缩放的宽度
set $height $4; # 设置裁剪/缩放的高度
set $ext $5; # 图片文件格式后缀
content_by_lua_file /usr/local/Tengine/lua/ImageResizer.lua; #加载外部 Lua 文件
}
}

完毕,保存并退出。
13.上传图片并测试
打开uploadimg文件夹,放入图片:

启动Tengine:/usr/local/Tengine/sbin/nginx

到浏览器访问时会报403,因为刚才关闭了

直接带图访问,成功:
14.到本机hosts文件配置图片域名地址并映射

Mac找到本机hosts文件参考如下:
添加链接描述
https://jingyan.baidu.com/article/f3ad7d0f55154309c3345bdd.html
修改完毕后到浏览器输入网址带图访问即可:
15.按规则裁剪图片:

完毕后图片路径会生成对应的图:

整理了2个小时,整理得这么优秀,感觉自己很棒!!!
