elasticsearch -- head插件
elasticsearch head插件是一个入门级的elasticsearch前端插件;我们来安装下;
第一步:安装nodejs
head插件是nodejs实现的,所以必须先安装Nodejs
参考:http://blog.java1234.com/blog/articles/354.html
第二步:安装git
我们要用git方式下载head插件
参考:http://blog.java1234.com/blog/articles/353.html
第三步:下载以及安装head插件
打开 https://github.com/mobz/elasticsearch-head
Running with built in server
git clone git://github.com/mobz/elasticsearch-head.gitcd elasticsearch-headnpm installnpm run start
openhttp://localhost:9100/
我们用这种最简单的方式安装
当然我们安装的地方是 /usr/local/
第四步:配置elasticsearch,允许head插件访问
进入elasticsearch config目录 打开 elasticsearch.yml
最后加上
http.cors.enabled: true
http.cors.allow-origin: "*"
第五步:测试
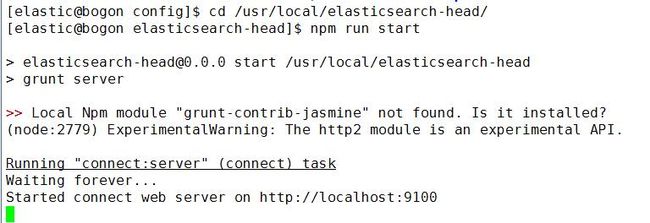
启动elasticsearch,再进入head目录,执行npm run start 启动插件
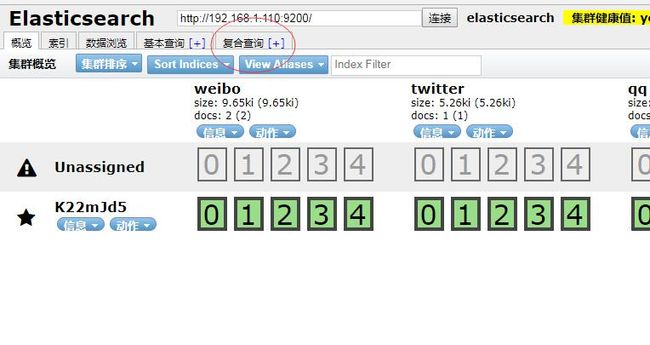
说明启动成功,然后浏览器 执行 http://192.168.1.110:9100/
内部输入 http://192.168.1.110:9200/ 点击连接 如果右侧输出黄色背景字体 说明配置完整OK;
elasticsearch-head插件添加索引
elasticsearch提供了丰富的http url接口对外提供服务,
这也使得elasticsearch插件特别多,功能也强大;
我们今天来讲下 用head插件来添加索引
这里有好几种方式,先讲一种原始的,
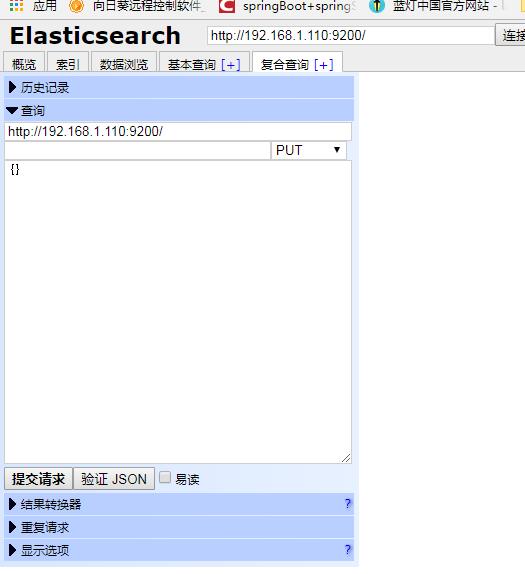
进入主页,选择 复合查询
我们以后执行操作 都在这里搞;
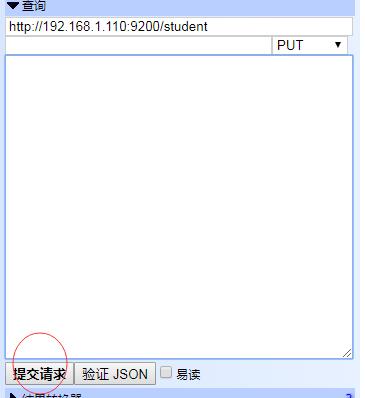
地址栏输入:http://192.168.1.110:9200/student/
然后点击“提交请求”,即可;
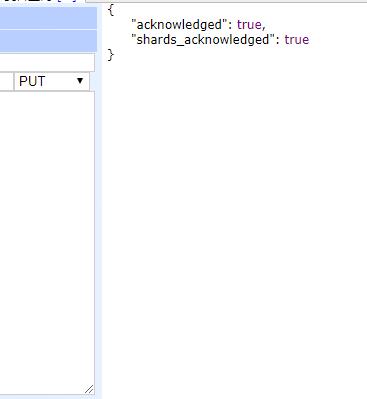
右侧返回索引添加成功信息;
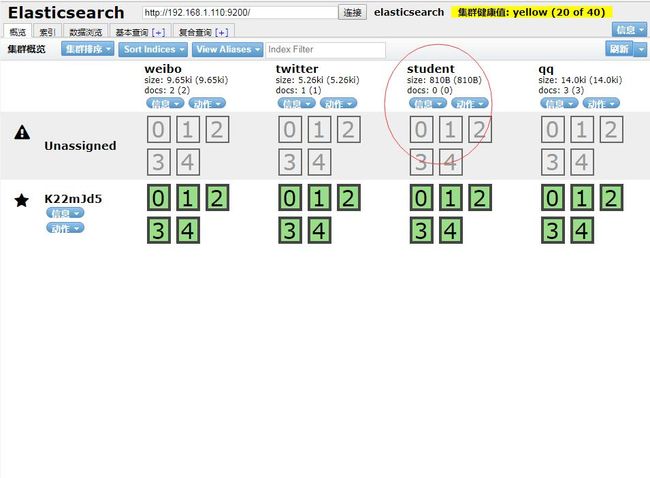
我们返回 概要 首页 点击 刷新 也能看到新建的索引student
这里方式有点索引 这里有更加简单的方式
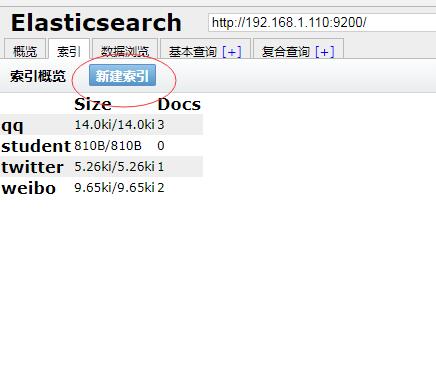
点击 索引标签,
点击“新建索引”,
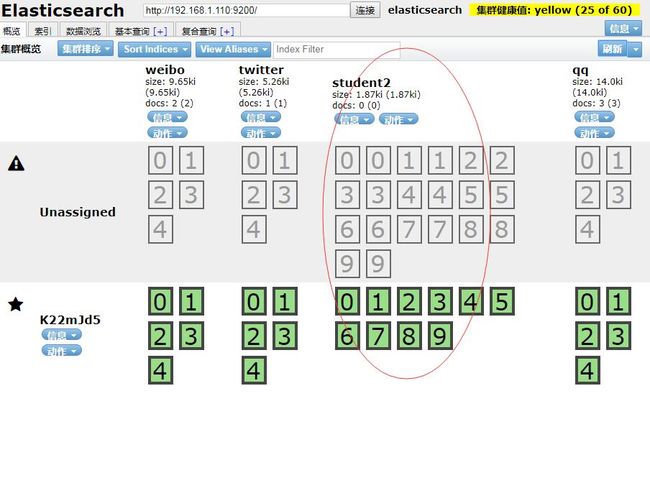
这里我们输入索引名称即可 当然默认分片数是5 副本数是1 我们输入索引名称student2 分片数10 副本2
假如单个机器部署的话 副本是没地方分配的 一般集群都是2台或者2台以上机器集群,副本都不存对应的分片所以机器的,这样能保证集群系统的可靠性。
我们点击"OK" 即可轻松建立索引 以及分片数和副本;
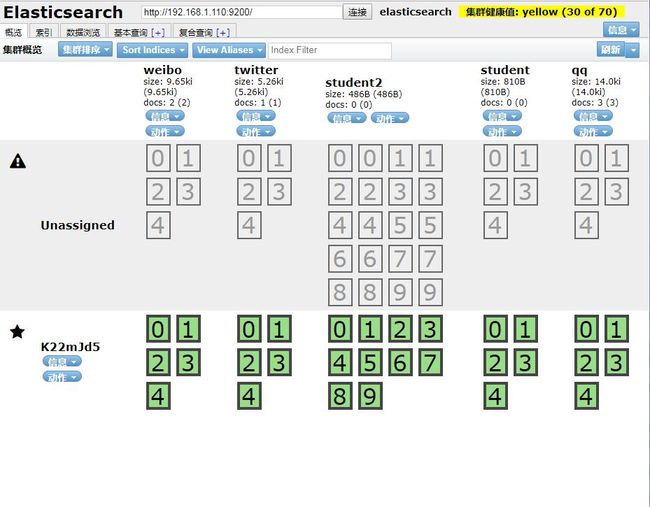
回到概要首页;
这里可以清晰的看到索引 以及分片和副本;
当然要删除索引的话
点 动作 然后 删除 ,即可;
比较简单
elasticsearch-head插件添加,修改,删除文档
elasticsearch-head插件添加,修改,删除文档
我们用head插件来实现下添加,修改,删除文档操作;
首先是添加文档,这里我们给student索引添加文档
先进入符合查询
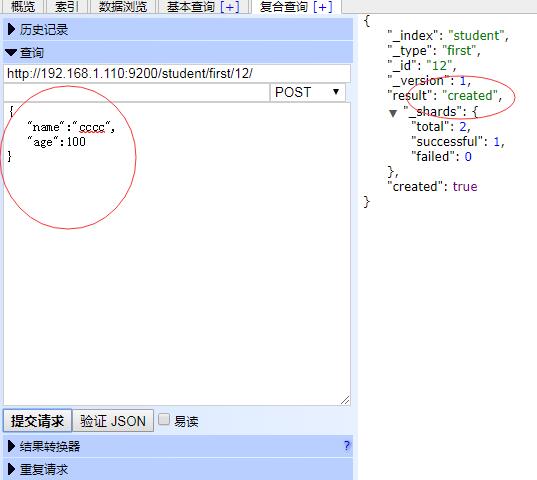
post方式 http://192.168.1.110:9200/student/first/12/
这里student是索引 first是类别 12是id
假如id没写的话 系统也会给我们自动生成一个
假如id本身已经存在 那就变成了修改操作;我们一般都要指定下id
我们输入Json数据,然后点击提交,右侧显示创建成功,当然我们可以验证下json
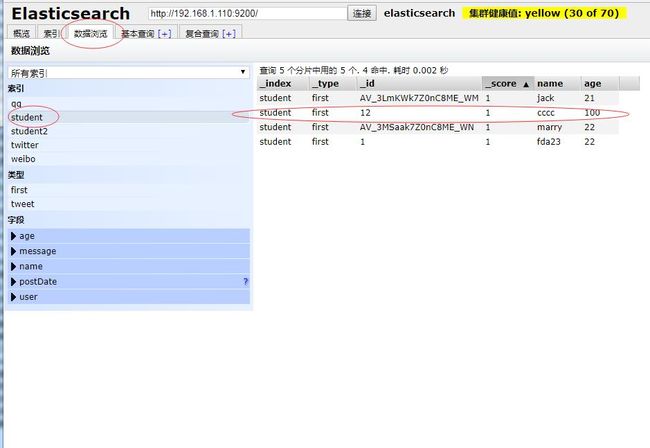
点 数据浏览,
我们可以看到新添加的索引文档
修改文档的话,
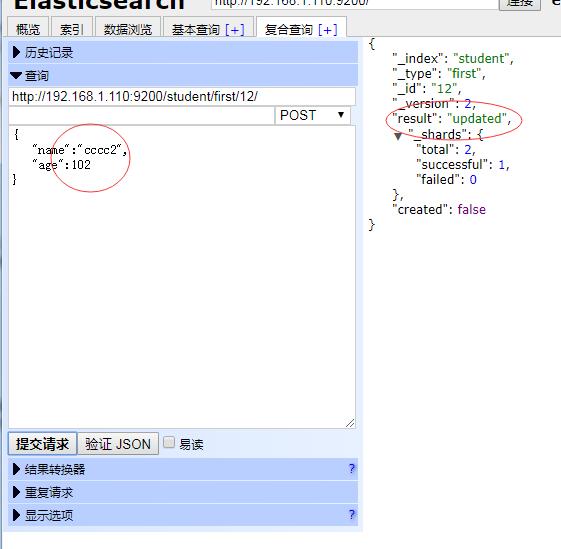
方式和添加一样,只不过我们一定要指定已经存在的id
地址输入:http://192.168.1.110:9200/student/first/12/
然后修改下数据,点击提交:
我们发现 提示修改成功;
数据浏览里:
查询文档也有可以通过请求
http://192.168.1.110:9200/student/first/12/ 选择get方式,然后点击提交
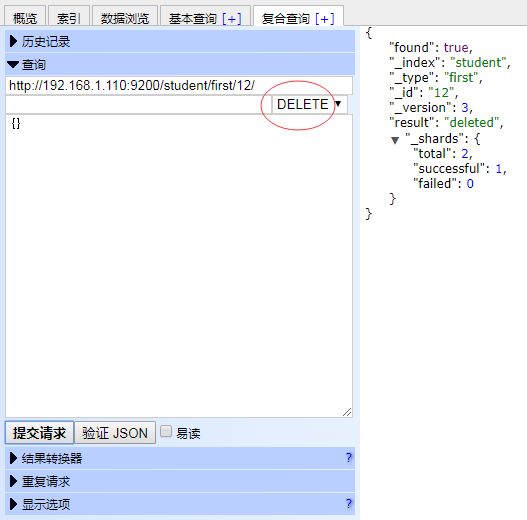
删除文档
选择delete即可;
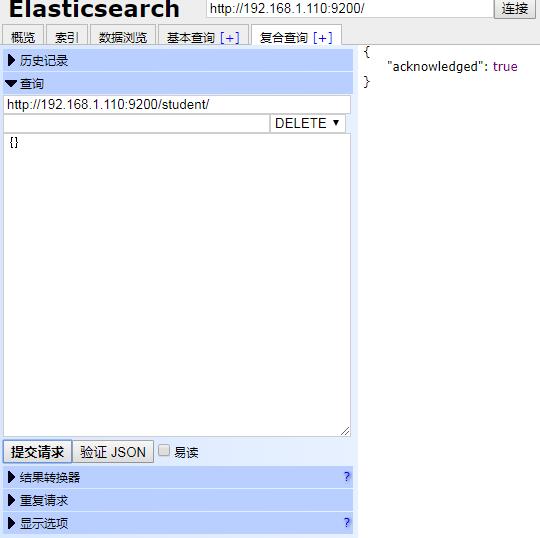
前面我们讲过删除索引的图形操作方式;
用http url命令也可以
输入:http://192.168.1.110:9200/student/
选择delete即可
elasticsearch使用head插件打开和关闭索引
elasticsearch使用head打开和关闭索引
打开/关闭索引接口允许关闭一个打开的索引或者打开一个已经关闭的索引。
关闭的索引只能显示索引元数据信息,不能够进行读写操作。
比如我们新建一个索引student2
我们用 POST http://192.168.1.110:9200/student2/_close/ 关闭索引
点击提交请求;
再概要首页里,可以刷新下 看到student2被关闭;
变成了灰色;
POST http://192.168.1.110:9200/student2/_open/ 打开索引;
点击提交请求,
回到概要首页,点击刷新,
又正常了。
elasticsearch head插件 增加索引映射
elasticsearch head插件 增加索引映射
elasticsearch HTTP API 允许你向索引(index)添加文档类型(type),或者向文档类型(type)中添加字段(field)。
PUT http://192.168.1.110:9200/student/
{
"mappings":{
"first":{
"properties":{
"name":{"type":"keyword"}
}
}
}
}
mapping是映射关键字 properties是添加指定文档类型的字段的关键字
点击提交,添加student索引
添加文档类型first
添加字段name 类型是keyword
(keyword类型适合短词汇内容,比如邮件,姓名,性别等等,text类型适合长文本,可以分词,比如文章标题,文章内容等)
PUT http://192.168.1.110:9200/student/_mapping/third/
{
"properties":{
"name2":{"type":"keyword"}
}
}
向已经存在的索引student添加文档类型为third,包含字段name2,字段类型是keyword字符串
elasticsearch head插件 查询索引映射关系
elasticsearch head插件 查询索引映射关系
http://192.168.1.110:9200/student/ GET 直接加索引名称即可 能查到所有信息
第二种方式 利用head插件图形工具:
进入概要首页,选择索引,然后索引信息,
直接显示索引的映射状态信息;
elasticsearch-.yml(中文配置详解)
# ======================== Elasticsearch Configuration =========================#
# NOTE: Elasticsearch comes with reasonable defaults for most settings.
# Before you set out to tweak and tune the configuration, make sure you
# understand what are you trying to accomplish and the consequences.
#
# The primary way of configuring a node is via this file. This template lists
# the most important settings you may want to configure for a production cluster.
#
# Please see the documentation for further information on configuration options:
#
#
# ---------------------------------- Cluster -----------------------------------
#
# Use a descriptive name for your cluster:
# 集群名称,默认是elasticsearch
# cluster.name: my-application
#
# ------------------------------------ Node ------------------------------------
#
# Use a descriptive name for the node:
# 节点名称,默认从elasticsearch-2.4.3/lib/elasticsearch-2.4.3.jar!config/names.txt中随机选择一个名称
# node.name: node-1
#
# Add custom attributes to the node:
#
# node.rack: r1
#
# ----------------------------------- Paths ------------------------------------
#
# Path to directory where to store the data (separate multiple locations by comma):
# 可以指定es的数据存储目录,默认存储在es_home/data目录下
# path.data: /path/to/data
#
# Path to log files:
# 可以指定es的日志存储目录,默认存储在es_home/logs目录下
# path.logs: /path/to/logs
#
# ----------------------------------- Memory -----------------------------------
#
# Lock the memory on startup:
# 锁定物理内存地址,防止elasticsearch内存被交换出去,也就是避免es使用swap交换分区
# bootstrap.memory_lock: true
#
#
#
# 确保ES_HEAP_SIZE参数设置为系统可用内存的一半左右
# Make sure that the `ES_HEAP_SIZE` environment variable is set to about half the memory
# available on the system and that the owner of the process is allowed to use this limit.
#
# 当系统进行内存交换的时候,es的性能很差
# Elasticsearch performs poorly when the system is swapping the memory.
#
# ---------------------------------- Network -----------------------------------
#
#
# 为es设置ip绑定,默认是127.0.0.1,也就是默认只能通过127.0.0.1 或者localhost才能访问
# es1.x版本默认绑定的是0.0.0.0 所以不需要配置,但是es2.x版本默认绑定的是127.0.0.1,需要配置
# Set the bind address to a specific IP (IPv4 or IPv6):
#
# network.host: 192.168.0.1
#
#
# 为es设置自定义端口,默认是9200
# 注意:在同一个服务器中启动多个es节点的话,默认监听的端口号会自动加1:例如:9200,9201,9202...
# Set a custom port for HTTP:
#
# http.port: 9200
#
# For more information, see the documentation at:
#
#
# --------------------------------- Discovery ----------------------------------
#
# 当启动新节点时,通过这个ip列表进行节点发现,组建集群
# 默认节点列表:
# 127.0.0.1,表示ipv4的回环地址。
# [::1],表示ipv6的回环地址
#
# 在es1.x中默认使用的是组播(multicast)协议,默认会自动发现同一网段的es节点组建集群,
# 在es2.x中默认使用的是单播(unicast)协议,想要组建集群的话就需要在这指定要发现的节点信息了。
# 注意:如果是发现其他服务器中的es服务,可以不指定端口[默认9300],如果是发现同一个服务器中的es服务,就需要指定端口了。
# Pass an initial list of hosts to perform discovery when new node is started:
#
# The default list of hosts is ["127.0.0.1", "[::1]"]
#
# discovery.zen.ping.unicast.hosts: ["host1", "host2"]
#
#
#
#
# 通过配置这个参数来防止集群脑裂现象 (集群总节点数量/2)+1
# Prevent the "split brain" by configuring the majority of nodes (total number of nodes / 2 + 1):
#
# discovery.zen.minimum_master_nodes: 3
#
# For more information, see the documentation at:
#
#
# ---------------------------------- Gateway -----------------------------------
#
# Block initial recovery after a full cluster restart until N nodes are started:
# 一个集群中的N个节点启动后,才允许进行数据恢复处理,默认是1
# gateway.recover_after_nodes: 3
#
# For more information, see the documentation at:
#
#
# ---------------------------------- Various -----------------------------------
# 在一台服务器上禁止启动多个es服务
# Disable starting multiple nodes on a single system:
#
# node.max_local_storage_nodes: 1
#
# 设置是否可以通过正则或者_all删除或者关闭索引库,默认true表示必须需要显式指定索引库名称
# 生产环境建议设置为true,删除索引库的时候必须显式指定,否则可能会误删索引库中的索引库。
# Require explicit names when deleting indices:
#
# action.destructive_requires_name: true
elasticsearch5.5多机集群配置
elasticsearch5.5多机集群配置
ELasticsearch 5.5要求JDK版本最低为1.8;
配置集群之前 先把要加群集群的节点的里的data目录下的Node目录 删除,否则集群建立会失败。
我这边虚拟机配置了两台centos IP分别是 192.168.1.110 和 192.168.1.111 ;
分别配置下elasticsearch.yml配置文件
110机器:
# ---------------------------------- Cluster -----------------------------------
#
# Use a descriptive name for your cluster:
#
cluster.name: my-application
#
# ------------------------------------ Node ------------------------------------
#
# Use a descriptive name for the node:
#
node.name: node-1
#
# Add custom attributes to the node:
#
#node.attr.rack: r1
#
# ----------------------------------- Paths ------------------------------------
#
# Path to directory where to store the data (separate multiple locations by comma):
#
#path.data: /path/to/data
#
# Path to log files:
#
#path.logs: /path/to/logs
#
# ----------------------------------- Memory -----------------------------------
#
# Lock the memory on startup:
#
#bootstrap.memory_lock: true
#
# Make sure that the heap size is set to about half the memory available
# on the system and that the owner of the process is allowed to use this
# limit.
#
# Elasticsearch performs poorly when the system is swapping the memory.
#
# ---------------------------------- Network -----------------------------------
#
# Set the bind address to a specific IP (IPv4 or IPv6):
#
network.host: 192.168.1.110
#
# Set a custom port for HTTP:
#
http.port: 9200
#
# For more information, consult the network module documentation.
#
# --------------------------------- Discovery ----------------------------------
#
# Pass an initial list of hosts to perform discovery when new node is started:
# The default list of hosts is ["127.0.0.1", "[::1]"]
#
discovery.zen.ping.unicast.hosts: ["192.168.1.110"]
#
# Prevent the "split brain" by configuring the majority of nodes (total number of master-eligible nodes / 2 + 1):
#
#discovery.zen.minimum_master_nodes: 3
#
# For more information, consult the zen discovery module documentation.
#
# ---------------------------------- Gateway -----------------------------------
#
# Block initial recovery after a full cluster restart until N nodes are started:
#
#gateway.recover_after_nodes: 3
#
# For more information, consult the gateway module documentation.
#
# ---------------------------------- Various -----------------------------------
#
# Require explicit names when deleting indices:
#
#action.destructive_requires_name: true
http.cors.enabled: true
http.cors.allow-origin: "*"
111机器:
# ---------------------------------- Cluster -----------------------------------
#
# Use a descriptive name for your cluster:
#
cluster.name: my-application
#
# ------------------------------------ Node ------------------------------------
#
# Use a descriptive name for the node:
#
node.name: node-2
#
# Add custom attributes to the node:
#
#node.attr.rack: r1
#
# ----------------------------------- Paths ------------------------------------
#
# Path to directory where to store the data (separate multiple locations by comma):
#
#path.data: /path/to/data
#
# Path to log files:
#
#path.logs: /path/to/logs
#
# ----------------------------------- Memory -----------------------------------
#
# Lock the memory on startup:
#
#bootstrap.memory_lock: true
#
# Make sure that the heap size is set to about half the memory available
# on the system and that the owner of the process is allowed to use this
# limit.
#
# Elasticsearch performs poorly when the system is swapping the memory.
#
# ---------------------------------- Network -----------------------------------
#
# Set the bind address to a specific IP (IPv4 or IPv6):
#
network.host: 192.168.1.111
#
# Set a custom port for HTTP:
#
http.port: 9200
#
# For more information, consult the network module documentation.
#
# --------------------------------- Discovery ----------------------------------
#
# Pass an initial list of hosts to perform discovery when new node is started:
# The default list of hosts is ["127.0.0.1", "[::1]"]
#
discovery.zen.ping.unicast.hosts: ["192.168.1.110"]
#
# Prevent the "split brain" by configuring the majority of nodes (total number of master-eligible nodes / 2 + 1):
#
#discovery.zen.minimum_master_nodes: 3
#
# For more information, consult the zen discovery module documentation.
#
# ---------------------------------- Gateway -----------------------------------
#
# Block initial recovery after a full cluster restart until N nodes are started:
#
#gateway.recover_after_nodes: 3
这里两台机器的cluster.name必须一致 这样才算一个集群
node.name节点名称每台取不同的名称,用来表示不同的集群节点
network.host配置成自己的局域网IP
http.port端口就固定9200
discovery.zen.ping.unicast.hosts主动发现节点我们都配置成110节点IP
配置完后 重启es服务;
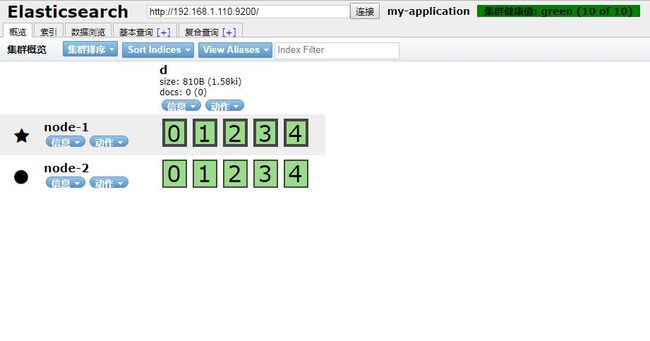
然后head插件我们查看下:
说明集群配置OK 。
