WebRtc服务搭建(三)
前面我们介绍了webrtc的环境搭建和服务器搭建,本章开始介绍webrtc的配置和运行,篇幅较长,请注意收藏。
让Linux命令在后台运行的命令用:在命令前加nohup命令后加&
1、coturn Nat穿透服务器
首先,在第一章篇首强调过,云服务器配置入站规则,允许访问3478端口(含tcp和udp,此端口用于nat穿透)
#启动 内网ip
nohup turnserver -L 172.31.247.136 -a -u liera:12345 -v -f -r nort.gov &其中:
172.31.247.136 是内网本机的ip,根据你本机ip替换;
账号liera 密码:12345 这个自行设置,在后面配置apprtc时需要用到;
命令后加 & ,执行起来后按 ctr+c,是不会停止的,且可以继续敲命令
输入以上命令后,需要再次回车即可回到正常输入命令
检查启动是否成功:
netstat -ntulp | grep turnserver #或者 lsof -i:3478输出大致这样的代表成功
COMMAND PID USER FD TYPE DEVICE SIZE/OFF NODE NAME
turnserve 15879 ubuntu 16u IPv4 111144 0t0 UDP 172.17.0.9:3478
turnserve 15879 ubuntu 17u IPv4 111145 0t0 UDP 172.17.0.9:3478
turnserve 15879 ubuntu 32u IPv4 111163 0t0 TCP 172.17.0.9:3478 (LISTEN)
turnserve 15879 ubuntu 33u IPv4 111164 0t0 TCP 172.17.0.9:3478 (LISTEN)
2、collider 信令服务器
目录:/home/ubuntu/turnserver-4.5.0.7/
首先云服务器配置入站规则,允许访问8089端口(tcp,用于客户端和collider建立websocket信令通信)
创建自签名的数字证书
如果没有openssl,需要安装
sudo mkdir -p /cert
cd /cert
CA私钥
sudo openssl genrsa -out key.pem 2048自签名证书
sudo openssl req -new -x509 -key key.pem -out cert.pem -days 1095
会提示输入国家等信息,随便输入即可
nohup $GOPATH/bin/collidermain -port=8089 -tls=true  -room-server="https://49.234.233.165:8080" &
同样检查是否成功
netstat -ntulp | grep collider 或者是查看端口是否被启动 lsof -i:8089输出大致这样的代表成功
tcp6 0 0 :::8089 :::* LISTEN 16864/collidermain
3、apprtc 房间服务器
首先云服务器配置入站规则,允许访问8080端口(tcp,此端口用于web访问)
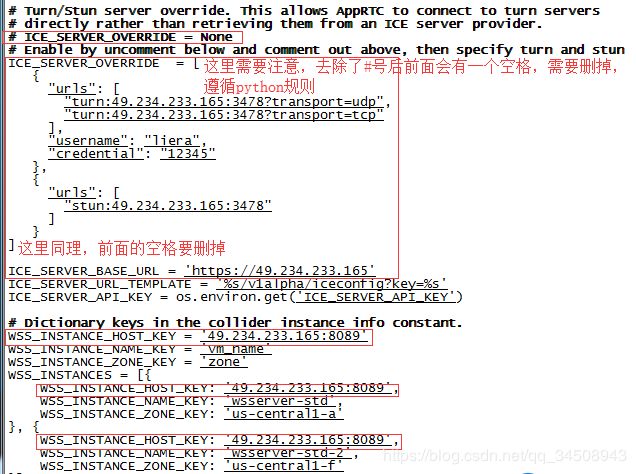
配置文件修改(主要是配置apprtc对应的conturn和collider相关参数)
vim /home/ubuntu/webrtc/apprtc/src/app_engine/constants.py找到
# Turn/Stun server override. This allows AppRTC to connect to turn servers
# directly rather than retrieving them from an ICE server provider.
ICE_SERVER_OVERRIDE = None
# Enable by uncomment below and comment out above, then specify turn and stun
# ICE_SERVER_OVERRIDE = [
# {
# "urls": [
# "turn:hostname/IpToTurnServer:19305?transport=udp",
# "turn:hostname/IpToTurnServer:19305?transport=tcp"
# ],
# "username": "TurnServerUsername",
# "credential": "TurnServerCredentials"
# },
# {
# "urls": [
# "stun:hostname/IpToStunServer:19302"
# ]
# }
修改后:
其中ip为外网ip
编译:
cd /home/ubuntu/webrtc/apprtc
sudo npm install
grunt build
如果出现 : No module named requests
> **错误: requests模块不存在**
>
> ```shell
> ImportError: No module named requests
> Warning: Command failed: python ./build/build_app_engine_package.py src out/app_engine
> Traceback (most recent call last):
> File "./build/build_app_engine_package.py", line 12, in
> import requests
> ImportError: No module named requests
> Use --force to continue.
>
> Aborted due to warnings.
> ```
>
> ##### 安装pip
>
> 下载setup-python工具
>
> ```shell
> # 有一行命令太长了,$开头的是一行命令
> $cd /root/webrtc
> $sudo wget https://pypi.python.org/packages/2.7/s/setuptools/setuptools-0.6c11-py2.7.egg --no-check-certificate
> $sudo chmod +x setuptools-0.6c11-py2.7.egg
> $sudo ./setuptools-0.6c11-py2.7.egg
> $sudo wget https://pypi.python.org/packages/source/p/pip/pip-1.5.4.tar.gz
> $tar -xf pip-1.5.4.tar.gz
> $python setup.py install
> $pip install requests
> #安装完成后再执行编译:
> #cd /root/webrtc/apprtc
> #grunt build
启动:
```shell
#172.31.247.136 : 内网ip
nohup dev_appserver.py --host=172.31.247.136 /root/webrtc/apprtc/out/app_engine --skip_sdk_update_check &
#提示更新选择: n
```
```shell
#检查
netstat -ntulp | grep 8080
#输出下列内容
tcp 0 0 172.31.4.236:8080 0.0.0.0:* LISTEN 17032/python
```
4、nginx
反向代理apprtc,使之支持https访问,如果http直接访问apprtc,则客户端无法启动视频音频采集(必须得用https访问)
```shell
#在nginx目录执行 PCRE:apt-get install libpcre3-dev
./configure --with-http_ssl_module
make install
#默认安装在/usr/local/nginx(也可以执行prefix)
#配置nginx.conf
vim /usr/local/nginx/conf/nginx.conf
#内容如下(注意修改自己的公网ip)
```
```nginx
events {
worker_connections 1024;
}
http{
upstream roomserver {
server 47.75.90.219:8080;
}
server {
listen 80;
server_name 47.75.90.219;
return 301 https://$server_name$request_uri;
}
server {
root /usr/share/nginx/html;
index index.php index.html index.htm;
listen 443 ssl;
ssl_certificate /cert/cert.pem;
ssl_certificate_key /cert/key.pem;
server_name 47.75.90.219;
location / {
proxy_pass http://roomserver$request_uri;
proxy_set_header Host $host;
}
location ~ .php$ {
fastcgi_pass unix:/var/run/php5-fpm.sock;
fastcgi_index index.php;
include fastcgi_params;
}
}
}
```
> 启动:
>
> /usr/local/nginx/sbin/nginx
> 浏览器通话跨域问题 :pushState
>
> Messages:Failed to start signaling: Failed to execute 'pushState' on 'History'
>
> ```shell
> vim /root/webrtc/apprtc/out/app_engine/js/apprtc.debug.js
> #搜索 pushState 增加:
> roomLink=roomLink.substring("http","https");
> ```
>
> 
