- 1. 概述
- 2. 详论
- 2.1. 位置
- 2.2. 着色
- 2.3. 其他
- 3. 结果
- 4. 参考
1. 概述
我在《OSG加载倾斜摄影数据》这篇博文中论述了如何通过OSG生成一个整体的索引文件,通过这个索引文件来正确显示ContextCapture(Smart3D)生成的倾斜摄影模型数据。这类倾斜摄影模型数据一般都会有个元数据metadata.xml,通过这个元数据,可以将其正确显示在osgEarth的数字地球上。
2. 详论
2.1. 位置
SRS就是空间坐标参考的意思,ENU表示是东北天站心坐标系,站心点的经纬度坐标为(108.9594, 34.2196)。这个站心点对应的应该是倾斜摄影模型的中心点,那么思路就很简单了,只需要平移旋转这个倾斜摄影模型,使模型的中心点对应于站心点。这其实是个地心坐标系于站心坐标系转换的问题:

在osgEarth中可以不用关心这个问题,其直接封装了一个类osgEarth::GeoTransform,可以直接通过这个类的接口来加载倾斜摄影模型:
std::string filePath = "D:/Data/scene/Dayanta/Data.osgb";
osg::ref_ptr node = osgDB::readNodeFile(filePath);

osg::ref_ptr xform = new osgEarth::GeoTransform();
xform->addChild(node);
xform->setTerrain(mapNode->getTerrain());
osgEarth::GeoPoint point(map->getSRS(), 108.9594, 34.2196, -410);                 //使用绝对高,正高
xform->setPosition(point);

osg::ref_ptr modelLayer = new osgEarth::ModelLayer("oblic", xform);
map->addLayer(modelLayer);
给osgEarth::GeoTransform传入的osgEarth::GeoPoint就是站心点。不过这种类型的metadata.xml似乎都没有给出准确的高程值,所以需要自己调整高程来贴地。可能因为我这里试用的倾斜摄影数据都是网上找的,不太可能给出准确的地理坐标。
2.2. 着色
另外一点要注意的是直接读取加载的倾斜摄影模型是没有颜色信息的,这点和OSG还不太一样,在帮助文档里面论述了这个问题:

所以一定要记得加上着色器渲染,否则倾斜摄影模型会变成白模:
osgEarth::Registry::shaderGenerator().run(node);
2.3. 其他
这个元数据的意思是这个倾斜摄影模型是根据EPSG编号为2384的空间参考坐标系下构建的。简单查了一下这个坐标系应该是xian80高斯克吕格平面投影直角坐标系,因为是用于三维数据,所以加上一个高程形成一个三维立体直角坐标系。严格意义上来讲,是需要将地球展成这个立体直角坐标系,将这个倾斜摄影模型放置到SRSOrigin的地理位置才是最准确的。但是一般的投影东向和北向的方向是不会变的,仍然可以将SRSOrigin的地理位置当成一个站心位置,只不过这个站心位置不再是经纬度而是EPSG:2384的平面坐标值(加上高程)。
所以像这种类型的数据,只需要将SRSOrigin的地理位置值转换成经纬度值,就变成2.1中描述的情况了。
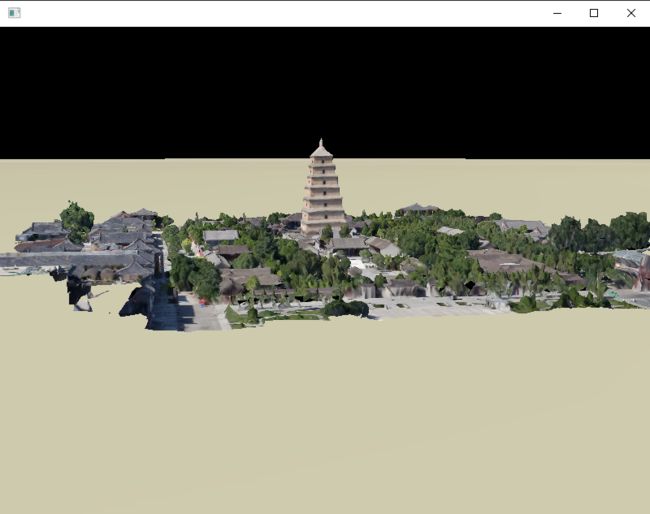
3. 结果
具体的实现代码如下:
#include
#include
#include

#include
#include

#include

#include
#include
#include
#include
#include
#include
#include

#include

#include

using namespace std;

void AddModel(osg::ref_ptr map, osg::ref_ptr mapNode)
{
	//
	std::string filePath = "D:/Data/scene/Dayanta/Data.osgb";
	osg::ref_ptr node = osgDB::readNodeFile(filePath);

	osg::ref_ptr xform = new osgEarth::GeoTransform();
	xform->addChild(node);
	xform->setTerrain(mapNode->getTerrain());
	osgEarth::GeoPoint point(map->getSRS(), 108.9594, 34.2196, -410);                 //使用绝对高,正高
	xform->setPosition(point);

	osg::ref_ptr modelLayer = new osgEarth::ModelLayer("oblic", xform);
	map->addLayer(modelLayer);

	osgEarth::Registry::shaderGenerator().run(node);
}

int main()
{
	CPLSetConfigOption("GDAL_DATA", "D:/Work/OSGNewBuild/OpenSceneGraph-3.6.4/3rdParty/x64/gdal-data");

	//string wktString = "EPSG:3857";			//web墨卡托投影
	//string wktString = "EPSG:4326";			//wgs84
	osgEarth::ProfileOptions profileOpts;
	//profileOpts.srsString() = wktString;

	//osgEarth::Bounds bs(535139, 3365107, 545139, 3375107);
	//osgEarth::Bounds bs(73, 3, 135, 53);
	//profileOpts.bounds() = bs;

	//地图配置:设置缓存目录
	osgEarth::Drivers::FileSystemCacheOptions cacheOpts;
	string cacheDir =  "D:/Work/OSGNewBuild/tmp";
	cacheOpts.rootPath() = cacheDir;

	//
	osgEarth::MapOptions mapOpts;
	mapOpts.cache() = cacheOpts;
	//mapOpts.coordSysType() = osgEarth::MapOptions::CSTYPE_PROJECTED;

	mapOpts.profile() = profileOpts;

	//创建地图节点
	osg::ref_ptr map = new osgEarth::Map(mapOpts);
	osg::ref_ptr mapNode = new osgEarth::MapNode(map);

	osgEarth::Drivers::GDALOptions gdal;
	//gdal.url() = "D:/Work/OSGNewBuild/osgearth-2.10.1/data/world.tif";
	//gdal.url() = "D:/Work/SinianGIS/bin/Resource/BlueMarbleNASA.jpg";
	gdal.url() = "D:/Work/SinianGIS/bin/Resource/baseMap.jpg";
	osg::ref_ptr imgLayer = new osgEarth::ImageLayer("BlueMarble", gdal);
	map->addLayer(imgLayer);

	AddModel(map, mapNode);

	osgViewer::Viewer viewer;
	viewer.getCamera()->setClearColor(osg::Vec4(0, 0, 0, 0));
	viewer.setSceneData(mapNode);

	osg::ref_ptr< osgEarth::Util::EarthManipulator> mainManipulator = new osgEarth::Util::EarthManipulator;
	viewer.setCameraManipulator(mainManipulator);

	osgEarth::Viewpoint vp;
	osgEarth::GeoPoint newPoint(map->getSRS(), 108.9594, 34.2196, 0);
	vp.focalPoint() = newPoint;
	vp.heading() = 0;
	vp.pitch() = -90;
	vp.range() = 1000;
	mainManipulator->setViewpoint(vp);

	viewer.setUpViewInWindow(100, 100, 800, 600);

	return viewer.run();
}
4. 参考
- GNSS学习笔记-坐标转换


