MQTT服务器搭建以及构建服务端和客户端
MQTT介绍
MQTT,是IBM推出的一种针对移动终端设备的基于TCP/IP的发布/预订协议,可以连接大量的远程传感器和控制设备:
- 轻量级的消息订阅和发布(publish/subscribe)协议
- 建立在TCP/IP协议之上
IoT,internet of things,物联网,MQTT在这方面应用较多。
MQTT协议是针对如下情况设计的:
- M2M(Machine to Machine) communication,机器端到端通信,比如传感器之间的数据通讯
- 因为是Machine to Machine,需要考虑:
- Machine,或者叫设备,比如温度传感器,硬件能力很弱,协议要考虑尽量小的资源消耗,比如计算能力和存储等
- M2M可能是无线连接,网络不稳定,带宽也比较小
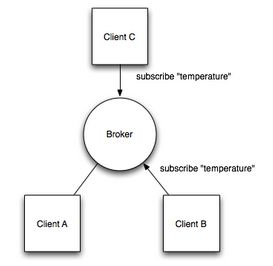
MQTT协议的架构,用一个示例说明。比如有1个温度传感器(1个Machine),2个小的显示屏(2个Machine),显示屏要显示温度传感器的温度值。
显示器需要先通过MQTT协议subscribe(订阅)一个比如叫temperature的topic(主题):

当温度传感器publish(发布)温度数据,显示器就可以收到了:

注:以上两张图,取自MQTT and CoAP, IoT Protocols
协议里还有2个主要的角色:
- client,客户端 broker,
- 服务器端
它们是通过TCP/IP协议连接的。因为MQTT是协议,所以不能拿来直接用的,就好比HTTP协议一样。需要找实现这个协议的库或者服务器来运行。
MQTT的官网见:http://mqtt.org/。其中http://mqtt.org/software里面提供了官方推荐的各种服务器和客户端使用的各种语言版本的API。
下面以服务器apache-apollo-1.7.1为例,在windows环境下测试。
1、在这里下载Apollo服务器,下载后解压。如下图所示:

bin下包含apollo和apollo.cmd两个文件:

2、运行apache-apollo-1.7.1\bin\apollo.cmd,输入create mybroker(名字任意取,这里是根据官网介绍的来取的)创建服务器实例,服务器实例包含了所有的配置,运行时数据等,并且和一个服务器进程关联。如果双击apollo.cmd出现闪一下就关闭的情况,则需要在命令行中敲入命令:

create mybroker之后会在bin目录下生成mybroker文件夹。

里面包含有很多信息,其中etc\apollo.xml文件下是配置服务器信息的文件,etc\users.properties文件包含连接MQTT服务器时用到的用户名和密码,后面会介绍,可以修改原始的admin=password,可以接着换行添加新的用户名密码。
3、打开cmd,运行apache-apollo-1.7.1\bin\mybroker\bin\apollo-broker.cmd run 开启服务器,如下图:

可以在浏览器中输入http://127.0.0.1:61680/,其自动转入:http://127.0.0.1:61680/console/index.html,apollo的登录页面。

此界面表示已经安装成功:该登录的用户名和密码在\apache-apollo-1.7.1\bin\mybroker\etc\users.properties里,打开users.properties文件:
## —————————————————————————
## Licensed to the Apache Software Foundation (ASF) under one or more
## contributor license agreements. See the NOTICE file distributed with
## this work for additional information regarding copyright ownership.
## The ASF licenses this file to You under the Apache License, Version 2.0
## (the “License”); you may not use this file except in compliance with
## the License. You may obtain a copy of the License at
##
## http://www.apache.org/licenses/LICENSE-2.0
##
## Unless required by applicable law or agreed to in writing, software
## distributed under the License is distributed on an “AS IS” BASIS,
## WITHOUT WARRANTIES OR CONDITIONS OF ANY KIND, either express or implied.
## See the License for the specific language governing permissions and
## limitations under the License.
## —————————————————————————
#
# The list of users that can login. This file supports both plain text or
# encrypted passwords. Here is an example what an encrypted password
# would look like:
#
# admin=ENC(Cf3Jf3tM+UrSOoaKU50od5CuBa8rxjoL)
#
admin=password
经过上面的简单步骤,服务器基本上就已经完成。输入admin,password就可以登录了,如下图:

服务端代码:
package bsit.mqtt.demo.one_way;

import org.eclipse.paho.client.mqttv3.MqttClient;
import org.eclipse.paho.client.mqttv3.MqttConnectOptions;
import org.eclipse.paho.client.mqttv3.MqttDeliveryToken;
import org.eclipse.paho.client.mqttv3.MqttException;
import org.eclipse.paho.client.mqttv3.MqttMessage;
import org.eclipse.paho.client.mqttv3.MqttPersistenceException;
import org.eclipse.paho.client.mqttv3.MqttTopic;
import org.eclipse.paho.client.mqttv3.persist.MemoryPersistence;
/**
 *
 * Title:Server
 * Description: 服务器向多个客户端推送主题,即不同客户端可向服务器订阅相同主题
 * @author chenrl
 * 2016年1月6日下午3:29:28
 */
public class Server {

    public static final String HOST = "tcp://192.168.1.3:61613";
    public static final String TOPIC = "toclient/124";
    public static final String TOPIC125 = "toclient/125";
    private static final String clientid = "server";

    private MqttClient client;
    private MqttTopic topic;
    private MqttTopic topic125;
    private String userName = "admin";
    private String passWord = "password";

    private MqttMessage message;

    public Server() throws MqttException {
        // MemoryPersistence设置clientid的保存形式,默认为以内存保存
        client = new MqttClient(HOST, clientid, new MemoryPersistence());
        connect();
    }

    private void connect() {
        MqttConnectOptions options = new MqttConnectOptions();
        options.setCleanSession(false);
        options.setUserName(userName);
        options.setPassword(passWord.toCharArray());
        // 设置超时时间
        options.setConnectionTimeout(10);
        // 设置会话心跳时间
        options.setKeepAliveInterval(20);
        try {
            client.setCallback(new PushCallback());
            client.connect(options);
            topic = client.getTopic(TOPIC);
            topic125 = client.getTopic(TOPIC125);
        } catch (Exception e) {
            e.printStackTrace();
        }
    }

    public void publish(MqttTopic topic , MqttMessage message) throws MqttPersistenceException,
            MqttException {
        MqttDeliveryToken token = topic.publish(message);
        token.waitForCompletion();
        System.out.println("message is published completely! "
                + token.isComplete());
    }

    public static void main(String[] args) throws MqttException {
        Server server = new Server();

        server.message = new MqttMessage();
        server.message.setQos(2);
        server.message.setRetained(true);
        server.message.setPayload("给客户端124推送的信息".getBytes());
        server.publish(server.topic , server.message);

        server.message = new MqttMessage();
        server.message.setQos(2);
        server.message.setRetained(true);
        server.message.setPayload("给客户端125推送的信息".getBytes());
        server.publish(server.topic125 , server.message);

        System.out.println(server.message.isRetained() + "------ratained状态");
    }
}
客户端代码:
package bsit.mqtt.demo.one_way;

import java.util.concurrent.Executors;
import java.util.concurrent.ScheduledExecutorService;
import java.util.concurrent.TimeUnit;

import org.eclipse.paho.client.mqttv3.MqttClient;
import org.eclipse.paho.client.mqttv3.MqttConnectOptions;
import org.eclipse.paho.client.mqttv3.MqttException;
import org.eclipse.paho.client.mqttv3.MqttSecurityException;
import org.eclipse.paho.client.mqttv3.MqttTopic;
import org.eclipse.paho.client.mqttv3.persist.MemoryPersistence;

public class Client {

    public static final String HOST = "tcp://192.168.1.3:61613";
    public static final String TOPIC = "toclient/124";
    private static final String clientid = "client124";
    private MqttClient client;
    private MqttConnectOptions options;
    private String userName = "admin";
    private String passWord = "password";

    private ScheduledExecutorService scheduler;

    private void start() {
        try {
            // host为主机名,clientid即连接MQTT的客户端ID,一般以唯一标识符表示,MemoryPersistence设置clientid的保存形式,默认为以内存保存
            client = new MqttClient(HOST, clientid, new MemoryPersistence());
            // MQTT的连接设置
            options = new MqttConnectOptions();
            // 设置是否清空session,这里如果设置为false表示服务器会保留客户端的连接记录,这里设置为true表示每次连接到服务器都以新的身份连接
            options.setCleanSession(true);
            // 设置连接的用户名
            options.setUserName(userName);
            // 设置连接的密码
            options.setPassword(passWord.toCharArray());
            // 设置超时时间 单位为秒
            options.setConnectionTimeout(10);
            // 设置会话心跳时间 单位为秒 服务器会每隔1.5*20秒的时间向客户端发送个消息判断客户端是否在线,但这个方法并没有重连的机制
            options.setKeepAliveInterval(20);
            // 设置回调
            client.setCallback(new PushCallback());
            MqttTopic topic = client.getTopic(TOPIC);
            //setWill方法,如果项目中需要知道客户端是否掉线可以调用该方法。设置最终端口的通知消息
            options.setWill(topic, "close".getBytes(), 2, true);

            client.connect(options);
            //订阅消息
            int[] Qos  = {1};
            String[] topic1 = {TOPIC};
            client.subscribe(topic1, Qos);

        } catch (Exception e) {
            e.printStackTrace();
        }
    }

    public static void main(String[] args) throws MqttException {
        Client client = new Client();
        client.start();
    }
}
MQTT订阅回调类:
package bsit.mqtt.demo.one_way;

import org.eclipse.paho.client.mqttv3.IMqttDeliveryToken;
import org.eclipse.paho.client.mqttv3.MqttCallback;
import org.eclipse.paho.client.mqttv3.MqttMessage;

/**
 * 发布消息的回调类
 *
 * 必须实现MqttCallback的接口并实现对应的相关接口方法CallBack 类将实现 MqttCallBack。
 * 每个客户机标识都需要一个回调实例。在此示例中,构造函数传递客户机标识以另存为实例数据。
 * 在回调中,将它用来标识已经启动了该回调的哪个实例。
 * 必须在回调类中实现三个方法:
 *
 *  public void messageArrived(MqttTopic topic, MqttMessage message)接收已经预订的发布。
 *
 *  public void connectionLost(Throwable cause)在断开连接时调用。
 *
 *  public void deliveryComplete(MqttDeliveryToken token))
 *  接收到已经发布的 QoS 1 或 QoS 2 消息的传递令牌时调用。
 *  由 MqttClient.connect 激活此回调。
 *
 */
public class PushCallback implements MqttCallback {

    public void connectionLost(Throwable cause) {
        // 连接丢失后,一般在这里面进行重连
        System.out.println("连接断开,可以做重连");
    }

    public void deliveryComplete(IMqttDeliveryToken token) {
        System.out.println("deliveryComplete---------" + token.isComplete());
    }

    public void messageArrived(String topic, MqttMessage message) throws Exception {
        // subscribe后得到的消息会执行到这里面
        System.out.println("接收消息主题 : " + topic);
        System.out.println("接收消息Qos : " + message.getQos());
        System.out.println("接收消息内容 : " + new String(message.getPayload()));
    }
}
运行服务端代码,可看到服务器会给客户端124/125各推送一条消息,

在运行124客户端代码,可看到124客户端接收的信息:

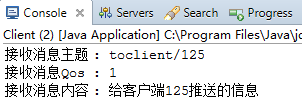
然后把客户端代码的Topic改为TOPIC = “toclient/125”;clientid = “client125”;再运行该段代码,可看到125客户端接收的信息:

多个客户端订阅同一主题,其clientid必不相同。客户端124/125订阅各自主题的内容,但是不同时间启动,都在启动后接收到各自信息,这体现出了服务器的推送功能。同样的,发送的主题信息,可以在服务器的topic可以看到,访问路径是:http://127.0.0.1:61680/
其实,如若服务端和客户端相互通信,即客户端可以订阅可以发布,服务端可以订阅也可以发布,则可不区分服务端客户端,两边代码几乎一样。类似,两个客户端都在订阅同一主题,这时由第三个客户端发布这一主题的请求,前两个客户端同样可以接受该主题的内容,这时三个客户端的代码几乎一样,只是前两个是订阅,后一个是发布。
本文转载自博客园:https://www.cnblogs.com/chenrunlin/p/5109028.html