Maven学习笔记(八)-Maven整合SSM(spring+springMVC+Mybatis)框架
一、所用版本与步骤
三个框架所使用的版本:
mybatis ---- 3.2.5
spring ---- 4.3.3.RELEASE
spring mvc ---- 4.3.3.RELEASE
其它:
junit ---- 4.8.1
mysql ---- 5.1.38
log4j ---- 1.2.17
c3p0 ---- 0.9.2.1
mybatis-spring ---- 1.3.0
jstl ---- 1.2
SSM框架整合的一般步骤:
1.新建一个Maven WEB项目
2.导入MySQL与Mybatis 依赖
3.写Mybatis配置文件及实体类和映射文件
4.测试(Mybatis)
**************
5.导入Spring 依赖
6.写Spring 配置文件applicationContext(引入db,c3p0DataSource,SessionFactory,事物)
7.测试(Spring与Mybatis)
**************
8.整合Spring MVC
9.写Controller包与Controller类
10.写Spring MVC配置文件(springmvc.xml)
11.web.xml中加载配置文件(Spring,SpringMVC)
二、整合框架
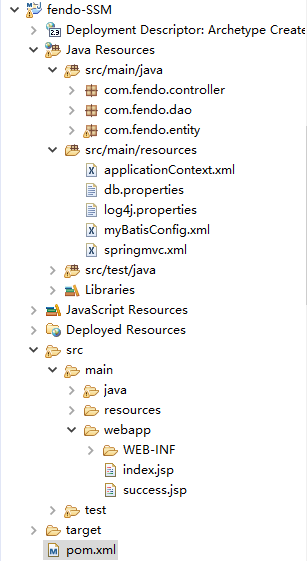
项目结构:
pom.xml文件内容:
  4.0.0
  com.fendo.ssm
  fendo-SSM
  war
  0.0.1-SNAPSHOT
  fendo-SSM Maven Webapp
  http://maven.apache.org


		4.3.3.RELEASE


      junit
      junit
      3.8.1
      test


			javax.servlet
			servlet-api
			2.3
			provided


			mysql
			mysql-connector-java
			5.1.38


			org.mybatis
			mybatis
			3.2.5


			log4j
			log4j
			1.2.17


			org.springframework
			spring-core
			${spring.version}


			org.springframework
			spring-web
			${spring.version}


			org.springframework
			spring-oxm
			${spring.version}


			org.springframework
			spring-tx
			${spring.version}


			org.springframework
			spring-jdbc
			${spring.version}


			org.springframework
			spring-webmvc
			${spring.version}


			org.springframework
			spring-aop
			${spring.version}


			org.springframework
			spring-context-support
			${spring.version}


			org.springframework
			spring-test
			${spring.version}


		    com.mchange
		    c3p0
		    0.9.2.1


		    org.mybatis
		    mybatis-spring
		    1.3.0


	       jstl
	       jstl
	      1.2


    fendo-SSM


          org.apache.tomcat.maven
          tomcat7-maven-plugin
          2.2

                http://localhost:8080/manager/text
		admin
		admin
1.新建一个Maven WEB项目
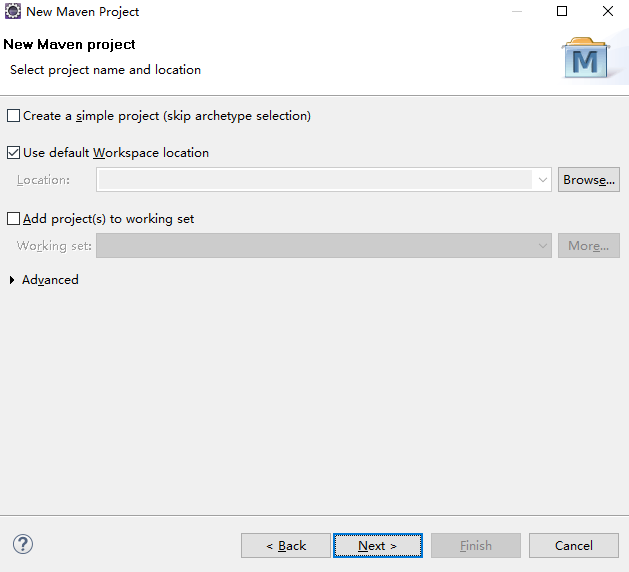
在eclipse菜单栏中选择“File”---“News”---“Other”菜单项,就会打开如下对话窗口,在窗口中选择“Maven”节点下“Maven Project”条目,如下图所示:

点击Next
点击Next

点击Next
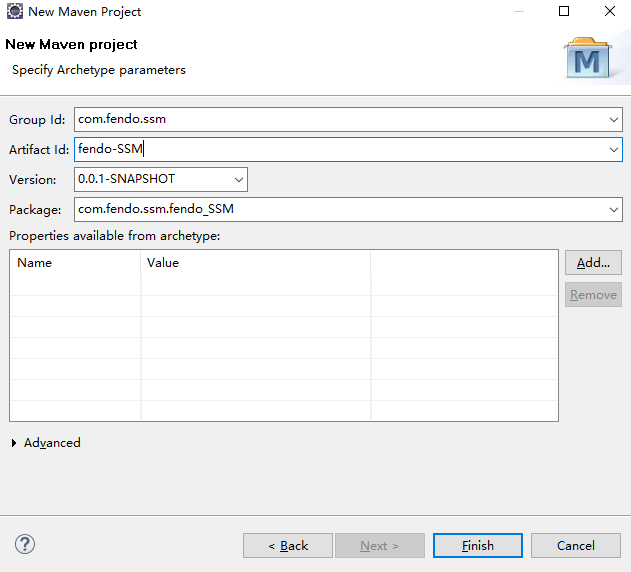
点击Finish

index.jsp页面报错: The superclass "javax.servlet.http.HttpServlet" was not found on the Java Build Path
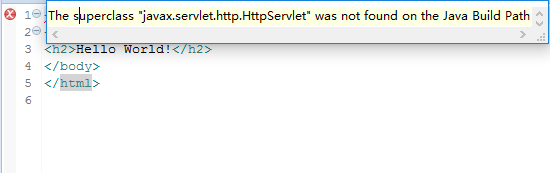
原因是没加入ServletAPI所导致的,在pom.xml中加入依赖就行了。
			javax.servlet
			servlet-api
			2.3
			provided
2.导入MySQL与Mybatis 依赖
			mysql
			mysql-connector-java
			5.1.38


			log4j
			log4j
			1.2.17


			org.mybatis
			mybatis
			3.2.5
3.写Mybatis配置文件及实体类和映射文件
新建两个包:
com.fendo.entity ----实体包
com.fendo.dao ----方法包
并在其中加入一个Person类和Person.xml的映射文件,和一个操作Person的接口类,以及一个测试类:

新建一个表: person

插入几条数据

实体类: person.java
package com.fendo.entity;

public class Person {

	private int pid;
	private String pname;
	private int page;

	private int pageIndex;
	private int pageSize;
	public int getPageIndex() {
		return pageIndex;
	}
	public void setPageIndex(int pageIndex) {
		this.pageIndex = pageIndex;
	}
	public int getPageSize() {
		return pageSize;
	}
	public void setPageSize(int pageSize) {
		this.pageSize = pageSize;
	}
	public Person() {
		super();
		// TODO Auto-generated constructor stub
	}
	public Person(int pid, String pname, int page) {
		super();
		this.pid = pid;
		this.pname = pname;
		this.page = page;
	}
	public int getPid() {
		return pid;
	}
	public void setPid(int pid) {
		this.pid = pid;
	}
	public String getPname() {
		return pname;
	}
	public void setPname(String pname) {
		this.pname = pname;
	}
	public int getPage() {
		return page;
	}
	public void setPage(int page) {
		this.page = page;
	}
	@Override
	public String toString() {
		return "Person [pid=" + pid + ", pname=" + pname + ", page=" + page + "]";
	}
	public Person(String pname, int page) {
		super();
		this.pname = pname;
		this.page = page;
	}


}
SQL操作配置文件: Person.xml
insert into person(pname,page) values(#{pname},#{page})
方法接口类: PersonDao.java
package com.fendo.dao;

import java.util.List;

import com.fendo.entity.Person;


public interface PersonDao {

	public List getPersons();

	public void addPerson(Person person);
}
测试类: TestMybatis.java
package com.fendo.test;

import java.io.IOException;

import org.apache.ibatis.io.Resources;
import org.apache.ibatis.session.SqlSession;
import org.apache.ibatis.session.SqlSessionFactory;
import org.apache.ibatis.session.SqlSessionFactoryBuilder;
import org.junit.After;
import org.junit.Before;
import org.junit.Test;

import com.fendo.dao.PersonDao;

public class TestMybatis {

	private SqlSession sqlSession;


	@Before
	public void before(){
		try {
			SqlSessionFactory sqlSessionFactory=new SqlSessionFactoryBuilder().build(Resources.getResourceAsStream("myBatisConfig.xml"));
			sqlSession = sqlSessionFactory.openSession();
		} catch (IOException e) {
			e.printStackTrace();
		}
	}

	@After
	public void after(){
		sqlSession.commit();
		sqlSession.close();
	}


	@Test
	public void test(){
		PersonDao personDao=sqlSession.getMapper(PersonDao.class);
		System.out.println(personDao.getPersons().size());
	}
}
4.测试(Mybatis)
Mybatis测试成功,下载地址: http://download.csdn.net/detail/u011781521/9714668
5.导入Spring 依赖
4.3.3.RELEASE
			org.springframework
			spring-core
			${spring.version}


			org.springframework
			spring-web
			${spring.version}


			org.springframework
			spring-oxm
			${spring.version}


			org.springframework
			spring-tx
			${spring.version}


			org.springframework
			spring-jdbc
			${spring.version}


			org.springframework
			spring-webmvc
			${spring.version}


			org.springframework
			spring-aop
			${spring.version}


			org.springframework
			spring-context-support
			${spring.version}


			org.springframework
			spring-test
			${spring.version}


		    com.mchange
		    c3p0
		    0.9.2.1


		    org.mybatis
		    mybatis-spring
		    1.3.0
6.写Spring 配置文件applicationContext(引入db,c3p0DataSource,SessionFactory,事物)
在src/main/resources下新建applicationContext.xml,以及db.properties配置文件
applicationContext.xml内容如下
配置Dao接口的两种方法说明

db.properties内容如下
uname=root
upass=123
driver_class=com.mysql.jdbc.Driver
url=jdbc:mysql://localhost:3306/test?useUnicode=true&characterEncoding=UTF-8

initPoolSize=5
maxPoolSize=10
把myBatisConfig.xml文件修改成如下
连接数据库属性哪些配置移到了applicationContext.xml文件中去了。
7.测试(Spring与Mybatis)
新建TestSpringMybatis测试类
public class TestSpringMybatis {
public static void main(String[] args) {
//01.加载spring配置文件
ApplicationContext ac=new ClassPathXmlApplicationContext("applicationContext.xml");
PersonDao personDao=(PersonDao) ac.getBean("personDao");
personDao.addPerson(new Person("小小A", 10));
System.out.println(personDao.getPersons().size());
}
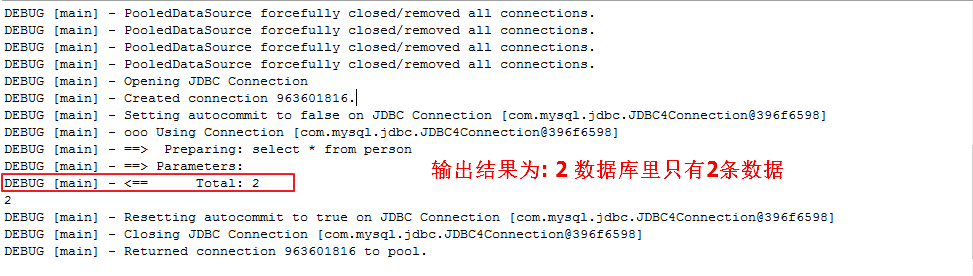
}运行输出结果如下:

spring+mybatis整合成功!!!!
8.整合Spring MVC
先写一个简单的注册页面与一个注册成功页面
index.jsp
<%@ page language="java" contentType="text/html; charset=utf-8"
pageEncoding="utf-8"%>
注册页面
success.jsp
<%@ page language="java" contentType="text/html; charset=UTF-8"
    pageEncoding="UTF-8"%>
<%@ taglib uri="http://java.sun.com/jsp/jstl/core" prefix="c"%>

<%@ page isELIgnored="false" %>


Insert title here


			编号
			姓名
			年龄


				${p.pid}
				${p.pname}
				${p.page}
这里导入了JSTL所以要在pom.xml中引入依赖
	jstl
	jstl
	1.2
9.写Controller包与Controller类
新建一个Controler包和一个PersonController类
@Controller
public class PersonController {

	@Autowired
	private PersonDao personDao;

	@RequestMapping("/addPerson")
	public ModelAndView addPerson(Person person){
		System.out.println("页面数据:"+person);

		//加入数据
		personDao.addPerson(person);

		//查数据
		List persons=personDao.getPersons();

		//存起来
		ModelAndView modelAndView=new ModelAndView();
		modelAndView.setViewName("success");
		modelAndView.addObject("persons", persons);

		return modelAndView;
	}

}
10.写Spring MVC配置文件(springmvc.xml)
11.web.xml中加载配置文件(Spring,SpringMVC)
  Archetype Created Web Application


		contextConfigLocation
		classpath:applicationContext.xml


		org.springframework.web.context.ContextLoaderListener


		springDispatcherServlet
		org.springframework.web.servlet.DispatcherServlet

			contextConfigLocation
			classpath:springmvc.xml

		1


		springDispatcherServlet
		*.action
最后在依赖中加入tomcat插件
          org.apache.tomcat.maven
          tomcat7-maven-plugin
          2.2

          		    http://localhost:8080/manager/text
					admin
					admin
然后右键项目-->Run AS --> Run Configurations ,在maven build的goals中输入命令: tomcat7:run

点击Run

然后访问: http://localhost:8080/fendo-SSM/index.jsp
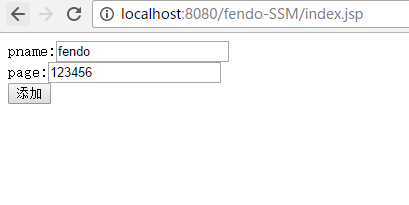
点击添加

添加成功

完整的项目地址: http://download.csdn.net/detail/u011781521/9714655