环境准备
- IDEA 社区版: 2019.3
- jdk: 1.8.0_241
- tomcat: 7.0.99
- maven: 3.6.3
- spring-boot:2.2.5.RELEASE
插件
- spring Assistant:解决社区版没有spring initializr
- Smart Tomcat:解决社区版没有tomca
- free mybatis plugin: 方便在mapper接口方法和mapper XML文件之间来回切换的插件
入坑之路
第一个接口,新建HomeController,@RequestMapping注解设定接口的路由,如下所示:
@RestController
public class HomeController {

    @RequestMapping("hello")
    public String hello()
    {
        return  "Hello World!";
    }
}
运行项目,在Postman中请求结果:
加上Mybatis
我在该项目中利用了mybatis,MyBatis 是一款优秀的持久层框架,它支持定制化 SQL、存储过程以及高级映射。用其他的框架也类似吧,大同小异,因为接触java时间比较短,之前一直从事.net方面的项目开发工作。
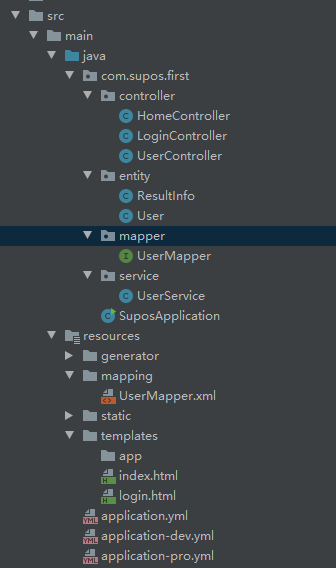
这是我建立的目录结构,分别建立了controller、entity、mapper、service包,按字面意思也很好理解了,控制器,实体,映射接口,服务。resources中加上mapping文件夹,用来存放xml映射。如下图所示。
配置
可以看出,我把application.properties配置文件删除了,用application.yml替换了,接下来看一下具体配置内容。
application.yml
spring:
  profiles:
    active: dev
application-dev.yml
server:
  port: 8080
spring:
  datasource:
    username: root
    password: 123456
    url: jdbc:mysql://localhost:3306/testdb?useUnicode=true&characterEncoding=utf-8&useSSL=true&serverTimezone=UTC
    driver-class-name: com.mysql.cj.jdbc.Driver

mybatis:
  mapper-locations: classpath:mapping/*Mapper.xml
  type-aliases-package: com.supos.first.entity
datasource
比较简单,稍微记录下就可以。可能是因为我的环境比较新,提示com.mysql.jdbc.Driver 过时了,需要改成com.mysql.cj.jdbc.Driver。
mybatis
- mapper-locations:映射的xml路径,xml的名称必须与mapper的接口名称一致。
- type-aliases-package:实体类的包名
这样配置基本就OK了
码代码
- 首先修改入口函数,@MapperScan将mapper注入到Spring,扫描包。
@SpringBootApplication
@MapperScan("com.supos.first.mapper")
public class SuposApplication {

   public static void main(String[] args) {
      SpringApplication.run(SuposApplication.class, args);
   }
}
- 创建一个User实体类,很简单,只有三个字段。
package com.supos.first.entity;

/**
 * @Classname ResultInfo
 * @Description TODO
 * @Date 2020/3/26 13:47
 * @Created by zhanwei
 */
public class User {
    private Integer id;
    private String name;
    private Integer age;

    public Integer getId() {
        return id;
    }
    public void setId(Integer id) {
        this.id = id;
    }
    public String getName() {
        return name;
    }
    public void setName(String name) {
        this.name = name;
    }
    public Integer getAge() {
        return age;
    }
    public void setAge(Integer age) {
        this.age = age;
    }
    @Override
    public String toString() {
        return "User{" +
                "id=" + id +
                ", name='" + name + '\'' +
                ", age='" + age + '\'' +
                '}';
    }
}
- 创建UserMapper接口,里面有三个接口
package com.supos.first.mapper;

import com.supos.first.entity.User;
import org.springframework.stereotype.Repository;
import java.util.List;

/**
 * @Classname ResultInfo
 * @Description TODO
 * @Date 2020/3/26 13:47
 * @Created by zhanwei
 */
@Repository
public interface UserMapper {

    List GetAllUser();

    User GetUser(int id);

    int InsertUser(User user);
}
- 在resources/mapping文件夹下,新建一个UserMapper.xml文件,id必须与接口定义一样
insert into user(Name,Age) values(#{name},#{age})
- 创建UserService服务类
package com.supos.first.service;

import com.supos.first.entity.User;
import com.supos.first.mapper.UserMapper;
import org.springframework.beans.factory.annotation.Autowired;
import org.springframework.stereotype.Service;
import java.util.List;

/**
 * @Classname ResultInfo
 * @Description TODO
 * @Date 2020/3/26 13:47
 * @Created by zhanwei
 */
@Service
public class UserService {

    @Autowired
    UserMapper userMapper;

    public List GetAllUser(){
        return userMapper.GetAllUser();
    }
     public User Sel(int id)
     {
         return userMapper.GetUser(id);
     }
    public int Insert(User user)
    {
        return userMapper.InsertUser(user);
    }
}
- 创建UserController控制器
package com.supos.first.controller;

import com.supos.first.entity.ResultInfo;
import com.supos.first.entity.User;
import com.supos.first.service.UserService;
import org.springframework.beans.factory.annotation.Autowired;
import org.springframework.web.bind.annotation.*;
import java.util.List;

/**
 * @Classname TestController
 * @Description TODO
 * @Date 2020/3/18 15:56
 * @Created by zhanwei
 */
@RestController
@RequestMapping("/testBoot")
public class UserController {
    @Autowired
    private UserService userService;

    @RequestMapping("getUser")
    public ResultInfo GetUser()
    {
        ResultInfo result=new ResultInfo();
        List list=userService.GetAllUser();
        result.setData(list);
        result.setCode(200);
        result.setResult(true);
        return result;
    }

    @RequestMapping("getUser/{id}")
    public ResultInfo GetUser(@PathVariable int id)
    {
        ResultInfo result=new ResultInfo();
        User user=userService.Sel(id);
        result.setData(user);
        result.setCode(200);
        result.setResult(true);
        return result;
    }

    @RequestMapping(value = "Insert",method = RequestMethod.POST)
    public String InsertUser(@RequestBody User user)
    {
        int row=userService.Insert(user);
        ResultInfo result=new ResultInfo();
        if(row>0) {
            result.setResult(true);
            result.setCode(200);
        }
        else {
            result.setResult(false);
            result.setCode(0);
        }
        return result;
    }
}
- 为了返回结果的统一性,我定义了一个ResultInfo的类,所有返回结果都可以套用。
package com.supos.first.entity;

/**
 * @Classname ResultInfo
 * @Description TODO
 * @Date 2020/3/26 13:47
 * @Created by zhanwei
 */
public class ResultInfo {
    private boolean result;
    private Integer code;
    private String message;
    private Object data;

    public boolean getResult() {
        return result;
    }
    public void setResult(boolean result) {
        this.result = result;
    }
    public Object getData() {
        return data;
    }
    public void setData(Object data) {
        this.data = data;
    }
    public Integer getCode() {
        return code;
    }
    public void setCode(Integer code) {
        this.code = code;
    }
    public String getMessage() {
        return message;
    }
    public void setMessage(String message) {
        this.message = message;
    }
}
这样就可以运行了。
ok成功了,我们去postman里面测试下这三个接口
测试
- Insert接口
- getUser接口,根据id获取用户信息
- getUser所有用户信息,data是个列表。
这样后台代码基本算是走通了,接下来我们把前端静态页面也放进去,请关注我,持续更新。


