ELK集群
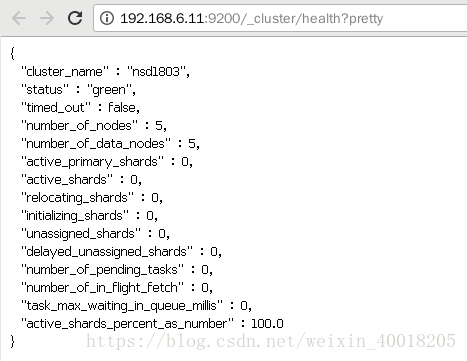
Cat < Cat >f1 < 重定项 < > >> << Stdin 0 标准输入(读) Stdout 1 标准输出(写) Stderr 2 标准错误(写) [root@rootroom9pc01 ~]# ulimit -n 1024 在linux中都是文件 文件描述符 [root@rootroom9pc01 ~]# cd /proc/$$ [root@rootroom9pc01 4990]# cd fd [root@rootroom9pc01 fd]# ls 0 1 2 255 [root@rootroom9pc01 fd]# cat /etc/passwd > 1 Echo $$ Echo “hello” > /proc/12345/fd/1 Echo “hello” > /dev/tcp/192.168.6.10/80 Tcpdump -i eth0 -n -xx -v host 192.168.6.10/80 Exec ls Cat ff Exec 2> ff Tail -f ff Rm -f ff Exec 1> ff //修改文件描述符 Cat ff Exec 创建文件描述符 Exec 6>ff Cat f1 >$6 //对文件描述符操作就是对文件操作 Cat ff Cd /proc/$$/fd Exec 6>&- Ls Cat ff #!/bin/bash Exec 9<>/dev/tcp/www.baidu.com/80 Echo -ne “GET /index.html HTTP/1.1\r\n” >&9 Echo -ne “Host: www.baidu.com\r\n\r\n” >&9 Cat &9 Chmod 755 ff Curl www.baidu.com Man bash /dev/udp /dev/stdin ELK是什么? ELK其实并不是一款软件,而是一整套解决方案,是三个软件产品的首字母缩写 Elasticsearch:负责日志检索和储存 Logstash:负责日志的收集和分析、处理 Kibana:负责日志的可视化 这三款软件都是开源软件,通常是配合使用,而且又先后归于Elastic.co公司名下,故被简称为ELK ELK能做什么? ELK组件在海量日志系统的运维中,可用于解决: 分布式日志数据集中式查询和管理 系统监控,包含系统硬件和应用各个组件的监控 – 故障排查 – 安全信息和事件管理 – 报表功能 cd /etc/libvirt/qemu/ [root@rootroom9pc01 qemu]# sed 's/demo/node1/' demo.xml > /etc/libvirt/qemu/node1.xml cd /var/lib/libvirt/images/ [root@rootroom9pc01 images]# qemu-img create -b node.qcow2 -f qcow2 node1.img 20G [root@rootroom9pc01 qemu]# virsh define /etc/libvirt/qemu/node1.xml virsh # start node1 virsh # console node1 [root@localhost ~]# vim /etc/sysconfig/network-scripts/ifcfg-eth0 DEVICE=eth0 ONBOOT=yes IPV6INIT=no BOOTPROTO=static TYPE=Ethernet IPADDR="192.168.6.11" NETMASK="255.255.255.0" GATEWAY="192.168.6.254" halt -p virsh # start node1 [root@localhost ~]# hostnamectl set-hostname es1 [root@localhost ~]# exit logout CentOS Linux 7 (Core) Kernel 3.10.0-693.el7.x86_64 on an x86_64 es1 login: [root@es1 ~]# ifconfig eth0: flags=4163 inet 192.168.6.11 [root@rootroom9pc01 ~]# yum search openjdk vim /etc/hosts 192.168.6.11 es1 [root@rootroom9pc01 ~]# mv '/root/桌面/ARCHITECTURE/architecture 02/elk/elk 1/elasticsearch-2.3.4.rpm' /var/ftp/public/ansible_soft/ [root@rootroom9pc01 ansible_soft]# ls ansible-2.4.2.0-2.el7.noarch.rpm python-paramiko-2.1.1-4.el7.noarch.rpm elasticsearch-2.3.4.rpm python-passlib-1.6.5-2.el7.noarch.rpm python2-jmespath-0.9.0-3.el7.noarch.rpm repodata python-httplib2-0.9.2-1.el7.noarch.rpm sshpass-1.06-2.el7.x86_64.rpm [root@rootroom9pc01 ansible_soft]# createrepo --update ./ [root@es1 ~]# cat /etc/yum.repos.d/local.repo [local_source] name=CentOS Source baseurl=ftp://192.168.6.254/public/ansible_soft enabled=1 gpgcheck=0 [local_centos] name=CentOS baseurl=ftp://192.168.6.254/centos7 enabled=1 gpgcheck=0 [root@es1 ~]# yum -y install java-1.8.0-openjdk [root@es1 ~]# yum -y install elasticsearch vim /etc/elasticsearch/elasticsearch.yml network.host: 0.0.0.0 [root@es1 ~]# systemctl start elasticsearch firefox:http://192.168.6.11:9200 elasticsearch 集群安装 一共安装 5 台 ES 数据库节点 配置所有主机的 /etc/hosts 192.168.1.11 es1 192.168.1.12 es2 192.168.1.13 es3 192.168.1.14 es4 192.168.1.15 es5 在所有节点安装 yum install -y java-1.8.0-openjdk elasticsearch 修改配置文件 vim /etc/elasticsearch/elasticsearch.yml cluster.name: nsd1803 node.name: 本机主机名称 network.host: 0.0.0.0 discovery.zen.ping.unicast.hosts: ["es1", "es2", "es3"] curl http://192.168.6.11:9200/_cluster/health?pretty 与启动顺序有关 失败时重启服务即可 [root@es1 ~]# systemctl restart elasticsearch{
"name" : "Valinor",
"cluster_name" : "elasticsearch",
"version" : {
"number" : "2.3.4",
"build_hash" : "e455fd0c13dceca8dbbdbb1665d068ae55dabe3f",
"build_timestamp" : "2016-06-30T11:24:31Z",
"build_snapshot" : false,
"lucene_version" : "5.5.0"
},
"tagline" : "You Know, for Search"
}
"name" : "Valinor",
"cluster_name" : "elasticsearch",
"version" : {
"number" : "2.3.4",
"build_hash" : "e455fd0c13dceca8dbbdbb1665d068ae55dabe3f",
"build_timestamp" : "2016-06-30T11:24:31Z",
"build_snapshot" : false,
"lucene_version" : "5.5.0"
},
"tagline" : "You Know, for Search"
}
