Elasticsearch6.X在linux系统安装部署
一.安装准备工作
安装参考文档:
ELK官网:https://www.elastic.co/
ELK官网文档:https://www.elastic.co/guide/index.html
ELK中文手册:https://www.elastic.co/guide/cn/elasticsearch/guide/current/index.html
ELK中文社区:https://elasticsearch.cn/
ELK-API :https://www.elastic.co/guide/en/elasticsearch/client/java-api/current/transport-client.html
(1)、规划安装目录
/usr/local/es
(2)、下载安装包
访问elasticSearch官网地址 https://www.elastic.co/
下载指定版本的安装包:elasticsearch-6.2.3.tar.gz
二 :安装
(1)、上传安装包到指定目录
通过FTP工具上传安装包到指定目录, 或者在服务器目录下直接下载: wget https://artifacts.elastic.co/downloads/elasticsearch/elasticsearch-6.6.0.tar.gz
(2)、解压安装包
tar -zxvf elasticsearch-6.2.3.tar.gz
(3)、重命名安装目录
mv elasticsearch-6.6.0 elasticsearch
(4)、修改配置文件
进入到es安装目录下的config文件夹中,修改elasticsearch.yml 文件
cd /usr/local/es/elasticsearch/config
vi /usr/local/es/elasticsearch/config/elasticsearch.yml
修改的主要内容:
# ---------------------------------- Cluster -----------------------------------

# Use a descriptive name for your cluster:
#配置es的集群名称,默认是elasticsearch,es会自动发现在同一网段下的es,如果在同一网段下有多个集##群,就可以用这个属性来区分不同的集群。
#
cluster.name: elasticsearch
#
# ------------------------------------ Node ------------------------------------
#
# Use a descriptive name for the node:
#节点名称
node.name: node-1
#
# Add custom attributes to the node:
#
#node.attr.rack: r1
#
# ----------------------------------- Paths ------------------------------------
#
# Path to directory where to store the data (separate multiple locations by comma):
#设置索引数据的存储路径
path.data: /usr/local/elasticsearch/data
#设置日志的存储路径
path.logs: /usr/local/elasticsearch/logs
#
# ---------------------------------- Network -----------------------------------
#
# Set the bind address to a specific IP (IPv4 or IPv6):
#
#设置当前的ip地址,通过指定相同网段的其他节点会加入该集群中
network.host: 192.168.0.108
#
# Set a custom port for HTTP:
#设置对外服务的http端口
http.port: 9200
#
# For more information, consult the network module documentation.
#
注:
1、补齐必要的目录
mkdir -p /usr/local/elasticsearch/data
mkdir -p /usr/local/elasticsearch/logs (目录可能已经存在,需先确定清楚)
2、network.host: 192.168.0.108(我本机的ip)
修改Elasticsearch的配置,使其支持外网访问。在浏览器中,访问http://xxxx:9200/(xxxx是运行elasticsearch的服务器的ip地址)即可。否则这可以在本机使用。
到此安装就OK了 启动 sh /usr/local/es/elasticsearch/bin/elasticsearch
三:前方高能请注意!
(1)开始启动会报错,因为安全问题elasticsearch 不让用root用户直接运行,所以要创建新用户。
因为安全问题elasticsearch 不让用root用户直接运行,所以要创建新用户。
具体操作如下:
useradd elastic
为用户赋权限
chown -R elastic:elastic /usr/local/es/elasticsearch/
然后使用es用户启动 :su elastic
cd /usr/local/es/elasticsearch/
启动es命令:sh /usr/local/es/elasticsearch/bin/elasticsearch
(2) 在elastic用户下启动时报错
需要给用户授权
chown -R elastic:elastic /usr/local/es/elasticsearch/
然后启动:sh /usr/local/es/elasticsearch/bin/elasticsearch
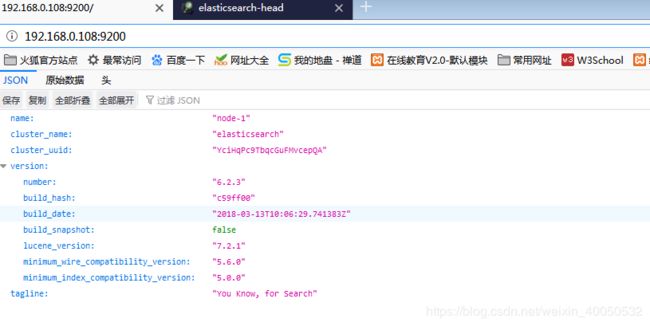
通过http://192.168.0.108:9200/出现下图的提示就成功了
这样的启动之时启动到了前台,关闭窗口后就会退出,一般我们启动在后台命令:
sh /usr/local/es/elasticsearch/bin/elasticsearch -d
注:后台启动后通过管道函数grep将其关闭,操作如下:
ps -ef|grep elasticsearch
kill -9 23222
四:分词器的安
(1):分词器的下载
注意分词器的版本必须和Elasticsearch的版本一致,下载地址:
https://github.com/medcl/elasticsearch-analysis-ik/releases/download/v6.2.3/elasticsearch-analysis-ik-6.2.3.zip(2):将其解压缩有放到 plugins目录下即可
/usr/local/es/elasticsearch/plugins
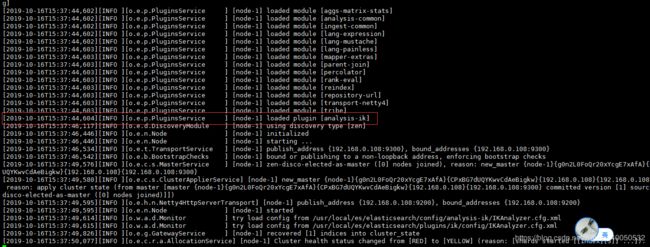
(3):重行启动elasticsearch后,启动日志中看见analysis-ik就说明成功了
五.ES插件安装
一、Head简介
在学习ElasticSearch(以下简称ES)的过程中,必不可少需要通过一些工具查看ES的运行状态以及数据。Head插件是ES的图形化界面,方便用户对数据进行增删改查,基于REST的四种方式进行数据交互。
二、Head安装
1、下载Head插件,上传至/home/目录下,并解压至/usr/local/es/elasticsearch-head/目录,需要注意ES5.0以上,Head插件不能放在ES的 plugins、modules目录下,否则ES启动会报错,下载地址
https://github.com/mobz/elasticsearch-head下载zip 解压
注意首先需要安装unzip解压命令,下面是解压该文件:
unzip /usr/local/es/elasticsearch-head-master.zip
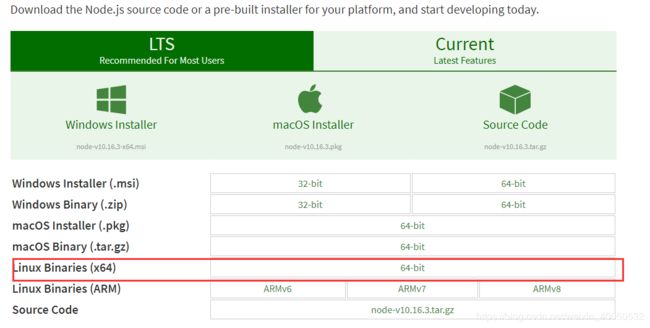
2、Head插件本质上还是一个node.js工程,因此首先需要安装node,如下图所示,下载之后上传至home目录。下载地址:
https://nodejs.org/en/download/
a、将node解压至/usr/node/目录下;
b、配置环境变量,执行:vim /etc/profile命令,并添加如下内容:
vim /etc/profile
export NODE_HOME=/usr/local/node
export PATH=$PATH:$NODE_HOME/bin
export NODE_PATH=$NODE_HOME/lib/node_modules
c、立即生效环境变量,并测试node环境变量,npm是随同node.js一起安装的包管理工具,能解决node.js代码部署上的很多问题,如下图所示:
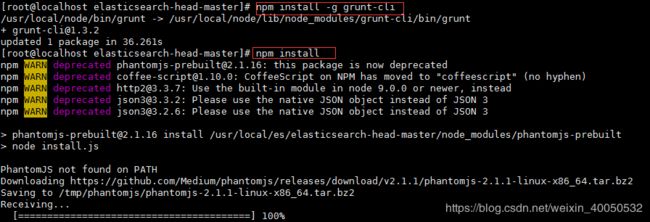
3、Grunt,简而言之就是运行在node.js上面的任务管理器(task runner),其可以在任何语言和项目中自动化指定的任务,可通过npm来安装Grunt。是一个很方便的构建工具,可以进行打包压缩、测试、执行等等的工作,6.0里的Head插件就是通过Grunt启动的。因此还需要安装一下Grunt:
首先切换至 cd /usr/local/es/elasticsearch-head-master目录下,执行如下命令
npm install -g grunt-cli
上述命令执行后会在当前目录生成node_modules文件夹。再执行如下代码下载依赖包:
npm install
三、Head配置
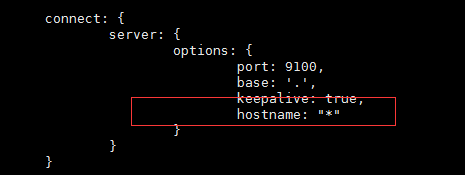
1、修改服务器监听地址,增加hostname属性,设置为 hostname: ‘*’
cd /usr/local/es/elasticsearch-head-master
vi Gruntfile.js
修改内容如下:
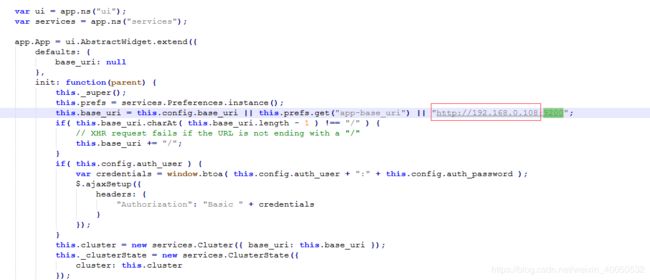
2、修改head的连接地址,将localhost修改为ES的服务器地址(文件内容较多,建议打开文件通过查找关键字定位,如下图所示)
vim /usr/local/es/elasticsearch-head-master/_site/app.js
3、修改elasticsearch配置文件:vi /usr/local/es/elasticsearch/config/elasticsearch.yml
在最后添加如下内容:
http.cors.enabled: true
http.cors.allow-origin: "*"
node.master: true
node.data: true
四、Head运行
再次切换至/usr/local/es/elasticsearch-head-master/目录下,执行如下命令,若是Ctrl+C退出后,则将终止程序:
grunt server
如果需要在后台运行,则执行如下命令:
nohup grunt server &exit

若是想关闭Head程序,可查看进程(如下所示),并执行结束进程命令:kill -9 进程ID

ps -ef | grep elasticsearch-head-master
下面是通过浏览器访问,可以看到head的主界面:
以上就是Elasticsearch 及插件elasticsearch-head-master 和分词器的安装,躺了好多坑,在这儿做个记录,防止以后忘记,有疏漏之处,还请不吝赐教

