ELK集群部署
做elastic stack集群部署
主机1:192.168.31.200 kibana
主机2:192.168.31.201
主机3:192.168.31.203
首先去官网下载对应的包,这里我们选择rpm安装
https://www.elastic.co/downloads
	ElasticSearch 5的程序环境:
		配置文件:
			/etc/elasticsearch/elasticsearch.yml
			/etc/elasticsearch/jvm.options
			/etc/elasticsearch/log4j2.properties
		Unit File:elasticsearch.service
		程序文件:
			/usr/share/elasticsearch/bin/elasticsearch
			/usr/share/elasticsearch/bin/elasticsearch-keystore:
			/usr/share/elasticsearch/bin/elasticsearch-plugin:管理插件程序
编辑配置文件
vim /etc/elasticsearch/elasticsearch.yml
cluster.name: myels
node.name: node1
path.data: /els/data
path.logs: /els/log
network.host: 192.168.31.200
discovery.zen.ping.unicast.hosts: ["node1", "node2","node3"]
discovery.zen.minimum_master_nodes: 2

vim vim /etc/elasticsearch/jvm.options
-Xms2g
-Xmx2g
#初始化分给它2g
然后创建对应的目录
mkdir -pv /els/{data,log}
chown  -R elasticsearch.elasticsearch /els
els的相关模块说明
https://www.elastic.co/guide/en/elasticsearch/reference/current/modules.html
安装完成后可以通过curl http://192.168.31.200:9200/_cat来查看状态
curl http://192.168.31.200:9200/_cat/nodes?h=name,ip,port,uptime,jdk
node2 192.168.31.201 9300 26.5m 1.8.0_131
node3 192.168.31.203 9300  7.1m 1.8.0_131
node1 192.168.31.200 9300 34.5m 1.8.0_131
查看插件
/usr/share/elasticsearch/bin/elasticsearch-plugin list
5版本以后的插件可以作为一个独立的服务运行,这里我们去github上下载然后安装head。
https://github.com/mobz/elasticsearch-head.git

create a fork of elasticsearch-head on github
clone your fork to your machine
cd elasticsearch-head
npm install # downloads node dev dependencies
grunt dev # builds the distribution files, then watches the src directory for changes (if you have an warning like "Warning: Task “clean” failed. Use —force to continue.", well use —force ;) )

直接npm run start会占据前台,这里我们可以使用nohup npm run start &运行于后台
然后需要修改配置文件
http.cors.enabled: true
http.cors.allow-orign: "*"
自己上传一个文档测试,注意索引会自行创建
curl -XPUT 'node1:9200/students/major/1?pretty' -H 'Content-Type: application/json' -d '
{"name": "jerry", "age": 17, "course": "Pixie jianfa"}'

查看索引
curl 'node1:9200/_cat/indices'
curl -XGET 'node1:9200/students/_search?pretty'
curl -XGET 'node1:9200/_search/?q=course:shiba&pretty'
安装kibana界面
rpm -ivh kibana-6.5.4-x86_64.rpm
vim /etc/kibana/kibana.yml

server.host: "192.168.31.200"
server.port: 5601
server.name: "node1"
elasticsearch.url: "http://node1:9200"
直接启动即可
systemctl start kibana
我们再新添一台nginx主机,然后在上面安装filebeats和logstash软件。
rpm -ivh filebeat-6.5.4-x86_64.rpm
vim /etc/filebeat/filebeat.yml

hosts: ["node1:9200", "node2:9200"]

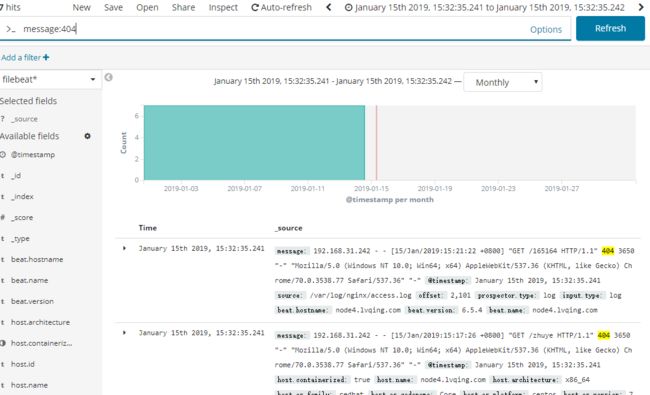
可以看到filebeat已经将数据推送到elasticsesarch上了
那么kibana上也可对数据进行处理了

但是filebeat处理数据的能力没有logstash好,所以我们再增加一个logstash节点,这里我们直接使用nginx主机
注意:logstash如果不使用logstash用户可能会产生一些权
限冲突的问题。
logstash的各插件配置官方文档https://www.elastic.co/guide/en/logstash/current/index.html
rpm -ivh logstash-6.5.4.rpm
vim /etc/logstash/conf.d/test.conf

input {
        stdin{}
}

output {
        stdout { codec => rubydebug }
}

检测语法,去掉-t就可以直接运行了
/usr/share/logstash/bin/logstash --path.settings /etc/logstash/ -t -f /etc/logstash/conf.d/test.conf
Sending Logstash logs to /var/log/logstash which is now configured via log4j2.properties
然后我们就可以在终端直接输入数据了
hello logstash
{
      "@version" => "1",
    "@timestamp" => 2019-01-15T12:35:51.470Z,
          "host" => "node4.lvqing.com",
       "message" => "hello logstash"
}
接下来我们配置logstash从beats读取数据,当然输出还是到屏幕上,稍后我们再进行配置输出到elasticsearch上
input {
        beats{
                host => '0.0.0.0'
                port => 5044
        }
}
然后我们需要修改filebeats输出的对象为logstash
output.logstash:
 hosts: ["192.168.31.204:5044"]

再启动logstash
/usr/share/logstash/bin/logstash --path.settings /etc/logstash/ -f /etc/logstash/conf.d/ceshi.conf
logstash就能收集到filebeat传过来的日志了,并且是已经帮我们切好片的
{
    "prospector" => {
        "type" => "log"
    },
         "input" => {
        "type" => "log"
    },
          "host" => {
                   "os" => {
             "version" => "7 (Core)",
              "family" => "redhat",
            "platform" => "centos",
            "codename" => "Core"
        },
                 "name" => "node4.lvqing.com",
                   "id" => "98b754e309454154b76d44862ecc843e",
        "containerized" => true,
         "architecture" => "x86_64"
    },
    "@timestamp" => 2019-01-15T13:51:36.416Z,
          "beat" => {
            "name" => "node4.lvqing.com",
         "version" => "6.5.4",
        "hostname" => "node4.lvqing.com"
    },
        "source" => "/var/log/nginx/access.log",
          "tags" => [
        [0] "beats_input_codec_plain_applied"
    ],
      "@version" => "1",
        "offset" => 2527,
       "message" => "192.168.31.242 - - [15/Jan/2019:21:51:30 +0800] \"GET /dsa HTTP/1.1\" 404 3650 \"-\" \"Mozilla/5.0 (Windows NT 10.0; Win64; x64) AppleWebKit/537.36 (KHTML, like Gecko) Chrome/70.0.3538.77 Safari/537.36\" \"-\""
}
然后logstash相对于filebea强大的地方就是他的过滤器,这里我们介绍使用grok插件,它已经事先定义好了正则,我们在使用的时候直接调用就可以了。
filter {
	grok {
		match => { "message" => ["%{IPORHOST:[nginx][access][remote_ip]} - %{DATA:[nginx][access][user_name]} \[%{HTTPDATE:[nginx
		][access][time]}\] \"%{WORD:[nginx][access][method]} %{DATA:[nginx][access][url]} HTTP/%{NUMBER:[nginx][access][http_version]}\
		" %{NUMBER:[nginx][access][response_code]} %{NUMBER:[nginx][access][body_sent][bytes]} \"%{DATA:[nginx][access][referrer]}\" \"
		%{DATA:[nginx][access][agent]}\""] }
		remove_field => "message"
	}
	date {
		match => [ "[nginx][access][time]", "dd/MMM/YYYY:H:m:s Z" ]
		remove_field => "[nginx][access][time]"
	}
	useragent {
		source => "[nginx][access][agent]"
		target => "[nginx][access][user_agent]"
		remove_field => "[nginx][access][agent]"
	}
	geoip {
		source => "[nginx][access][remote_ip]"
		target => "geoip"
		database => "/etc/logstash/GeoLite2-City.mmdb"
	}

}

output {
	elasticsearch {
		hosts => ["node1:9200","node2:9200","node3:9200"]
		index => "logstash-ngxaccesslog-%{+YYYY.MM.dd}"
	}
}