Nginx基础
Nginx是俄罗斯人编写的一款高性能的HTTP和反向代理服务器,在高连接并发的情况下,它能够支持高达50000个并发连接数的响应,但是内存、CPU等系统资源消耗却很低,运行很稳定。
Nginx的优势
为什么选择Nginx?因为它具有以下特点:
- 速度快,先天的事件驱动型设计、全异步的网络I/O处理机制、极少的进程间切换。
- 扩展性强,它支持很多第三方模块。
- 可靠性好,Nginx是基于多进程设计,每个worker进程相对独立,master进程在1个worker进程出错时可以快速“拉起”新的worker子进程提供服务。
- 低内存消耗,10000个非活跃的HTTP Keep-Alive连接在Nginx中仅消耗2.5MB的内存。
- 高并发,单机支持10万以上的并发连接。
- 热部署,master管理进程与worker工作进程的分离设计,使得Nginx能够提供热部署功能。
- 最自由的BSD许可协议,BSD许可协议不只是允许用户免费使用Nginx,它还允许用户在自己的项目中直接使用或修改Nginx源码,然后发布。
Nginx先天的事件驱动型设计、全异步的网络I/O处理机制、极少的进程间切换以及许多优化设计,都使得Nginx天生善于处理高并发压力下的互联网请求,同时Nginx降低了资源消耗,可以把服务器硬件资源“压榨”到极致。
Nginx的作用
Nginx一般处于应用的网关位置,常用来做静态资源服务器、负载均衡和反向代理(路由功能)。
- 静态资源服务器:在mvvm模式中,充当文件读取职责,一般用来做动静分离。
- 负载均衡:对后台服务器集群进行负载。
- 反向代理:域名/路径,进行路由选择后台服务器。
Nginx基础概念
nginx是基于多进程设计,通过ps -ef|grep nginx我们可以查看nginx的进程:
[root@localhost sbin]# ps -ef|grep nginx
root       7400      1  0 16:53 ?        00:00:00 nginx: master process ./nginx
nobody     9841   7400  0 17:29 ?        00:00:00 nginx: worker process
nobody     9842   7400  0 17:29 ?        00:00:00 nginx: worker process
通过命令我们可以发现,nginx对应了多个进程,主进程master和工作进程worker一般情况下,worker进程的数量与服务器上的CPU核心数相等,如果配置了缓存还会有缓存加载器进程(cache loader)和缓存管理器进程(cache manager)等。但是所用进程都只包含一个线程,并且进程之间主要通过共享内存的方式来进行通信。主进程以root用户权运行,其他进程是以nginx.config配置文件配置的用户运行,模式是nobody。
主进程主要完成如下工作:
- 读取并验正配置信息;
- 创建、绑定及关闭套接字;
- 启动、终止及维护worker进程的个数,管理worker进程;
- 无须中止服务而重新配置工作特性;
- 重新打开日志文件;
worker进程主要完成的任务包括:
- 接收、传入并处理来自客户端的连接;
- 提供反向代理及过滤功能;
- nginx任何能完成的其它任务;
nginx采用多进程的方式主要是因为要保证Nginx的高可用和高可靠性。如果Nginx 使用了多线程,当某一个第三方模块引发了一个错误,如:地址越界时,就会导致整个Nginx全部挂掉; 而采用多进程来实现时,却能很好的规避这个问题,类似于微服务的思想。
配置文件结构
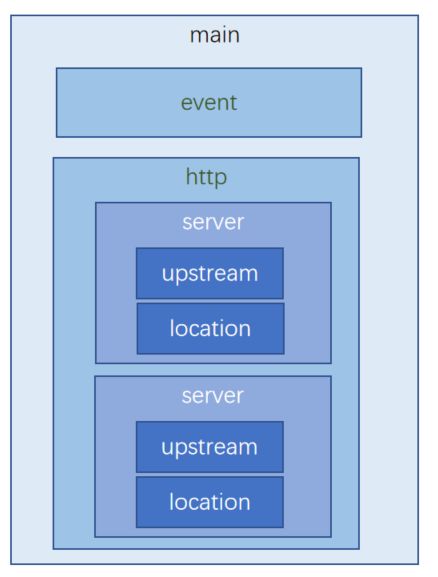
nginx.conf配置文件结构如图:
| 类型 | 说明 |
|---|---|
| main | 全局设置 |
| events | 设定nginx的工作模式及连接数上限 |
| http | 服务器相关属性 |
| server | 虚拟主机设置 |
| upstream | 上游服务器设置,主要为反向代理、负载均衡相关配置 |
| location | URL匹配特定位置后的设置,路由分发 |
# ----------------全局模块-------------------
#user  nobody; # 配置worker进程的用户权限
worker_processes  2; # 配置启动worker进程数量

#error_log  logs/error.log; # 错误日志文件
#error_log  logs/error.log  notice;  # 错误日志文件和日志级别的配置
#error_log  logs/error.log  info;

#pid        logs/nginx.pid; # Nginx进程PID存放路径,做日志切割用

events {
    use epoll; # 设定nginx的工作模式,epoll是多路复用,可选值select ,poll,kqueue,epoll,rtsig,/dev/poll
    worker_connections  1024;  # 连接数上限
}


http {
    include       mime.types; # 引入外部文件,降低主文件的复杂度
    default_type  application/octet-stream; # 设置mime_types

    # 设置访问日志的格式和地址
    #log_format  main  '$remote_addr - $remote_user [$time_local] "$request" '
    #                  '$status $body_bytes_sent "$http_referer" '
    #                  '"$http_user_agent" "$http_x_forwarded_for"';

    #access_log  logs/access.log  main;

    sendfile        on; # 配置允许sendfile方式传输文件,开启高效文件传输模式(zero copy 方式),避免内核态数据和用户态区数据之间的拷贝。
    #tcp_nopush     on; # 开启TCP_NOPUSH套接字(sendfile开启时有用)

    #keepalive_timeout  0; #  配置连接超时时间
    keepalive_timeout  65;

    #gzip  on; # 设置是否开启gzip压缩模块

    # 负载均衡配置,默认使用轮询,下面是基于权重。
    upstream nginx {
        #       ip_hash;
        server 172.17.0.4:8081 weight=2;
        server 172.17.0.5:8081 weight=1;
    }

    # 虚拟主机的配置
    server {
        listen       80; # 虚拟主机的服务端口
        server_name  localhost; # 用来指定ip或者域名,多个域名用空格分开。可以使用*通配符或正则表达式,如:server_name  ~^www\.(.+)\.com$;

        #charset koi8-r; # 字符集配置

        #access_log  logs/host.access.log  main;
        # 地址匹配设置,支持正则匹配,也支持条件匹配,这里是默认请求地址,用户可以location命令对nginx进行动态和静态网页过滤处理
        location / {
            root   html; # 虚拟主机的网页根目录
            index  index.html index.htm; # 默认访问首页文件
        }

        #error_page  404              /404.html;

        # redirect server error pages to the static page /50x.html
        #
        error_page   500 502 503 504  /50x.html;
        location = /50x.html {
            root   html;
        }

        location /proxy_pass_uri {
            # 返反向代理配置
            proxy_pass http://www.xxx.com;
        }

        # proxy the PHP scripts to Apache listening on 127.0.0.1:80
        #
        #location ~ \.php$ {
        #    proxy_pass   http://127.0.0.1;
        #}

        # pass the PHP scripts to FastCGI server listening on 127.0.0.1:9000
        #
        #location ~ \.php$ {
        #    root           html;
        #    fastcgi_pass   127.0.0.1:9000;
        #    fastcgi_index  index.php;
        #    fastcgi_param  SCRIPT_FILENAME  /scripts$fastcgi_script_name;
        #    include        fastcgi_params;
        #}

        # deny access to .htaccess files, if Apache's document root
        # concurs with nginx's one
        #
        #location ~ /\.ht {
        #    deny  all;
        #}
    }


    # another virtual host using mix of IP-, name-, and port-based configuration
    #
    #server {
    #    listen       8000;
    #    listen       somename:8080;
    #    server_name  somename  alias  another.alias;

    #    location / {
    #        root   html;
    #        index  index.html index.htm;
    #    }
    #}


    # HTTPS server
    #
    #server {
    #    listen       443 ssl;
    #    server_name  localhost;

    #    ssl_certificate      cert.pem;
    #    ssl_certificate_key  cert.key;

    #    ssl_session_cache    shared:SSL:1m;
    #    ssl_session_timeout  5m;

    #    ssl_ciphers  HIGH:!aNULL:!MD5;
    #    ssl_prefer_server_ciphers  on;

    #    location / {
    #        root   html;
    #        index  index.html index.htm;
    #    }
    #}

}
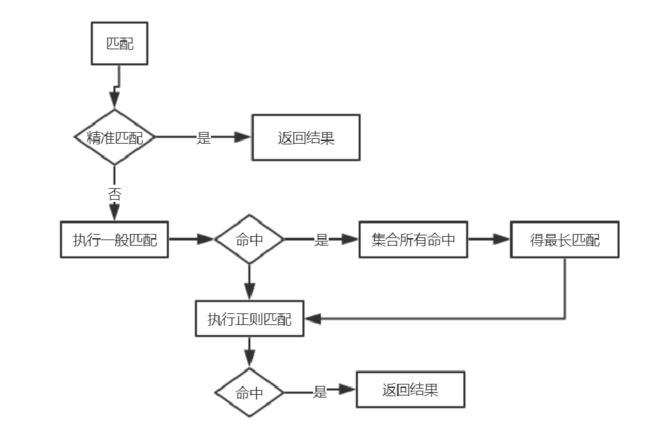
location 规则
语法:location[=|~|~*|^~|@]/uri/{...}
location 规则如下:
=表示把URI作为字符串,以便与参数中的uri做完全的精准匹配,如:
location = /aaa {
  # 只有用户请求/aaa时才会匹配这个规则
}
~表示匹配URI时是字母大小写敏感的。~*表示匹配URI时忽略字母大小写问题。^~表示匹配URI时只需要其前半部分与uri参数匹配即可。例如:
location ^~ /aaa {
  # 表示以/aaa开头的请求都会匹配这个规则
}
~*表示使用正则表达式,如:
location ~* \.(gif|jpg|png)$ {
  # 表示以.gif、.jpg和.png 结尾的请求都会匹配这个规则
}
Rewrite(地址从定向)
rewrite是实现URL重定向的重要指令,他根据regex(正则表达式)来匹配内容跳转到replacement,结尾是flag标记:
- 指令语法:
rewrite regex replacement [flag]; - 应用位置:server、location、if
regex是正则表达式;replacement是替换值,新值;flag是处理标志。
rewrite 最后一项flag参数:
| 标记符号 | 说明 |
|---|---|
| last | 本条规则匹配完成后继续向下匹配新的location URI规则 |
| break | 本条规则匹配完成后终止,不在匹配任何规则 |
| redirect | 返回302临时重定向 |
| permanent | 返回301永久重定向 |
简单例子1:
rewrite ^/(.*) http://www.baidu.com/ permanent; # 匹配成功后跳转到百度,执行永久301跳转
简单例子2:
location ~ /b/d {
    rewrite ^/  /c.html break;
    root   html/static/;
}
若rewrite正则匹配命中,则修改为path = /c.html;若不命中,就不执行替换。命中后就变成了在html/static文件夹下查找c.html。
反向代理
server {
	listen 80;
	server_name  process.enjoy.com;

	#后台服务原始路径:172.17.0.4:8081/nginx/enjoy/getInfo

	#无/,访问路径:http://process.enjoy.com/nginx/enjoy/getInfo
	location /nginx/enjoy { #匹配路径/nginx/enjoy,剩余路径/getInfo
	proxy_pass http://172.17.0.4:8081;#此处未关闭,传递整个路径/nginx/enjoy/getInfo到目标ip:port
		# proxy_pass http://172.17.0.4:8081/nginx/enjoy;
	}
	# 有/,访问路径:http://process.enjoy.com/dynamic/nginx/enjoy/getInfo
	location /dynamic {#匹配路径/dynamic,剩余路径/nginx/enjoy/getInfo
		proxy_pass http://172.17.0.4:8081/;#此处关闭,只传递/nginx/enjoy/getInfo到目标ip:port
	}

	#访问路径:http://process.enjoy.com/static/a.html ---b.html/c.html
	location /static {#匹配路径/static,剩余路径/a.html
	#	root html/;#root声明,在html文件夹,查找/static/a.html文件
	}

	#访问路径:http://process.enjoy.com/target/a.html ---b.html/c.html
	location /target {#匹配路径/target,剩余路径/a.html
		alias html/static/;##alias声明,在html/static/文件夹,查找a.html文件
	}

}
匹配过程
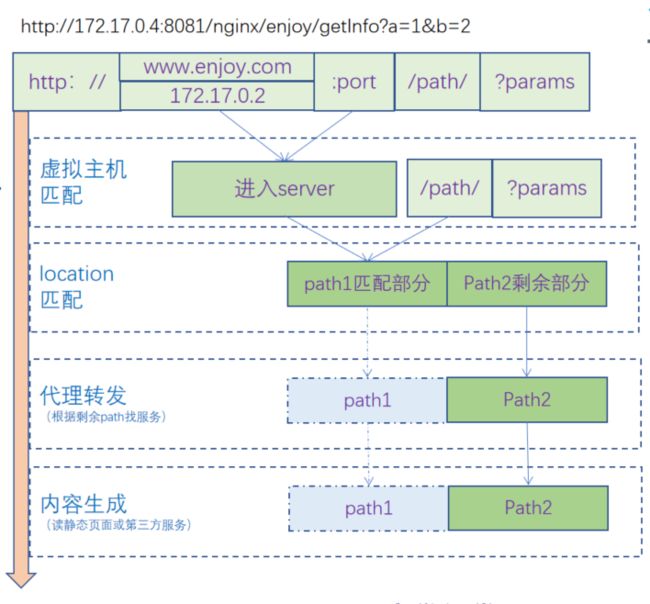
url=http://172.17.0.4:8081/nginx/enjoy/getInfo?a=1&b=2=域名+端口+path+param的匹配过程:
- 根据域名/IP+端口来定位虚拟主机(server)。
- 进行path与location的匹配,其中完整的
path=匹配path(path1)+剩余path(path2)。 - 在根据代理规则进行代理。
代理规则
root:在目录里查找path1+path2路径。alias:在目录里找path2路径。proxy_pass= ip:port/:转发ip+端口+path2路径。proxy_pass= ip:port:转发ip+端口+path1+path2路径。- 若url以/结尾,认为是目录,会执行
index命令,找文件路径为目录+path2;否则不执行index,表示直达文件。
负载均衡配置
- 语法:upstream name {…}
- 配置块:http
upstream块定义了一个上游服务器的集群,便于反向代理中的proxy_pass使用。
简单例子:
upstream backend {
    # ip_hash;
    server backend1.example.com weight=2;
    server backend2.example.com weight=1;
}

server {
	location /proxy_pass_uri {
		# 返反向代理配置
		proxy_pass http://backend;
	}
}
默认使用轮询,可以通过weight=2来设置权重。ip_hash表示基于IP做hash,这样可以保证同一个IP的请求始终落在同一个机器上。
nginx详细配置可以参考《深入理解Nginx:模块开发与架构解析(第2版)》第二章
日志配置和及切割
编写shell,vim /usr/local/nginx/sbin/logcut.sh:
#!/bin/bash
#设置日志文件存放目录
LOG_HOME="/usr/local/nginx/logs/"
#备分文件名称
LOG_PATH_BAK="$(date -d yesterday +%Y%m%d%H%M)"
#重命名日志文件
mv ${LOG_HOME}/access.log ${LOG_HOME}/access.${LOG_PATH_BAK}.log
mv ${LOG_HOME}/error.log ${LOG_HOME}/error.${LOG_PATH_BAK}.log
#向nginx主进程发信号重新打开日志
kill -USR1 `cat ${LOG_HOME}/nginx.pid`
配置cron,使用crontab -e命令,将下面的代码加到文件最后:
*/1 * * * * /usr/local/nginx/sbin/logcut.sh
然后执行如下命令:
/etc/init.d/rsyslog start; #系统日志,如不开启,看不到定时任务日志
/etc/rc.d/init.d/crond start; #定时任务开启
查看系统日志tail -f /var/log/cron:
[root@localhost logs]# tail -f /var/log/cron
May  8 18:01:01 localhost run-parts(/etc/cron.hourly)[12056]: starting 0anacron
May  8 18:01:01 localhost run-parts(/etc/cron.hourly)[12067]: finished 0anacron
May  8 18:01:01 localhost run-parts(/etc/cron.hourly)[12056]: starting mcelog.cron
May  8 18:01:01 localhost run-parts(/etc/cron.hourly)[12075]: finished mcelog.cron
May  8 18:10:01 localhost CROND[12654]: (root) CMD (/usr/lib64/sa/sa1 1 1)
Nginx的内置变量
| 名称 | 说明 |
|---|---|
| $host | 请求中的主机头(Host)字段,如果请求中的主机头不可用或者空,则为处理请求的server名称 |
| $http_HEADER | HTTP请求头中的内容,HEADER为HTTP请求中的内容转为小写,-变为_(破折号变为下划线),例如:$http_user_agent(Uaer-Agent的值) |
| $remote_addr | 客户端的IP地址。 |
| $remote_port | 客户端的端口。 |
| $request_method | 这个变量是客户端请求的动作,通常为GET或POST。 |
| $request_uri | 这个变量等于包含一些客户端请求参数的原始URI |
| $scheme | 所用的协议,比如http或者是https |
| $server_name | 服务器名称。 |
| $server_port | 请求到达服务器的端口号。 |
| $server_protocol | 请求使用的协议,通常是HTTP/1.0或HTTP/1.1。 |
| $uri | 请求中的当前URI(不带请求参数,参数位于$args) |
if语句,常用正则
| 正则 | 说明 |
|---|---|
| = ,!= | 比较的一个变量和字符串。 |
| ~, ~* | 与正则表达式匹配的变量,如果这个正则表达式中包含 |
| -f,!-f | 检查一个文件是否存在。 |
| -d, !-d | 检查一个目录是否存在。 |
| -e,!-e | 检查一个文件、目录、符号链接是否存在。 |
| -x, !-x | 检查一个文件是否可执行。 |
- 静态资源:
location ~ /rex/.*\.(htm|js|css)$ - 域名校验:
if ( $http_origin ~ http://(.*).enjoy.com) - 浏览器校验:
if ($http_user_agent ~ Firefox)


