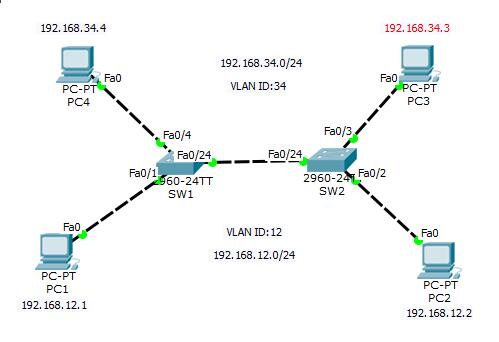
一、实验说明:按照网络拓扑图连接并设置好PC机的IP地址,要求PC1、PC2在VLAN 12上访问,PC3、PC4在VLAN 34上访问,PC1与PC2互联互通,PC3与PC4互联互通,VLan 12 与VLan 34互不相通,以实现隔离局域网的广播域。附图如下:
二、思路:
①创建VLAN
②设置access模式访问固定Vlan
③设置turnk模式传输多个Vlan
④验证配置
⑤连通测试
三、主要步骤:
@交换机一的基本配置
Switch>enable
Switch#configure terminal
Enter configuration commands, one per line. End with CNTL/Z.
Switch(config)#no ip domain lookup
Switch(config)#hostname SW1
@在交换机一上创建Vlan
SW1(config)#vlan 12
SW1(config-vlan)#exit
SW1(config)#vlan 34
SW1(config-vlan)#exit
@在交换机一上设置access模式
SW1(config)#interface f0/1
SW1(config-if)#switchport mode access
SW1(config-if)#switchport access vlan 12 //将access模式的端口放入VLan 12 中
SW1(config-if)#no shutdown //最好开启端口,以防万一
SW1(config-if)#exit
SW1(config)#interface f0/4
SW1(config-if)#switchport mode access
SW1(config-if)#switchport access vlan 34 //将access模式的端口放入VLan 34 中
SW1(config-if)#no shutdown //最好开启端口,以防万一
SW1(config-if)#exit
SW1#show vlan brief
VLAN Name Status Ports
---- -------------------------------- --------- -------------------------------
1 default active Fa0/2, Fa0/3, Fa0/5, Fa0/6……
12 VLAN0012 active Fa0/1
34 VLAN0034 active Fa0/4
……
@在交换机一上设置交换机互联的端口为trunk模式
SW1(config)#interface f0/24
SW1(config-if)#switchport mode trunk
SW1(config-if)#end
%SYS-5-CONFIG_I: Configured from console by console
@验证trunk接口
SW1#show interface trunk
Port Mode Encapsulation Status Native vlan
Fa0/24 on 802.1q trunking 1
Port Vlans allowed on trunk
Fa0/24 1-1005
Port Vlans allowed and active in management domain
Fa0/24 1,12,34
……
------------------------------------------------------------------
在交换机2上进行类似操作,注解略
Switch>enable
Switch#configure terminal
Enter configuration commands, one per line. End with CNTL/Z.
Switch(config)#no ip domain lookup
Switch(config)#hostname SW2
SW2(config)#vlan 12
SW2(config-vlan)#exit
SW2(config)#vlan 34
SW2(config-vlan)#exit
SW2(config)#interface f0/2
SW2(config-if)#switchport mode access
SW2(config-if)#switchport access vlan 12
SW2(config-if)no shutdown
SW2(config-if)#exit
SW2(config)#interface f0/3
SW2(config-if)#switchpor mode access
SW2(config-if)#switchport access vlan 34
SW2(config-if)no shutdown
SW2(config-if)#exit
SW2(config)#interface f0/24
SW2(config-if)#switchport mode trunk
SW2(config-if)#exit
SW2(config)#end
SW2#show vlan brief
VLAN Name Status Ports
---- -------------------------------- --------- -------------------------------
1 default active Fa0/1, Fa0/4, Fa0/5, Fa0/6……
12 VLAN0012 active Fa0/2
23 VLAN0023 active
……
SW2#show interface trunk
Port Mode Encapsulation Status Native vlan
Fa0/24 on 802.1q trunking 1
Port Vlans allowed on trunk
Fa0/24 1-1005
Port Vlans allowed and active in management domain
Fa0/24 1,12,23,34,111
……
>>>>>>>>>>>>>>>>>>>>>>>>>>>>>>>>>>>>>>>>>>>>>>>>>>>>>>>>>>>>>>>
实验结果:
在PC1~PC4命令行界面用ping命令验证连通性,结果PC1与PC2互联互通,PC3与PC4互联互通,VLan 12 与VLan 34互不相通。
四、延伸:如何删除 VLAN ?
1、首先将 VLAN 的成员端口移除;
SW1#configure terminal
Enter configuration commands, one per line. End with CNTL/Z.
@将端口fas0/解除固定访问vlan14,端口变回默认的 vlan 1
SW1(config)#interface f0/1
SW1(config-if)#no switchport access vlan 12
SW1(config-if)#exit
@其次删除不再使用的VLAN号
SW1(config)#no vlan 12
SW1(config)#end
五、实验总结:
1、trunk链路发送出去的数据是带有vlan标签的,仅有交换机、路由器等网络设备才能认识,PC是无法识别的,所以接PC的端口,不可以配置为trunk,trunk模式用于配置在交换设备上,允许不同VLan的数据包通过。
2、Access链路发送出去的数据是不带有任何标签的,access模式用于配置在非交换设备上,一口端口只能允许指定的那个Vlan数据通行。
3、trunk 中存在一个特殊的 VLAN --native VLAN (本地/本征 VLAN), 该 vlan 中的 流量是没有标签 的,默认值为 vlan 1。
4、当trunk链路收到一个没有标签的数据包时,转发给本地交换机的 native vlan 中的成员端口,不会将其丢弃.
