Android中的常用控件
1、TextView
id:为TextView设置一个组件id
layout_width:组件的宽度,一般写:wrap_content或者match_parent(fill_parent),前者是控件显示的内容多大,控件就多大,而后者会填满该控件所在的父容器;当然也可以设置成特定的大小,比如我这里为了显示效果,设置成了200dp。
layout_height:组件的高度,内容同上。
gravity:设置控件中内容的对齐方向,TextView中是文字,ImageView中是图片等等。
text:设置显示的文本内容
textColor:设置字体颜色
textStyle:设置字体风格,三个可选值:normal(无效果),bold(加粗),italic(斜体)
textSize:字体大小,单位一般是用sp!
background:控件的背景颜色,可以理解为填充整个控件的颜色,可以是图片
【实例6】
<?xml version="1.0" encoding="utf-8"?>
<LinearLayout xmlns:android="http://schemas.android.com/apk/res/android"
    android:layout_width="match_parent"
    android:layout_height="match_parent">

    <TextView
        android:id="@+id/text_one"
        android:layout_width="match_parent"
        android:layout_height="wrap_content"
        android:textSize="30sp"
        android:text="TextView测试"
        android:layout_gravity="center"
        android:textColor="#66ccff"
        android:textStyle="bold|italic"/>
</LinearLayout>
2、EditView
EditText继承自TextView,可以进行编辑操作,将用户信息传递给Android程序。还可以为EditText控件设置监听器,用来测试用户输入的内容是否合法。
【实例7】
<?xml version="1.0" encoding="utf-8"?>
<LinearLayout xmlns:android="http://schemas.android.com/apk/res/android"
    android:orientation="vertical"
    android:layout_width="match_parent"
    android:layout_height="match_parent"
    android:padding="10dp">

    <TextView
        android:layout_width="match_parent"
        android:layout_height="wrap_content"
        android:text="用户名:"
        android:textSize="30sp"
        android:textColor="#00ff00"/>

    <EditText
        android:layout_width="match_parent"
        android:layout_height="wrap_content"
        android:hint="请输入用户名"
        android:textSize="30sp"
        android:maxLines="2"/>


</LinearLayout>
3、Button
【实例3】
Activity_main.xml
<?xml version="1.0" encoding="utf-8"?>
<LinearLayout xmlns:android="http://schemas.android.com/apk/res/android"
    android:orientation="vertical"
    android:layout_width="match_parent"
    android:layout_height="match_parent"
    >


    <Button
        android:id="@+id/btn_one"
        android:layout_width="match_parent"
        android:layout_height="wrap_content"
        android:text="按钮1"
        android:textSize="20dp"
        android:onClick="click" />

    <Button
        android:id="@+id/btn_two"
        android:layout_width="match_parent"
        android:layout_height="wrap_content"
        android:textSize="20dp"
        android:text="按钮2" />
</LinearLayout>
MainActivity.java
package com.example.myuidemo2;

import androidx.appcompat.app.AppCompatActivity;

import android.os.Bundle;
import android.view.View;
import android.widget.Button;

public class MainActivity extends AppCompatActivity implements View.OnClickListener{

    private Button myBtn_one;
    private Button myBtn_two;
    @Override
    protected void onCreate(Bundle savedInstanceState) {
        super.onCreate(savedInstanceState);
        setContentView(R.layout.activity_main);

        //找到按钮控件
        myBtn_one = findViewById(R.id.btn_one);
        myBtn_two = findViewById(R.id.btn_two);

        //按钮第二种点击事件
       /* myBtn_one.setOnClickListener(new View.OnClickListener() {
            @Override
            public void onClick(View v) {
                myBtn_one.setText("按钮1已被点击");
            }
        });

        myBtn_two.setOnClickListener(new View.OnClickListener() {
            @Override
            public void onClick(View v) {
                myBtn_two.setText("按钮2已被点击");
            }
        });*/

        //按钮第三种点击事件
        myBtn_one.setOnClickListener(this);
        myBtn_two.setOnClickListener(this);

    }

    @Override
    public void onClick(View v) {
        //具体判断一下点击的是那个按钮
        switch (v.getId()){
            case R.id.btn_one:
                myBtn_one.setText("按钮1已被点击");break;
            case R.id.btn_two:
                myBtn_two.setText("按钮2已被点击");break;
        }
    }

    //按钮第一种点击事件
//    public void click(View v){
//        myBtn_one.setText("按钮1已被点击");
//    }
}
4、RadioButton
【实例4】
activity_main.xml
<?xml version="1.0" encoding="utf-8"?>
<LinearLayout xmlns:android="http://schemas.android.com/apk/res/android"
    android:orientation="vertical"
    android:layout_width="match_parent"
    android:layout_height="match_parent"
    >

    <RadioGroup
        android:id="@+id/rdg"
        android:layout_width="match_parent"
        android:layout_height="wrap_content"
        android:orientation="vertical">

        <RadioButton
            android:id="@+id/rbtn"
            android:layout_width="wrap_content"
            android:layout_height="wrap_content"
            android:textSize="25sp"
            android:text="男"/>

        <RadioButton
            android:layout_width="wrap_content"
            android:layout_height="wrap_content"
             android:text="女"
             android:textSize="25sp"/>


    </RadioGroup>

    <TextView
        android:id="@+id/tv"
        android:layout_width="wrap_content"
        android:layout_height="wrap_content"
        android:layout_below="@+id/rdg"
        android:text="aa"
        android:textSize="30dp"/>


</LinearLayout>
MainActivity.java
package com.example.myuidemo2;

import androidx.appcompat.app.AppCompatActivity;

import android.os.Bundle;
import android.view.View;
import android.widget.Button;
import android.widget.RadioGroup;
import android.widget.TextView;

public class MainActivity extends AppCompatActivity {


    @Override
    protected void onCreate(Bundle savedInstanceState) {
        super.onCreate(savedInstanceState);
        setContentView(R.layout.activity_main);

        //1.找到相关控件
        final TextView textView = findViewById(R.id.tv);
        RadioGroup radioGroup = findViewById(R.id.rdg);


        //2.通过radiogroup来判断选择的是男是女
        radioGroup.setOnCheckedChangeListener(new RadioGroup.OnCheckedChangeListener() {
            @Override
            public void onCheckedChanged(RadioGroup group, int checkedId) {
                if(checkedId == R.id.rbtn){
                    textView.setText("选择的是男");
                }
                else {
                    textView.setText("选择的是女");
                }
            }
        });


    }


}
运行结果:
5、ImageView
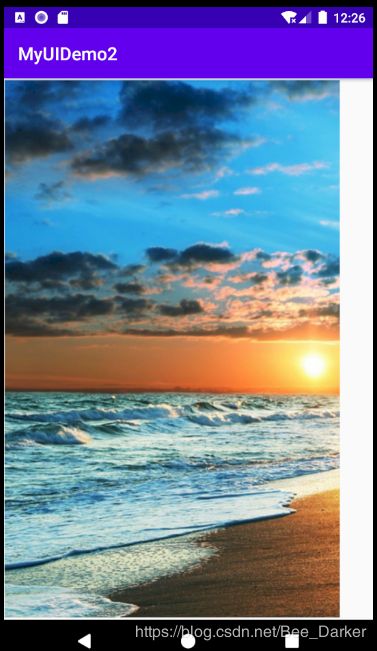
ImageView是视图控件,它继承自View, 其功能是在屏幕中显示图像。ImageView类 可以从各种来源加载图像(如资源库或网络)并提供缩放、裁剪、着色(渲染)等功能。
【实例5】
<?xml version="1.0" encoding="utf-8"?>
<RelativeLayout xmlns:android="http://schemas.android.com/apk/res/android"
    android:orientation="vertical"
    android:layout_width="match_parent"
    android:layout_height="match_parent"
    >

    <ImageView
        android:layout_width="wrap_content"
        android:layout_height="wrap_content"
        android:background="@drawable/p00"/>


</RelativeLayout>


