Flutter开发:TextField常用属性的使用
在flutter开发过程中,掌握常用组件的使用是必备技能,flutter常用的组件和App开发时候常用的控件基本一模一样,只是使用的方式不一样罢了。
本篇博文分享一下flutter的文本输入框TextField组件的使用,该组件类似于iOS的TextField控件和Android的EditText控件,但是感觉flutter的文本输入框组件比App的文本输入框控件使用共简单一点,flutter的textfield组件的常用属性以及使用方式如下所示。
首先再来看一下flutter关于textfield的源码部分的使用介绍,如下所示:
const TextField({
Key key,
this.controller,//编辑框的控制器
this.focusNode,// 获取键盘焦点
this.decoration = const InputDecoration(),//边框装饰,输入框的装饰器,用来修改外观
TextInputType keyboardType,//设置输入键盘的类型
this.textInputAction,// 键盘操作按钮的类型
this.textCapitalization = TextCapitalization.none,// 设置大小写键盘
this.style,//输入文本的样式
this.strutStyle,
this.textAlign = TextAlign.start,//输入的文本对齐方式
this.textAlignVertical,
this.textDirection,// 输入文字的排列方向
this.readOnly = false, //是否为只读模式
ToolbarOptions toolbarOptions,
this.showCursor,
this.autofocus = false, // 是否自动对焦校验
this.obscureText = false,// 是否隐藏输入内容,eg:密码格式
this.autocorrect = true,// 是否自动校正
this.enableSuggestions = true,
this.maxLines = 1,// 最大行数
this.minLines,
this.expands = false,
this.maxLength,// 允许输入的最大字符个数
this.maxLengthEnforced = true,// 是否允许超过输入最大长度,配合maxLength一起使用
this.onChanged,// 文本内容变化时回调
this.onEditingComplete,// 提交内容时回调
this.onSubmitted,// 用户提示完成时回调
this.inputFormatters,// 对输入文本的验证及格式
this.enabled, // 输入框是否不可点击
this.cursorWidth = 2.0,//光标的宽度
this.cursorRadius,// 光标圆角弧度
this.cursorColor,//光标的颜色
this.keyboardAppearance,// 键盘的亮度
this.scrollPadding = const EdgeInsets.all(20.0),// 滚动到视图中时,填充边距
this.dragStartBehavior = DragStartBehavior.start,
this.enableInteractiveSelection = true, // 长按是否显示[剪切、复制、粘贴菜单]弹框
this.onTap,//点击输入框时的回调
this.buildCounter,
this.scrollController,
this.scrollPhysics,
})
看了上面那么多属性,觉得flutter的textfield属性还是比较丰富的,所以在使用的时候要好好参考API的这些属性介绍,也没必要全部熟练掌握,只是要掌握常用的用法即可。本博文只介绍一部分常用属性,具体如下所示。
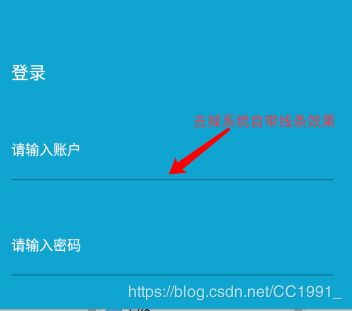
1、去掉textfield自带下划线背景。
TextField(
decoration: InputDecoration(
border: InputBorder.none, //去掉输入框的下滑线
),
),
2、设置textfield输入框填充背景颜色
TextField(
decoration: InputDecoration(
fillColor: Colors.white, //设置背景色
filled: true,), //设置filled为true
),
3、修改textfield的高度
一般方法:
new TextField(
decoration: InputDecoration(
contentPadding: EdgeInsets.only(left: 15.0, top: 5.0, right: 5.0, bottom: 5.0),
),
)
万能方法:
new ConstrainedBox(
constraints: BoxConstraints(
maxHeight: 20,
maxWidth: 210
),
child: new TextField(
decoration: InputDecoration(
contentPadding: const EdgeInsets.symmetric(vertical: 4.0),
),
),
4、设置textfield的边框圆角
TextField(
decoration: InputDecoration(
border: OutlineInputBorder(
borderRadius: BorderRadius.circular(20),
borderSide: BorderSide.none),
filled: true,
fillColor: Color(0xffaaaaaa), //设置无色
),
),
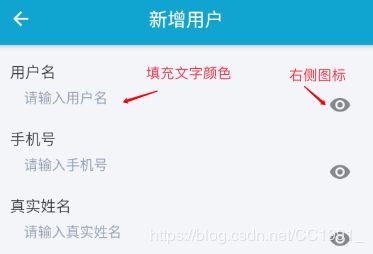
5、设置textfield提示文字的颜色
TextField(
style: TextStyle(fontSize: 20),
decoration: InputDecoration( //输入框修饰
hintText: “请输入账号”,
hintStyle: TextStyle(fontSize: 15.0, color: Color(0xff96A3B6)),//设置提示文字样式
),
),
6、设置textfield左右位置的图标
TextField(
decoration: InputDecoration(
hintText: '请输入真实姓名',
hintStyle: TextStyle(
fontSize: 15.0, color: Color(0xff96A3B6)), //设置提示文字样式
contentPadding: EdgeInsets.only(
left: 15.0, top: 5.0, right: 5.0, bottom: 5.0),
border: InputBorder.none,
icon: Icon(Icons.person), //左侧图标
suffixIcon: Icon( //右侧图标
Icons.remove_red_eye,
),
),
style: new TextStyle(
fontSize: ScreenUtil.instance.setSp(10.0),
color: Color(0xFF3D3D3D),
),
obscureText: true,
controller: _passwordTextControl,
),
以上就是本章全部内容,欢迎关注三掌柜的微信公众号“iOS开发by三掌柜”,三掌柜的新浪微博“三掌柜666”,欢迎关注!
三掌柜的微信公众号:
三掌柜的新浪微博:


