2020.3.22 python笔记
文章目录
- 方法没有重载
- 方法的动态性
- 私有属性和私有方法(实现封装)
- @property装饰器
- 面向对象三大特征介绍
- 继承
- 类成员的继承和重写
- object根类
- dir()查看对象属性
- 查看类的继承层次结构
- 重写__str__()方法
- 多重继承
- MRO()
- super()获得父类定义
- 多态
- 特殊方法和运算符重载
- 特殊属性
- 对象的浅拷贝和深拷贝
- 组合
- 设计模式_工厂模式实现
- 设计模式_单例模式实现
方法没有重载
在其他语言中,可以定义多个重名的方法,只要保证方法签名唯一即可。方法签名包含3个部分:方法名、参数数量、参数类型。
python中,方法的参数没有类型(调用时确定参数的类型),参数的数量也可以由可变参数控制。因此,python中是没有方法的重载的。定义一个方法即可有多种调用方式,相当于实现了其他语言中的方法的重载。
如果我们在类体中定义了多个重名的方法,只有最后一个方法有效,前面的全被覆盖。
建议:不要使用重名的方法!python中方法没有重载。
方法的动态性
python是动态语言,我们可以动态的为类添加新的方法,或者动态的修改类的已有的方法。
#测试方法的动态性
class Person:
    def work(self):
        print("努力上班")

def play_game(s):
    print("{0}在玩游戏".format(s))

def work2(s):
    print("好好工作,努力上班,赚钱")

Person.play = play_game;
p = Person()
p.work()
p.play()    #Person.play(p)

Person.work = work2

p.work()
努力上班
<__main__.Person object at 0x01A80E90>在玩游戏
好好工作,努力上班,赚钱
私有属性和私有方法(实现封装)
python对于类的成员没有严格的访问控制限制,这与其他面对对象语言有区别。关于私有属性和私有方法,有如下要点:
- 通常我们约定,两个下划线开头的属性是私有的(private)。其他为公共的(public).
- 类内部可以访问私有属性(方法)
- 类外部不能直接访问私有属性(方法)
- 类外部可以通过“ _类名__私有属性(方法)名” 访问私有属性(方法)
【注】方法本质上也是属性!只不过是可以通过()执行而已。所以此处讲的私有属性和公有属性,同时也讲了私有方法和公有方法的用法。如下测试中,同时也包含了私有方法和公有方法的例子。
#测试私有属性

class Employee:

    __company ="ABC"  #类变量也可以私有

    def __init__(self,name,age):
        self.name = name
        self.__age = age   #前面有下划线,变成私有属性

    def __work(self):   #此为私有方法
        print("好好工作")
        print("年龄:{0}".format(self.__age))   #自己的方法调自己的属性没有问题,别人调用不了,对外封闭
        print(Employee.__company)  #内部能调用,外部调用只能像最后一行那样调用

e = Employee("hj",18)

print(e.name)
#print(e.age)
print(e._Employee__age)   #这么写才能调用私有属性
print(dir(e))

e._Employee__work()  #调用私有方法
print(Employee._Employee__company)  #外部调用只能这么调用
hj
18
['_Employee__age', '_Employee__company', '_Employee__work', '__class__', '__delattr__', '__dict__', '__dir__', '__doc__', '__eq__', '__format__', '__ge__', '__getattribute__', '__gt__', '__hash__', '__init__', '__init_subclass__', '__le__', '__lt__', '__module__', '__ne__', '__new__', '__reduce__', '__reduce_ex__', '__repr__', '__setattr__', '__sizeof__', '__str__', '__subclasshook__', '__weakref__', 'name']
好好工作
年龄:18
ABC
ABC
@property装饰器
@property可以将一个方法的调用方式变成属性调用。
#测试@prorperty
class Employee:

    @property
    def salary(self):
        print("salary run ...")
        return 10000

empl = Employee(a)
#empl.salary()
print(empl.salary)

#empl.salary = 20000  #报错,不能设置属性
salary run ...
10000
例2
#@property装饰器的用法

class Employee:
    def __init__(self,name,salary):
        self.__name = name
        self.__salary = salary

    def get_salary(self):
        return self.__salary

    def set_salary(self,salary):
        if 1000<salary<50000:
            self.__salary = salary
        else:
            print("录入错误")

empl = Employee("hj",10000)
print(empl.get_salary())
empl.set_salary(-20000)
print(empl.get_salary())
利用@property装饰器的写法:
#@property装饰器的用法

class Employee:
    def __init__(self,name,salary):
        self.__name = name
        self.__salary = salary

    @property
    def salary(self):
         return self.__salary

    @salary.setter
    def salary(self,salary):
        if 1000<salary<50000:
            self.__salary = salary
        else:
            print("录入错误")


'''
    def get_salary(self):
        return self.__salary

    def set_salary(self,salary):
        if 1000


empl = Employee("hj",10000)
#print(empl.get_salary())
#empl.set_salary(-20000)
#print(empl.get_salary())

print(empl.salary)
empl.salary = 2000
print(empl.salary)
10000
2000
面向对象三大特征介绍
python是面向对象的语言,也支持面向对象编程的三大特性:继承、封装(隐藏)、多态。
- 封装(隐藏):隐藏对象的属性和实现细节,只对外提供必要的方法。相当于将细节封起来,只对外暴露相关调用方法。
- 继承:继承可以让子类具有父类的特性,提高了代码的重要性。从设计上是一种增量进化,原有父类设计不变的情况下,可以增加新的功能,或者改进已有的算法。
- 多态:多态是指同一个方法调用由于对象不同会产生不同的行为。生活中这样的例子比比皆是:同样是休息方法,人不同休息方法不同。
继承
继承是面对对象程序设计的重要特征,也是实现代码复用的重要手段。
如果一个新类继承自一个设计好的类,就直接具备了已有类的特征,就大大降低了工作难度。已有的类,我们称为父类或者基类,新的类,我们称为子类或者派生类。
语法格式
python支持多重继承,一个子类可以继承多个父类。
class 子类类名(父类1[,父类2,...])
	类体
如果在类定义中没有指定父类,则默认父类是object类。也就是说,object是所有类的父类,里面定义了一些所有类共有的默认实现,比如:__new__()。
定义子类时,必须在其构造函数中调用父类的构造函数。调用格式如下:父类名.__init__(self,参数列表)
#测试继承的基本使用
class Person:

    def __init__(self,name,age):
        self.name = name
        self.__age = age  #私有属性,私有的,继承了但不能直接用

    def say_age(self):
        print("年龄,年龄,我也不知道")

class Student(Person):  #Student继承了Person

    def __init__(self,name,age,score):
        Person.__init__(self,name,age)  #必须显式的调用父类初始化方法,不然解释器不会去调用
        self.score = score

#Student-->Person-->object类
print(Student.mro())

s = Student("hj",18,60)
s.say_age()
print(s.name)
#print(s.age)  #报错,私有的继承了,但不能直接用
print(dir(s))   #查属性
print(s._Person__age)   #这样才能调用继承的私有属性
[<class '__main__.Student'>, <class '__main__.Person'>, <class 'object'>]
年龄,年龄,我也不知道
hj
['_Person__age', '__class__', '__delattr__', '__dict__', '__dir__', '__doc__', '__eq__', '__format__', '__ge__', '__getattribute__', '__gt__', '__hash__', '__init__', '__init_subclass__', '__le__', '__lt__', '__module__', '__ne__', '__new__', '__reduce__', '__reduce_ex__', '__repr__', '__setattr__', '__sizeof__', '__str__', '__subclasshook__', '__weakref__', 'name', 'say_age', 'score']
18
类成员的继承和重写
- 成员继承:子类继承了父类除构造方法之外的所有成员
- 方法重写:子类可以重新定义父类中的方法,这样就会覆盖父类的方法,也称为重写。
#测试方法的重写
class Person:

    def __init__(self,name,age):
        self.name = name
        self.__age = age  #私有属性,私有的,继承了但不能直接用

    def say_age(self):
        print("我的年龄:",self.__age)

    def say_introduce(self):
        print("我的名字是{0}".format(self.name))

class Student(Person):

    def __init__(self,name,age,score):
        Person.__init__(self,name,age)  #必须显式的调用父类初始化方法,不然解释器不会去调用
        self.score = score

    def say_introduce(self):
        '''子类重写了父类的方法,相当于把父类覆盖了,再调用就是子类'''
        print("报告老师,我的名字是:{0}".format(self.name))


s = Student("hj",18,80)
s.say_age()
s.say_introduce()
我的年龄: 18
报告老师,我的名字是:hj
object根类
object类是所有类的父类,因此所有的类都有object类的属性和方法。我们显然有必要深入研究一下object类的结构。
dir()查看对象属性
他可以让我们看到指定对象所有的属性。
#查看对象的所有属性以及和object进行对比
class Person:
    def __init__(self,name,age):
        self.name = name
        self.age = age

    def say_age(self):
        print(self.name,"的年龄是:",self.age)

obj = object()
print(dir(obj))

s2 = Person("hj",18)
print(dir(s2))
执行结果:
['__class__', '__delattr__', '__dir__', '__doc__', '__eq__', '__format__', '__ge__', '__getattribute__', '__gt__', '__hash__', '__init__', '__init_subclass__', '__le__', '__lt__', '__ne__', '__new__', '__reduce__', '__reduce_ex__', '__repr__', '__setattr__', '__sizeof__', '__str__', '__subclasshook__']
['__class__', '__delattr__', '__dict__', '__dir__', '__doc__', '__eq__', '__format__', '__ge__', '__getattribute__', '__gt__', '__hash__', '__init__', '__init_subclass__', '__le__', '__lt__', '__module__', '__ne__', '__new__', '__reduce__', '__reduce_ex__', '__repr__', '__setattr__', '__sizeof__', '__str__', '__subclasshook__', '__weakref__', 'age', 'name', 'say_age']
从上述结果看出以下要点:
- Person对象增加了留个属性:__dict__,__module__,__weakref__,age,name,say_age
- object的所有属性,Person类作为object的子类,显然包含了所有的属性
- 我们打印age、name、say_age,发现say_age虽然是方法,实际上也是属性。只不过,这个属性的类型是method而已
age
name
say_age
查看类的继承层次结构
通过类的方法mro()或者类的属性__mro__可以输出这个类的继承层次结构。
#查看类的继承层次结构
class A:pass
class B(A):pass  #B继承了A
class C(B):pass   #C继承了B

print(C.mro())
[<class '__main__.C'>, <class '__main__.B'>, <class '__main__.A'>, <class 'object'>]

重写__str__()方法
用于返回一个对于对象的描述,对应与内置函数str()经常用于print()方法,帮助我们查看对象的信息。
__str__()方法可以重写。
#测试重写object的__str__()方法

class Person:  #默认继承object类

    def __init__(self,name):
        self.name = name

    def __str__(self):
        return"名字是:{0}".format(self.name)

p = Person("hj")
print(p)
名字是:hj
多重继承
python支持多重继承,一个子类可以有多个直接父类。这样,就具备了多个父类的特点。但是由于,这样会被类的整体层次搞的异常复杂,尽量避免使用。

MRO()
python支持多继承,如果父类中有相同名字的方法,在子类没有指定父类名时,解释器将从左到右按顺序搜索。
MRO(Method Resolution Order):方法解析顺序。我们可以通过mro()方法获得类的层次结构,方法解析顺序也是按照这个类的层次结构寻找的。
#测试mro()方法解析顺序

#多重继承
class A:
    def aa(self):
        print("aa")

    def say(self):
        print("say AAA!")

class B:
    def bb(self):
        print("bb")

    def say(self):
        print("say BBB!")

class C(B,A):  #B在前面,就解析B
    def cc(self):
        print("cc")

c = C()
c.cc()
c.bb()
c.aa()
print(C.mro())   #打印类的层次结构
c.say()    #解释器寻找方法是从左到右的方式寻找,此时会执行B类中的say()
cc
bb
aa
[<class '__main__.C'>, <class '__main__.B'>, <class '__main__.A'>, <class 'object'>]
say BBB!
super()获得父类定义
在子类中,如果想要获得父类的方法时,我们可以通过super()来做。
super()代表父类的定义,不是父类对象。
#测试super(),代表父类的定义,而不是父类的对象

class A:

    def say(self):
        print("A:",self)

class B(A):

    def say(self):
        #A.say(self)或下行
        super().say()
        print("B:",self)

B().say()
A: <__main__.B object at 0x00730A30>
B: <__main__.B object at 0x00730A30>
多态
多态(polymorphism)是指同一个方法调用由于对象不同可能会产生不同的行为。在现实生活中,我们有很多例子,比如:中国人用筷子吃饭,英国人用刀叉吃饭。
关于多态要注意以下2点:
- 多态是方法的多态,属性没有多态
- 多态的存在有2个必要条件:继承、方法重写
#测试多态

class Man:
    def eat(self):
        print("饿了,吃饭啦!")

class Chinese(Man):
    def eat(self):
        print("中国人用筷子吃饭")

class English(Man):
    def eat(self):
        print("英国人用叉子吃饭")

class Indian(Man):
    def eat(self):
        print("印度人用右手吃饭")

def manEat(m):
    if isinstance(m,Man):
        m.eat()   #多态,一个方法调用,根据对象不同调用不同的方法
    else:
        print("不能吃饭")

manEat(Chinese())
manEat(English())
中国人用筷子吃饭
英国人用叉子吃饭
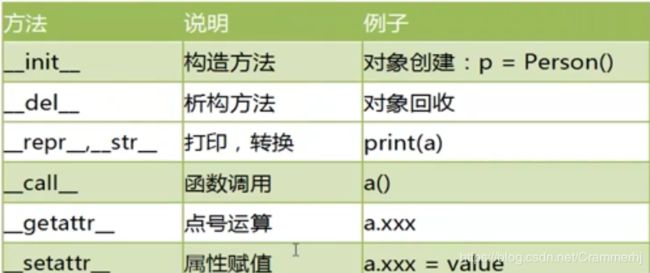
特殊方法和运算符重载
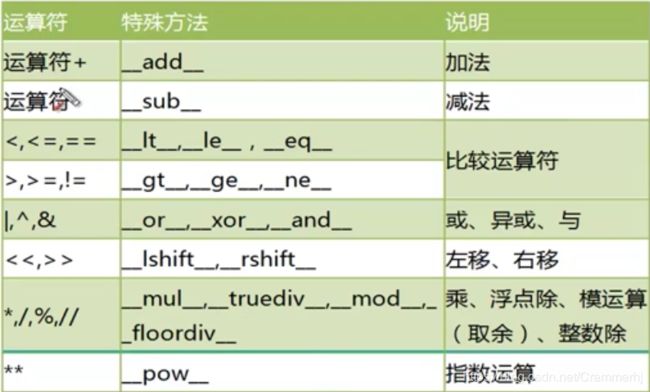
python的运算符实际上是通过调用对象的特殊方法实现的。
常见的特殊方法统计如下:

每个运算符实际上都对应了相应的方法,统计如下:
 测试
测试
#测试运算符的重载

class Person:
    def __init__(self,name):
        self.name = name

    def __add__(self,other):
        if isinstance(other,Person):
            return"{0}--{1}".format(self.name,other.name)
        else:
            return"不是同类对象,不能相加"

    def __mul__(self,other):
        if isinstance(other,int):
            return self.name*other
        else:
            return "不是同类对象,不能相乘"

p1 = Person("hj")
p2 = Person("hj2")

x = p1 + p2
print(x)

print(p1*3)
hj--hj2
hjhjhj
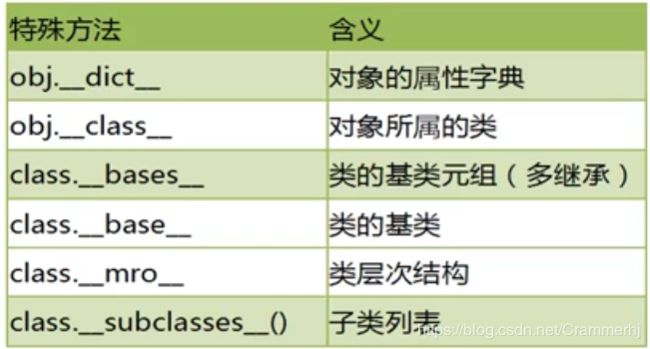
特殊属性
python对象中包含了很多双下划线开始和结束的属性,这些是特殊属性,有特殊用法。
这里我们列出常见的特殊属性:
#测试特殊属性

class A:
    pass

class B:
    pass

class C(B,A):

    def __init__(self,nn):
        self.nn = nn

    def cc(self):
        print("cc")

c = C(3)

print(dir(c))
print(c.__dict__)
print(c.__class__)  #属于哪类
print(C.__bases__)
print(C.mro())
print(A.__subclasses__())  #子类列表
['__class__', '__delattr__', '__dict__', '__dir__', '__doc__', '__eq__', '__format__', '__ge__', '__getattribute__', '__gt__', '__hash__', '__init__', '__init_subclass__', '__le__', '__lt__', '__module__', '__ne__', '__new__', '__reduce__', '__reduce_ex__', '__repr__', '__setattr__', '__sizeof__', '__str__', '__subclasshook__', '__weakref__', 'cc', 'nn']
{'nn': 3}
<class '__main__.C'>
(<class '__main__.B'>, <class '__main__.A'>)
[<class '__main__.C'>, <class '__main__.B'>, <class '__main__.A'>, <class 'object'>]
[<class '__main__.C'>]
对象的浅拷贝和深拷贝
- 变量的赋值操作:只是形成两个变量,实际上还是指向同一个对象。
- 浅拷贝:python拷贝一般都是浅拷贝。拷贝时,对象包含的子对象内容不拷贝。因此,源对象和拷贝对象会引用同一个子对象。
- 深拷贝:使用copy模块的deepcopy函数,递归拷贝对象中包含的子对象。源对象和拷贝对象所有的子对象也不同。
#测试对象的浅拷贝和深拷贝
import copy

class MobilePhone:
    def __init__(self,cpu,screen):
        self.cpu = cpu
        self.screen = screen

class CPU:
    def calculate(self):
        print("算你个12345")
        print("cpu对象:",self)

class Screen:
    def show(self):
        print("显示一个好看的画面")
        print("screen对象:", self)

'''
#测试变量赋值
m1 = MobilePhone()
m2 = m1
print(m1)
print(m2)
'''

#测试变量赋值
c1 = CPU()
c2 = c1
print(c1)
print(c2)

#测试浅拷贝
print("测试浅拷贝....")
s1 = Screen()
m1 = MobilePhone(c1,s1)
m2 = copy.copy(m1)  #浅拷贝

print(m1,m1.cpu,m1.screen)
print(m2,m2.cpu,m2.screen)

#测试深拷贝
print("测试深拷贝")
m3 = copy.deepcopy(m1)
print(m1,m1.cpu,m1.screen)
print(m3,m3.cpu,m3.screen)
<__main__.CPU object at 0x00DCED50>
<__main__.CPU object at 0x00DCED50>
测试浅拷贝....
<__main__.MobilePhone object at 0x00E50A50> <__main__.CPU object at 0x00DCED50> <__main__.Screen object at 0x00E50AB0>
<__main__.MobilePhone object at 0x00E50D30> <__main__.CPU object at 0x00DCED50> <__main__.Screen object at 0x00E50AB0>
测试深拷贝
<__main__.MobilePhone object at 0x00E50A50> <__main__.CPU object at 0x00DCED50> <__main__.Screen object at 0x00E50AB0>
<__main__.MobilePhone object at 0x00F26390> <__main__.CPU object at 0x00F26470> <__main__.Screen object at 0x00F264B0>
组合
“is-a"关系,我们可以使用"继承”。从而实现子类拥有的父类的方法和属性。“is-a”关系指的是类似这样的关系:狗是动物,dog is a animal.狗类就应该继承动物类。
“has-a”关系,我们可以使用"组合",也能实现一个类拥有另一个类的方法和属性,“has-a”关系指的是这样的关系:手机拥有CPU。MobilePhone has a CPU.
#测试组合

#使用继承实现代码的复用
class A1:
    def say_a1(self):
        print("a1,a1,a1")

class B1(A1):
    pass

b1 = B1()
b1.say_a1()

#同样的效果,使用组合实现代码的复用
class A2:
    def say_a2(self):
        print("a2,a2,a2")

class B2:
    def __init__(self,a):
        self.a = a
a2 = A2()
b2 = B2(a2)
b2.a.say_a2()
a1,a1,a1
a2,a2,a2
例2
#测试has-a关系,使用组合

class MobilePhone:
    def __init__(self,cpu,screen):
        self.cpu = cpu
        self.screen = screen

class CPU:
    def calculate(self):
        print("算你个12345")
        print("cpu对象:",self)

class Screen:
    def show(self):
        print("显示一个好看的画面")
        print("screen对象:", self)


m = MobilePhone(CPU(),Screen())
m.cpu.calculate()
m.screen.show()
算你个12345
cpu对象: <__main__.CPU object at 0x0040ED50>
显示一个好看的画面
screen对象: <__main__.Screen object at 0x00E50750>
设计模式_工厂模式实现
设计模式是面向对象语言特有的内容,使我们在面临某一类问题时候固定的做法,设计模式有很多种,比较流行的是·GOF(group of four)23种设计模式。当然我们没有必要全部学习,学习几个常用的即可。
对于初学者,我们学习两个最常用的模式:工厂模式和单例模式。
工厂模式实现了创建者和调用者的分离,使用专门的工厂类将选择实现类、创建对象进行统一的管理和控制。
#测试工厂模式

class CarFactory:
    def create_car(self,brand):
        if brand == "奔驰":
            return Benz()
        elif brand == "宝马":
            return BNM()
        elif brand == "比亚迪":
            return BYD()
        else:
            return "未知品牌,无法创建"

class Benz:
    pass

class BNM:
    pass

class BYD:
    pass

factory = CarFactory()
c1 = factory.create_car("奔驰")
c2 = factory.create_car("比亚迪")
print(c1)
print(c2)
<__main__.Benz object at 0x01A60810>
<__main__.BYD object at 0x01A60870>
设计模式_单例模式实现
单例模式(Singleton Pattern)的核心作用是确保一个类只有一个实例,并且提供一个访问该实例的全局访问点。
单例模式只生成一个实例对象,减少了对系统资源的开销。当一个对象的产生需要比较多的资源,如读取配置文件、产生其他依赖对象时,可以产生一个单例对象,然后永久驻留内存中,从而极大的降低开销。
#测试单例模式

class MySingleton:

    __obj = None     #类属性
    __init_flag = True


    def __new__(cls, *args, **kwargs):
        if cls .__obj == None:
            cls.__obj = object.__new__(cls)
        return cls.__obj

    def __init__(self,name):
        if MySingleton.__init_flag:
            print("int.....")
            self.name = name
            MySingleton.__init_flag = False

a = MySingleton("aa")
b = MySingleton("bb")
print(a)
print(b)
c = MySingleton("cc")
print(c)
int.....
<__main__.MySingleton object at 0x00A30A30>
<__main__.MySingleton object at 0x00A30A30>
<__main__.MySingleton object at 0x00A30A30>
例2
#测试工厂模式和单例模式的整合使用

class CarFactory:
    __obj = None     #类属性
    __init_flag = True


    def create_car(self,brand):
        if brand == "奔驰":
            return Benz()
        elif brand == "宝马":
            return BNM()
        elif brand == "比亚迪":
            return BYD()
        else:
            return "未知品牌,无法创建"


    def __new__(cls, *args, **kwargs):
        if cls .__obj == None:
            cls.__obj = object.__new__(cls)
        return cls.__obj

    def __init__(self):
        if CarFactory.__init_flag:
            print("int CarFactory.....")
            CarFactory.__init_flag = False

class Benz:
    pass

class BNM:
    pass

class BYD:
    pass

factory = CarFactory()
c1 = factory.create_car("奔驰")
c2 = factory.create_car("比亚迪")
print(c1)
print(c2)

factory2 = CarFactory()
print(factory)
print(factory2 )
int CarFactory.....
<__main__.Benz object at 0x01A70AD0>
<__main__.BYD object at 0x01A70A30>
<__main__.CarFactory object at 0x01A50850>
<__main__.CarFactory object at 0x01A50850>