Tensorflow2.0 迁移学习 Fine tune 模型库Tensorflow Hub
参考Tensorflow官网的图像迁移学习的训练内容,使用预训练的CNN进行迁移学习。
目录
- 模型库
- Tensorflow Hub
- Tensorflow.keras.application
- 迁移学习的步骤
- 使用TF Hub进行迁移学习
- 使用Tensorflow.keras.application进行迁移学习
- 预处理
- 创建迁移基础模型
- Fine tuning
模型库
Tensorflow Hub
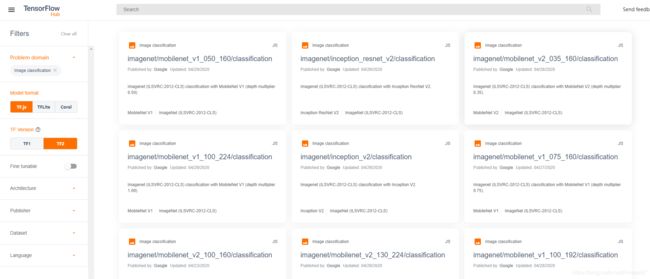
一个有大量完成训练的经典网络库。如下大家可以根据自己的任务、编译环境和Tensorflow环境等筛选训练好的模型。

然后直接使用hub.KerasLayer(URL)进行调用.
m = tf.keras.Sequential([
    hub.KerasLayer("https://hub.tensorflow.google.cn/tensorflow/efficientnet/b4/classification/1")
])
m.build([None, expect_img_size, expect_img_size, 3])  # Batch input shape.
Tensorflow.keras.application
Keras框架中的VGG、GoogLeNet、Inception、Xception、ResNet、MobileNet、DenseNet、NASNet。
base_model = tf.keras.applications.MobileNetV2(input_shape=IMG_SHAPE,
                                               include_top=False,
                                               )
具体介绍可参看
Tensorflow.keras.application放在Tensorfolow Hub后面可以看出,Google以后应该会主推Hub。
迁移学习的步骤
- 从模型库Tensorflow Hub 或者Tensorflow.keras.application下载已经训练好的模型,代码如上
- 去掉最后一层,根据分类增加自己的分类层
base_model.trainable = False
global_average_layer = tf.keras.layers.GlobalAveragePooling2D()
prediction_layer = tf.keras.layers.Dense(5) # 5类
model = tf.keras.Sequential([
  base_model,
  global_average_layer,
  prediction_layer
])
- Fine Tune 高阶的卷积层trainable
base_model.trainable = True
fine_tune_at = 100 #  微调开始层数
for layer in base_model.layers[:fine_tune_at]:
layer.trainable =  False
- Fine Tune 低学习率进行微调学习
model.compile(loss=tf.keras.losses.BinaryCrossentropy(from_logits=True),
            optimizer = tf.keras.optimizers.RMSprop(lr=base_learning_rate/10),
            metrics=['accuracy'])
使用TF Hub进行迁移学习
参考.
TF Hub环境配置
import matplotlib.pylab as plt
!pip install -q tf-nightly
import tensorflow as tf
!pip install -q -U tf-hub-nightly
!pip install -q tfds-nightly
import tensorflow_hub as hub
from tensorflow.keras import layers
下载基于ImageNet训练的mobilenet_v2网络,并建立分类器
classifier_url ="https://tfhub.dev/google/tf2-preview/mobilenet_v2/classification/2"
IMAGE_SHAPE = (224, 224)
classifier = tf.keras.Sequential([
    hub.KerasLayer(classifier_url, input_shape=IMAGE_SHAPE+(3,))
]) #IMAGE_SHAPE+(3,)=>(224, 224, 3)
下载计算机科学家葛麗絲·霍普 (Grace Hopper)的样张图片
import numpy as np
import PIL.Image as Image

grace_hopper = tf.keras.utils.get_file('image.jpg','https://storage.googleapis.com/download.tensorflow.org/example_images/grace_hopper.jpg')
grace_hopper = Image.open(grace_hopper).resize(IMAGE_SHAPE)
grace_hopper
麗絲·霍普 (Grace Hopper)输入到网络预测得到结果
grace_hopper = np.array(grace_hopper)/255.0
grace_hopper.shape
result = classifier.predict(grace_hopper[np.newaxis, ...])
result.shape
predicted_class = np.argmax(result[0], axis=-1)
predicted_class
解码预测结果数字对应的标签是文字标签(FYI:计算机科学家葛麗絲·霍普 (Grace Hopper)还是个军官)
labels_path = tf.keras.utils.get_file('ImageNetLabels.txt','https://storage.googleapis.com/download.tensorflow.org/data/ImageNetLabels.txt')
imagenet_labels = np.array(open(labels_path).read().splitlines())
plt.imshow(grace_hopper)
plt.axis('off')
predicted_class_name = imagenet_labels[predicted_class]
_ = plt.title("Prediction: " + predicted_class_name.title())
以上知识热身,现在才开始真的例子
加载花花数据集,并完成预处理,这里使用.flow_from_directory方法对tf.keras.preprocessing.image.ImageDataGenerator对象完成标准化图像分类操作
data_root = tf.keras.utils.get_file(
  'flower_photos','https://storage.googleapis.com/download.tensorflow.org/example_images/flower_photos.tgz',
   untar=True)
image_generator = tf.keras.preprocessing.image.ImageDataGenerator(rescale=1/255)
image_data = image_generator.flow_from_directory(str(data_root), target_size=IMAGE_SHAPE)
for image_batch, label_batch in image_data:
  print("Image batch shape: ", image_batch.shape)
  print("Label batch shape: ", label_batch.shape)
  break
直接预测一下结果。因为是五种花花的数据集结果还不理想,需要进一步操作一番
result_batch = classifier.predict(image_batch)
result_batch.shape
predicted_class_names = imagenet_labels[np.argmax(result_batch, axis=-1)]
predicted_class_names
plt.figure(figsize=(10,9))
plt.subplots_adjust(hspace=0.5)
for n in range(30):
  plt.subplot(6,5,n+1)
  plt.imshow(image_batch[n])
  plt.title(predicted_class_names[n])
  plt.axis('off')
_ = plt.suptitle("ImageNet predictions")
重新加载一个没有最后一层全连接层(headless model)的mobilenet_v2
feature_extractor_url = "https://tfhub.dev/google/tf2-preview/mobilenet_v2/feature_vector/2" #@param {type:"string"}
feature_extractor_layer = hub.KerasLayer(feature_extractor_url,
                                         input_shape=(224,224,3))
看看中间层的输出维度,并把headless model的权值和偏移量冻结了。
feature_batch = feature_extractor_layer(image_batch)
print(feature_batch.shape)
feature_extractor_layer.trainable = False
增加一个5类的最后全连接层,并看看可训练的参数,发现trainable params:L6405刚好等于1280*5+5
model = tf.keras.Sequential([
  feature_extractor_layer,
  layers.Dense(image_data.num_classes)
])

model.summary()
predictions = model(image_batch)
开始训练网络
model.compile(
  optimizer=tf.keras.optimizers.Adam(),
  loss=tf.keras.losses.CategoricalCrossentropy(from_logits=True),
  metrics=['acc'])
class CollectBatchStats(tf.keras.callbacks.Callback):
  def __init__(self):
    self.batch_losses = []
    self.batch_acc = []

  def on_train_batch_end(self, batch, logs=None):
    self.batch_losses.append(logs['loss'])
    self.batch_acc.append(logs['acc'])
    self.model.reset_metrics()
steps_per_epoch = np.ceil(image_data.samples/image_data.batch_size)

batch_stats_callback = CollectBatchStats()

history = model.fit_generator(image_data, epochs=2,
                              steps_per_epoch=steps_per_epoch,
                              callbacks = [batch_stats_callback])
看看训练过程的loss 和acc变化情况
plt.figure()
plt.ylabel("Loss")
plt.xlabel("Training Steps")
plt.ylim([0,2])
plt.plot(batch_stats_callback.batch_losses)
plt.figure()
plt.ylabel("Accuracy")
plt.xlabel("Training Steps")
plt.ylim([0,1])
plt.plot(batch_stats_callback.batch_acc)
可视化一下预测结果
class_names = sorted(image_data.class_indices.items(), key=lambda pair:pair[1])
class_names = np.array([key.title() for key, value in class_names])
class_names
predicted_batch = model.predict(image_batch)
predicted_id = np.argmax(predicted_batch, axis=-1)
predicted_label_batch = class_names[predicted_id]
label_id = np.argmax(label_batch, axis=-1)
plt.figure(figsize=(10,9))
plt.subplots_adjust(hspace=0.5)
for n in range(30):
  plt.subplot(6,5,n+1)
  plt.imshow(image_batch[n])
  color = "green" if predicted_id[n] == label_id[n] else "red"
  plt.title(predicted_label_batch[n].title(), color=color)
  plt.axis('off')
_ = plt.suptitle("Model predictions (green: correct, red: incorrect)")
保存结果并对比加载模型于元模型的预测结果
reloaded = tf.keras.models.load_model(export_path)
result_batch = model.predict(image_batch)
reloaded_result_batch = reloaded.predict(image_batch)
abs(reloaded_result_batch - result_batch).max()
使用Tensorflow.keras.application进行迁移学习
参考
预处理
环境配置
import os
import numpy as np
import matplotlib.pyplot as plt
import tensorflow as tf
加载猫狗数据
这里加载的raw_train, raw_validation, raw_test数据类型
metadata数据类型
import tensorflow_datasets as tfds
tfds.disable_progress_bar()
(raw_train, raw_validation, raw_test), metadata = tfds.load(
    'cats_vs_dogs',
    split=['train[:80%]', 'train[80%:90%]', 'train[90%:]'],
    with_info=True,
    as_supervised=True,
)
print(raw_train)
print(raw_validation)
print(raw_test)
show 两张, metadata
get_label_name = metadata.features['label'].int2str

for image, label in raw_train.take(2):
  plt.figure()
  plt.imshow(image)
  plt.title(get_label_name(label))
图像预处理操作=> (160, 160, 3)。(-1, 1)
IMG_SIZE = 160 # All images will be resized to 160x160

def format_example(image, label):
  image = tf.cast(image, tf.float32)
  image = (image/127.5) - 1
  image = tf.image.resize(image, (IMG_SIZE, IMG_SIZE))
  return image, label
train = raw_train.map(format_example)
validation = raw_validation.map(format_example)
test = raw_test.map(format_example)
BATCH_SIZE = 32
SHUFFLE_BUFFER_SIZE = 1000
train_batches = train.shuffle(SHUFFLE_BUFFER_SIZE).batch(BATCH_SIZE)
validation_batches = validation.batch(BATCH_SIZE)
test_batches = test.batch(BATCH_SIZE)
tensorflow.python.data.ops.dataset_ops.DatasetV1Adapter对象使用.take方法取第一个batch的数据
for image_batch, label_batch in train_batches.take(1):
   pass
image_batch.shape
创建迁移基础模型
迁移MobileNetV2,去掉最后一层,设置为不可训练
IMG_SHAPE = (IMG_SIZE, IMG_SIZE, 3)

# Create the base model from the pre-trained model MobileNet V2
base_model = tf.keras.applications.MobileNetV2(input_shape=IMG_SHAPE,
                                               include_top=False,
                                               weights='imagenet')
base_model.trainable = False
base_model.summary()
增加分类层
global_average_layer = tf.keras.layers.GlobalAveragePooling2D()
prediction_layer = tf.keras.layers.Dense(1)
model = tf.keras.Sequential([
  base_model,
  global_average_layer,
  prediction_layer
])
查看可训练的参数
base_learning_rate = 0.0001
model.compile(optimizer=tf.keras.optimizers.RMSprop(lr=base_learning_rate),
              loss=tf.keras.losses.BinaryCrossentropy(from_logits=True),
              metrics=['accuracy'])
model.summary()
len(model.trainable_variables)
查看初始精度
initial_epochs = 10
validation_steps=20

loss0,accuracy0 = model.evaluate(validation_batches, steps = validation_steps)
print("initial loss: {:.2f}".format(loss0))
print("initial accuracy: {:.2f}".format(accuracy0))
开始训练,并显示结果
history = model.fit(train_batches,
                    epochs=initial_epochs,
                    validation_data=validation_batches)
acc = history.history['accuracy']
val_acc = history.history['val_accuracy']

loss = history.history['loss']
val_loss = history.history['val_loss']

plt.figure(figsize=(8, 8))
plt.subplot(2, 1, 1)
plt.plot(acc, label='Training Accuracy')
plt.plot(val_acc, label='Validation Accuracy')
plt.legend(loc='lower right')
plt.ylabel('Accuracy')
plt.ylim([min(plt.ylim()),1])
plt.title('Training and Validation Accuracy')

plt.subplot(2, 1, 2)
plt.plot(loss, label='Training Loss')
plt.plot(val_loss, label='Validation Loss')
plt.legend(loc='upper right')
plt.ylabel('Cross Entropy')
plt.ylim([0,1.0])
plt.title('Training and Validation Loss')
plt.xlabel('epoch')
plt.show()
Fine tuning
通过初步的迁移学习过程,猫狗的二分类预测精度达到了95%左右,如何进一步提升预测精度,就需要在原来模型的基础上增加可训练参数的量,即Fine tuning 卷积网络的近输出端的网络权值,使得网络可以更有效的提取与新数据相关的高层图形特征。
注意:Fine tuning只能在已完成上一步操作,即只保留最后分类层trainable以后进行。原因是初始的随机分类层会使得梯度过大,进而造成pre-trained层的权值大幅改变,失去特征提取的能力。
设置100层以后的网络权值为trainable
base_model.trainable = True
# Let's take a look to see how many layers are in the base model
print("Number of layers in the base model: ", len(base_model.layers))

# Fine-tune from this layer onwards
fine_tune_at = 100

# Freeze all the layers before the `fine_tune_at` layer
for layer in base_model.layers[:fine_tune_at]:
  layer.trainable =  False
缩小learning_rate/10训练模型
model.compile(loss=tf.keras.losses.BinaryCrossentropy(from_logits=True),
              optimizer = tf.keras.optimizers.RMSprop(lr=base_learning_rate/10),
              metrics=['accuracy'])
在迁移学习的基础上,继续Fine Tune 10个epoch
fine_tune_epochs = 10
total_epochs =  initial_epochs + fine_tune_epochs

history_fine = model.fit(train_batches,
                         epochs=total_epochs,
                         initial_epoch =  history.epoch[-1],
                         validation_data=validation_batches)
可以看出模型的预测精度又有了进一步的提升
acc += history_fine.history['accuracy']
val_acc += history_fine.history['val_accuracy']

loss += history_fine.history['loss']
val_loss += history_fine.history['val_loss']
plt.figure(figsize=(8, 8))
plt.subplot(2, 1, 1)
plt.plot(acc, label='Training Accuracy')
plt.plot(val_acc, label='Validation Accuracy')
plt.ylim([0.8, 1])
plt.plot([initial_epochs-1,initial_epochs-1],
          plt.ylim(), label='Start Fine Tuning')
plt.legend(loc='lower right')
plt.title('Training and Validation Accuracy')

plt.subplot(2, 1, 2)
plt.plot(loss, label='Training Loss')
plt.plot(val_loss, label='Validation Loss')
plt.ylim([0, 1.0])
plt.plot([initial_epochs-1,initial_epochs-1],
         plt.ylim(), label='Start Fine Tuning')
plt.legend(loc='upper right')
plt.title('Training and Validation Loss')
plt.xlabel('epoch')
plt.show()