仿微信朋友圈项目梳理
项目功能简介:
用户通过手机号验证码进行登录和注册 可以浏览动态列表中的所有动态 登录成功后用户可以发表自己的动态 也可以对自己认可欣赏的动态进行点赞和评论 也可以通过动态结识志同道合的朋友 进行聊天和探讨
- 前端:采用Vue框架搭建 weui进行页面布局
- 后端:采用node.js
- 数据库:mangoDB库
1. 登录注册功能:

- 通过weui中weui-form进行的页面布局
- 使用 /^1[3456789]\d{9}$/ 此正则表达式验证手机号是否合法
- 用户点击获取验证码后按钮变成60秒倒计时
- 调用后端接口通过调用阿里云短信服务向用户输入的手机号码发送验证码
- 验证码输入后点击同意并阅读相关条款后 注册/确定按钮变成激活状态
- 登录成功后该页面跳转至上一需登录页面
- 将用户信息存入store中(Vuex)
2. 主页:
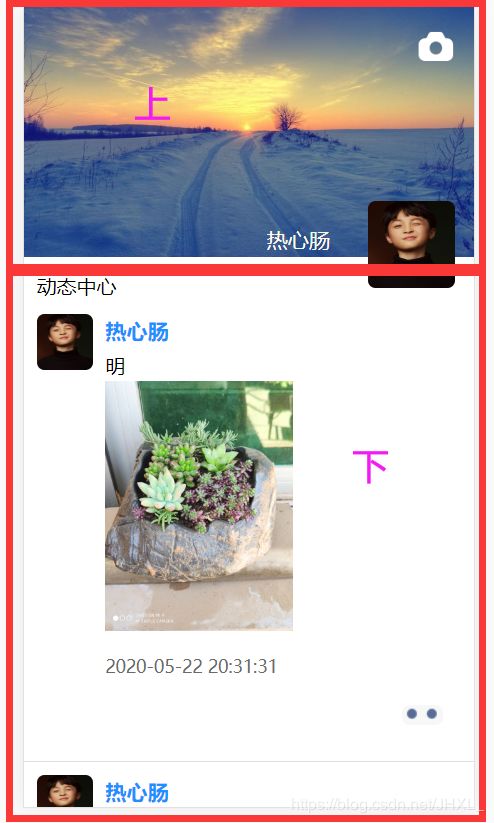
2.1 上半部分:
- 头部导航 返回按钮 相机标志(见主题3)
- 背景图 头像 用户昵称 如果用户未登录是系统随机匹配的图片
2.1.1 头部:
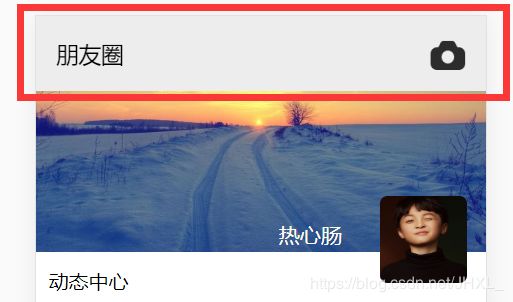
当导航条在最顶部时此导航部分为透明,并且不显示朋友圈文字,当用户向下混动一定距离时,导航部分为灰色背景色显示文字,并且相机颜色为黑色,点击相机图标跳转到发布动态页面
2.1.1.1导航栏的变色实现
- 检测当滚动条的滚动具体大于100时为导航栏元素添加一个类名小于时取消类名
- 使用交集选择器 判断元素具备两个类名时才添加背景颜色 隐藏文字 切换相机图片
2.1.1.2点击相机发表动态
- 判断用户是否登录 上面当用户登录成功后会将用户的信息存入公共可访问的store 中,所有可以在store数据中查询用户是否登录
- 如果未登录跳转到login登录页面 (见主题1)
- 若登录后跳转动态发表页面 (见主题3)
2.1.2 背景图的切换
- 点击背景图像运用weui.actionSheet会弹出一选择框

- 点击取消后选框消失
- 点击从相册选择 会通过ref属性 用代码进行对uploader中的单击事件的触发
- 我们将weui-uploader这模块隐藏不显示
- 但uploader被单击时会执行像主题3.3中的步骤进行图片的上传
onSuccess: function (ret) {
        // 更换用户的背景图像
        self.submit(ret)
      }
- 上传成功后我们会触发submit函数并且将ret图片的信息作为参数进行传递
async submit (obj) {
      // 更新数据库中的背景图像
      const res = await service.post('users/update', {
        userId: this.$store.state.currentUser._id,
        bgurl: obj.data.url
      })
      // 更新本地中的北背景图像
      if (res.data.code === 0) {
        this.$store.dispatch('setUser', {
          ...this.$store.state.currentUser,
          bgurl: obj.data.url
        })
      }
- 通过调用接口 更新用户的背景图 成功后我们将调用store中的方法改变本地的背景图
- 在调用store中的方法时我们传过去的参数中是运用对象的深拷贝(…)
2.1.3 点击头像进入用户中心
- 判断用户如果没有登录跳转到login登录页面如果已经登录跳转到个人中心页面
- 个人中心功能见主题4
2.2 下半部分

- 动态列表
- 点赞评论
- 头像点击查看对方信息
- 图片的查看
2.2.1 动态列表
- 显示的头像信息 昵称
- 显示帖子的内容(如果文字较多设置只显示三行超出隐藏)
 overflow: hidden;
                text-overflow: ellipsis;
                display: -webkit-box;
                -webkit-line-clamp: 3;
                -webkit-box-orient: vertical;
- 显示动态中携带的图片(一张图片按照图片的最长边进行成比例缩放,,多张图片按照固定宽高设置)
 <!-- 帖子中如果有多张图片 按照列表显示 图片的尺寸都一样 -->
                <div class="img-content" v-if="data.picList.length>1">
                    <img v-for="imgInfo in data.picList"
                    :key="imgInfo.id"
                    :preview="data._id"
                    :src="imgInfo.url"
                    class="img-warp">
                </div>
                <!-- 如果帖子中只有一张图片 图片可以放大显示 要求狂傲不能超过200px -->
                <div class="img-content-one" v-if="data.picList.length===1">
                    <img
                    :src="data.picList[0].url"
                    class="img-warp-one"
                    :preview="data._id"
                    :style="initImgSize(data.picList[0])">
                </div>
- 帖子的发表时间,通过moment来进行时间格式化
2.2.2 点赞评论
- 点赞
- 用户点击 - - 的时候 出现点赞评论的标识
- 当该用户已经点过赞时,显示取消点赞,用户未点赞时,显示点赞
- 点赞宇取消点赞都是用过点击时判断点赞还是取消来请求后端的不同接口进行修改
- 成功后也要修改store中的本地数据
- 评论
-
获取当前手指的坐标 并触发bus中的showInput事件
addComment (e) { // 获取当前点击的坐标 this.data.pageY = e.pageY this.data.clientY = e.clientY this.$bus.$emit('showInput', this.data) } -
当用户触发showInput事件后显示文本框
-
通过os进行检测用户的手机系统评论的文本框也是不同的
this.$bus.$on('showInput', (currentData) => { if (this.$refs.inputBar) { // 显示输入框 this.showInput = true // 调用输入框组件的focusInput事件,以弹起键盘 this.$refs.inputBar.focusInput(currentData) // this.$refs.inputWrap.style.top = currentData.pageY + 'px' // 调整页面的位置 if (os.isIOS) { this.$refs.inputWrap.style.top = currentData.pageY + 'px' // 计算页面的滚动距离 setTimeout(() => { const y = currentData.pageY - window.keyboradHeight window.scroll(0, y) }, 300) } } })- 调用输入框组件的focusInput事件,以弹起键盘
- 调整页面的位置
- 计算页面的滚动距离
-
2.2.3 点击图片查看大图

- 通过使用preview来实现图片的查看
- preview作为元素的动态属性 值为每组图片公共值 这里使用发表用户的_id
- 可以左右滑动进行切换图片
2.2.4 点击头像查看作者信息
- 点击自己的头像则会跳转到主题4
- 点击其他作者的头像则会跳转到用户信息(传递用户id在路径中)
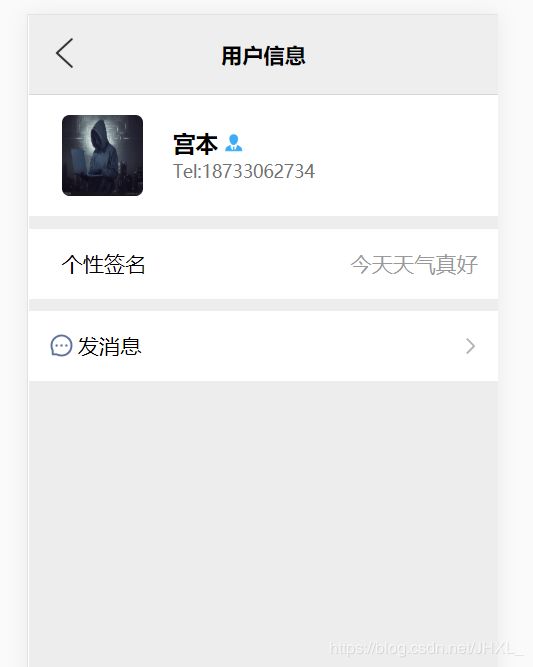
- 通过传递过来的id进行查寻用户信息在此进行展示
- 点击发消息跳转到聊天页面(传递参数用户id用户昵称到路径中)主题5
2.3 上划加载更多
2.4 下拉更新
3. 发表动态页面
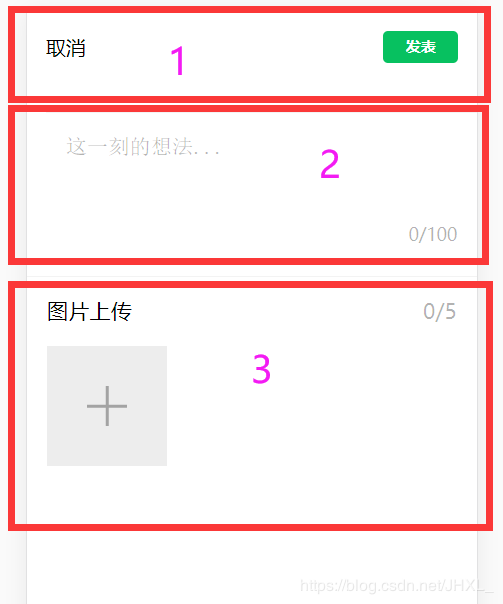
3.1 第一部分(取消发表按钮)
3.1.1 取消按钮————回到上一页面
3.1.2 发布按钮
- 验证文字是否为空
- 文字的数量是否合法
- 请求接口进行发布
- 成功后会跳转到主页(见主题2)
3.2 第二部分(文本区域)
3.2.1 用户输入的文字数量
- 将展示用户输入文字数量使用动态数据,通过input事件实时得到文字数量不断改变变量的值
3.2.2 限定用户输入的文字数量为100
- 采用weui中的form文本域
- 通过双向绑定的元素得知用户输入的文字数量,当用户输入的文字数量超过100时,获取文字的内容通过substr属性取前一百个文字复制给双向绑定的文字内容的变量造成超出100字不能输入的现象。
3.3 第三部分(上传图片)
3.3.1 采用weui中的uploader技术进行图片的上传
在weui中的this指向并不是Vue实例所以在第一行中加入const self=this 让self常量指向我们的Vue实例
  const self = this
    weui.uploader('#uploader', {
      url: service.baseURL + '/post/uploadimg',
      auto: true,
      type: 'file',
      fileVal: 'image',
      compress: {
        width: 1600,
        height: 1600,
        quality: 0.8
      },
      onBeforeQueued: function (files) {
        // `this` 是轮询到的文件, `files` 是所有文件
        if (['image/jpg', 'image/jpeg', 'image/png', 'image/gif'].indexOf(this.type) < 0) {
          weui.alert('请上传符合条件的图片')
          return false // 阻止文件添加
        }
        if (this.size > 10 * 1024 * 1024) {
          weui.alert('请上传不超过10M的图片')
          return false
        }
        // 控制多元每次不能超过五张
        if (files.length > self.totalUploadCount) {
          weui.alert('最多只能上传' + self.totalUploadCount + '张图片,请重新选择')
          return false
        }
        // 如果已经上传五张图片 作为不能继续上传
        if (self.uploadCount + 1 > self.totalUploadCount) {
          weui.alert('最多只能上传' + self.totalUploadCount + '张图片')
          return false
        }

        self.uploadCount++

        // return true; // 阻止默认行为,不插入预览图的框架
      },
      onBeforeSend: function (data, headers) {
        const token = document.cookie.split('=')[1]
        headers['wec-access-token'] = token
      },
      onProgress: function (procent) {
        // console.log(this, procent)
        // return true; // 阻止默认行为,不使用默认的进度显示
      },
      onSuccess: function (ret) {
        ret.data.id = this.id
        self.picList.push(ret.data)
      },
      onError: function (err) {
        console.log('error:' + err)
        // return true; // 阻止默认行为,不使用默认的失败态
      }
    })
- onBeforeQueued
选择要上传的图片时触发(验证图片是否符合要求)- 验证图片的格式
- 验证图片的大小不能超过10M
- 控制每次选择图片不能超过五张
- 控制如果已经选择五中图片不能继续上传
- onBeforeSend
图片上传前触发- 我们将用户登录成功后存入Local Storage中的cuser(token)放到请求头headers中
- onSuccess
图片上传成功后触发- 将图片的id存到 ret.data中
- 将图片的所有信息添加到picList数组中
3.3.2 查看图片


- 点击小图片时可以展现大图 点击图片时会通过e.target拿到事件源
- 通过getAttribute(‘style’)方法获取style中属性background-image: url(“blob:http://192.168.0.107:8080/c1e0e8bf-4ac6-4184-a839-0cdcce473aa4”);
- 通过“ " ”进行分割得到第二个元素 也就是路径
- 将得到的路径复制给weui.gallery 他具有两个参数,一个是图片的路径,一个是删除图片我们在第二个参数中调用删除图片的函数并且将图片的信息以及查看大图的 div作为参数传递过去(见主题3.3.3)(self指向的是this Vue的实例)
 preImg (e) {
      const self = this
      const url = e.target.getAttribute('style').split('"')[1]
      var gallery = weui.gallery(url, {
        onDelete: function () {
          self.deleteImg(e.target, gallery)
        }
      })
    }
3.3.3 删除图片
deleteImg (target, gallery) {
      const self = this
      weui.confirm('确认删除图片吗', () => {
        const id = target.getAttribute('data-id')
        const index = self.picList.findIndex(item => {
          return item.id === id
        })
        self.picList.splice(index, 1)
        // 删除对应的DOM元素
        target.remove()
        self.uploadCount--
      })
      gallery.hide(function () {
        console.log('`gallery`has been hidden')
      })
    }
- 运用weui中的confirm确定是否对删除图片
- 确定删除:通过id找出picList数组中与之相同的图片信息进行删除,同时将对应的DOM元素进行删除
- 上面执行的同时会执行hide事件,将我们现实大图的div进行隐藏
4. 用户个人中心

- 导航部分为公用组件 通过父子组件prop进行传值(头部导航的文字内容)
- 点击<按钮跳转上一页面
4.1 更换头像
- 点击用户的头像时 依靠ref属性使用代码触发隐藏的上传图片插件的单击事件,进而激活uploader进行图片的上传
- 上传成功后分为以下两步
 onSuccess: async function (ret) {
        // console.log(ret)
        const res = await service.post('users/update', {
          userId: self.$store.state.currentUser._id,
          avatar: ret.data.url
        })
        if (res.data.code === 0) {
          self.$store.dispatch('setUser', {
            ...self.$store.state.currentUser,
            avatar: ret.data.url
          })
          weui.toast('上传成功', 2000)
        }
      }
- 上传下成功后在此函数中ret中就是上传成功图片的所有信息
- 访问接口并且将用户id从store中取出以及图片的地址一并放到请求体中 更新数据库中的头像
- 数据库中的数据更新成功后 会通过调用store中的方法来改变本地的头像地址 同样请求体中还是使用对象的深拷贝
4.2 修改用户昵称

- 点击用户昵称时会跳转页面
- 点击提交按钮 验证文本框内容不能为空
- 请求后端接口修改数据库中的昵称
- 成功后通过store中的方法修改本地昵称
- 最后将文本框内容清空,提示修改成功,2秒后跳转至个人中心
4.3 更换/发表用户个性签名
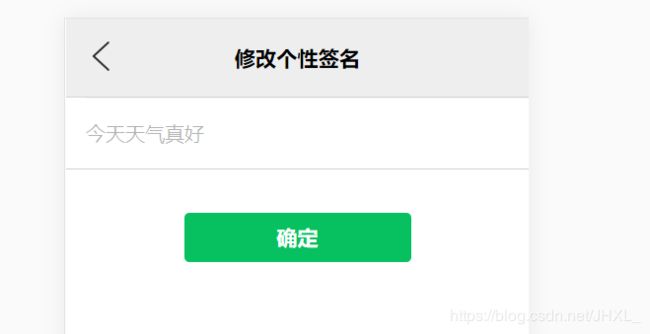
- 点击个性签名时会跳转页面
- 展示已有的个性签名 可更改 可添加
- 点击提交按钮 验证文本框内容不能为空
- 请求后端接口修改数据库中的个性签名
- 成功后通过store中的方法修改本地数据
- 最后提示修改成功,2秒后跳转至个人中心
4.4 切换性别
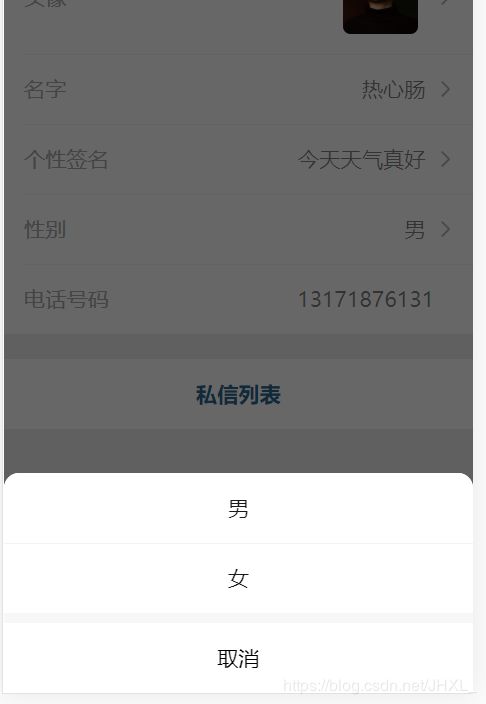
- 点击性别时会弹出选项框运用weui中的actionSheet进行性别选择
 weui.actionSheet([
        {
          label: '男',
          onClick: async function () {
            const res = await service.post('users/update', {
              userId: self.$store.state.currentUser._id,
              gender: '1'
            })
            if (res.data.code === 0) {
              self.$store.dispatch('setUser', {
                ...self.$store.state.currentUser,
                gender: '1'
              })
              weui.toast('修改成功', 1000)
            }
          }
        },
        {
          label: '女',
          onClick: async function () {
            const res = await service.post('users/update', {
              userId: self.$store.state.currentUser._id,
              gender: '0'
            })
            if (res.data.code === 0) {
              self.$store.dispatch('setUser', {
                ...self.$store.state.currentUser,
                gender: '0'
              })
              weui.toast('修改成功', 1000)
            }
          }
        }
      ], [
        {
          label: '取消',
          onClick: function () {
            console.log('取消')
          }
        }
      ])
- 点击取消则会隐藏选项框
- 点击男,会请求后端接口将gender属性值设置为‘1’进行更改,成功后更改本地数据
- 点击女,会请求后端接口将gender属性值设置为‘0’进行更改,成功后更改本地数据
5. 聊天窗口

- 通过用户传递过来的用户昵称显示在最上方
- 点击返回按钮跳转上一页面
- 运用vue-socket.io和socket.io-client实现前后端的聊天数据的交互
- 页面加载时,首先当前用户登录socket,获取当前登录用户与当前指定用户的聊天记录
6. 页面之间切换的动画效果
我们采用animate实现页面之间的切换 animate样式官网点击查看 我们应该将样式应用到所有组件切换需要必经之路–App.vue
-
首先我要安装animate
$ npm install animate.css --save
-
在main.js中引用
import ‘animate.css’
-
需要将运用动画的元素使用标签包裹起来
<transition :enter-active-class="transitionIN" :leave-active-class="transitionOut" > <router-view/> </transition> -
里面的enter-active-class是为要切换来的(进场)设置动画
-
leave-active-class是为要切出(出场)设置动画,两属性值均为动态
-
考虑到不同的页面切换的动画应该不同 so我们采用侦听器来检测路由的变化进而对个别的页面做出个性动画
// 侦听器:侦听路由的变化进而应用不同的转场动画 watch: { $route (to, from) { if (to.name === 'Publish') { this.transitionIN = 'animate__animated animate__slideInUp' this.transitionOut = '' } else if (from.name === 'Publish') { this.transitionIN = '' this.transitionOut = 'animate__animated animate__slideOutDown' } else { this.transitionIN = 'animate__animated animate__slideInLeft' this.transitionOut = 'animate__animated animate__slideOutLeft' } } }- $route就是监测此时路由 里面的参数: to要跳转到那个路由,from是从哪里来