C#应用案例之气泡小球反弹
创建窗体
1.打开VS软件创建一个windows窗体应用文件

2.为窗体设置属性并为属性进行赋值
            this.FormBorderStyle = FormBorderStyle.None;//窗体的边框类型为无边框型
            this.Size = new Size(300, 300);             //窗体的宽和高均为300个像素长度
            this.BackColor = Color.Red;                 //窗体的背景颜色为红色
            this.Location = new Point(0, 0);            //窗体的左上角的坐标为(0,0)
this.Opacity = 0.6; //窗体的不透明度为0.6,即透明度为0.4将窗体更改为小球(画圆三部曲)
在进行画圆之前应先为GraphicsPath引入命名空间

1.将窗体进行关联(在实际操作过程中应将这一步放在最后)
2.创建画图的图形对象
3.开始画图
//画圆三部曲
            GraphicsPath path = new GraphicsPath();        //创建画图的图形对象
            path.AddEllipse(0, 0, this.Width, this.Height);//开始画图,为小球的坐标和宽高进行赋值
            this.Region = new Region(path);                //设置窗体关联
让小球进行反弹
首先在工具箱中添加timer组件利用
timer组件令小球进行运动
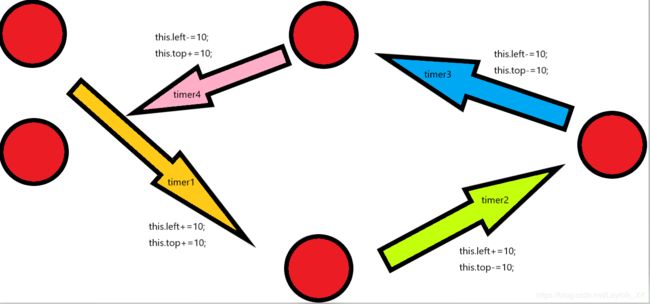
理想情况下小球会如图进行运动

因此代码为:
timer1
private void timer1_Tick(object sender, EventArgs e)
        {
            this.Left += 10;
            this.Top += 10;
            if (this.Top+this.Height>=Screen.PrimaryScreen.WorkingArea.Height)
            {
                timer1.Stop();
                timer2.Start();
            }
        }
timer2
private void timer2_Tick(object sender, EventArgs e)
        {
            this.Left += 15;
            this.Top -= 10;
            if (this.Left+this.Width>=Screen.PrimaryScreen.WorkingArea.Width)
            {
                timer2.Stop();
                timer3.Start();
            }
        }
timer3
private void timer3_Tick(object sender, EventArgs e)
        {
            this.Left -= 10;
            this.Top -= 10;
            if (this.Top <= 0)
            {
                timer3.Stop();
                timer4.Start();
            }
        }
timer4
private void timer4_Tick(object sender, EventArgs e)
        {
            this.Left -= 25;
            this.Top += 10;
            if (this.Left<=0)
            {
                timer4.Stop();
                timer1.Start();
            }
        }
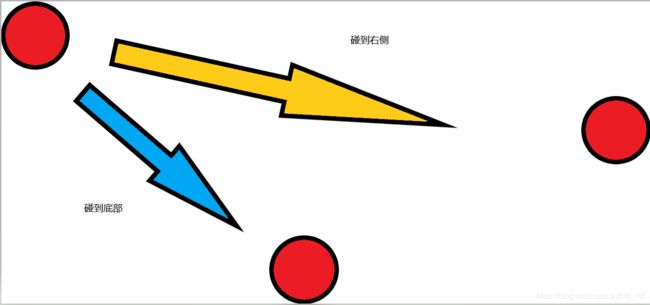
但是在实际操作过程中小球的每次运动根据物理的反弹轨迹都会出现2种情况
所有情况应为如图所示:

以timer1小球运行时为例:
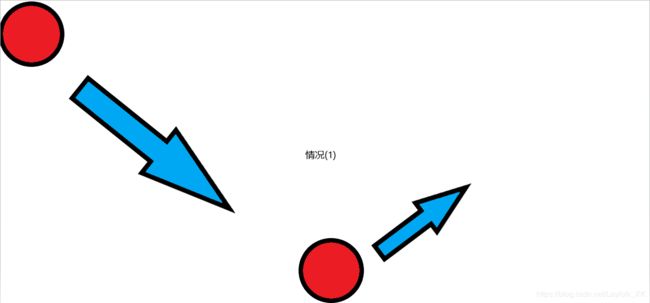
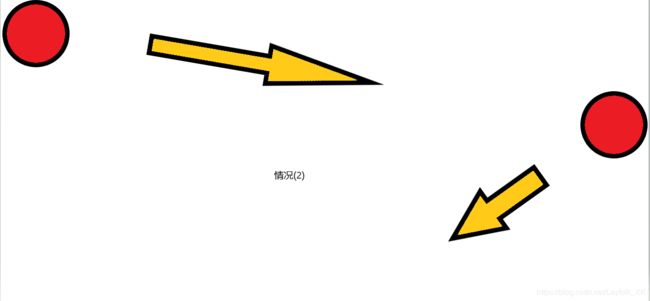
会出现如图两种情况
(1)小球碰撞到底部
(2)小球碰撞到右侧

在小球第二次碰撞到后会进行第二次反弹


情况(2)进行反弹后小球运动方向与timer4的运动方向一致,因此在timer1停止以后还有可能跟timer4
所以timer1的完整代码为:
private void timer1_Tick(object sender, EventArgs e)
        {
            this.Left += 10;
            this.Top += 10;
            if (this.Top+this.Height>=Screen.PrimaryScreen.WorkingArea.Height)//情况(1)
            {
                timer1.Stop();
                timer2.Start();
            }
            if (this.Left+this.Width>=Screen.PrimaryScreen.WorkingArea.Width) //情况(2)
            {
                timer1.Stop();
                timer4.Start();
            }
其余3个timer同理
timer2
 private void timer2_Tick(object sender, EventArgs e)
        {
            this.Left += 10;
            this.Top -= 10;
            if (this.Left+this.Width>=Screen.PrimaryScreen.WorkingArea.Width)
            {
                timer2.Stop();
                timer3.Start();
            }
            if (this.Top<=0)
            {
                timer2.Stop();
                timer1.Start();
            }
        }
timer3
 private void timer3_Tick(object sender, EventArgs e)
        {
            this.Left -= 10;
            this.Top -= 10;
            if (this.Top<=0)
            {
                timer3.Stop();
                timer4.Start();
            }
            if (this.Left<=0)
            {
                timer3.Stop();
                timer2.Start();
            }
        }
timer4
private void timer4_Tick(object sender, EventArgs e)
        {
            this.Left -= 10;
            this.Top += 10;
            if (this.Left<=0)
            {
                timer4.Stop();
                timer1.Start();
            }
            if (this.Top+this.Height>=Screen.PrimaryScreen.WorkingArea.Height)
            {
                timer4.Stop();
                timer3.Start();
            }
        }
最后,为了保证程序的完整运行应该在添加组件之前打开timer1
timer1.Start();启动调试
