虚拟机搭建istio1.3.2
我采用的版本的话 是1.3.2 其余的版本其实也行
k8s:1.4.2
helm:2.14.3
helm 需要配置一下仓库
helm repo add azure http://mirror.azure.cn/kubernetes/charts/
helm repo update
helm search mysql //测试helm charts repo是否正常访问
之后istio安装
直接代码操作
1 .wget https://github.com/istio/istio/releases/download/1.3.2/istio-1.3.2-linux.tar.gz (curl也行)
tar -xvf istio-1.3.2-linux.tar.gz
cd istio-1.3.2
export PATH=$PWD/bin:$PATH
2 helm 配置istio的仓库(这里是微软的 其余的仓库也可以)
helm repo add istio.io https://storage.googleapis.com/istio-release/releases/1.3.2/charts/
3 创建namesapce
kubectl create namespace istio-system
4 创建crds资源
helm install install/kubernetes/helm/istio-init --name istio-init --namespace istio-system --set gateways.istio-ingressgateway.type=NodePort
5 查看crds(大概需要等个半分钟 要不然查看是0)
kubectl get crds | grep 'istio.io' | wc -l 如果显示23 表示正确 (注:好像开启一个组件好像是28 我记不清了)
6 安装 为了简化安装,我们使用values-istio-demo-auth.yaml这个配置文件,可以默认配置好istio的常用组组件
但是需要set一些参数 特别强调 本机是虚拟机 memory是2G(后来改成了3G) 但是内存是个很大的显示 需要设定pilot的流量 否则后续pilot的pod会显示pending 在这里我们限制500MI 其余的限制 是为了开启istio的组件 这样的话 方便外部ip访问
helm install install/kubernetes/helm/istio --name istio --namespace istio-system --values install/kubernetes/helm/istio/values-istio-demo.yaml --set gateways.istio-ingressgateway.type=NodePort --set grafana.enabled=true --set kiali.enabled=true --set tracing.enabled=true --set pilot.resources.requests.memory="500Mi"
7 之后 kubectl get pods -n istio-system 查看pod的情况 如果有问题 就describe 比如我这里网速很不好 很多imagepulloff 我都是手动的docker pull 的
查看svc kubectl get svc -n istio-system
8 如果一切显示正常 running或者complete就可以了
9 之后 可以暴露 利用granafa或者kiala查看 也可以部署bookinfo啥的
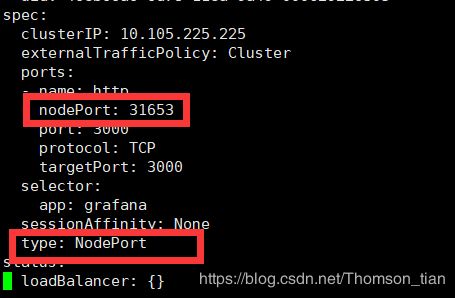
在安装的过程中,grafana默认的是ClusterIP 可以编辑对应的服务,改成NodePort,个人认为比put forward 好点
kubectl edit svc grafana -n istio-system
可以指定对应的nodeport 如果不指定的话 会自动创建一个nodeport
我这里的是自动生成的,需要指定一下nodeport的范围,暴露一个在30000 ~32767范围内的端口。
之后在本地的浏览器内输入
http://IP(个人主机地址):31653/d/G8wLrJIZk/istio-mesh-dashboard
就可以访问了,其余的插件也是一样的 暴露相应的服务就好
参考网址:
isito安装:
https://blog.csdn.net/scwang18/article/details/100833874?depth_1-utm_source=distribute.pc_relevant.none-task&utm_source=distribute.pc_relevant.none-task
https://www.cnblogs.com/caozhiyuan/p/11621732.html
插件暴露:https://blog.csdn.net/weixin_30906701/article/details/97409347?depth_1-utm_source=distribute.pc_relevant.none-task&utm_source=distribute.pc_relevant.none-task

