Android稳定性测试-- Monkey源码分析
背景
最近由于公司要求对移动端的app做各种专项测试,包括稳定性测试,性能测试(cpu,内存,流畅度,电量,流量,启动时间)。基于以上的测试项,我的初期想法是开发一套移动端专项测试平台(包括数据输入,性能指标采集,结果报告的生成与展示,bug单自动提交,持续集成),专门针对app的稳定性和性能进行测试。
本系列教程主要针对Android端的稳定性测试,后续会增加Android端的性能测试。想到稳定性,当然首选Google自带的Monkey,但是Monkey最大的短板是,它不是基于控件的,导致很多事件是无效的,且覆盖率不可控,并且没有截图功能导致问题很难定位;
基于上述所以决定对Monkey进行造轮子,弥补以上的不足!!
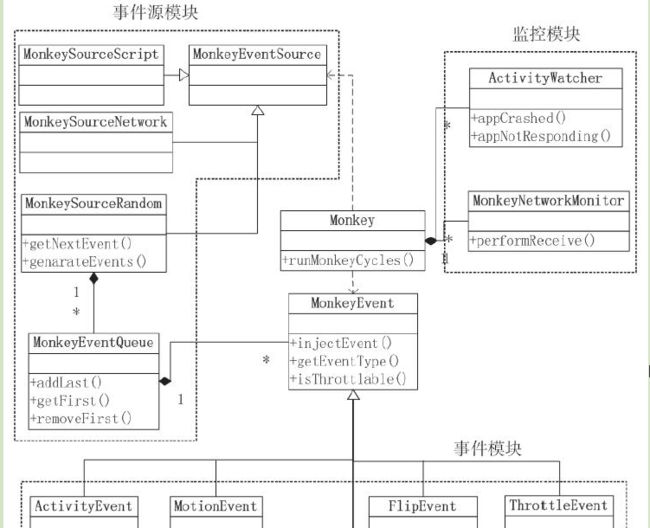
Monkey的代码框架
图片来自网络:
Monkey的代码框架中,大概包括如下模块:
主控模块:主控模块即Monkey类,是入口函数所在类,主要负责参数解析和赋值、初始化运行环境,执行runMonkeyCycles()方法,针对不同的事件源开始获取并执行不同的事件。
事件源模块:事件源代表不同的事件来源。以MonkeyEventSource为基类,它是一个接口,主要的实现类是MonkeySourceRandom,也就是默认的随机事件源,当然也还有网络事件源 MonkeySourceNetwork,脚本事件源 MonkeySourceScript。
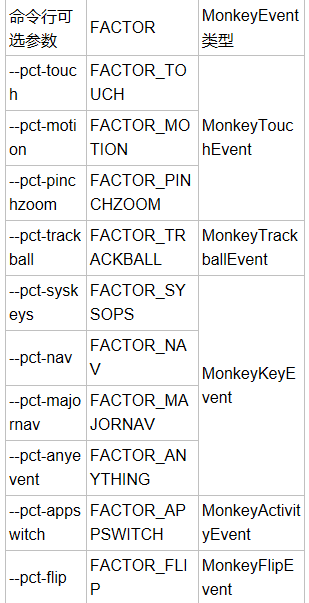
MonkeySourceRandom类首先是定义了10种事件,分别是TOUCH, MOTION, PINCHZOOM, TRACKBALL, NAV, MAJORNAV, SYSOPS, APPSWITCH, FLIP和ANYTHING,这些事件和命令行中的可设置10种参数对应。在构造方法中设置了各个事件的初始占比,并定了一个用于存储事件的队列。
事件模块:事件代表了各种用户操作类型。以MonkeyEvent为基类,衍生出各种Event类,每一个Event类代表一种用户操作类型,如常见的点击、输入、滑动事件等。MonkeyEvent抽象类中提供了intinjectEvent()方法,用于执行对应的事件。
监控模块:监控部分包括异常监控和网络监控两部分。异常监控通过ActivityWatch类来实现,主要监控Activity的Crash和ANR事件。网络监控通过MonkeyNetworkMonitor类来实现,主要用于统计运行期间移动网络和Wi-Fi网络的链接时长
常见方法
processOptions(),用来解析命令行传入的参数,设置相应的变量。
runMonkeyCycles() 执行具体事件
validate() 将传入的参数结合默认的参数进行调整和校验。
generateEvents() 生成随机事件
getNextEvent() 获取到事件 MonkeyEvent
injectEvent() 对于具体的事件,触发真正的执行
常见事件
0:–pct-touch//touch
events percentage触摸事件百分比(触摸事件是一个在屏幕单一位置的按下-抬起事件)
1:–pct-motion//motion
events percentage手势事件百分比(手势事件是由一个在屏幕某处的按下事件、一系列的伪随机移动、一个抬起事件组成)即一个滑动操作,但是是直线的,不能拐弯
2:–pct-pinchzoom//pinch
zoom events percentage二指缩放百分比,即智能机上的放大缩小手势操作
3:–pct-trackball//trackball
events percentage轨迹球事件百分比(轨迹球事件包括一个或多个随机移动,有时还伴有点击。轨迹球现在智能手机上已经没有了,就是类似手柄的方向键一样)
4:–pct-rotation//screen
rotation events percentage屏幕旋转百分比,横屏竖屏
5:–pct-nav//nav
events percentage”基本”导航事件百分比(导航事件包括上下左右,如方向输入设备的输入)老手机的上下左右键,智能机上没有
6:–pct-majornav//major
nav events percentage”主要”导航事件百分比(这些导航事件通常会引发UI的事件,例如5-way pad的中间键、回退键、菜单键)
7:–pct-syskeys//system(key)
operations percentage”系统”按钮事件百分比(这些按钮一般专供系统使用,如Home, Back, Start Call, End Call,音量控制)
8:–pct-appswitch//app
switch events percentage启动activity事件百分比。在随机的间隔里,Monkey会执行一个startActivity()调用,作为最大程度覆盖包中全部Activity的一种方法
9:–pct-flip//keyboard
flip percentage键盘轻弹百分比,如点击输入框,键盘弹起,点击输入框以外区域,键盘收回
10:–pct-anyevent//anyevents
percentage其他类型事件百分比。包括了其他所有的类型事件,如按键、其他不常用的设备上的按钮等等。
主控模块代码分析
1. main方法:
/**
     * Command-line entry point.
     *
     * @param args The command-line arguments
     */
    public static void main(String[] args) {
        // Set the process name showing in "ps" or "top"
        Process.setArgV0("com.android.commands.monkey");

        int resultCode = (new Monkey()).run(args);
        System.exit(resultCode);
    }
第一句的意思就是在 shell 命令行下 使用 ps | grep com.**.monkey 就找到正在运行的monkey进程
第二句是后续的内容,我们继续看后续干了什么。
2. run方法
/**
     * Run the command!
     *
     * @param args The command-line arguments
     * @return Returns a posix-style result code. 0 for no error.
     */
    private int run(String[] args) {
        // Super-early debugger wait
        for (String s : args) {
            if ("--wait-dbg".equals(s)) {
                Debug.waitForDebugger();
            }
        }

        // Default values for some command-line options
        mVerbose = 0;
        mCount = 1000;
        mSeed = 0;
        mThrottle = 0;

        // prepare for command-line processing
        mArgs = args;
        mNextArg = 0;

        // set a positive value, indicating none of the factors is provided yet
        for (int i = 0; i < MonkeySourceRandom.FACTORZ_COUNT; i++) {
            mFactors[i] = 1.0f;
        }

        if (!processOptions()) {
            return -1;
        }

        if (!loadPackageLists()) {
            return -1;
        }

        // now set up additional data in preparation for launch
        if (mMainCategories.size() == 0) {
            mMainCategories.add(Intent.CATEGORY_LAUNCHER);
            mMainCategories.add(Intent.CATEGORY_MONKEY);
        }

        if (mVerbose > 0) {
            System.out.println(":Monkey: seed=" + mSeed + " count=" + mCount);
            if (mValidPackages.size() > 0) {
                Iterator it = mValidPackages.iterator();
                while (it.hasNext()) {
                    System.out.println(":AllowPackage: " + it.next());
                }
            }
            if (mInvalidPackages.size() > 0) {
                Iterator it = mInvalidPackages.iterator();
                while (it.hasNext()) {
                    System.out.println(":DisallowPackage: " + it.next());
                }
            }
            if (mMainCategories.size() != 0) {
                Iterator it = mMainCategories.iterator();
                while (it.hasNext()) {
                    System.out.println(":IncludeCategory: " + it.next());
                }
            }
        }

        if (!checkInternalConfiguration()) {
            return -2;
        }

        if (!getSystemInterfaces()) {
            return -3;
        }

        if (!getMainApps()) {
            return -4;
        }

        mRandom = new SecureRandom();
        mRandom.setSeed((mSeed == 0) ? -1 : mSeed);

        if (mScriptFileNames != null && mScriptFileNames.size() == 1) {
            // script mode, ignore other options
            mEventSource = new MonkeySourceScript(mRandom, mScriptFileNames.get(0), mThrottle,
                    mRandomizeThrottle, mProfileWaitTime, mDeviceSleepTime);
            mEventSource.setVerbose(mVerbose);

            mCountEvents = false;
        } else if (mScriptFileNames != null && mScriptFileNames.size() > 1) {
            if (mSetupFileName != null) {
                mEventSource = new MonkeySourceRandomScript(mSetupFileName,
                        mScriptFileNames, mThrottle, mRandomizeThrottle, mRandom,
                        mProfileWaitTime, mDeviceSleepTime, mRandomizeScript);
                mCount++;
            } else {
                mEventSource = new MonkeySourceRandomScript(mScriptFileNames,
                        mThrottle, mRandomizeThrottle, mRandom,
                        mProfileWaitTime, mDeviceSleepTime, mRandomizeScript);
            }
            mEventSource.setVerbose(mVerbose);
            mCountEvents = false;
        } else if (mServerPort != -1) {
            try {
                mEventSource = new MonkeySourceNetwork(mServerPort);
            } catch (IOException e) {
                System.out.println("Error binding to network socket.");
                return -5;
            }
            mCount = Integer.MAX_VALUE;
        } else {
            // random source by default
            if (mVerbose >= 2) { // check seeding performance
                System.out.println("// Seeded: " + mSeed);
            }
            mEventSource = new MonkeySourceRandom(mRandom, mMainApps, mThrottle, mRandomizeThrottle);
            mEventSource.setVerbose(mVerbose);
            // set any of the factors that has been set
            for (int i = 0; i < MonkeySourceRandom.FACTORZ_COUNT; i++) {
                if (mFactors[i] <= 0.0f) {
                    ((MonkeySourceRandom) mEventSource).setFactors(i, mFactors[i]);
                }
            }

            // in random mode, we start with a random activity
            ((MonkeySourceRandom) mEventSource).generateActivity();
        }

        // validate source generator
        if (!mEventSource.validate()) {
            return -5;
        }

        // If we're profiling, do it immediately before/after the main monkey
        // loop
        if (mGenerateHprof) {
            signalPersistentProcesses();
        }

        mNetworkMonitor.start();
        int crashedAtCycle = runMonkeyCycles();
        mNetworkMonitor.stop();

        synchronized (this) {
            if (mRequestAnrTraces) {
                reportAnrTraces();
                mRequestAnrTraces = false;
            }
            if (mRequestAnrBugreport){
                System.out.println("Print the anr report");
                getBugreport("anr_" + mReportProcessName + "_");
                mRequestAnrBugreport = false;
            }
            if (mRequestAppCrashBugreport){
                getBugreport("app_crash" + mReportProcessName + "_");
                mRequestAppCrashBugreport = false;
            }
            if (mRequestDumpsysMemInfo) {
                reportDumpsysMemInfo();
                mRequestDumpsysMemInfo = false;
            }
            if (mRequestPeriodicBugreport){
                getBugreport("Bugreport_");
                mRequestPeriodicBugreport = false;
            }
        }

        if (mGenerateHprof) {
            signalPersistentProcesses();
            if (mVerbose > 0) {
                System.out.println("// Generated profiling reports in /data/misc");
            }
        }

        try {
            mAm.setActivityController(null);
            mNetworkMonitor.unregister(mAm);
        } catch (RemoteException e) {
            // just in case this was latent (after mCount cycles), make sure
            // we report it
            if (crashedAtCycle >= mCount) {
                crashedAtCycle = mCount - 1;
            }
        }

        // report dropped event stats
        if (mVerbose > 0) {
            System.out.print(":Dropped: keys=");
            System.out.print(mDroppedKeyEvents);
            System.out.print(" pointers=");
            System.out.print(mDroppedPointerEvents);
            System.out.print(" trackballs=");
            System.out.print(mDroppedTrackballEvents);
            System.out.print(" flips=");
            System.out.println(mDroppedFlipEvents);
        }

        // report network stats
        mNetworkMonitor.dump();

        if (crashedAtCycle < mCount - 1) {
            System.err.println("** System appears to have crashed at event " + crashedAtCycle
                    + " of " + mCount + " using seed " + mSeed);
            return crashedAtCycle;
        } else {
            if (mVerbose > 0) {
                System.out.println("// Monkey finished");
            }
            return 0;
        }
    }
这个run中的内容基本就是Monkey运行的流程,主要做了:
1、处理命令行参数:
if (!processOptions()) {
            return -1;
        }
2、处理要拉起的应用程序的Activity:
我们在运行Monkey的时候,如果指定了“ -p 包名 ”,那么Monkey一定会拉起这个App的第一个Activity,这个究竟是怎么实现的呢?就是借助Intent这个东西:
 // now set up additional data in preparation for launch
 if (mMainCategories.size() == 0) {
        mMainCategories.add(Intent.CATEGORY_LAUNCHER);
        mMainCategories.add(Intent.CATEGORY_MONKEY);
 }
3、处理Source模块:
Source模块,以MonkeyEventSource为接口,衍生出三种Source类:MonkeySourceRandom类(随机生成事件)、MonkeySourceScript(从脚本获取事件)、MonkeySourceNetwork(从网络获取事件)。
if (mScriptFileNames != null && mScriptFileNames.size() == 1) {
            // script mode, ignore other options
            mEventSource = new MonkeySourceScript(mRandom, mScriptFileNames.get(0), mThrottle,
                    mRandomizeThrottle, mProfileWaitTime, mDeviceSleepTime);
            mEventSource.setVerbose(mVerbose);

            mCountEvents = false;
        } else if (mScriptFileNames != null && mScriptFileNames.size() > 1) {
            if (mSetupFileName != null) {
                mEventSource = new MonkeySourceRandomScript(mSetupFileName,
                        mScriptFileNames, mThrottle, mRandomizeThrottle, mRandom,
                        mProfileWaitTime, mDeviceSleepTime, mRandomizeScript);
                mCount++;
            } else {
                mEventSource = new MonkeySourceRandomScript(mScriptFileNames,
                        mThrottle, mRandomizeThrottle, mRandom,
                        mProfileWaitTime, mDeviceSleepTime, mRandomizeScript);
            }
            mEventSource.setVerbose(mVerbose);
            mCountEvents = false;
        } else if (mServerPort != -1) {
            try {
                mEventSource = new MonkeySourceNetwork(mServerPort);
            } catch (IOException e) {
                System.out.println("Error binding to network socket.");
                return -5;
            }
            mCount = Integer.MAX_VALUE;
        } else {
            // random source by default
            if (mVerbose >= 2) { // check seeding performance
                System.out.println("// Seeded: " + mSeed);
            }
            mEventSource = new MonkeySourceRandom(mRandom, mMainApps, mThrottle, mRandomizeThrottle);
            mEventSource.setVerbose(mVerbose);
            // set any of the factors that has been set
            for (int i = 0; i < MonkeySourceRandom.FACTORZ_COUNT; i++) {
                if (mFactors[i] <= 0.0f) {
                    ((MonkeySourceRandom) mEventSource).setFactors(i, mFactors[i]);
                }
            }

            // in random mode, we start with a random activity
            ((MonkeySourceRandom) mEventSource).generateActivity();
        }
这部分只要是来判断Monkey的事件源来自何方,根据这些事件的来源,由不同的类做处理。MonkeySourceRandom事件的来源就是我们在命令行输入参数后的伪随机压力测试;MonkeySourceScript事件来源于Monkey识别的一种脚本,事实上Monkey也可以做到通过脚本指定位置点击,滑动等操作,但是该脚本的可读性非常的差,编写不易,因此这里我也没有介绍;第三种MonkeySourceNetwork来自于后面我们要讲的Monkeyrunner,Monkeyrunner通过socket将一些要处理的事件发给Monkey,由Monkey来完成最后的处理。
4、循环处理事件:
        mNetworkMonitor.start();
        int crashedAtCycle = runMonkeyCycles();
        mNetworkMonitor.stop();
主要看看 runMonkeyCycles() 这个函数主要做了什么:
/**
     * Run mCount cycles and see if we hit any crashers.
     *
     * TODO: Meta state on keys
     *
     * @return Returns the last cycle which executed. If the value == mCount, no
     *         errors detected.
     */
    private int runMonkeyCycles() {
        int eventCounter = 0;
        int cycleCounter = 0;

        boolean shouldReportAnrTraces = false;
        boolean shouldReportDumpsysMemInfo = false;
        boolean shouldAbort = false;
        boolean systemCrashed = false;

        // TO DO : The count should apply to each of the script file.
        while (!systemCrashed && cycleCounter < mCount) {
                ...
            MonkeyEvent ev = mEventSource.getNextEvent();
            if (ev != null) {
                int injectCode = ev.injectEvent(mWm, mAm, mVerbose);
                ...
             }
        ...
        }
       ....
}
这里涉及到了一个重要的东西就是MonkeyEvent。
以MonkeyEvent为基类,衍生出各种Event类,如Monkey中常见的点击,输入,滑动事件;
那么一个点击的操作究竟是怎么进行下去的呢?我们可以到上面调用的是injectEvent,这个方法是由基类定义的,每一个子类去实现不同的内容,点击、滑动等这个方法都是通过第一个参数一个iWindowManager的对象而完成的,当然也有不需要这个参数,例如MonkeyThrottleEvent这个类的实现方法,根本没有用到iwm:
@Override
public int injectEvent(IWindowManager iwm, IActivityManager iam, int verbose) {

    if (verbose > 1) {
        System.out.println("Sleeping for " + mThrottle + " milliseconds");
    }
    try {
        Thread.sleep(mThrottle);
    } catch (InterruptedException e1) {
        System.out.println("** Monkey interrupted in sleep.");
        return MonkeyEvent.INJECT_FAIL;
    }

    return MonkeyEvent.INJECT_SUCCESS;
}
那么这个iWindowManager的对象究竟是什么呢?这个事系统隐藏的一个接口,通过这个接口可以注入一些操作事件,那么我们以后是不是也可以用这个接口来进行事件的注入呢?答案是no
我们来看看:谷歌为了方便Monkey能够轻松的完成一些点击、滑动事件,因此在使用了这个系统隐藏的接口,Monkey这个应用拥有这个两个独特的权限:第一个是SET_ACTIVITY_WATCHER这个权限,它允许monkey对activity的生命周期进行全权控制。第二个就是INJECT_EVENTS这个权限它允许monkey去模拟触摸和按键事件。为了防止这个系统隐藏接口暴露出的漏洞,普通的App是不能请求到这些权限的,只有android系统同意的应用才会得到允许获得这些权限。为了防止坏人使用Monkey来进行这个事件的注入,Monkey也只被允许root运行或者是shell这个组的成员运行。

