WPF 命令绑定的各种方式
WPF 命令绑定的各种方式
引言
在WPF开发过程中,不得不学习的就是MVVM模式。但是在MVVM中又绕不开命令(Command)的使用。下面通过几种方式介绍我了解的WPF命令绑定方式。
如何使用
控件继承ICommand接口,直接使用Command
首先通过这里简单介绍Command在MVVM中的使用。
ViewModel类
// using System.ComponentModel;
// using System.Runtime.CompilerServices;
MainViewModel
	///
    /// Interactive logic for MainWindow
    ///
    public class MainViewModel : INotifyPropertyChanged
    {
        public MainViewModel()
        {
            SignInCommand = new RelayCommand(() =>
            {
                MessageBox.Show($"Hello {Username},welcome to Melphily's world");
            });
        }
        private string username;

        ///
        /// User name
        ///
        public string Username
        {
            get { return username; }
            set
            {
                username = value;
                RaisePropertyChanged();
            }
        }

        ///
        /// Sign in command
        ///
        public ICommand SignInCommand { get; private set; }

        #region Notify Handler

        public event PropertyChangedEventHandler PropertyChanged = (sender, e) => { };

        public void RaisePropertyChanged([CallerMemberName] string propertyName = null)
        {
            PropertyChanged(this, new PropertyChangedEventArgs(propertyName));
        }

        #endregion
    }
Command类
// using System.Windows.Input;
RelayCommand
    ///
    /// the command without input parameter
    ///
    public class RelayCommand : ICommand
    {
        public event EventHandler CanExecuteChanged = (sender, e) => { };

        private Action mAction;

        public RelayCommand(Action action)
        {
            this.mAction = action;
        }

        public bool CanExecute(object parameter)
        {
            // Always allow the action can execute.
            return true;
        }

        public void Execute(object parameter)
        {
            // Take action
            mAction.Invoke();
        }
    }
View类
MainWindow.xaml
MainWindow.xaml.cs
	///
    /// Interactive logic for MainWindow.xaml
    ///
    public partial class MainWindow : Window
    {
        public MainWindow()
        {
            InitializeComponent();

            // Bind the Binding source to the DataContext
            DataContext = new MainViewModel();
        }
    }
至此,MVVM的简单应用就完成了。这里面简单实现了输入用户名登陆,在登陆(Sign In)操作时,使用了命令绑定的形式****,在ViewModel类(MainViewModel)接收命令,并做相应的处理。
运行效果:

扩展使用
上面通过较为完整的实例展示了MVVM模式中的Command绑定使用。但是一些WPF控件(例如ListBox)并不支持Command命令绑定。下面我们通过几种方式讨论如何解决,以ListBox举例。
使用InputBinding
Model
MusicItemModel.cs
public class MusicItemModel
    {
        public int Id { get; set; }
        public string Name { get; set; }
        public string Singer { get; set; }

        public MusicItemModel()
        {
            SelectedCommand = new RelayCommandWithParameter(p =>
            {
                MessageBox.Show($"Selected music is {Name} Singed by {Singer},the Id is {p}");
            });
        }

        ///
        /// Select command
        ///
        public ICommand SelectedCommand { get; private set; }

    }
Command
RelayCommandWithParameter.cs
///
/// the command without input parameter
///
public class RelayCommandWithParameter : ICommand
{
public event EventHandler CanExecuteChanged = (sender, e) => { };
private ActionView Model
MusicListViewModel.cs
///
/// Interactive logic for MusicListPage
///
public class MusicListViewModel : INotifyPropertyChanged
{
public MusicListViewModel()
{
Musics = new ObservableCollection()
{
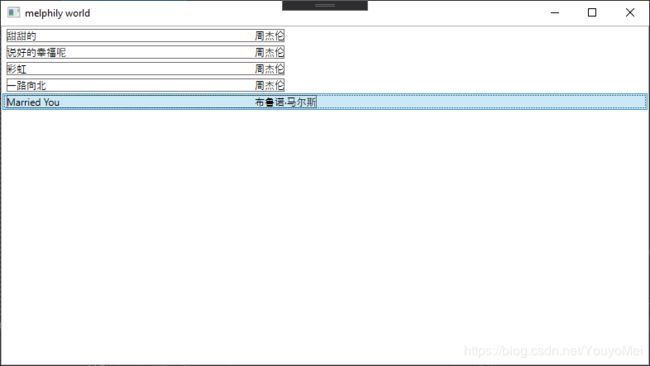
new MusicItemModel(){ Id=1, Name="甜甜的", Singer="周杰伦"},
new MusicItemModel(){ Id=1, Name="说好的幸福呢", Singer="周杰伦"},
new MusicItemModel(){ Id=1, Name="彩虹", Singer="周杰伦"},
new MusicItemModel(){ Id=1, Name="一路向北", Singer="周杰伦"},
new MusicItemModel(){ Id=1, Name="Married You", Singer="布鲁诺·马尔斯"},
};
}
private ObservableCollection musics;
public ObservableCollection Musics
{
get { return musics; }
set { musics = value; RaisePropertyChanged(); }
}
#region Notify Handler
public event PropertyChangedEventHandler PropertyChanged = (sender, e) => { };
public void RaisePropertyChanged([CallerMemberName] string propertyName = null)
{
PropertyChanged(this, new PropertyChangedEventArgs(propertyName));
}
#endregion
}
View
MusicListPage.xaml.cs
	///
    /// Interactive logic for MusicListPage.xaml
    ///
    public partial class MusicListPage : Page
    {
        public MusicListPage()
        {
            InitializeComponent();
            DataContext = new MusicListViewModel();
        }
    }
MusicListPage.xaml
命令绑定是使用Grid控件的InputBinding实现的。

使用System.Windows.Interactivity.dll
呈现的内容和上面一样,只需要修改MusicListPage.xaml中的命令绑定即可。
System.Windows.Interactivity.dll这个时微软后期提供的。
1.将System.Windows.Interactivity.dll引入到项目中。
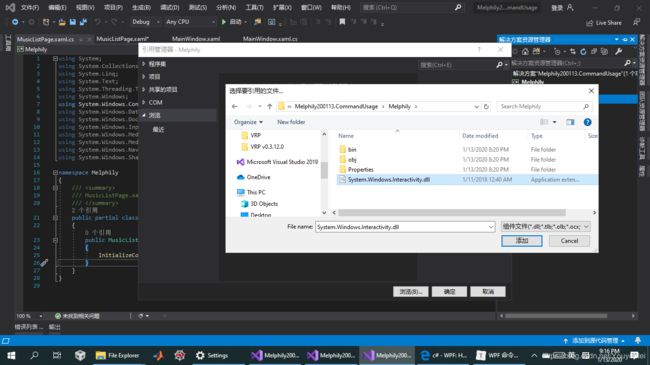

2.XAML中声明
xmlns:i="http://schemas.microsoft.com/expression/2010/interactivity"
3.XAML中使用
MusicListPage.xaml

自定义模板使用含有ICommand接口的控件传递命令
对于没有继承ICommand接口的控件,可以重定义控件的模板,并在模板中加入可以使用Command绑定的控件例如Button来实现命令的绑定。
使用上面的示例,只修改数据模板,如下所示。
MusicListPage.xaml
虽然这种方式比较简单粗暴,但由于是直接在模板上面操作,所有控件是否有焦点变得非常重要了,还有就是需要隐藏控件的一些不需要显示的样式。
样式没设置好,会出现意想不到的情况。如下:

自定义模板使用用户控件(UserControl)【添加Command依赖属性】传递命令
鉴于上面自定义模板使用含有ICommand接口的控件传递命令的方式存在的一些弊端,我们可以自定义带有命令的控件来解决不便利的地方。
1.自定义CommandControl控件
CommandControl.xaml
CommandControl.xaml.cs
using System.Windows;
using System.Windows.Controls;
using System.Windows.Input;

namespace Melphily.UiCore
{
    ///
    /// CommandControl.xaml 的交互逻辑
    ///
    public partial class CommandControl : UserControl
    {
        public CommandControl()
        {
            InitializeComponent();
            MouseLeftButtonDown += OnMouseLeftButtonDown;
        }
        private void OnMouseLeftButtonDown(object sender, MouseButtonEventArgs mouseButtonEventArgs)
        {
            if (Command != null)
            {
                if (Command.CanExecute(CommandParameter))
                {
                    Command.Execute(CommandParameter);
                }
            }
        }

        public static readonly DependencyProperty CommandProperty =
            DependencyProperty.Register("Command", typeof(ICommand),
                typeof(CommandControl),
                new FrameworkPropertyMetadata(null, FrameworkPropertyMetadataOptions.None));

        public ICommand Command
        {
            get { return (ICommand)GetValue(CommandProperty); }
            set { SetValue(CommandProperty, value); }
        }

        public static readonly DependencyProperty CommandParameterProperty =
            DependencyProperty.Register("CommandParameter", typeof(object),
                typeof(CommandControl),
                new FrameworkPropertyMetadata(null, FrameworkPropertyMetadataOptions.None));

        public object CommandParameter
        {
            get { return (object)GetValue(CommandParameterProperty); }
            set { SetValue(CommandParameterProperty, value); }
        }
    }
}
2.在模板中使用CommandControl
MusicListPage.xaml
由于CommandControl是一个透明的控件,因此不用考虑样式的问题,可以直接使用。其次它是内容控件,因此该控件是始终存在焦点。
但是,如果将该控件作为模板(ControlTemplate/DataTemplate)时,发现无法对容器内的控件设置名称,因此,在设置样式模板时局限性会很大。
自定义模板使用自定义控件(CustomControl)【添加Command依赖属性】传递命令
鉴于用户控件带来的弊端,我们依然可以使用自定义控件(CustomControl)来解决。
创建一个自定义控件:
在项目中点击添加–》新建项
然后找到“CustomControl”或者“WPF自定义控件”,设置好名称,点击创建。
创建之后首先会存在一个对应.cs文件,然后会自动创建一个Theme(主题)文件夹,并创建一个Generic.xaml文件(通用样式文件)。
接下来我们编写自定义控件
1.加入我们的命令依赖属性和相关处理事件。
CommandControl.cs
using System.Windows;
using System.Windows.Controls;
using System.Windows.Input;
namespace Deamon.UiCore
{
///
/// 按照步骤 1a 或 1b 操作,然后执行步骤 2 以在 XAML 文件中使用此自定义控件。
///
/// 步骤 1a) 在当前项目中存在的 XAML 文件中使用该自定义控件。
/// 将此 XmlNamespace 特性添加到要使用该特性的标记文件的根
/// 元素中:
///
/// xmlns:MyNamespace="clr-namespace:Deamon.UiCore"
///
///
/// 步骤 1b) 在其他项目中存在的 XAML 文件中使用该自定义控件。
/// 将此 XmlNamespace 特性添加到要使用该特性的标记文件的根
/// 元素中:
///
/// xmlns:MyNamespace="clr-namespace:Deamon.UiCore;assembly=Deamon.UiCore"
///
/// 您还需要添加一个从 XAML 文件所在的项目到此项目的项目引用,
/// 并重新生成以避免编译错误:
///
/// 在解决方案资源管理器中右击目标项目,然后依次单击
/// “添加引用”->“项目”->[浏览查找并选择此项目]
///
///
/// 步骤 2)
/// 继续操作并在 XAML 文件中使用控件。
///
///
public class CommandControl : ContentControl
{
static CommandControl()
{
DefaultStyleKeyProperty.OverrideMetadata(typeof(CommandControl), new FrameworkPropertyMetadata(typeof(CommandControl)));
}
public CommandControl()
{
MouseLeftButtonDown += CommandControlCC_MouseLeftButtonDown;
}
private void CommandControlCC_MouseLeftButtonDown(object sender, MouseButtonEventArgs e)
{
if (Command != null)
{
if (Command.CanExecute(CommandParameter))
{
Command.Execute(CommandParameter);
}
}
}
private void OnMouseLeftButtonDown(object sender, MouseButtonEventArgs mouseButtonEventArgs)
{
if (Command != null)
{
if (Command.CanExecute(CommandParameter))
{
Command.Execute(CommandParameter);
}
}
}
public static readonly DependencyProperty CommandProperty =
DependencyProperty.Register("Command", typeof(ICommand),
typeof(CommandControl),
new FrameworkPropertyMetadata(null, FrameworkPropertyMetadataOptions.None));
public ICommand Command
{
get { return (ICommand)GetValue(CommandProperty); }
set { SetValue(CommandProperty, value); }
}
public static readonly DependencyProperty CommandParameterProperty =
DependencyProperty.Register("CommandParameter", typeof(object),
typeof(CommandControl),
new FrameworkPropertyMetadata(null, FrameworkPropertyMetadataOptions.None));
public object CommandParameter
{
get { return (object)GetValue(CommandParameterProperty); }
set { SetValue(CommandParameterProperty, value); }
}
}
}
注释是默认加上的,是用来引导你如何设计和使用该自定义控件。默认情况下,自定义控件是继承自Control类的,因为我们的命令控件是需要包裹其它控件,所以直接继承ContentControl会减少我们对内容设计的逻辑代码。(PS:如果不这么做也可以自己添加Content属性,然后再面板中使用ContentPresenter将Content显示到界面上。)
2.在Generic.xaml文件中修改控件默认样式
Generic.xaml
ContentPresenter默认情况下已经将Content属性绑定到了改控件上,如果是其它控件,需要具体了解(绑定、样式、模板等)相关知识。
3.在模板中使用CommandControl
MusicListPage.xaml
使用方式和UserControl一模一样,只是控件的定义方式不一样而已。