Python爬虫入门与进阶
目录
- 一、学习搭建网站
- 二、requests库入门
- 1、安装(在python中)
- 2、主要方法
- 3、对象的属性
- 4、requests库主要功能
- 三、requests库进阶
- 1、requests异常
- 2、try-except方法(python)
- 3、高级用法
- 4、练习 - 爬取 百度搜索 页面
- 四、Robots协议
- 1、爬虫规模
- 2、爬虫带来的问题
- 3、爬虫反制的措施
- 4、练习 - 爬取亚马逊
- 五、正则表达式
- 1、简介
- 2、re库
- (1)re.match()
- (2)re.search()
- (3)re.findall()
- (4)re.sub()
- (5)re.compile()
- 3、爬取猫眼电影网 - 榜单 - top100电影信息
- 六、网页内容解析
- 1、使用Beautiful Soup
- (1)解析器
- (2)安装
- (3)官方文档:
- (4)例子
- (5)基本使用
- (6)又一个例子 - 爬取猫眼电影网
- (7)遍历文档树
- (8)搜索文档树
- (9)Beautiful Soup实战
- (10)网络爬虫中常用的四种选择器总结
- (11)CSS选择器
- 七、案例:小猪短租网页信息爬取
- 八、信息标记与存储
- 1、信息标记
- (1)目的
- (2)信息组织方式
- (3)信息标记方式
- (4)XML
- (5)JSON(JS对象标记)
- (6)YAML
- 2、文件存储
- (1)open()
- (2)JSON文件存储
- (3)存储到csv文件
- 3、关系型数据库存储
- (1)MySQL的存储
- 4、非关系型数据库存储
- (1)MongoDB 4.0 安装
- (2)在python3中使用MongoDB
- (3)Compass
- 九、Ajax数据爬取
- 1、什么是Ajax
- 2、爬取微博内容
- 十、Scrapy框架的使用
- 1、简介
- 2、安装
- 3、Scrapy shell
- 例一:
- 例二:
- 4、Spider运行流程:
- 5、scrapy爬虫使用步骤
- 实战1 爬取腾讯招聘职位
本文主要是记录了我学爬虫的过程,不喜勿喷~
大家可以用此文来作为一个引导,文中的代码直接复制去python的IDE(比如pycharm或者spider)中就可以运行(需要先安装相应的python库)。小机灵鬼们要仔细学下去的话,文中会有一些链接,当然也可以自行百度/Google,或者买一本书来慢慢看
有一些是我在其他教程里面踩过的坑,比如用老方法(直接用cookie)已经不能模拟登录知乎了QAQ
文中有些链接可能需要哦
一、学习搭建网站
要用爬虫从网站上抓取信息,要先知道网站的构成和搭建方法
网页构成:
HTML - 定义网页的结构
css - 定义外观
js - 实现各种实时、动态、交互的页面功能
我们可以在pycharm中新建html和css文件,然后搭建自己的网站。
关于python:推荐使用pycharm + anaconda
参考资料:
Python:https://www.liaoxuefeng.com/wiki/0014316089557264a6b348958f449949df42a6d3a2e542c000
Html 教程:http://www.w3school.com.cn/html/index.asp
Css 教程:http://www.w3school.com.cn/css/index.asp
JS 教程:http://www.w3school.com.cn/b.asp
或者:https://www.liaoxuefeng.com/wiki/001434446689867b27157e896e74d51a89c25cc8b43bdb3000
不一定要都看完才往下学,可以只看前面一点点,需要的时候再查阅(是个正常人都不会有兴趣全部看完的)
二、requests库入门
中文官方文档:http://cn.python-requests.org/zh_CN/latest/
当然还有英文的:http://www.python-requests.org/en/master/
requests快速上手:http://docs.python-requests.org/zh_CN/latest/user/quickstart.html
1、安装(在python中)
pip install requests
2、主要方法
| 方法 | 用途 |
|---|---|
| requests.get(url, params, **kwargs) | 获取HTML网页的主要方法。其中params作为url中的额外参数,用于生成更具体的链接;**kwargs为访问控制参数 |
| requests.head() | 获取网页头信息 |
| requests.post() | 在网页原有基础上提交新内容 |
| requests.put() | 覆盖原有内容 |
| requests.patch() | 修改局部内容 |
| requests.delete() | 删除各种内容 |
返回response对象
3、对象的属性
r = requests.xxx(...)
| 属性 | 内容 |
|---|---|
| r.status_code | HTTP请求的返回状态,200代表访问成功,404代表失败 |
| r.text | HTTP响应内容的字符串形式 |
| r.encoding | 从HTTP head标签中获取的响应内容的编码方式 |
| r.apparent.encoding | 从具体响应内容分析出的编码方式 |
| r.content | HTTP响应内容的二进制形式 |
| r.cookies | |
| r.headers |
输出r.text前,最好先运行语句:
r.encoding = r.apparent.encoding
以避免出现乱码
4、requests库主要功能
基本请求(六种)
文件上传
Cookies登录,回话维持
代理设置
身份认证
三、requests库进阶
1、requests异常
| 异常 | 说明 |
|---|---|
| requests.ConnectionError | 网络连接错误异常,如DNS查询失败,拒绝连接等 |
| requests.HTTPError | HTTP错误异常,即状态码不等于200时 |
| requests.Timeout | 请求URL超时 |
| requests.TooManyRedirects | 重定向次数太多 |
| requests.ConnectTimeout | 连接远程服务器超时异常 |
| requests.URLRequired | 缺少URL |
2、try-except方法(python)
用于处理程序正常执行过程中出现的一些异常情况,如语法错误、数据除零错误。
一般用来作为爬虫的代码框架,例子:
import requests


# 判断状态码异常
def getHTML(url):
    try:
        r = requests.get(url, timeout=30)
        r.raise_for_status()  # 状态码不等于200时返回1,并跳转到except
        r.encoding = r.apparent_encoding   # 使输出的r.text中不会出现乱码
        return r.text
    except:
        return "产生状态码异常"


url1 = 'http://www.baidu.com'
url2 = 'www.baidu.com'
print(getHTML(url1))
print(getHTML(url2))
3、高级用法
文件上传
import requests

# 上传一个文件,首先自行创建一个test.txt
file = {'file': open('test.txt', 'rb')}
r = requests.post("https://httpbin.org/post", files=file)  # 该网站是一个适合学习爬虫的测试网站
print(r.text)
获取cookies
import requests


r = requests.get('http://www.baidu.com')
print(r.cookies)
print('\n')
print(type(r.cookies))
print('\n')
for key, value in r.cookies.items():  #items()方法将其转化为元组组成的列表
    print(key, value)
会话维持
import requests


# 利用session,请求测试网址https://httpbin.org/cookies/set/number/123,
# 同时设置了一个cookie,名称为number,内容为123
s = requests.session()
s.get('https://httpbin.org/cookies/set/number/123')

r = s.get('https://httpbin.org/cookies')
print(r.text)
网络图片的下载与保存
打开百度图片,任选一张,右键,在新页面打开,复制图片URL
import requests


url = 'https://timgsa.baidu.com/timg?image&quality=80&size=b9999_10000&sec=1542903064518&di=49abdd9985efa1e5e7795590c' \
      '34781ce&imgtype=0&src=http%3A%2F%2Fpic3.zhimg.com%2Fv2-3afcf01edb3403f00efd5e4dafa2815b_1200x500.jpg'
r = requests.get(url)
print(r.text[:1000])  # 输出很乱的东西,实际上是像素点变成了str
print(r.content[:1000])  # 输出16进制内容,代表像素点。结果前的b代表这是bytes类型的数据

with open('picture.png', 'wb') as f:
    f.write(r.content)
用requests来模拟登录:
有兴趣的小机灵鬼可以百度一下新版知乎的模拟登录方法,旧版的单纯用cookie来模拟登录知乎的方法已经无效了。这里就不作展示了emmm我懒
4、练习 - 爬取 百度搜索 页面
使用get()方法中的params参数,获取百度对于某个关键词的搜索页面的源码。同时解决params中的中文编码问题。
import requests


url = 'http://www.baidu.com/s'
keyword = {'wd': '爬虫'.encode('gbk')}
try:
    r = requests.get(url, params=keyword)
    r.raise_for_status()
    r.encoding = r.apparent_encoding
    print(r.text)
except:
    print('获取源码失败')
可以在浏览器中打开百度,搜索 爬虫,然后对比代码输出的结果。
四、Robots协议
1、爬虫规模
小规模网页爬虫:用requests方法获取网页
中规模网站爬虫:运用scrapy
大规模全网爬虫:多用于搜索引擎,要自己开发,没有第三方库。这就超出我的知识范围了
2、爬虫带来的问题
影响Web服务器性能
隐私泄露
3、爬虫反制的措施
来源审判:判断User-Agent进行限制
发布公告:Robots协议(Robots Exclusion Protocol),告知网络爬虫哪些页面可以抓取,哪些不可以
4、练习 - 爬取亚马逊
伪装成浏览器,爬取亚马逊网页
import requests


url = 'https://www.amazon.cn/dp/B07746N2J9'
header = {'user-agent': 'Mozilla/5.0'}  # 用于伪装成浏览器
try:
    r = requests.get(url, headers=header)
    r.raise_for_status()
    r.encoding = r.apparent_encoding
    print(r.text[:1000])
except:
    print('获取网页失败')
五、正则表达式
1、简介
正则表达式是一种特殊的字符串模式,用于匹配一组字符串,就好比用模具做产品,而正则表达式就是这个模具,定义一种规则去匹配符合规则的字符串。
参考资料:
https://www.liaoxuefeng.com/wiki/0014316089557264a6b348958f449949df42a6d3a2e542c000/00143193331387014ccd1040c814dee8b2164bb4f064cff000
http://www.runoob.com/regexp/regexp-tutorial.html
在线正则表达式测试:http://tool.oschina.net/regex# 在第一个框框中输入要测试的文本,然后在第二个框框输入正则表达式,或者点击右边的一列选项(接着就会出现写好的响应的表达式)
2、re库
如果你的python环境中没有re库,请自行安装。
下面来看看常用的函数。
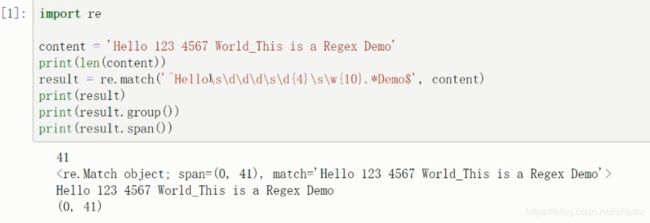
(1)re.match()
该方法尝试从字符串的起始位置匹配一个模式,如果不是起始位置匹配成功的话,match()就返回None;如果成功,就返回一个SRE_Match对象。
result = re.match(pattern, string, flags=0) # patter是正则表达式,string是要匹配的字符串
result.group()返回匹配的字符串,result.span()返回的是匹配到的字符串在原字符串中的位置范围。例子:
(2)re.search()
它在匹配时会扫描整个字符串,然后返回第一个成功匹配的结果。
(3)re.findall()
扫描整个字符串,然后返回所有成功匹配的结果。
(4)re.sub()
用于删掉字符串中的特定内容。
(5)re.compile()
将正则字符串编译成正则表达式对象。
3、爬取猫眼电影网 - 榜单 - top100电影信息
下面来看一下比较凶残的例子:
使用正则表达式,爬取猫眼电影-榜单-最受期待榜中的所有电影(http://maoyan.com/board/6?offset=0 )的信息,并输出到txt文件:
import requests
# 下面这些python库请自行安装
import re
import json
import time


# 爬取单一网页
def get_one_page(url):
    headers = {
        'User-Agent': 'Mozilla/5.0 (Windows NT 6.1; WOW64) AppleWebKit/537.36 (KHTML, like Gecko) '  # 伪装成浏览器
                      'Chrome/63.0.3239.132 Safari/537.36'
    }
    r = requests.get(url, headers=headers)
    if r.status_code == 200:
        return r.text
    return None


# 提取单一网页的关键信息
def parse_one_page(html):
    # 使用正则表达式提取关键内容
    pattern = re.compile('(\d+)(.*?).*'
                       '?(.*?)(.*?)', re.S)  # 第二个参数为re.S,作用是使得 . 可以匹配换行符
    items = re.findall(pattern, html)
    result = []
    for item in items:
        result.append({
            '排名': item[0],
            '海报': item[1],
            '电影名称': item[2],
            '主演': item[3].strip()[3:] if len(item[3]) > 3 else '',
            '上映时间': item[4].strip()[5:] if len(item[4]) > 5 else ''
        })
    return result


# 写进txt文件
def write_to_file(content):
    with open('result2.txt', 'a', encoding='utf-8') as f:
        # print(type(json.dumps(content)))
        # 先将content转换为字符串格式,然后再写入文件
        f.write(json.dumps(content, ensure_ascii=False) + '\n')


def main(offset):
    url = 'http://maoyan.com/board/6?offset=' + str(offset)
    html = get_one_page(url)
    for item in parse_one_page(html):
        print(item)
        write_to_file(item)


if __name__ == '__main__':
    # 因为每一页只有10部电影,所以需要循环提取
    for i in range(10):
        main(offset=i * 5)
        # 访问完每页后停一小会,对应反爬虫机制
        time.sleep(1)

# 前五条输出:
# {'排名': '1', '海报': 'http://p1.meituan.net/movie/c7453592d38b7aff6a774a52732792cd3778866.jpg@160w_220h_1e_1c', '电影名称': '人间·喜剧', '主演': '艾伦,王智,鲁诺', '上映时间': '2018-12-07'}
# {'排名': '2', '海报': 'http://p0.meituan.net/movie/c304c687e287c7c2f9e22cf78257872d277201.jpg@160w_220h_1e_1c', '电影名称': '龙猫', '主演': '秦岚,糸井重里,岛本须美', '上映时间': '2018-12-14'}
# {'排名': '3', '海报': 'http://p0.meituan.net/movie/e5f0a55327d5be1caa9f110abcca23865841112.jpg@160w_220h_1e_1c', '电影名称': '飞驰人生', '主演': '沈腾,黄景瑜,尹正', '上映时间': '2019-02-05'}
# {'排名': '4', '海报': 'http://p1.meituan.net/movie/9cd36871e75c756f3ad175afa6452cf2177292.jpg@160w_220h_1e_1c', '电影名称': '疯狂的外星人', '主演': '黄渤,沈腾,马修·莫里森', '上映时间': '2019-02-05'}
# {'排名': '5', '海报': 'http://p1.meituan.net/movie/c57e3e283679ab6efab23b16a2d20364838623.jpg@160w_220h_1e_1c', '电影名称': '情圣2', '主演': '吴秀波,白百何,肖央', '上映时间': '2019-02-05'}
六、网页内容解析
前面介绍了使用正则表达式来提取内容的方法,但是一大堆正则表达式,看着就想杀人
于是,可爱的程序猿们开发出了各种解析工具。鼓掌.jpg
1、使用Beautiful Soup
Beautiful Soup是Python的一个HTML或XML的解析库,可以用来方便地提取我们想要的网页内容。
(1)解析器
Beautiful Soup在解析时实际上依赖解析器,它支持一下四种解析器:
| 解析器 | 使用方法 | advantage | 坑爹的地方 |
|---|---|---|---|
| Python标准库 | BeautifulSoup(markup, “html.parser”) | Python内置 | Python 2.7.3 or 3.2.2 前 的版本中文档容错能力差 |
| lxml HTML解析器 | BeautifulSoup(markup, “lxml”) | 速度快 | 需要安装lxml |
| lxml XML解析器 | BeautifulSoup(markup, “xml”) | 速度快(XML是负责传输方面的东西) | 需要安装lxml |
| HTML5lib | BeautifulSoup(markup, “html5lib”) | 容错性好 | 速度慢 |
(2)安装
pip install beautifulsoup4
# 安装lxml解析器
pip install lxml
(3)官方文档:
https://beautifulsoup.readthedocs.io/zh_CN/latest/
(4)例子
from bs4 import BeautifulSoup


# 非标准格式的html代码
html_doc = """
The Dormouse's story

The Dormouse's story

Once upon a time there were three little sisters; and their names were
Elsie,
Lacie and
Tillie;
and they lived at the bottom of a well.

...
"""

soup = BeautifulSoup(html_doc, "lxml")
# 变为标准格式的html代码
print(soup.prettify())
(5)基本使用
soup = BeautifulSoup(html, 'lxml')
类比:
soup = 汤, html = 汤料,‘lxml’ = 食谱
Beautiful Soup将复杂HTML文档转换成一个复杂的树形结构(soup), 每个节点都是Python对象,所有对象可以归纳为4种: Tag , NavigableString , BeautifulSoup , Comment . (具体可以看官方文档)
辛辛苦苦画的树:
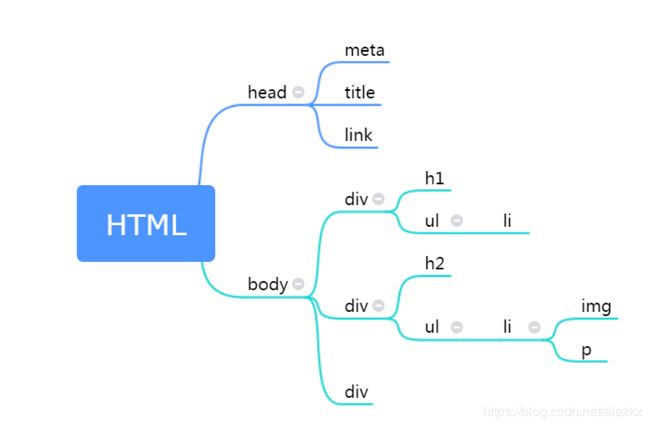
上面例子中的soup即为一个BeautifulSoup对象。
Tag对象对应于HTML中的一个个标签。
# 打印上面例子中title / body标签中的内容,如果有多个同名的标签,则返回第一个
print(soup.title, '\n')
print(soup.body, '\n')

print(type(soup.p), '\n')

# 每个tag都有自己的名字,通过 .name 来获取:
print(soup.p.name, '\n')

# 一个tag可能有很多个属性. tag.attrs返回一个字典(属性名:属性值)
# tag的属性可以被添加,删除或修改. tag的属性操作方法与字典一样
print(soup.p.attrs, '\n')
print(soup.p.attrs['class'], '\n')

# 来看看我们这锅汤
print(type(soup), '\n')
print(soup, '\n')
Beautiful Soup用 NavigableString 类来包装tag中的字符串:
# 获取标签内部的内容,tag.string,返回的是 NavigableString类型
print(soup.p.string, '\n')
print(type(soup.p.string), '\n')
(6)又一个例子 - 爬取猫眼电影网
爬取猫眼电影-榜单-top100(http://maoyan.com/board/4 )的页面内容:
from bs4 import BeautifulSoup
import requests


headers = {
           'User-Agent': 'Mozilla/5.0 (Windows NT 6.1; WOW64) AppleWebKit/537.36 (KHTML, like Gecko) '  # 伪装成浏览器
                         + 'Chrome/63.0.3239.132 Safari/537.36'}
url = 'http://maoyan.com/board/4'
r = requests.get(url, headers=headers)
html = r.text
soup = BeautifulSoup(html, 'lxml')

# print(soup.prettify())
# 输出为标准格式的爬取的html代码

print(soup.head.title)
print(soup.head.title.string)
# output:
# TOP100榜 - 猫眼电影 - 一网打尽好电影
# TOP100榜 - 猫眼电影 - 一网打尽好电影

# 用tag.string打印内容时,注释的内容也会输出,改进方法:
print(soup.head.title.get_text())
# 当然title里面没有注释,所以输出还是一样~_~
(7)遍历文档树
注意这里的文档删除了第一个p标签
from bs4 import BeautifulSoup


# 非标准格式的html代码
html_doc = """
The Dormouse's story


Once upon a time there were three little sisters; and their names were
Elsie,
Lacie and
Tillie;
and they lived at the bottom of a well.

...
"""

soup = BeautifulSoup(html_doc, "lxml")

# 通过点取属性的方式只能获得当前名字的第一个tag:
soup.a
# Elsie

# 如果想要得到所有的标签,或是通过名字得到比一个tag更多的内容的时候,就需要用到 Searching the tree 中描述的方法,比如: find_all()
soup.find_all('a')
# [Elsie,
#  Lacie,
#  Tillie]


print(soup.p.contents, '\n')
# output:
# ['Once upon a time there were three little sisters; and their names were\n', Elsie, ',\n', Lacie, ' and\n', Tillie, ';\nand they lived at the bottom of a well.']

# 输出直接子节点
print(soup.p.children, '\n')
#

for key, value in enumerate(soup.p.children):
    print(key, value)
# 0 Once upon a time there were three little sisters; and their names were
#
# 1 Elsie
# 2 ,
#
# 3 Lacie
# 4  and
#
# 5 Tillie
# 6 ;
# and they lived at the bottom of a well.

print('\n')

# 输出所有子节点
print(soup.p.descendants, '\n')
#

for key, value in enumerate(soup.p.descendants):
    print(key, value)
# 0 Once upon a time there were three little sisters; and their names were
#
# 1 Elsie
# 2 Elsie
# 3 ,
#
# 4 Lacie
# 5 Lacie
# 6  and
#
# 7 Tillie
# 8 Tillie
# 9 ;
# and they lived at the bottom of a well.

print('\n')

# 输出直接父节点
print(soup.a.parent, '\n')

# 获取所有父节点
print(soup.a.parents)
for key, value in enumerate(soup.a.parents):
    print(key, value)

# 获取前/后一个兄弟节点:tag.next_sibling, tag.previous_sibling
# 迭代获取:tag.next_siblings, tag.previous_siblings
(8)搜索文档树
Beautiful Soup定义了很多搜索方法,常用的有2个: find() 和 find_all() .
find_all( name , attrs , recursive , string , **kwargs )
soup.find_all("title")
# [The Dormouse's story ]
soup.find_all("p", "title")
# [The Dormouse's story
]
soup.find_all("a")
# [Elsie,
# Lacie,
# Tillie]
soup.find_all(id="link2")
# [Lacie]
import re
soup.find(string=re.compile("sisters"))
# u'Once upon a time there were three little sisters; and their names were\n'
(9)Beautiful Soup实战
使用Beautiful Soup,爬取猫眼电影-榜单-TOP100榜中的所有电影(http://maoyan.com/board/6?offset=0 )的信息,并输出到txt文件:
import requests
import json
import time
from bs4 import BeautifulSoup

# 爬取单一网页
def get_one_page(url):
    headers = {
        'User-Agent': 'Mozilla/5.0 (Windows NT 6.1; WOW64) AppleWebKit/537.36 (KHTML, like Gecko) '  # 伪装成浏览器
                      'Chrome/63.0.3239.132 Safari/537.36'
    }
    r = requests.get(url, headers=headers)
    if r.status_code == 200:
        return r.text
    return None


# 提取单一网页的关键信息
def parse_one_page(html):
    soup = BeautifulSoup(html, 'lxml')
    items = soup.select('dd')
    # print('type(items):', type(items))
    # print('type(items)[0]:', type(items[0]))
    # print(items[0])
    # print(items)
    for item in items:
        # 注意到这里的class是多值属性,所以只需匹配第一个值
        index = item.find(name='i', class_='board-index').get_text()
        post = item.find(name='img', class_='board-img')['data-src']
        name = item.find(name='p', class_='name').get_text()
        # strip()用于去除字符串前后的空格和换行符
        star = item.find(name='p', class_='star').get_text().strip()[3:]
        time = item.find(name='p', class_='releasetime').get_text()[5:]
        score = item.find(name='p', class_='score').get_text()
        yield {
            '排名': index,
            '海报': post,
            '电影名称': name,
            '主演': star,
            '上映时间': time,
            '评分': score
        }


# 写进txt文件
def write_to_file(content):
    with open('result.txt', 'a', encoding='utf-8') as f:
        # print('type(json.dumps(content)): ', type(json.dumps(content)))
        # 先将content转换为字符串格式,然后再写入文件
        f.write(json.dumps(content, ensure_ascii=False) + '\n')


def main(offset):
    url = 'http://maoyan.com/board/4?offset=' + str(offset)
    html = get_one_page(url)
    for item in parse_one_page(html):
        print(item)
        write_to_file(item)


if __name__ == '__main__':
    # 因为每一页只有10部电影,所以需要循环提取
    for i in range(10):
        main(offset=i * 10)
        # 访问完每页后停一小会,对应反爬虫机制
        time.sleep(0.5)

# 前面12条输出:
{"排名": "1", "海报": "http://p1.meituan.net/movie/20803f59291c47e1e116c11963ce019e68711.jpg@160w_220h_1e_1c", "电影名称": "霸王别姬", "主演": "张国荣,张丰毅,巩俐", "上映时间": "1993-01-01", "评分": "9.6"}
{"排名": "2", "海报": "http://p0.meituan.net/movie/283292171619cdfd5b240c8fd093f1eb255670.jpg@160w_220h_1e_1c", "电影名称": "肖申克的救赎", "主演": "蒂姆·罗宾斯,摩根·弗里曼,鲍勃·冈顿", "上映时间": "1994-10-14(美国)", "评分": "9.5"}
{"排名": "3", "海报": "http://p0.meituan.net/movie/54617769d96807e4d81804284ffe2a27239007.jpg@160w_220h_1e_1c", "电影名称": "罗马假日", "主演": "格利高里·派克,奥黛丽·赫本,埃迪·艾伯特", "上映时间": "1953-09-02(美国)", "评分": "9.1"}
{"排名": "4", "海报": "http://p0.meituan.net/movie/e55ec5d18ccc83ba7db68caae54f165f95924.jpg@160w_220h_1e_1c", "电影名称": "这个杀手不太冷", "主演": "让·雷诺,加里·奥德曼,娜塔莉·波特曼", "上映时间": "1994-09-14(法国)", "评分": "9.5"}
{"排名": "5", "海报": "http://p1.meituan.net/movie/f5a924f362f050881f2b8f82e852747c118515.jpg@160w_220h_1e_1c", "电影名称": "教父", "主演": "马龙·白兰度,阿尔·帕西诺,詹姆斯·肯恩", "上映时间": "1972-03-24(美国)", "评分": "9.3"}
{"排名": "6", "海报": "http://p1.meituan.net/movie/0699ac97c82cf01638aa5023562d6134351277.jpg@160w_220h_1e_1c", "电影名称": "泰坦尼克号", "主演": "莱昂纳多·迪卡普里奥,凯特·温丝莱特,比利·赞恩", "上映时间": "1998-04-03", "评分": "9.5"}
{"排名": "7", "海报": "http://p0.meituan.net/movie/da64660f82b98cdc1b8a3804e69609e041108.jpg@160w_220h_1e_1c", "电影名称": "唐伯虎点秋香", "主演": "周星驰,巩俐,郑佩佩", "上映时间": "1993-07-01(中国香港)", "评分": "9.2"}
{"排名": "8", "海报": "http://p0.meituan.net/movie/b076ce63e9860ecf1ee9839badee5228329384.jpg@160w_220h_1e_1c", "电影名称": "千与千寻", "主演": "柊瑠美,入野自由,夏木真理", "上映时间": "2001-07-20(日本)", "评分": "9.3"}
{"排名": "9", "海报": "http://p0.meituan.net/movie/46c29a8b8d8424bdda7715e6fd779c66235684.jpg@160w_220h_1e_1c", "电影名称": "魂断蓝桥", "主演": "费雯·丽,罗伯特·泰勒,露塞尔·沃特森", "上映时间": "1940-05-17(美国)", "评分": "9.2"}
{"排名": "10", "海报": "http://p0.meituan.net/movie/230e71d398e0c54730d58dc4bb6e4cca51662.jpg@160w_220h_1e_1c", "电影名称": "乱世佳人", "主演": "费雯·丽,克拉克·盖博,奥利维娅·德哈维兰", "上映时间": "1939-12-15(美国)", "评分": "9.1"}
{"排名": "11", "海报": "http://p1.meituan.net/movie/ba1ed511668402605ed369350ab779d6319397.jpg@160w_220h_1e_1c", "电影名称": "天空之城", "主演": "寺田农,鹫尾真知子,龟山助清", "上映时间": "1992", "评分": "9.1"}
{"排名": "12", "海报": "http://p1.meituan.net/movie/18e3191039d5e71562477659301f04aa61905.jpg@160w_220h_1e_1c", "电影名称": "喜剧之王", "主演": "周星驰,莫文蔚,张柏芝", "上映时间": "1999-02-13(中国香港)", "评分": "9.2"}
(10)网络爬虫中常用的四种选择器总结
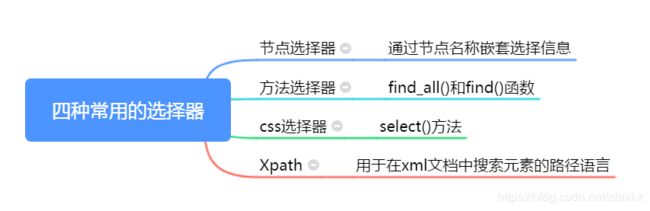
Beautiful Soup支持前三种。
find_all()返回的是list,其中的元素为tag对象;find()返回的是一个tag对象。
例子:
节点选择器:soup.div.next_sibling.ul.li.p(因为soup.div只会搜索到第一个div,所以需要next_sibling)
方法选择器:soup.find(name='p', class_='....'
总体感觉CSS选择器最方便简单易用,所以下面重点介绍
(11)CSS选择器
CSS选择器的语法规则:http://www.w3school.com.cn/cssref/css_selectors.asp
简单例子:(对于(7)遍历文档树 中的html代码)
soup.select("title")
# [The Dormouse's story ]
soup.select("p:nth-of-type(3)")
# [...
]
soup.select("body a")
# [Elsie,
# Lacie,
# Tillie]
soup.select("html head title")
# [The Dormouse's story ]
对于特定网页的特定位置,获取其CSS selector的方法:将鼠标移到网页中的特定位置 -> 右击 -> 审查元素 / 检查 -> 然后弹出html代码,高亮部分对应于目标位置,右击高亮部分的代码 -> Copy -> Copy selector
所以,(9)Beautiful Soup实战 (爬取猫眼电影-榜单-TOP100榜中的所有电影(http://maoyan.com/board/6?offset=0 )的信息,并输出到txt文件)中的parse_one_page(html)函数的第二行可以改成:
items = soup.select('#app > div > div > div.main > dl > dd')
当然,parse_one_page(html)函数也可以直接改成:
# 提取单一网页的关键信息
def parse_one_page(html):
    soup = BeautifulSoup(html, 'lxml')
    indexes = soup.select('#app > div > div > div.main > dl > dd > i')
    posts = soup.select('#app > div > div > div.main > dl > dd > a > img.board-img')
    names = soup.select('#app > div > div > div.main > dl > dd > div > div > div.movie-item-info > p.name > a')
    stars = soup.select('#app > div > div > div.main > dl > dd > div > div > div.movie-item-info > p.star')
    times = soup.select('#app > div > div > div.main > dl > dd > div > div > div.movie-item-info > p.releasetime')
    scores = soup.select('#app > div > div > div.main > dl > dd > div > div > div.movie-item-number.score-num > p')
    for index, post, name, star, time, score in zip(indexes, posts, names, stars, times, scores):
        yield {
            '排名': index.get_text(),
            '海报': post['data-src'],
            '电影名称': name.get_text(),
            '主演': star.get_text().strip()[3:],
            '上映时间': time.get_text()[5:],
            '评分': score.get_text()
        }
七、案例:小猪短租网页信息爬取
打开小猪短租网页,搜索上海的房源,显示出一堆房子,一共有5页。下面来试试爬取每间房子的具体信息。
可能出现的问题1:
一般我们获取selector是这样做的:右键点击审查,然后在弹出的html源码中右键选择Copy–>Copy selector,然后删除selector中的子节点信息,然后就可以使用select()筛选出每条信息中的目标内容。
但是!
我们复制回来的selector是浏览器上的selector,我们平时在浏览器上看到的都是经过js脚本的加工,所以selector也是经过加工的。而我们程序爬取到的网页并没有经过浏览器加工,所以所需的selector有可能和浏览器上的不一样,也就是为什么我们可能会得到一个空列表。
所以:
如果遇到这个问题,我们可以去掉复制回来的selector的前面一部分。如果还是没办法准确定位,那再往前加
可能出现的问题2
当网页有多条信息时,每条信息的格式有可能不一样,所以使用selector前,在网页的源码界面用ctrl + F,输入selector,检查这条selector是否满足要求
import requests
from bs4 import BeautifulSoup
import time
import json


def get_url(outer_url):
    headers = {
        'User-Agent': 'Mozilla/5.0 (Windows NT 6.1; WOW64) AppleWebKit/537.36 (KHTML, like Gecko) '  # 伪装成浏览器
                      + 'Chrome/63.0.3239.132 Safari/537.36'
    }
    r = requests.get(outer_url, headers=headers)
    html = r.text
    soup = BeautifulSoup(html, 'lxml')
    tags = soup.select('#page_list > ul > li > a')
    urls = [i.get('href') for i in tags]
    return urls


# 这里传入的url是每间房子对应的网址,然后我们就可以为所欲为
# 因为我懒,随便爬点东西练练手就好了
# 你们喜欢的话,还可以加点房主的名字,性别之类的
def get_info(url):
    headers = {
        'User-Agent': 'Mozilla/5.0 (Windows NT 6.1; WOW64) AppleWebKit/537.36 (KHTML, like Gecko) '  # 伪装成浏览器
                      + 'Chrome/63.0.3239.132 Safari/537.36'
    }
    r = requests.get(url, headers=headers)
    html = r.text
    # print(url)
    # print(html)
    soup = BeautifulSoup(html, 'lxml')
    # print(len(soup.select("div.wrap.clearfix.con_bg > div.con_l > div.pho_info > h4")))
    # 下面的select()返回的是只包含一个元素的list
    title = soup.select('div.wrap.clearfix.con_bg > div.con_l > div.pho_info > h4')[0].get_text().strip()
    addr = soup.select('div.wrap.clearfix.con_bg > div.con_l > div.pho_info > p > span')[0].get_text().strip()
    price = soup.select('#pricePart > div.day_l')[0].get_text()
    img = soup.select('#curBigImage')[0]['src']
    return {
        '标题': title,
        '地址': addr,
        '价格': price,
        '图片': img
    }


def write_to_file(content):
    with open('result.json', 'a', encoding='utf-8') as f:
        f.write(json.dumps(content, ensure_ascii=False) + '\n')


if __name__ == '__main__':
    # 对于上海的房源,得到前三页房源列表的网址
    # 方法一:
    # outer_url2 = []
    # for i in range(1,4):
    #     outer_url2.append('http://sh.xiaozhu.com/search-duanzufang-p' + str(i) + '-0/')

    # 方法二:
    outer_url = ['http://sh.xiaozhu.com/search-duanzufang-p{}-0/'.format(i) for i in range(1, 4)]

    # 读取每个具体房源的信息,然后写入到json文件
    for i in outer_url:
        urls = get_url(i)
        for j in urls:
            content = get_info(j)
            time.sleep(1)
            write_to_file(content)

    # 读取json文件中前五条信息
    with open('result.json', 'r', encoding='utf-8') as f:
        for i in range(0, 5):
            str = f.readline()
            content = json.loads(str)
            # 如果输出str和content,看起来内容是几乎一样的,但是前者是字符串,后者是字典
            print(content)

# output:
# {'标题': '【森淼地】市中心地铁一线八线温馨小木屋', '地址': '上海市静安区平型关路377弄嘉利明珠城', '价格': '¥698', '图片': 'https://image.xiaozhustatic1.com/00,800,533/17,0,69,20455,1800,1200,33addea4.jpg'}
# {'标题': '近地铁1/2/8号线人民广场复式老洋房整租', '地址': '上海市黄浦区江阴路88弄', '价格': '¥888起', '图片': 'https://image.xiaozhustatic1.com/00,800,533/15,0,91,2031,1800,1200,9d15a776.jpg'}
# {'标题': '【迪士尼】森系亲子套间·独立儿童房/含早/地铁2号线五分钟', '地址': '上海市浦东新区华夏东路1348弄33号', '价格': '¥399起', '图片': 'https://image.xiaozhustatic1.com/00,800,533/17,0,76,3249,1798,1200,e8f16206.jpg'}
# {'标题': '迪斯尼烟花秀,近在咫尺!中环20分钟直达市区', '地址': '上海市浦东新区孙环路377弄31号', '价格': '¥388起', '图片': 'https://image.xiaozhustatic1.com/00,800,533/51,0,8,530,1798,1200,d7b02723.jpg'}
# {'标题': '欢乐谷/玛雅水上乐园/万达广场/loft1室', '地址': '上海市松江区谷阳北路2558弄龙湖新壹城', '价格': '¥238起', '图片': 'https://image.xiaozhustatic1.com/00,800,533/15,0,2,28847,1800,1200,771777a7.jpg'}
八、信息标记与存储
1、信息标记
(1)目的
为了更加方便地组织和存储各种信息,以及为计算机处理、传播消息提供一种统一个方法,必须对信息进行一定的标记
(2)信息组织方式
HTML (HyperText Markup Language,超文本标记语言)
(3)信息标记方式
XML(扩展标记语言), JSON,YAML
(4)XML
XML被设计用来传输和存储数据,其焦点是数据的内容。它是独立于软件和硬件的信息传输工具。
HTML被设计用来显示数据,其焦点是数据的外观。
(5)JSON(JS对象标记)
JSON是一种轻量级的数据交换格式。
对象表示为键值对:{"firstname": "John"}
数据由逗号分隔
花括号保存对象
方括号保存数组
(6)YAML
它是一种直观的能够被电脑识别的数据序列化格式。
2、文件存储
如果想要存储为文本文件,可以选择txt,json,csv格式;另外,也可以存储到数据库中(在下一节介绍)。
(1)open()
f = open(name, mode, buffering)
f.write(....)
f.close()
或者:
with open(name, mode, buffering) as f:
    # 写入
    f.write(.....)
    # 或者读取:
    content = f.read()
# do something with content
......
name:文件名
mode:mode决定了打开文件的模式:只读,写入,追加等。默认为只读(‘r’)
(2)JSON文件存储
dumps():将 Python 对象编码成 JSON 字符串(形式为键值对)
loads():将已编码的 JSON 字符串解码为 Python 对象
参考资料:
官方文段:https://docs.python.org/3.6/library/json.html
用人话写的东西:https://blog.csdn.net/xgh1951/article/details/80392411
例子:(9)Beautiful Soup实战 (爬取猫眼电影-榜单-TOP100榜中的所有电影(http://maoyan.com/board/6?offset=0 )的信息,并输出到txt文件)中的write_to_file(content)函数可以改成:
def write_to_file(content):
    with open('result.json', 'a', encoding='utf-8') as f:
        f.write(json.dumps(content, ensure_ascii=False) + '\n')
原来的函数中,open()第一个参数为result.txt,所以存储在文件中的东西是字符串;现在变成了result.json,存储的东西变成了json对象。要使用数据时,先读取文件(用f.read()),然后用json.loads()转化为python对象:
import json

with open('作业7/result.json', 'r', encoding='utf-8') as f:
    str = f.readlines()[0]  #前面存了很多个json对象,这里取第一个对象
    data = json.loads(str)
    print(type(data))
    print(data)
(3)存储到csv文件
例子:
import csv


with open('data.csv', 'w', newline='') as f:  # 如果不设置newline,则每两行数据之间会隔一行
    writer = csv.writer(f)
    writer.writerow(['id', 'name', 'age'])
    writer.writerow(['001', 'Alex', 18])
    writer.writerow(['002', 'Jane', 20])
用Excel或者WPS打开生成的文件:

3、关系型数据库存储
关系型数据库是基于关系模型的数据库,而关系模型是通过二维表来保存的,所以它的存储方式就是行列组成的表,每一列是一个字段,每一行是一条记录。表可以看作某个实体的集合,而实体之间存在联系,这就需要表与表之间对的关联关系来体现,如主键外键的关联关系。多个表组成一个数据库,也就是关系型数据库。
关系型数据库有很多种,如SQLite,MySQL,Oracle,SQL Server,DB2等。
科普:SQL的全称是Structured Query Language
(1)MySQL的存储
Python2中,连接MySQL的库大多是使用MySQLdb;在Python3中,则一般使用PyMySQL
安装:pip install pymysql
4、非关系型数据库存储
NoSQL,全称Not Only SQL,泛指非关系型数据库。NoSQL是基于键值对的,而且不要经过SQL层的解析,数据之间没有耦合性,性能非常高(针对小规模数据)。在工业界,人们更多地使用关系型数据库。
非关系型数据库可以细分为:
- 键值存储数据库:代表有Redis、Voldemort、Oracle BDB等
- 列存储数据库:代表有Cassandra、HBase、Riak等
- 文档型数据库:代表有CouchDB和MongoDB等
- 图形数据库:代表有Neo4J、InfoGrid和Infinite Graph等
对于爬虫数据来说,一条数据可能存在某些字段提取失败而缺失的情况,而且数据可能随时调整。另外,数据之间还可能存在嵌套关系。如果使用关系型数据库来存储爬虫数据,一是需要提前建表,二是如果存在数据嵌套关系的话,需要进行序列化操作才可以存储,这非常不方便。However,如果用了非关系型数据,那就要舒服多了!So,推荐使用MongoDB!
(1)MongoDB 4.0 安装
官方文档:https://docs.mongodb.com/manual/
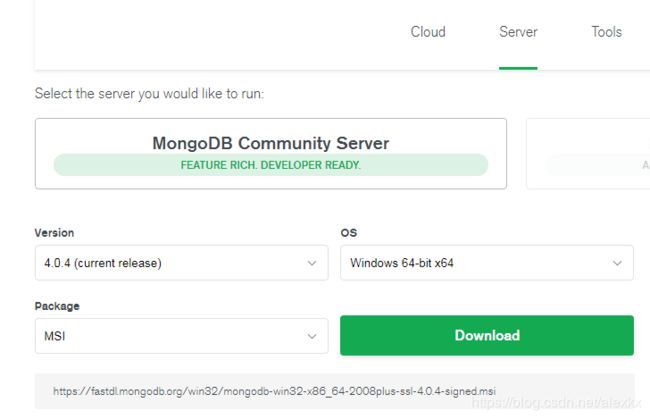
在window 64位系统上安装:(其他系统的安装方法可以在官方文档中查看)
从官网下载最新版本的msi文件:
https://www.mongodb.com/download-center/community?jmp=docs
双击运行,在Complete / Custom那里,可以点击Custom,然后选择安装目录。
下一步按照默认配置:

这里表示直接将开启一个名为MongoDB的服务,并且创建了保存数据和日志的目录。
再下一步,选择不要安装Compass(Compass是MongoDB的图形化界面,然鹅我们通过python来使用MongoDB就ojbk了),如果你头铁要安装Compass的话,可能会等很久很久很久,等到天荒地老,海枯石烂orz
接着,等 就完事了。
然后你就有了一个已经开启的MongoDB服务了,可以在python中的pymongo库来访问。
(2)在python3中使用MongoDB
在python3中,我们需要通过pymongo这个库来使用MongoDB。
入门:https://api.mongodb.com/python/current/index.html
pymongo官方文档:https://api.mongodb.com/python/current/index.html
简单例子:
import pymongo


# 连接MongoDB
client = pymongo.MongoClient(host='localhost', port=27017)

# 指定数据库(MongoDB中可以建立多个数据库),这里如果test数据库不存在,程序就会直接新建一个
db = client['test']

# 指定集合(每个数据库包含多个集合,类似于关系型数据库的表)
collection = db['students']

# 插入数据
student1 = {
    'id': '001',
    'name': 'Jane',
    'age': 18,
    'gender': 'female'
}
collection.insert(student1)

# 在pymongo 3.x版本中,官方推荐使用insert_one()和insert_many()方法来分别插入单条和多条记录
student2 = {
    'id': '002',
    'name': 'Edward',
    'age': 18,
    'gender': 'male'
}

student3 = {
    'id': '003',
    'name': 'May',
    'age': 18,
    'gender': 'female'
}

student4 = {
    'id': '004',
    'name': 'Sun',
    'age': 18,
    'gender': 'male'
}

collection.insert_one(student2)
collection.insert_many([student3, student4])
查询:
result = collection.find_one({'name': 'Sun'})
print(result)
# result类型为字典,其内容为:
# {'_id': ObjectId('5c1205990deeec28584065ad'), 'id': '004', 'name': 'Sun', 'age': 18, 'gender': 'male'}

results = collection.find({'age': 18})  # 这里result是一个生成器对象
for item in results:
    print(item)
# 输出:
# {'_id': ObjectId('5c1205990deeec28584065ad'), 'id': '004', 'name': 'Sun', 'age': 18, 'gender': 'male'}
# {'_id': ObjectId('5c1205990deeec28584065aa'), 'id': '001', 'name': 'Jane', 'age': 18, 'gender': 'female'}
# {'_id': ObjectId('5c1205990deeec28584065ab'), 'id': '002', 'name': 'Edward', 'age': 18, 'gender': 'male'}
# {'_id': ObjectId('5c1205990deeec28584065ac'), 'id': '003', 'name': 'May', 'age': 18, 'gender': 'female'}
# {'_id': ObjectId('5c1205990deeec28584065ad'), 'id': '004', 'name': 'Sun', 'age': 18, 'gender': 'male'}
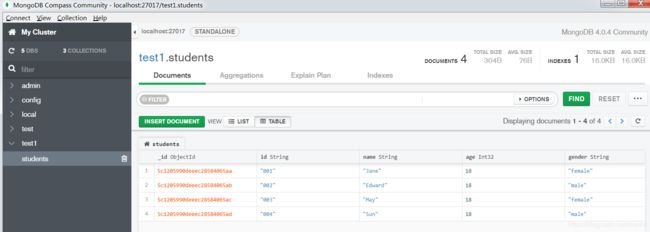
(3)Compass
需要MongoDB图形化界面的话,可以自行安装Compass
https://docs.mongodb.com/compass/current/install/
这个东西还是很简单直观易用的。
安装好以后,第一次打开时会有个简短的教程。
按照指引连接数据库,就可以查看刚刚输入的数据:
九、Ajax数据爬取
1、什么是Ajax
Ajax,全称为Asynchronous JavaScript and XML,即异步的JavaScript 和 XML。这个东西不是一门编程语言,而是利用JavaScript在保证页面不被刷新、页面链接保持不变的情况下与服务器交换数据并更新部分网页的技术。
一个典型的例子就是我们刷微博时,往下拉的时候,才会继续加载下面的内容,这时候就是用到了Ajax这个东西。
那么怎么查看页面加载过程中浏览器和服务器之间发送请求和接收响应的所有记录呢??
使用chrome打开 https://m.weibo.cn ,随便搜索一个用户,右击鼠标,点击“检查”,点击“Network”,选择“XHR”类型的文件(在第三行,filter右边那里),选择“getIndex”开头的文件,就可以看到加载的内容(包括微博正文,转发数,点赞数等等),其中Headers部分为头部信息,Preview部分为浏览器解析后的json对象(键值对形式),Response为解析前的json对象。
如果将网页继续往下拉,会发现越来越多“getIndex”开头的文件。这是因为浏览器在不断加载更多的微博。

2、爬取微博内容
下面我们来爬取baby的微博:
import requests
from bs4 import BeautifulSoup


url = 'https://m.weibo.cn/api/container/getIndex?'
headers = {
    # 从XHR文件的Headers中的request headers部分获得以下头部信息
    'Host': 'm.weibo.cn',
    'Referer': 'https://m.weibo.cn/u/1669879400?uid=1669879400&luicode=10000011&lfid=100103type%3D1%26q%3D%E8%BF%AA%'
               + 'E4%B8%BD%E7%83%AD%E5%B7%B4',
    'User-Agent': 'Mozilla/5.0 (Windows NT 6.1; Win64; x64) AppleWebKit/537.36 (KHTML, like Gecko) '
                  + 'Chrome/70.0.3538.77 Safari/537.36',
    'X-Requested-With': 'XMLHttpRequest'
}


def get_page(page: int):
    """获取第page页的内容,将获得的数据变成字典类型后返回"""
    params = {
        'uid': '1642351362',
        'luicode': '10000011',
        'lfid': '100103type%3D1%26q%3D%E6%9D%A8%E9%A2%96',
        'type': '1642351362',
        'value': '1642351362',
        'containerid': '1076031642351362',
        'page': page  # 这是用来换页的,前面的参数是用来指定微博用户的
    }
    try:
        r = requests.get(url, params=params, headers=headers)
        if r.status_code == 200:
            return r.json()
        else:
            return None
    except requests.ConnectionError as e:
        print('Error', e.args)
        return None


def parse_page(dict_obj: dict, page: int):
    if dict:
        items = dict_obj.get('data').get('cards')  # 此处items的类型为list
        for key, value in enumerate(items):
            if page == 1 and key == 1:
                continue
            else:
                blog = value.get('mblog')  # 此处blog的类型为dict
                id = blog.get('id')
                text = BeautifulSoup(blog.get('text'), 'lxml').get_text()  # 原本的内容为不标准的html代码,所以先用Beautiful Soup进行解析
                attitudes_count = blog.get('attitudes_count')
                comments_count = blog.get('comments_count')
                reposts_count = blog.get('reposts_count')

                print('page: ', page, '  index: ', key)
                print('微博id: ', id,
                      '\n内容: ', text,
                      '\n点赞数: ', attitudes_count,
                      '\n评论数: ', comments_count,
                      '\n转发数: ', reposts_count,
                      '\n---------------')


if __name__ == '__main__':
    for page in range(1, 3):
        dict_obj = get_page(page)
        parse_page(dict_obj, page)

# 前面一部分输出:
# page:  1   index:  0
# 微博id:  4311457790792722
# 内容:  腮红小课堂之“吉祥三宝”#明星制片人微计划##angelababy不止AB# 网页链接 angelababy的秒拍视频
# 点赞数:  49861
# 评论数:  14610
# 转发数:  32598
# ---------------
# page:  1   index:  2
# 微博id:  4311086293183075
# 内容:  那需要摆渡你一下吗,马力?@陳奕迅所長
# 点赞数:  33763
# 评论数:  11325
# 转发数:  21568
# ---------------
# page:  1   index:  3
# 微博id:  4311028709812047
# 内容:  元气DIY,桃心腮红vs月亮腮红#明星制片人微计划##angelababy不止AB面# 1000万播放解锁彩蛋,点击助力V榜
# 点赞数:  65481
# 评论数:  25729
# 转发数:  58129
# ---------------
# page:  1   index:  4
# 微博id:  4309267466533383
# 内容:  感恩有你
# 点赞数:  378787
# 评论数:  50017
# 转发数:  205475
# ---------------
# page:  1   index:  5
# 微博id:  4309220658315366
# 内容:  怀揣着梦和爱,好听~4月1日新专辑安排一下
# 点赞数:  56201
# 评论数:  44929
# 转发数:  16541
十、Scrapy框架的使用
1、简介
Scrapy是纯python实现的一个爬虫框架。通过多个组件的相互协作、组件对异步处理的支持,Scrapy最大限度地利用了网络带宽,大大提高了数据爬取和处理的效率,比requests + BeautifulSoup快很多。
Scrapy 0.24 文档(中文):https://scrapy-chs.readthedocs.io/zh_CN/0.24/
Scrapy 1.5 documentation(英文):https://docs.scrapy.org/en/latest/index.html
Note: 这两个文档对应的scrapy版本不一样。你自己的scrapy版本可以在Anaconda Navigator 中的Environment那里查看。
用人话写的快速入门教程:http://www.scrapyd.cn/doc/137.html
2、安装
使用Anaconda的小伙伴用以下命令就可以直接安装了:
conda install -c conda-forge scrapy
最好不要简单地用conda install scrapy,否则容易出问题。
如果不是使用anaconda的(这么好的东西竟然放着不用),请自行百度安装方法。
3、Scrapy shell
借助Scrapy shell来模拟scrapy请求的过程。一般用来快速测试所写的css或xpath路径是否正确,而不用等到写完整个项目后再测试。
例一:
爬取以下页面:
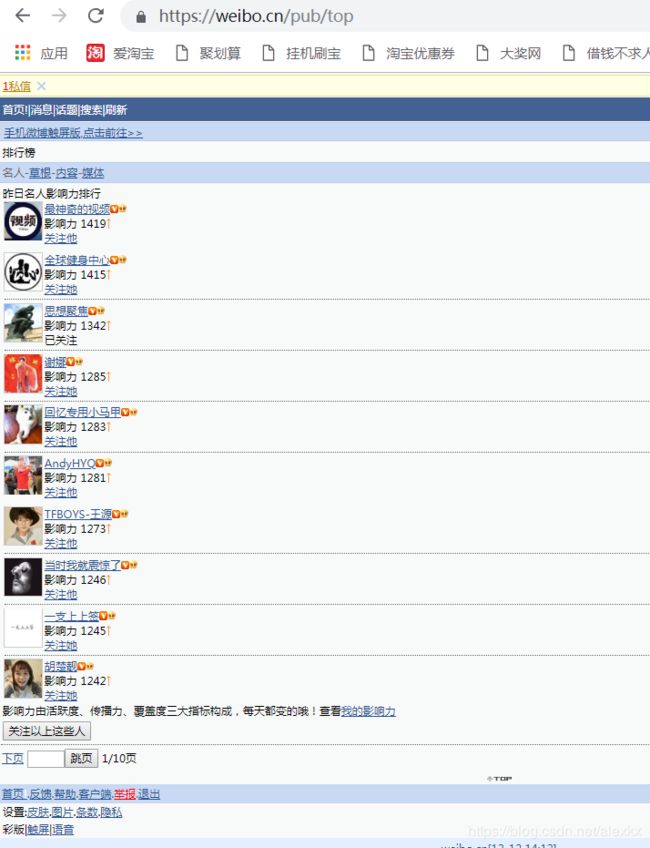
在命令行(cmd)中输入:scrapy shell https://weibo.cn/pub/top
进入交互界面:

使用response.text查看获得的网页源码
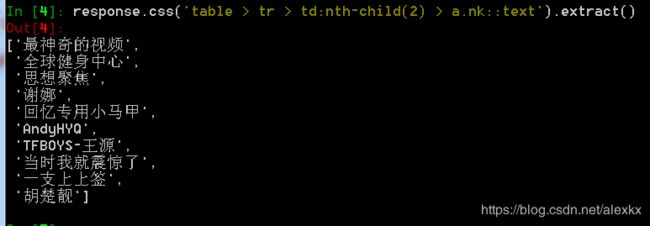
使用response.xpath()或者response.css()来提取特定节点。
使用xpath爬取前十名的用户名:response.xpath('//table/tr/td[2]/a[1]/text()').extract()

使用css爬取前十名的用户名:response.css('table > tr > td:nth-child(2) > a.nk::text').extract()
例二:
爬取腾讯招聘网页的信息:https://hr.tencent.com/position.php
在cmd中输入 scrapy shell https://hr.tencent.com/position.php
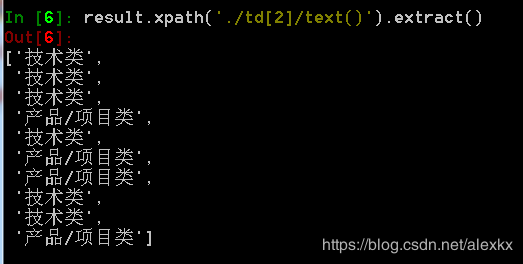
然后 result = response.xpath('//tr[@class="even"]|//tr[@class="odd"]'),得到是个关于职位信息的节点
获取前十个职位名称:result.xpath('./td/a/text()').extract()

获取职位类别:result.xpath('./td[2]/text()').extract()
获取下一页路径:response.xpath('//a[@id="next"]/@href').extract()

可能出现的问题:
- 从Elements看到的html代码和response.text中的代码会有点不一样。所以直接使用从浏览器复制的selector或者xpath时,可能会得到空列表。 解决办法: 从网页复制路径后(右键-检查-在对应位置右键-Copy),将selector或者xpath前面一部分(或者中间一部分)删去。
- 另外,用浏览器打开第一个网页时,由于你的浏览器可能保存了cookies,所以会自动登录你的微博。对于导致“关注他” / “已关注”部分,从Elements看到的html代码和response.text中的代码也会不一样。Elements中有区分“关注他” / “已关注”,而response.text中全部都是“关注他”。
- scrapy shell 报错:twisted.web._newclient.ResponseNeverReceived: [
]
我一开始时是用conda install scrapy这个命令来安装scrapy的,后来发现这个问题以后,试了很多网上的方法都没用,就把scrapy卸了,用conda install -c conda-forge scrapy再装一次,就没问题了
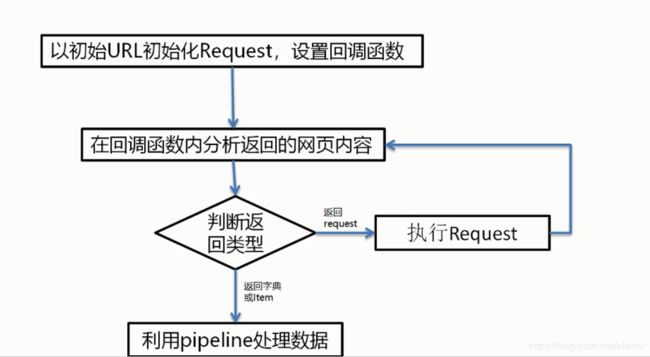
4、Spider运行流程:
在实现Scrapy爬虫项目时,最核心的便是Spider类了。
简单来说,Scrapy要做的事情主要有两件:
- 定义爬取网站的动作
- 分析爬取下来的网页
对于Spider类来说,整个爬取循环过程为:
5、scrapy爬虫使用步骤
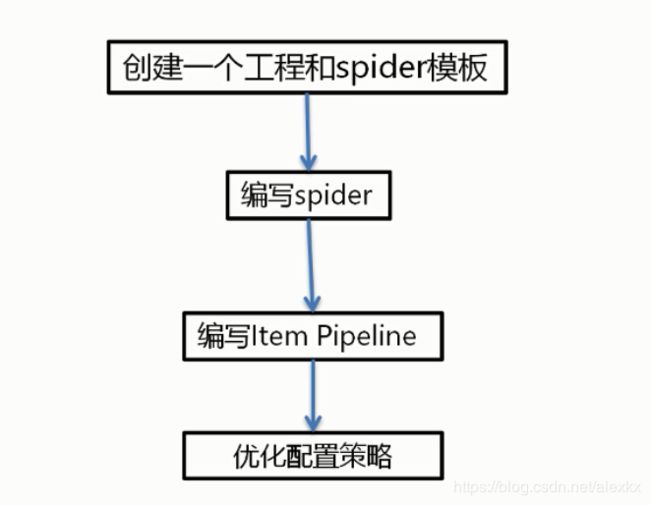
实战1 爬取腾讯招聘职位
目标网页:https://hr.tencent.com/position.php
任务:爬取网页中的职位信息,并保存到json文件中
在命令行中输入:scrapy startproject jobs_in_tencent 这样我们就在当前目录下创建了一个scrapy项目
cd jobs_in_tencent
scrapy genspider position tencent.com
这就在spiders文件夹中创建了一个position.py文件
接下来将item.py改为:
# -*- coding: utf-8 -*-

# Define here the models for your scraped items
#
# See documentation in:
# https://doc.scrapy.org/en/latest/topics/items.html

import scrapy


class JobsInTencentItem(scrapy.Item):
    # define the fields for your item here like:
    # name = scrapy.Field()
    position_name = scrapy.Field()
    position_type = scrapy.Field()
    position_num = scrapy.Field()
    location = scrapy.Field()
    release_time = scrapy.Field()
将spiders/position.py改为:
# -*- coding: utf-8 -*-
import scrapy
from ..items import JobsInTencentItem


class PositionSpider(scrapy.Spider):
    name = 'position'
    allowed_domains = ['hr.tencent.com']
    start_urls = ['https://hr.tencent.com/position.php']

    def parse(self, response):
        targets = response.xpath('//tr[@class="even"]|//tr[@class="odd"]')
        for i in targets:
            item = JobsInTencentItem()
            item['position_name'] = i.xpath('./td/a/text()').extract_first()  # extract_first()返回第一个元素,而不是list
            item['position_type'] = i.xpath('./td[2]/text()').extract_first()
            item['position_num'] = i.xpath('./td[3]/text()').extract_first()
            item['location'] = i.xpath('./td[4]/text()').extract_first()
            item['release_time'] = i.xpath('./td[5]/text()').extract_first()
            yield item

        # 爬取下一页
        next = response.xpath('//a[@id="next"]/@href').extract_first()
        base_url = 'https://hr.tencent.com/'
        next_url = base_url + next
        yield scrapy.Request(url=next_url, callback=self.parse)
将pipelines.py改为:
# -*- coding: utf-8 -*-

# Define your item pipelines here
#
# Don't forget to add your pipeline to the ITEM_PIPELINES setting
# See: https://doc.scrapy.org/en/latest/topics/item-pipeline.html
import json


class JobsInTencentPipeline(object):
    def __init__(self):
        self.file = open('tencent_positions.json', 'w', encoding='utf-8')

    def process_item(self, item, spider):
        content = json.dumps(dict(item), ensure_ascii=False) + '\n'
        self.file.write(content)

    def close_spider(self, spider):
        self.file.close()
修改settings.py:
将 # ROBOTSTXT_OBEY = True 这一行注释掉:# ROBOTSTXT_OBEY = True
取消ITEM_PIPELINES 的注释:
ITEM_PIPELINES = {
   'jobs_in_tencent.pipelines.JobsInTencentPipeline': 300,
}
取消USER_AGENT的注释,并改为:
USER_AGENT = 'Mozilla/5.0 (Windows NT 10.0; WOW64) AppleWebKit/537.36 (KHTML, like Gecko) Chrome/70.0.3538.110 Safari/537.36'
在命令行中进入这个项目的目录,输入:scrapy crawl position
运行完成后,将得到一个json文件,下面为该文件中的前面一部分内容:
{"position_name": "22989-高级大数据研发工程师(深圳/北京/上海/成都)", "position_type": "技术类", "position_num": "2", "location": "成都", "release_time": "2018-12-12"}
{"position_name": "TEG14-云网络高级研发工程师(深圳)", "position_type": "技术类", "position_num": "2", "location": "深圳", "release_time": "2018-12-12"}
{"position_name": "TEG14-云网络后台开发工程师", "position_type": "技术类", "position_num": "1", "location": "深圳", "release_time": "2018-12-12"}
{"position_name": "22989-通信研发项目经理", "position_type": "产品/项目类", "position_num": "-1", "location": "深圳", "release_time": "2018-12-12"}
{"position_name": "27092-用户增长研发工程师(深圳)", "position_type": "技术类", "position_num": "1", "location": "深圳", "release_time": "2018-12-12"}
{"position_name": "CSIG02-医疗行业高级产品经理(北京)", "position_type": "产品/项目类", "position_num": "1", "location": "北京", "release_time": "2018-12-12"}
{"position_name": "TEG13-安全产品经理(深圳)", "position_type": "产品/项目类", "position_num": "1", "location": "深圳", "release_time": "2018-12-12"}
{"position_name": "TEG13-小语种语音算法工程师(北京)", "position_type": "技术类", "position_num": "1", "location": "北京", "release_time": "2018-12-12"}
{"position_name": "TEG13-小语种机器翻译算法工程师 (北京)", "position_type": "技术类", "position_num": "1", "location": "北京", "release_time": "2018-12-12"}
{"position_name": "TEG13-舆情洞察数据产品经理(深圳)", "position_type": "产品/项目类", "position_num": "2", "location": "深圳", "release_time": "2018-12-12"}
{"position_name": "S2-Java高级开发工程师(深圳)", "position_type": "技术类", "position_num": "1", "location": "深圳", "release_time": "2018-12-12"}
{"position_name": "CSIG07-安全技术高级工程师(深圳)(深圳总部)", "position_type": "技术类", "position_num": "1", "location": "深圳", "release_time": "2018-12-12"}
{"position_name": "29569-用户运营产品经理(渠道方向)", "position_type": "产品/项目类", "position_num": "1", "location": "深圳", "release_time": "2018-12-12"}
{"position_name": "18434-web前端工程师", "position_type": "技术类", "position_num": "1", "location": "深圳", "release_time": "2018-12-12"}
{"position_name": "18302-Unreal4手游客户端资深开发工程师(深圳总部)", "position_type": "技术类", "position_num": "1", "location": "深圳", "release_time": "2018-12-12"}
{"position_name": "SA-腾讯社交广告产品策划经理(OM广告 上海)", "position_type": "产品/项目类", "position_num": "2", "location": "上海", "release_time": "2018-12-12"}
{"position_name": "TEG13-业务运维工程师(深圳)", "position_type": "技术类", "position_num": "1", "location": "深圳", "release_time": "2018-12-12"}
{"position_name": "25422-堡垒之夜本地化与版本管理", "position_type": "产品/项目类", "position_num": "1", "location": "深圳", "release_time": "2018-12-12"}
{"position_name": "21085-CF移动端运营策划(深圳)", "position_type": "产品/项目类", "position_num": "1", "location": "深圳", "release_time": "2018-12-12"}
{"position_name": "21085-FPS端游运营/数据分析", "position_type": "产品/项目类", "position_num": "1", "location": "深圳", "release_time": "2018-12-12"}
{"position_name": "CSIG07-安全技术高级工程师(深圳)(北京)", "position_type": "技术类", "position_num": "2", "location": "北京", "release_time": "2018-12-12"}
{"position_name": "20772-企鹅影视电影/网络电影文学策划", "position_type": "产品/项目类", "position_num": "1", "location": "北京", "release_time": "2018-12-12"}
{"position_name": "27566-互动小说平台资深运营经理(深圳)", "position_type": "产品/项目类", "position_num": "1", "location": "深圳", "release_time": "2018-12-12"}
OJBK!