SMTP配置 postfix
默认端口25
/var/log/maillog ##服务日志
mail [email protected]
Subject: hello
hello world
. #用"."来结束录入内容并发送
mailq ##查看邮件队列
postqueue -f ##重新处理邮件队列
默认情况下邮件端口只在127.0.0.1上开启
2.
配置
vim /etc/postfix/main.cf
116 inet_interfaces = all ##25端口开启的网络接口
76 myhostname = westos-mail.westos.com ##指定mta主机名称
83 mydomain = westos.com ##指定mta的域名
99 myorigin = westos.com ##指定邮件来源结尾(@后面的字符内容)
164 mydestination = $myhostname, $mydomain, localhost ##接收邮件结尾字符的指定
systemctl restart postfix.service
systemctl stop firewalld

3.邮件别名及发送给多用户邮件
[root@qq-mail ~]# vim /etc/aliases
别名: 真名 ##邮件别名
别名: :include:filename ##邮件群发
vim filename
user1
user2
postalias /etc/aliases
mail 别名

给多用户发送邮件:


4.通过远程主机测试邮件服务
[kiosk@foundation16 Desktop]$ yum install telnet -y ##安装telnet
测试:
[root@foundation16 ~]# telnet 172.25.254.116 25
Trying 172.25.254.116...
Connected to 172.25.254.116.
Escape character is '^]'.
220 westos-mail.westos.com ESMTP Postfix
mail from:[email protected] ##发送端
250 2.1.0 Ok
rcpt to:[email protected] ##接受端

5.邮件客户端的访问控制
#限制客户端
在mta上
postconf -e "smtpd_client_restrictions = check_client_access hash:/etc/postfix/access" ##检测/etc/postfix/access文件
vim /etc/postfix/access
172.25.254.16 REJECT ##拒绝16主机远程访问
postmap /etc/postfix/access ##加密
systemctl restart postfix ##重启

测试:

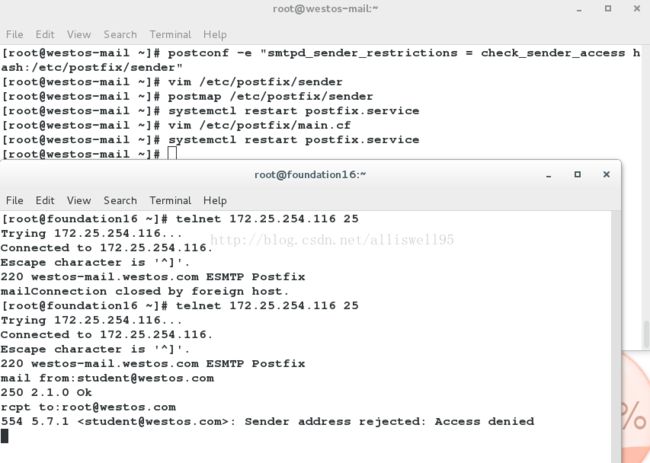
##限制用户发送
postconf -e "smtpd_sender_restrictions = check_sender_access hash:/etc/postfix/sender"
vim /etc/postfix/sender
[email protected] REJECT
postmap /etc/postfix/sender
systemctl restart postfix
测试:
##限制用户接收
postconf -e "smtpd_recipient_restrictions = check_recipient_access hash:/etc/postfix/recip"
vim /etc/postfix/recip
[email protected] REJECT
postmap /etc/postfix/recip
systemctl restart postfix

##出站地址伪装
postconf -e "smtp_generic_maps = hash:/etc/postfix/generic"
vim /etc/postfix/generic
[email protected] [email protected]
postmap /etc/postfix/generic
systemctl restart postfix
测试
su - westos
mail [email protected]
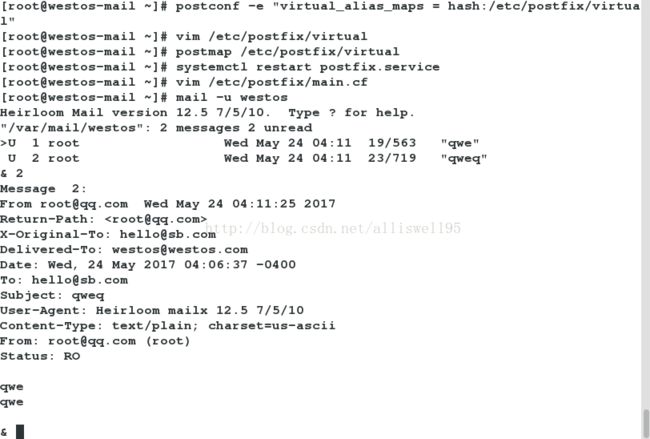
##入战地址转换
dns mx 记录解析先做好

postconf -e "virtual_alias_maps = hash:/etc/postfix/virtual"
/etc/postfix/virtual
虚拟名字 真实用户
[email protected] [email protected]
postmap /etc/postfix/virtual
systectl restart postfix
测试
mail [email protected]
10.dovecot
1)
dovecot 用来提供收件协议
pop3 110
pop3s 995
imap 143
imaps 993
给定用户名称,用户密码,dovecot程序代我们去看这个用户的邮件文件
yum install dovecot -y ##安装dovecot服务
vim /etc/dovecot/dovecot.conf
24 protocols = imap pop3 lmtp ##支持协议,lmtp表示pop3s,imaps,加密协议
48 login_trusted_networks = 0.0.0.0/0 ##允许所有人登陆
49 disable_plaintext_auth = no ##开启认证
vim /etc/dovecot/conf.d/10-mail.conf
30 mail_location = mbox:~/mail:INBOX=/var/mail/%u ##邮件地址
systemctl restart dovecot
useradd westos
passwd westos
su - westos
[westos@westos-mail ~]$ mkdir mail/.imap/ -p
[westos@westos-mail ~]$ touch mail/.imap/INBOX
或者直接在root用户下(前面建立的用户仍然没有,后面建立的用户自动覆盖)
[root@westos-mail ~]# mkdir /etc/skel/mail/.imap -p
[root@westos-mail ~]# touch /etc/skel/mail/.imap -p
测试:
mutt -f pop://[email protected]

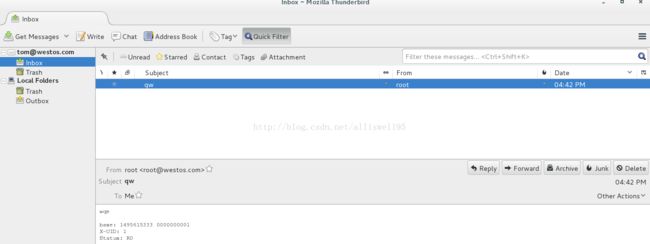
客户端工具:thunderbird

进入界面后: 选择自己的用户 类如:[email protected]
继续填写如下:

登陆后 可以正常使用了:
postfix+mariadb
yum install httpd php php-mysql mariadb-server.x86_64 -y
建立数据库并进入数据库图形管理界面
创建email数据库,emailuser数据表
表中包含username,password,domain,maildir 4个字段
并插入数据
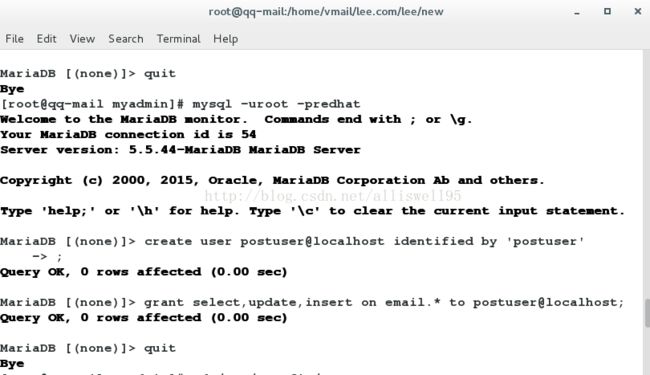
[root@qq-mail myadmin]# mysql_secure_installation ##给予mysql root 密码


用root用户登陆数据库
create user postuser@localhost identified by 'postuser'; ##创建用户,密码
grant select,update,insert on email.* to postuser@localhost; ##授予用户查询,更新,插入权限
cd /etc/postfix/
vim /etc/postfix/mailuser.cf ##用户名称查询
hosts = localhost ##数据库所在主机
user = postuser ##登陆数据库的用户
password = postuser ##登陆数据库的密码
dbname = email ##postfix要查询的库的名称
table = emailuser ##postfix要查询的表的名称
select_field = username ##postfix要查询的字段
where_field = username ##用户给定postfix的查询条件
cp -p mailuser.cf maildomain.cf ##用户域名查询
vim maildomain.cf
hosts = localhost
user = postuser
password = postuser
dbname = email
table = emailuser
select_field = domain
where_field = domain
cp -p mailuser.cf mailbox.cf ##用户邮箱位置查询
hosts = localhost
user = postuser
password = postuser
dbname = email
table = emailuser
select_field = maildir
where_field = username
postmap -q "[email protected]" mysql:/etc/postfix/mailuser.cf
[email protected]
postmap -q "lee.com" mysql:/etc/postfix/maildomain.cf
lee.com
postmap -q "[email protected]" mysql:/etc/postfix/mailbox.cf
/mnt/lee.com/lee
groupadd -g 666 vmail
useradd -s /sbin/nologin -u 666 vmail -g 666
postconf -e "virtual_mailbox_base = /home/vmail"
postconf -e "virtual_uid_maps = static:666"
postconf -e "virtual_gid_maps = static:666"
postconf -e "virtual_alias_maps = mysql:/etc/postfix/mailuser.cf"
postconf -e "virtual_mailbox_domains = mysql:/etc/postfix/maildomain.cf"
postconf -e "virtual_mailbox_maps = mysql:/etc/postfix/maildomain.cf"

测试查看:

