Spring Cloud2.0之Oauth2环境搭建(授权码模式和密码授权模式)
Spring Cloud2.0之Oauth2环境搭建(授权码模式和密码授权模式)
oauth2 server 微服务授权中心, github源码 https://github.com/spring-cloud/spring-cloud-security
对微服务接口做一些权限控制。要给合作伙伴。 通过授权码或者通过密码方式获取accessToken,通过token去获取调用权限。
对于商户来说需要有appId 和 appSecret。
对于之前的连接做进一步解析:
https://graph.qq.com/oauth2.0/authorize?response_type=code&client_id=101462456&state=888&redirect_uri=http://toov5.fuck.com/qqLoginBack
type是授权码形式 appId 回调地址
用户点击确定之后会到后面的回调地址中,浏览器的格式是: 回调地址+auth
开发步骤:(非常类似腾讯QQ互联)
1. 获取授权码,连接拼接:授权类型、 appId 、 回调地址(与数据库表是一致的)
toov5 使用Spring Cloud Oauth2.0搭建
http://localhost:8080/oauth/authorize?response_type=code&client_id=client_1&redirect_uri=http://www.toov5.com
2.使用授权码获取Access Token
http://localhost:8080/oauth/token?grant_type=authorization_code&code=fOdmx2&redirect_uri=http://www.toov5.com&scope=all
用这几个参数去表里查询获取 accessToken 码
获取到accessToken就可以调用接口了
用Oauth2.0 管理微服务中的开放接口,对接口进行授权认证:
在Spring Cloud需要使用oauth2来实现多个微服务的统一认证授权,通过向OAUTH服务发送某个类型的grant type进行集中认证和授权,从而获得access_token,而这个token是受其他微服务信任的,我们在后续的访问可以通过access_token来进行,从而实现了微服务的统一认证授权。
客户端根据约定的ClientID、ClientSecret、Scope来从Access Token URL地址获取AccessToken,并经过AuthURL认证,用得到的AccessToken来访问其他资源接口。
注: Spring Cloud oauth2 需要依赖Spring security 在引入Oauth框架是需要引入Spring security
注意表结构就好了
所以综上所述:
别人在调用我的接口时候,需要申请appId。需要申请的话就需要在我的项目表中插入一条数据
微服务安全框架 SpringBootSecurity,Oauth2角色划分
1、Resource Server:被授权访问的资源
2、Authotization Server:OAUTH2认证授权中心
3、Resource Owner: 用户
4、Client:使用API的客户端(如Android 、IOS、web app)
OAuth2四种授权方式
1、授权码模式(authorization code)用在客户端与服务端应用之间授权
2、简化模式(implicit)用在移动app或者web app(这些app是在用户的设备上的,如
在手机上调起微信来进行认证授权)
3、密码模式(resource owner password credentials)应用直接都是受信任的(都是由一家公司开发的)
4、客户端模式(client credentials)用在应用API访问
密码形式的和授权形式的: 第一个是不用授权,通过密码调用。 第二个是需要授权
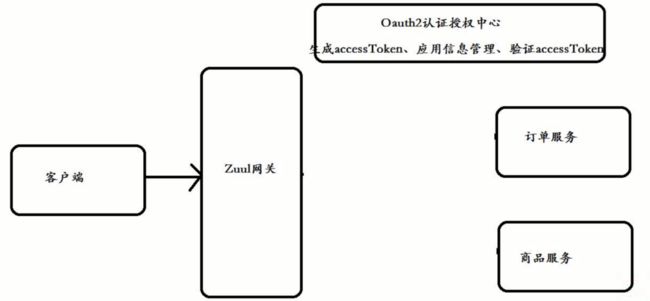
架构:
客户端不能直接调用订单服务的,需要走网关,然后进入到订单服务里面。后期服务比较多时候,需要授权认证。
使用授权码获取accessToken
对每个服务进行验证accessToken
应用信息appId appkey 回调地址
添加一层 Oauth2.0授权中心 ,对于订单服务、商品服务 都要做accessToken验证的 。 通过网关之后还有一层认证授权中心。
客户端先去获取accessToken,而accessToken生成于Oauth2.0认证授权中心。即为: 客户端到认证授权中心,通过appId和appSerect拿到accessToken。
验证accessToken是否有效等等也是通过它实现的。
认证授权中心是管理accessToken相关的
过程:客户端携带appid和授权码去Oauth2.0认证授权中心,获取accessToken。
客户端携带accessToken去访问,经过网关,网关转发到订单服务,然后去Oauth2.0认证授权中心去验证accessToken。
注:客户端代表某一个合作机构
资源中心概念: 有哪些接口需要去授权认证 。对开放接口进行授权认证。
要想调用接口 首先要去任重授权中心获取accessToken
小结:
合作机构必须要调用oauth2任重授权中心获取对应的accessToken
再使用accessToken代用微服务器中开放接口
搭建:Oauth2.0授权中心 然后资源服务中心 两步走。
架构实现:
1. 搭建认证授权中心
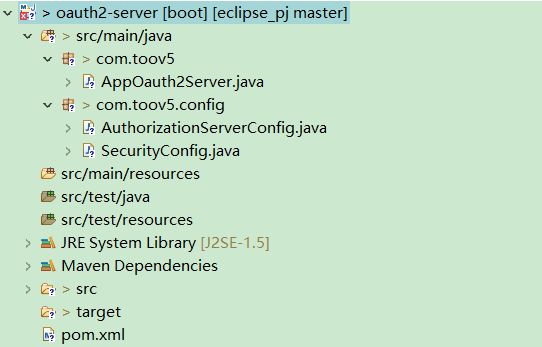
创建maven工程: oauth2-server
相应的创建授权类信息: AuthorizationServerConfig
pom.xml:
  4.0.0
  com.toov5
  oauth2-server
  0.0.1-SNAPSHOT


        org.springframework.boot
        spring-boot-starter-parent
        2.0.1.RELEASE


                org.springframework.cloud
                spring-cloud-dependencies
                Finchley.M7
                pom
                import


            org.springframework.boot
            spring-boot-starter-web


            org.projectlombok
            lombok


            org.springframework.boot
            spring-boot-starter-freemarker


        spring-boot 整合security -->

            org.springframework.boot
            spring-boot-starter-security


            org.springframework.cloud
            spring-cloud-starter-oauth2


            spring-milestones
            Spring Milestones
            https://repo.spring.io/libs-milestone

                false
config:
package com.toov5.config;

import org.springframework.context.annotation.Bean;
import org.springframework.context.annotation.Configuration;
import org.springframework.http.HttpMethod;
import org.springframework.security.authentication.AuthenticationManager;
import org.springframework.security.authentication.AuthenticationProvider;
import org.springframework.security.authentication.dao.DaoAuthenticationProvider;
import org.springframework.security.core.Authentication;
import org.springframework.security.core.AuthenticationException;
import org.springframework.security.core.userdetails.User;
import org.springframework.security.core.userdetails.UserDetailsService;
import org.springframework.security.crypto.bcrypt.BCryptPasswordEncoder;
import org.springframework.security.crypto.password.PasswordEncoder;
import org.springframework.security.oauth2.config.annotation.configurers.ClientDetailsServiceConfigurer;
import org.springframework.security.oauth2.config.annotation.web.configuration.AuthorizationServerConfigurerAdapter;
import org.springframework.security.oauth2.config.annotation.web.configuration.EnableAuthorizationServer;
import org.springframework.security.oauth2.config.annotation.web.configurers.AuthorizationServerEndpointsConfigurer;
import org.springframework.security.oauth2.config.annotation.web.configurers.AuthorizationServerSecurityConfigurer;
import org.springframework.security.provisioning.InMemoryUserDetailsManager;

//配置授权中心信息
@Configuration
@EnableAuthorizationServer // 开启认证授权中心
public class AuthorizationServerConfig extends AuthorizationServerConfigurerAdapter {
    // accessToken有效期
    private int accessTokenValiditySeconds = 7200; // 两小时
    private int refreshTokenValiditySeconds = 7200; // 两小时

    // 添加商户信息
    public void configure(ClientDetailsServiceConfigurer clients) throws Exception {
        //方式一授权码授权模式    appid                           appkey
        clients.inMemory().withClient("client_1").secret(passwordEncoder().encode("123456"))
        .redirectUris("http://www.baidu.com").authorizedGrantTypes("authorization_code").scopes("all"). //回调地址 授权模式
         accessTokenValiditySeconds(accessTokenValiditySeconds)  //有效期时间
         .refreshTokenValiditySeconds(refreshTokenValiditySeconds); //刷新时间// 设置token类型
    public void configure(AuthorizationServerEndpointsConfigurer endpoints) {
        endpoints.authenticationManager(authenticationManager()).allowedTokenEndpointRequestMethods(HttpMethod.GET,
                HttpMethod.POST);
    }

    @Override
    public void configure(AuthorizationServerSecurityConfigurer oauthServer) {
        // 允许表单认证
        oauthServer.allowFormAuthenticationForClients();
        // 允许check_token访问
        oauthServer.checkTokenAccess("permitAll()");
    }

    @Bean
    AuthenticationManager authenticationManager() {
        AuthenticationManager authenticationManager = new AuthenticationManager() {

            public Authentication authenticate(Authentication authentication) throws AuthenticationException {
                return daoAuhthenticationProvider().authenticate(authentication);
            }
        };
        return authenticationManager;
    }

    @Bean
    public AuthenticationProvider daoAuhthenticationProvider() {
        DaoAuthenticationProvider daoAuthenticationProvider = new DaoAuthenticationProvider();
        daoAuthenticationProvider.setUserDetailsService(userDetailsService());
        daoAuthenticationProvider.setHideUserNotFoundExceptions(false);
        daoAuthenticationProvider.setPasswordEncoder(passwordEncoder());
        return daoAuthenticationProvider;
    }

    // 设置添加用户信息,正常应该从数据库中读取
    @Bean
    UserDetailsService userDetailsService() {
        InMemoryUserDetailsManager userDetailsService = new InMemoryUserDetailsManager();
        userDetailsService.createUser(User.withUsername("user_1").password(passwordEncoder().encode("123456"))
                .authorities("ROLE_USER").build());
        userDetailsService.createUser(User.withUsername("user_2").password(passwordEncoder().encode("1234567"))
                .authorities("ROLE_USER").build());
        return userDetailsService;
    }

    @Bean  //password加密的方式 相当于把PasswordEncoder类对象 注册到容器中
    PasswordEncoder passwordEncoder() {
        // 加密方式
        PasswordEncoder passwordEncoder = new BCryptPasswordEncoder();
        return passwordEncoder;
    }
}
访授权中心:授权链接 要 与配置中的参数一致 !

此时访问必然报错!
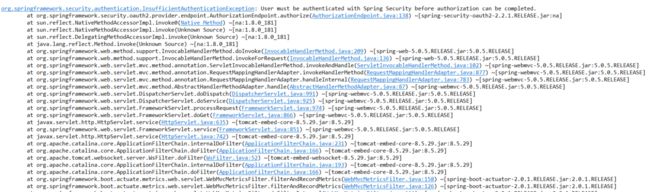
因为依赖于security框架!必须要配置。强制要求配置
解决办法 添加Security权限:
package com.toov5.config;
import org.springframework.context.annotation.Bean;
import org.springframework.security.authentication.AuthenticationManager;
import org.springframework.security.config.annotation.web.builders.HttpSecurity;
import org.springframework.security.config.annotation.web.configuration.WebSecurityConfigurerAdapter;
import org.springframework.security.crypto.bcrypt.BCryptPasswordEncoder;
import org.springframework.security.crypto.password.PasswordEncoder;
import org.springframework.stereotype.Component;
@Component
public class SecurityConfig extends WebSecurityConfigurerAdapter {
// 授权中心管理器
@Bean
@Override
public AuthenticationManager authenticationManagerBean() throws Exception {
AuthenticationManager manager = super.authenticationManagerBean();
return manager;
}
@Bean
public PasswordEncoder passwordEncoder() {
return new BCryptPasswordEncoder();
}
// 拦截所有请求,使用httpBasic方式登陆
@Override
protected void configure(HttpSecurity http) throws Exception {
http.authorizeRequests().antMatchers("/**").fullyAuthenticated().and().httpBasic(); //拦截所有请求 通过httpBasic进行认证
}
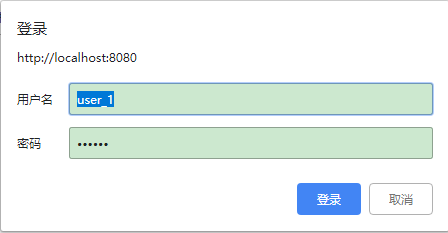
}重新启动后:

验证token 刷新token 都有日志
访问:
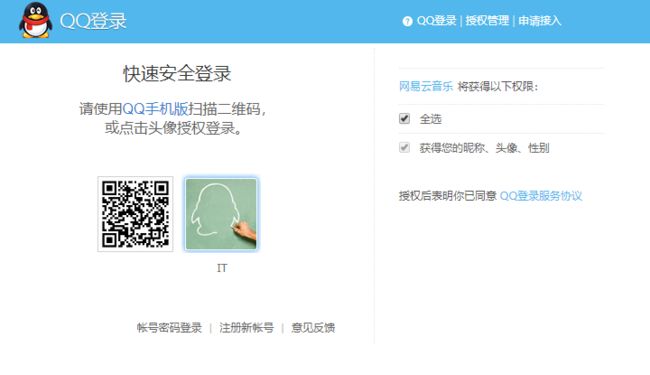
点击确认后: 应用client_1 是否接受资源授权? 接受 和 拒绝

点击接受:跳转到回调地址中去 并且 拿到授权码 (生成授权码的流程 全部框架自带的)

相当于QQ授权登录的:
授权中心项目结构:
表结构:https://blog.csdn.net/qq_27384769/article/details/79440449
补充下:
正常项目流程下,还有一个protal门户网站,用户申请appId。
密码授权模式:
使用用户用户名称和密码进行获取accessToken, 小项目这样做的多
(appid是应用于哪个机构)
验证授权:
获取accessToken请求地址: http://localhost:8080/oauth/token
看下面的例子,注意正常情况下都是读数据库的。这里为了方便介绍,写死了
配置:
package com.toov5.config;

import org.springframework.context.annotation.Bean;
import org.springframework.context.annotation.Configuration;
import org.springframework.http.HttpMethod;
import org.springframework.security.authentication.AuthenticationManager;
import org.springframework.security.authentication.AuthenticationProvider;
import org.springframework.security.authentication.dao.DaoAuthenticationProvider;
import org.springframework.security.core.Authentication;
import org.springframework.security.core.AuthenticationException;
import org.springframework.security.core.userdetails.User;
import org.springframework.security.core.userdetails.UserDetailsService;
import org.springframework.security.crypto.bcrypt.BCryptPasswordEncoder;
import org.springframework.security.crypto.password.PasswordEncoder;
import org.springframework.security.oauth2.config.annotation.configurers.ClientDetailsServiceConfigurer;
import org.springframework.security.oauth2.config.annotation.web.configuration.AuthorizationServerConfigurerAdapter;
import org.springframework.security.oauth2.config.annotation.web.configuration.EnableAuthorizationServer;
import org.springframework.security.oauth2.config.annotation.web.configurers.AuthorizationServerEndpointsConfigurer;
import org.springframework.security.oauth2.config.annotation.web.configurers.AuthorizationServerSecurityConfigurer;
import org.springframework.security.provisioning.InMemoryUserDetailsManager;

//配置授权中心信息
@Configuration
@EnableAuthorizationServer // 开启认证授权中心
public class AuthorizationServerConfig extends AuthorizationServerConfigurerAdapter {
    // accessToken有效期
    private int accessTokenValiditySeconds = 7200; // 两小时
    private int refreshTokenValiditySeconds = 7200; // 两小时

    // 添加商户信息
    public void configure(ClientDetailsServiceConfigurer clients) throws Exception {
        //方式一授权码授权模式    appid                           appkey
//        clients.inMemory().withClient("client_1").secret(passwordEncoder().encode("123456"))
//        .redirectUris("http://www.baidu.com").authorizedGrantTypes("authorization_code").scopes("all"). //回调地址 授权模式
//         accessTokenValiditySeconds(accessTokenValiditySeconds)  //有效期时间
//         .refreshTokenValiditySeconds(refreshTokenValiditySeconds); //刷新时间

        //方式二密码授权模式
        // withClient appid                                 appkey (也叫appSecrete)
        clients.inMemory().withClient("client_1").secret(passwordEncoder().encode("123456"))
                .authorizedGrantTypes("password","client_credentials","refresh_token").scopes("all").accessTokenValiditySeconds(accessTokenValiditySeconds); //有效期时间
    }

    // 设置token类型
    public void configure(AuthorizationServerEndpointsConfigurer endpoints) {
        endpoints.authenticationManager(authenticationManager()).allowedTokenEndpointRequestMethods(HttpMethod.GET,
                HttpMethod.POST);
    }

    @Override
    public void configure(AuthorizationServerSecurityConfigurer oauthServer) {
        // 允许表单认证
        oauthServer.allowFormAuthenticationForClients();
        // 允许check_token访问
        oauthServer.checkTokenAccess("permitAll()");
    }

    @Bean
    AuthenticationManager authenticationManager() {
        AuthenticationManager authenticationManager = new AuthenticationManager() {

            public Authentication authenticate(Authentication authentication) throws AuthenticationException {
                return daoAuhthenticationProvider().authenticate(authentication);
            }
        };
        return authenticationManager;
    }

    @Bean
    public AuthenticationProvider daoAuhthenticationProvider() {
        DaoAuthenticationProvider daoAuthenticationProvider = new DaoAuthenticationProvider();
        daoAuthenticationProvider.setUserDetailsService(userDetailsService());
        daoAuthenticationProvider.setHideUserNotFoundExceptions(false);
        daoAuthenticationProvider.setPasswordEncoder(passwordEncoder());
        return daoAuthenticationProvider;
    }

    // 设置添加用户信息,正常应该从数据库中读取
    @Bean
    UserDetailsService userDetailsService() {
        InMemoryUserDetailsManager userDetailsService = new InMemoryUserDetailsManager();
        userDetailsService.createUser(User.withUsername("user_1").password(passwordEncoder().encode("123456"))
                .authorities("ROLE_USER").build());
        userDetailsService.createUser(User.withUsername("user_2").password(passwordEncoder().encode("1234567"))
                .authorities("ROLE_USER").build());
        return userDetailsService;
    }

    @Bean  //password加密的方式 相当于把PasswordEncoder类对象 注册到容器中
    PasswordEncoder passwordEncoder() {
        // 加密方式
        PasswordEncoder passwordEncoder = new BCryptPasswordEncoder();
        return passwordEncoder;
    }
}
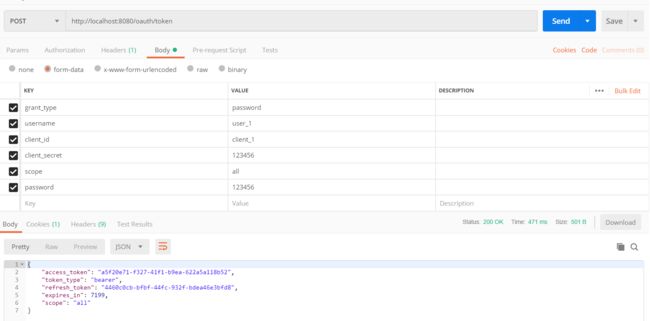
postman:
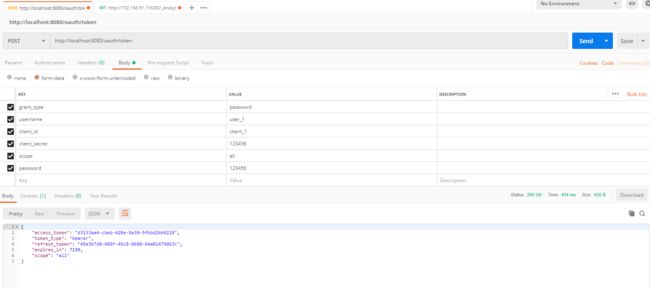
这样获取到了 accessToken
小结:密码模式想要获取到accessToken,不用authorization code . 使用用户名和密码,就可以获取到accessToken了。
用户名 和 密码要与配置的一致,实际项目时候用的是读数据库动态获取。

补充: 如果clientId appId 同时使用密码模式和授权码,获取accessToken。 会获取相同的accessToken! 因为是与appId 进行关联的。
刷新和验证accessToken
accessToken过期怎么处理? 使用刷新令牌获取新的accessToken
至少提前十分钟,刷新令牌接口进行判断。


用户需要使用这个token 换取accessToken就OK了
用户访问:
刷新新的accessToken
http://localhost:8080/oauth/token?grant_type=refresh_token&refresh_token=45e3b7d0-408f-49c8-8600-64a01479063c&client_id=client_1&client_secret=123456
获取新的accessToken

访问后报错!

类型是唯一的,需要修改
// 设置token类型
    public void configure(AuthorizationServerEndpointsConfigurer endpoints) {
        endpoints.authenticationManager(authenticationManager()).allowedTokenEndpointRequestMethods(HttpMethod.GET,
                HttpMethod.POST);
        //重新设置userDetailsService  不然刷新accessToken时候会报错!!!
        endpoints.authenticationManager(authenticationManager());
        endpoints.userDetailsService(userDetailsService());


    }
重新发送刷新的链接及其参数:

不停的刷新不停的修改
验证accessToken是否有效接口:
http://localhost:8080/oauth/check_token?token=b1d4b07f-b40b-4932-b3f0-1c5c898e086a

资源服务中心的搭建
pom:
  4.0.0
  com.toov5
  oauth2-resource-order
  0.0.1-SNAPSHOT

        org.springframework.boot
        spring-boot-starter-parent
        2.0.1.RELEASE


                org.springframework.cloud
                spring-cloud-dependencies
                Finchley.M7
                pom
                import


            org.springframework.boot
            spring-boot-starter-web


            org.projectlombok
            lombok


            org.springframework.boot
            spring-boot-starter-freemarker


        spring-boot 整合security -->

            org.springframework.boot
            spring-boot-starter-security


            org.springframework.cloud
            spring-cloud-starter-oauth2


            spring-milestones
            Spring Milestones
            https://repo.spring.io/libs-milestone

                false
yml:
##应用端 角色  合作机构

server:
  port: 8081


logging:
  level:
    org.springframework.security: DEBUG

security:
  oauth2:
    resource:
      ####从认证授权中心上验证token
      tokenInfoUri: http://localhost:8080/oauth/check_token
      preferTokenInfo: true
    client:   ## 获取accesstoken地址
      accessTokenUri: http://localhost:8080/oauth/token
      userAuthorizationUri: http://localhost:8080/oauth/authorize  ###授权地址
      ###appid
      clientId: client_1
      ###appSecret
      clientSecret: 123456
资源服务:
package com.toov5.controller;

import org.springframework.web.bind.annotation.RequestMapping;
import org.springframework.web.bind.annotation.RestController;
/*
 * 资源服务请求
 */
@RestController
@RequestMapping("/api/order")
public class OrderController {

    @RequestMapping("/addOrder")
    public String addOrder() {
        return "addOrder";
    }

}
资源拦截配置:
package com.toov5.config;

import org.springframework.context.annotation.Configuration;
import org.springframework.security.config.annotation.web.builders.HttpSecurity;
import org.springframework.security.oauth2.config.annotation.web.configuration.EnableResourceServer;
import org.springframework.security.oauth2.config.annotation.web.configuration.ResourceServerConfigurerAdapter;

@Configuration
@EnableResourceServer  //开启资源服务中心
public class ResourceServerConfiguration extends ResourceServerConfigurerAdapter {

    @Override
    public void configure(HttpSecurity http) throws Exception {
        // 对 api/order 请求进行拦截   验证accessToken  与controller 的要有关系
        http.authorizeRequests().antMatchers("/api/order/**").authenticated();
    }

}
启动类:
package com.toov5;

import org.springframework.boot.SpringApplication;
import org.springframework.boot.autoconfigure.SpringBootApplication;
import org.springframework.boot.autoconfigure.security.oauth2.client.EnableOAuth2Sso;

@SpringBootApplication
@EnableOAuth2Sso
public class AppOrder {

    public static void main(String[] args) {
        SpringApplication.run(AppOrder.class, args);
    }
}
先启动 认证授权中心,再启动资源中心
请求资源: http://127.0.0.1:8081/api/order/addOrder

需要添加token
通过postman获取: http://localhost:8080/oauth/token
访问服务资源: http://127.0.0.1:8081/api/order/addOrder
Authorization bearer 31820c84-2e52-408f-9d21-a62483aad59d 注意要有空格!

注:
正常情况下拦截服务资源 是在网关里面的!
拦截资源统一由网关进行Oauth2.0验证
开放接口和内部接口一定要独立出来! 可以封装业务逻辑相同,但是内部外部一定要相同
public开头的 需要做Oauth2.0验证的
动态读取表信息权限校验
官方推荐SQL:
https://github.com/spring-projects/spring-security-oauth/blob/master/spring-security-oauth2/src/test/resources/schema.sql
我直接给抄过来了:
create table oauth_client_details (
  client_id VARCHAR(256) PRIMARY KEY,
  resource_ids VARCHAR(256),
  client_secret VARCHAR(256),
  scope VARCHAR(256),
  authorized_grant_types VARCHAR(256),
  web_server_redirect_uri VARCHAR(256),
  authorities VARCHAR(256),
  access_token_validity INTEGER,
  refresh_token_validity INTEGER,
  additional_information VARCHAR(4096),
  autoapprove VARCHAR(256)
);

create table oauth_client_token (
  token_id VARCHAR(256),
  token LONGVARBINARY,
  authentication_id VARCHAR(256) PRIMARY KEY,
  user_name VARCHAR(256),
  client_id VARCHAR(256)
);

create table oauth_access_token (
  token_id VARCHAR(256),
  token LONGVARBINARY,
  authentication_id VARCHAR(256) PRIMARY KEY,
  user_name VARCHAR(256),
  client_id VARCHAR(256),
  authentication LONGVARBINARY,
  refresh_token VARCHAR(256)
);

create table oauth_refresh_token (
  token_id VARCHAR(256),
  token LONGVARBINARY,
  authentication LONGVARBINARY
);

create table oauth_code (
  code VARCHAR(256), authentication LONGVARBINARY
);

create table oauth_approvals (
    userId VARCHAR(256),
    clientId VARCHAR(256),
    scope VARCHAR(256),
    status VARCHAR(10),
    expiresAt TIMESTAMP,
    lastModifiedAt TIMESTAMP
);


-- customized oauth_client_details table
create table ClientDetails (
  appId VARCHAR(256) PRIMARY KEY,
  resourceIds VARCHAR(256),
  appSecret VARCHAR(256),
  scope VARCHAR(256),
  grantTypes VARCHAR(256),
  redirectUrl VARCHAR(256),
  authorities VARCHAR(256),
  access_token_validity INTEGER,
  refresh_token_validity INTEGER,
  additionalInformation VARCHAR(4096),
  autoApproveScopes VARCHAR(256)
);
注: 这里面索引太长,报错。大家可以修改下InnoDB索引长度
索引太长会降低性能,这里我统一修改为25,作为测试用。实际开发视情况而定。
根据本次的设计:
create database oauth2;

USE oauth2;
create table oauth_client_details (
  client_id VARCHAR(256) PRIMARY KEY,
  resource_ids VARCHAR(256),
  client_secret VARCHAR(256),
  scope VARCHAR(256),
  authorized_grant_types VARCHAR(256),
  web_server_redirect_uri VARCHAR(256),
  authorities VARCHAR(256),
  access_token_validity INTEGER,
  refresh_token_validity INTEGER,
  additional_information VARCHAR(4096),
  autoapprove VARCHAR(256)
);


create table oauth_client_token (
  token_id VARCHAR(256),
  token BLOB,
  authentication_id VARCHAR(25) PRIMARY KEY,
  user_name VARCHAR(256),
  client_id VARCHAR(256)
);

create table oauth_access_token (
  token_id VARCHAR(256),
  token BLOB,
  authentication_id VARCHAR(250) PRIMARY KEY,
  user_name VARCHAR(256),
  client_id VARCHAR(256),
  authentication BLOB,
  refresh_token VARCHAR(256)
);

create table oauth_refresh_token (
  token_id VARCHAR(256),
  token BLOB,
  authentication BLOB
);

create table oauth_code (
  code VARCHAR(256), authentication BLOB
);

create table oauth_approvals (
    userId VARCHAR(256),
    clientId VARCHAR(256),
    scope VARCHAR(256),
    status VARCHAR(10),
    expiresAt TIMESTAMP,
    lastModifiedAt TIMESTAMP
);


-- customized oauth_client_details table
create table ClientDetails (
  appId VARCHAR(256) PRIMARY KEY,
  resourceIds VARCHAR(256),
  appSecret VARCHAR(256),
  scope VARCHAR(256),
  grantTypes VARCHAR(256),
  redirectUrl VARCHAR(256),
  authorities VARCHAR(256),
  access_token_validity INTEGER,
  refresh_token_validity INTEGER,
  additionalInformation VARCHAR(4096),
  autoApproveScopes VARCHAR(256)
);
注: 表名不要随便改,字段也不要随便改!
动态的配置:
maven 中引入数据库的jdbc等链接jar包依赖
  4.0.0
  com.toov5
  oauth2-server
  0.0.1-SNAPSHOT


        org.springframework.boot
        spring-boot-starter-parent
        2.0.1.RELEASE


                org.springframework.cloud
                spring-cloud-dependencies
                Finchley.M7
                pom
                import


            org.springframework.boot
            spring-boot-starter-web


            org.projectlombok
            lombok


            org.springframework.boot
            spring-boot-starter-freemarker


        spring-boot 整合security -->

            org.springframework.boot
            spring-boot-starter-security


            org.springframework.cloud
            spring-cloud-starter-oauth2


            org.springframework.boot
            spring-boot-starter-jdbc


            mysql
            mysql-connector-java


            spring-milestones
            Spring Milestones
            https://repo.spring.io/libs-milestone

                false
Application.yml 配置数据库信息
spring:
  datasource:
    hikari:
      connection-test-query: SELECT 1
      minimum-idle: 1
      maximum-pool-size: 5
      pool-name: dbcp1
    driver-class-name: com.mysql.jdbc.Driver
    url: jdbc:mysql://localhost:3306/oauth2?autoReconnect=true&useSSL=false
    username: root
    password: root
配置文件:
package com.toov5.config;

import javax.sql.DataSource;

import org.springframework.beans.factory.annotation.Autowired;
import org.springframework.beans.factory.annotation.Qualifier;
import org.springframework.context.annotation.Bean;
import org.springframework.context.annotation.Configuration;
import org.springframework.security.authentication.AuthenticationManager;
import org.springframework.security.authentication.AuthenticationProvider;
import org.springframework.security.authentication.dao.DaoAuthenticationProvider;
import org.springframework.security.core.Authentication;
import org.springframework.security.core.AuthenticationException;
import org.springframework.security.core.userdetails.User;
import org.springframework.security.core.userdetails.UserDetailsService;
import org.springframework.security.crypto.bcrypt.BCryptPasswordEncoder;
import org.springframework.security.crypto.password.PasswordEncoder;
import org.springframework.security.oauth2.config.annotation.configurers.ClientDetailsServiceConfigurer;
import org.springframework.security.oauth2.config.annotation.web.configuration.AuthorizationServerConfigurerAdapter;
import org.springframework.security.oauth2.config.annotation.web.configuration.EnableAuthorizationServer;
import org.springframework.security.oauth2.config.annotation.web.configurers.AuthorizationServerEndpointsConfigurer;
import org.springframework.security.oauth2.config.annotation.web.configurers.AuthorizationServerSecurityConfigurer;
import org.springframework.security.oauth2.provider.token.TokenStore;
import org.springframework.security.oauth2.provider.token.store.JdbcTokenStore;
import org.springframework.security.provisioning.InMemoryUserDetailsManager;

// 配置授权中心信息
@Configuration
@EnableAuthorizationServer // 开启认证授权中心
public class AuthorizationServerConfig extends AuthorizationServerConfigurerAdapter {

    @Autowired
    //@Qualifier("authenticationManagerBean")
    private AuthenticationManager authenticationManager;

    @Autowired
    @Qualifier("dataSource")
    private DataSource dataSource;

   //默认token都是存在内存中去的  一种是redis  一种是数据库中

    @Bean
    public TokenStore tokenStore() {
        // return new InMemoryTokenStore(); //使用内存中的 token store
        return new JdbcTokenStore(dataSource); /// 使用Jdbctoken store
    }

    @Override
    public void configure(ClientDetailsServiceConfigurer clients) throws Exception {

        // 添加授权用户
        clients.jdbc(dataSource)
          .withClient("client_1").secret(new BCryptPasswordEncoder().encode("123456"))
        .authorizedGrantTypes("password", "refresh_token", "authorization_code")// 允许授权范围
        .redirectUris("http://www.toov5.com").authorities("ROLE_ADMIN", "ROLE_USER")// 客户端可以使用的权限
        .scopes("all").accessTokenValiditySeconds(7200).refreshTokenValiditySeconds(7200);
    }

    @Override
    public void configure(AuthorizationServerEndpointsConfigurer endpoints) throws Exception {
        endpoints.tokenStore(tokenStore()).authenticationManager(authenticationManager)
                .userDetailsService(userDetailsService());// 必须设置
                                                            // UserDetailsService
                                                            // 否则刷新token 时会报错
    }

    @Bean
    UserDetailsService userDetailsService() {
        InMemoryUserDetailsManager userDetailsService = new InMemoryUserDetailsManager();
        userDetailsService.createUser(User.withUsername("user_1").password(new BCryptPasswordEncoder().encode("123456"))
                .authorities("ROLE_USER").build());
        userDetailsService.createUser(User.withUsername("user_2")
                .password(new BCryptPasswordEncoder().encode("1234567")).authorities("ROLE_USER").build());
        return userDetailsService;
    }

    @Override
    public void configure(AuthorizationServerSecurityConfigurer security) throws Exception {
        security.tokenKeyAccess("permitAll()").checkTokenAccess("isAuthenticated()")
                .allowFormAuthenticationForClients();// 允许表单登录

    }

    @Bean
    AuthenticationManager authenticationManager() {
        AuthenticationManager authenticationManager = new AuthenticationManager() {

            public Authentication authenticate(Authentication authentication) throws AuthenticationException {
                return daoAuhthenticationProvider().authenticate(authentication);
            }
        };
        return authenticationManager;
    }
    @Bean
    public AuthenticationProvider daoAuhthenticationProvider() {
        DaoAuthenticationProvider daoAuthenticationProvider = new DaoAuthenticationProvider();
        daoAuthenticationProvider.setUserDetailsService(userDetailsService());
        daoAuthenticationProvider.setHideUserNotFoundExceptions(false);
        daoAuthenticationProvider.setPasswordEncoder(passwordEncoder());
        return daoAuthenticationProvider;
    }

    @Bean
    PasswordEncoder passwordEncoder() {
        // 加密方式
        PasswordEncoder passwordEncoder = new BCryptPasswordEncoder();
        return passwordEncoder;
    }

}
访问:
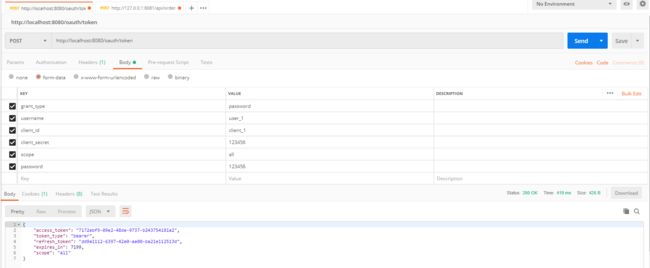
授权中心将数据存储到数据库中:

authentication_id 是加密的密码
重新启动,再次访问肯定报错,因为有这个数据了
上述实现体验为目的,实际情况下,搭建个web端,管理表,进行插入数据。
进行增删改查,密码通过
new BCryptPasswordEncoder().encode("123456")  进行加密


客户端进行使用时候: 携带 accessToken