Linux企业实战之容器(十二)——Kubernetes(7)
Kubernetes存储
1 ConfigMap的配置管理
-
Configmap用于保存配置数据,以键值对形式存储。
-
configMap 资源提供了向 Pod 注入配置数据的方法。
-
旨在让镜像和配置文件解耦,以便实现镜像的可移植性和可复用性。
-
典型的使用场景:
-
填充环境变量的值
-
设置容器内的命令行参数
-
填充卷的配置文件
-
(1) 创建ConfigMap的方式
-
四种创建方式:
-
使用字面值创建
-
使用文件创建
-
使用目录创建
-
编写configmap的yaml文件创建
-
-
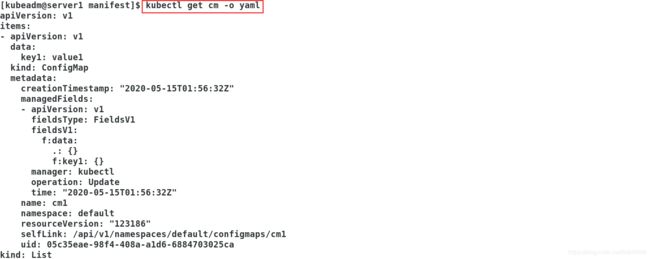
使用字面值创建
kubectl create configmap cm1 --from-literal=key1=value1      #创建一个名为cm1的configmap
kubectl get cm                                               #查看configmap中的资源
kubectl describe cm cm1                                      #查看cm1的具体信息
kubectl get cm -o yaml                                       #查看我们创建cm1后生成的yaml文件内容

-
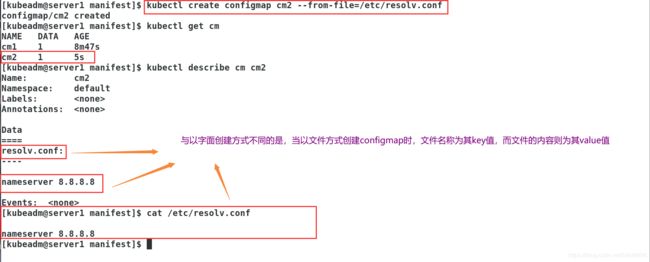
使用文件来创建
kubectl create configmap cm2 --from-file=/etc/resolv.conf   #创建一个名为cm2的configmap,是以文件的方式来创建的
kubectl get cm
kubectl describe cm cm2

cat /etc/resolv.conf
-
使用目录创建
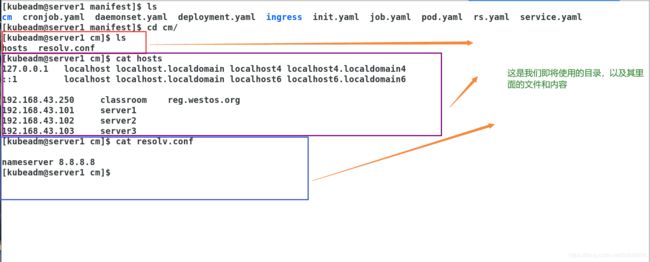
kubectl create configmap cm3 --from-file=cm          #以目录的方式创建一个configmap
kubectl get cm
kubectl describe cm cm3                              #查看新创建的cm3这个configmap的详细信息


-
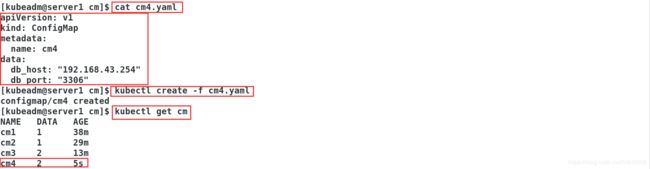
编写configmap的yaml文件创建
vim cm4.yaml
apiVersion: v1
kind: ConfigMap
metadata:
name: cm4
data:
db_host: "192.168.43.254"
db_port: "3306"
kubectl create -f cm4.yaml #通过yaml文件的方式来创建一个configmap
kubectl get cm
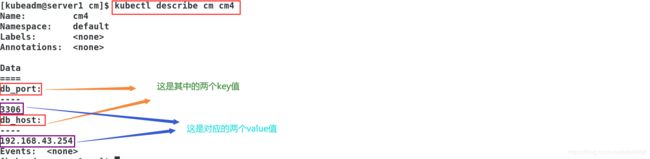
kubectl describe cm cm4
(2)如何使用configmap
-
通过环境变量的方式直接传递给pod
- 使用configmap设置环境变量
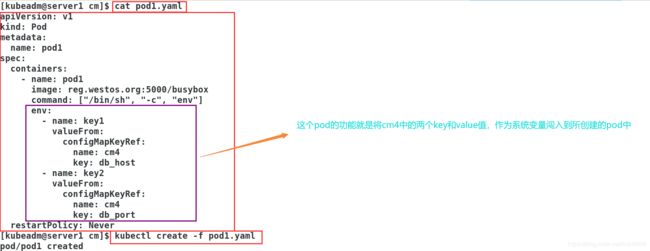
方式一:在yaml文件中直接定义好key
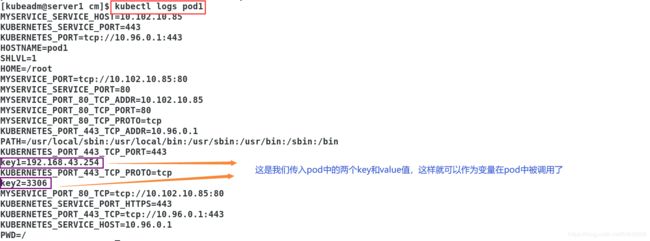
步骤一:编写yaml文件,创建一个pod
vim pod1.yaml

apiVersion: v1
kind: Pod
metadata:
  name: pod1
spec:
  containers:
    - name: pod1
      image: reg.westos.org:5000/busybox
      command: ["/bin/sh", "-c", "env"]
      env:
        - name: key1						#在这里我们定义好了第一个key值为key1
          valueFrom:
            configMapKeyRef:
              name: cm4
              key: db_host
        - name: key2						#在这里我们定义好了第二个key值为key2
          valueFrom:
            configMapKeyRef:
              name: cm4
              key: db_port
  restartPolicy: Never

kubectl create -f pod1.yaml
kubectl get pod

步骤二:查看变量是否传入pod中
kubectl logs pod1
方式二:在yaml文件中不定义key值,而是直接从创建好的cm中来获取
步骤一:编写yaml文件,创建pod
vim pod2.yaml

apiVersion: v1
kind: Pod
metadata:
  name: pod2
spec:
  containers:
    - name: pod2
      image: reg.westos.org:5000/busybox
      command: ["/bin/sh", "-c", "env"]
      envFrom:
        - configMapRef:
            name: cm4
  restartPolicy: Never

kubectl create -f pod2.yaml
kubectl get pod
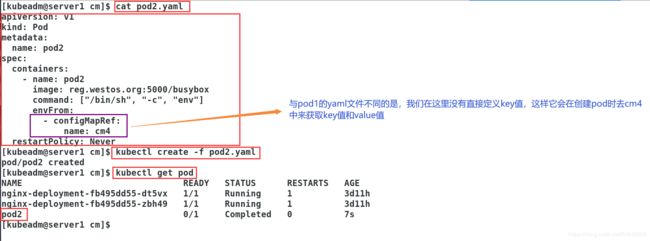
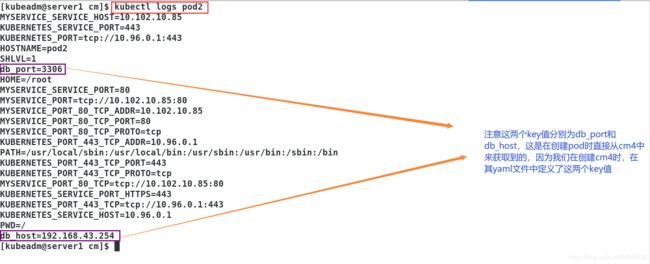
步骤二:查看变量是否传入pod中
kubectl logs pod2

-
通过在pod的命令行下运行的方式
- 使用conigmap设置命令行参数
步骤一:编写yaml文件,创建pod
vim pod3.yaml

apiVersion: v1
kind: Pod
metadata:
  name: pod3
spec:
  containers:
    - name: pod3
      image: reg.westos.org:5000/busybox
      command: ["/bin/sh", "-c", "echo $(db_host) $(db_port)"]
      envFrom:
        - configMapRef:
            name: cm4
  restartPolicy: Never

kubectl create -f pod3.yaml
kubectl get pod
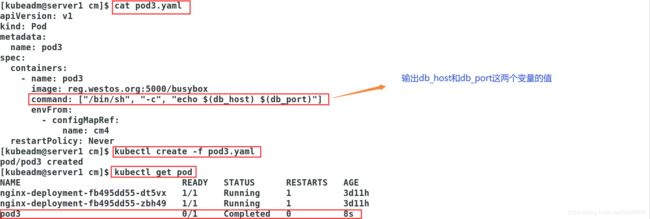
步骤二:查看输出的变量值
kubectl logs pod3
![]()
-
作为volume的方式挂载到pod内
- 通过数据卷使用configmap
步骤一:编辑yaml文件,创建pod
vim pod4.yaml

apiVersion: v1
kind: Pod
metadata:
  name: pod4
spec:
  containers:
    - name: pod4
      image: reg.westos.org:5000/myapp:v1
      volumeMounts:
      - name: config-volume
        mountPath: /config
  volumes:
    - name: config-volume
      configMap:
        name: cm4

kubectl create -f pod4.yaml
kubectl get pod
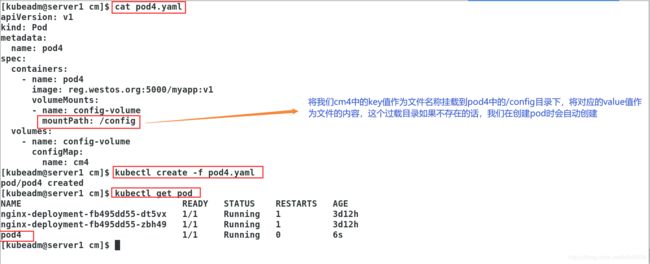
步骤二:查看容器中的挂载目录以及相应的文件
kubectl exec -it pod4 -- sh

- ConfigMap的热更新
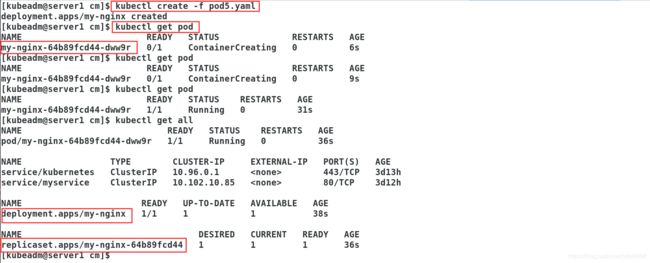
步骤一:编辑yaml文件,创建pod
vim pod5.yaml

apiVersion: apps/v1
kind: Deployment
metadata:
  name: my-nginx
spec:
  replicas: 1
  selector:
    matchLabels:
      app: nginx
  template:
    metadata:
      labels:
        app: nginx
    spec:
      containers:
        - name: nginx
          image: reg.westos.org:5000/nginx
          ports:
          - containerPort: 80
          volumeMounts:
          - name: config-volume
            mountPath: /config
      volumes:
        - name: config-volume
          configMap:
            name: cm4

kubectl creat -f pod5.yaml
kubectl get pod
kubectl get all
步骤二:查看容器中的挂载目录以及相应的文件
kubectl exec -it my-nginx-64b89fcd44-dww9r -- bash
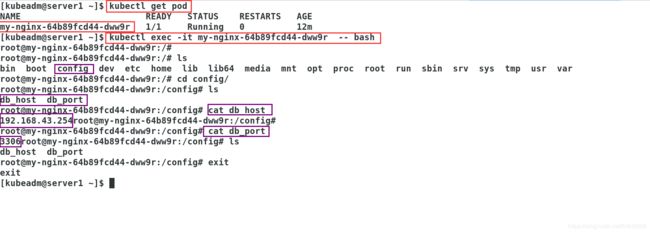
步骤三:修改cm4中value的值,删除pod,然后自动创建pod来更新信息
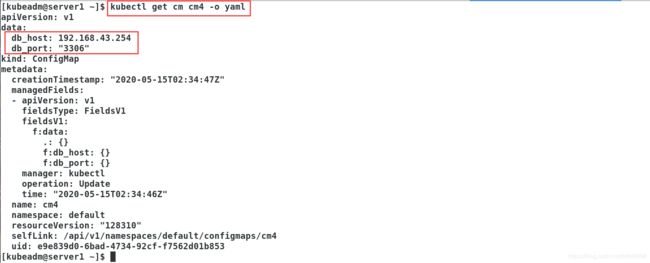
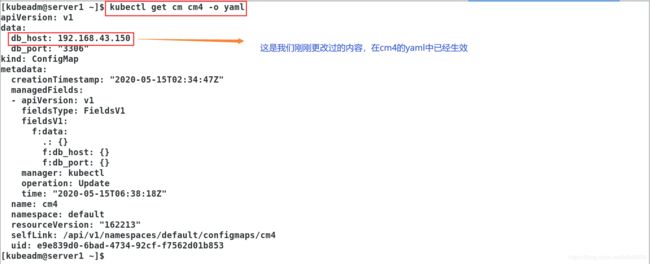
kubectl get cm cm4 -o yaml      #查看当前cm4中的内容
kubectl edit cm cm4             #修改cm4中的内容
kubectl get cm cm4 -o yaml      #查看修改后的cm4的内容
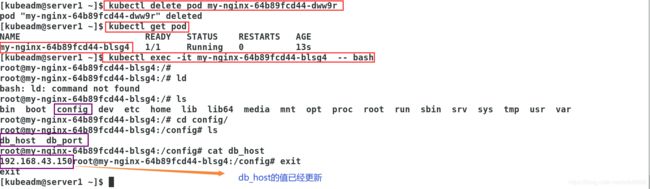
kubectl exec -it my-nginx-64b89fcd44-dww9r -- bash #在pod中来查看修改的内容是否生效

kubectl delete pod my-nginx-64b89fcd44-dww9r            #删除pod,然后会自动创建一个新pod
kubectl get pod
kubectl exec -it my-nginx-64b89fcd44-blsg4  -- bash    #在新生成的pod中来查看修改的内容是否生效
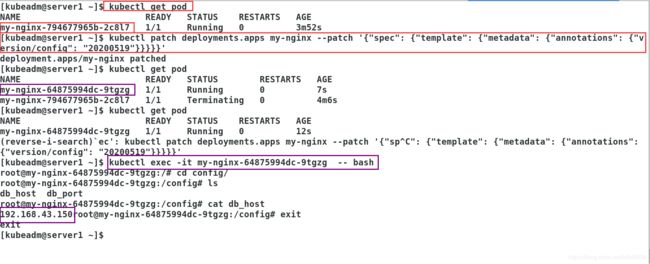
步骤四:上面步骤三中删除pod,自动重建,这样可以触发pod的滚动更新,这是其中一种方法,还有另外一种方法就是修改“version/config”来触发Pod滚动更新
kubectl patch deployments.apps my-nginx --patch '{"spec": {"template": {"metadata": {"annotations": {"version/config": "20200518"}}}}}'

kubectl get pod
kubectl exec -it my-nginx-64875994dc-9tgzg  -- bash
实例一:将nginx的主配置文件挂载到pod中的指定目录下
步骤一:编辑yaml文件创建pod,编辑nginx配置文件,以此文件来新创建一个configmap
vim pod.yaml
apiVersion: apps/v1
kind: Deployment
metadata:
name: my-nginx
spec:
replicas: 1
selector:
matchLabels:
app: nginx
template:
metadata:
labels:
app: nginx
spec:
containers:
- name: nginx
image: reg.westos.org:5000/nginx
volumeMounts:
- name: config-volume
mountPath: /etc/nginx/conf.d
volumes:
- name: config-volume
configMap:
name: nginxconf
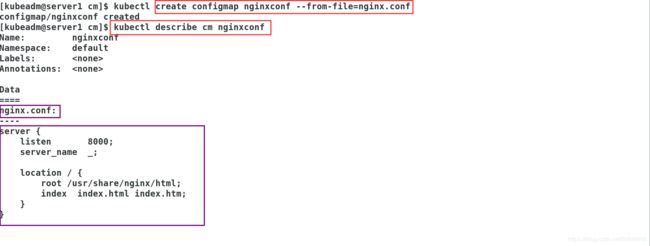
vim nginx.conf
server {
listen 8000;
server_name _;
location / {
root /usr/share/nginx/html;
index index.html index.htm;
}
}
kubectl create configmap nginxconf --from-file=nginx.conf
kubectl describe cm nginxconf
kubectl create -f pod.yaml
kubectl get pod

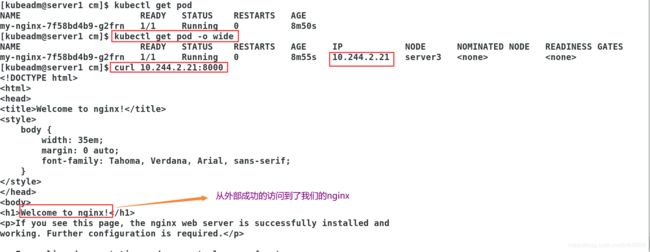
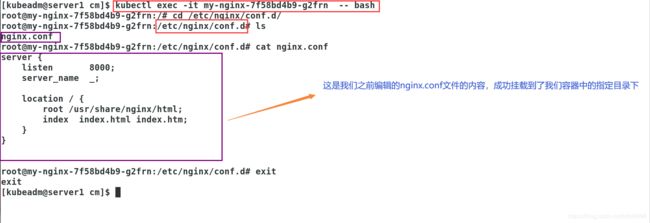
步骤二:从外部直接进行访问,然后进入到创建的pod中,查看创建的nginx.conf文件对否挂载到我们指定的目录下
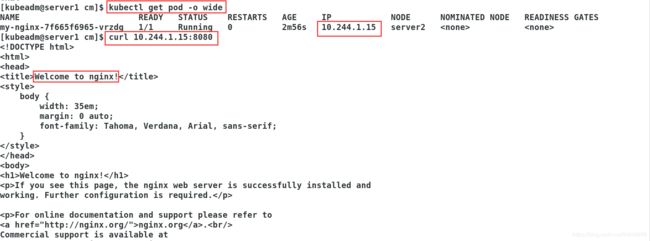
kubectl get pod -o wide
curl 10.244.2.21:8000
kubectl exec -it my-nginx-7f58bd4b9-g2frn  -- bash
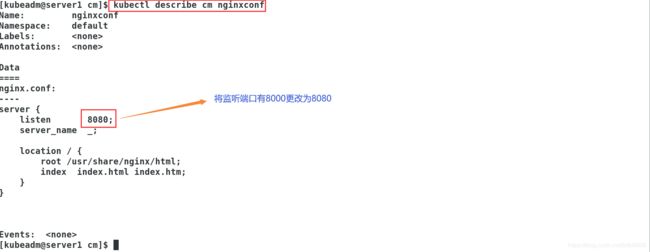
步骤三:修改nginxconf中的端口信息,然后进行手动的版本更新,让pod的进行滚动更新,然后进行测试
kubectl edit cm nginxconf                                 #修改端口信息
kubectl describe cm nginxconf
kubectl patch deployments.apps my-nginx --patch '{"spec": {"template": {"metadata": {"annotations": {"version/config": "20200518"}}}}}'          #做滚动更新
kubectl get pod
kubectl exec -it my-nginx-7f665f6965-vrzdg  -- bash
curl 10.244.1.15:8080


2 Secret配置管理
-
Secret 对象类型用来保存敏感信息,例如密码、OAuth 令牌和 ssh key。
-
敏感信息放在 secret 中比放在 Pod 的定义或者容器镜像中来说更加安全和灵活。
-
Pod 可以用两种方式使用 secret:
-
作为 volume 中的文件被挂载到 pod 中的一个或者多个容器里。
-
当 kubelet 为 pod 拉取镜像时使用。
-
-
Secret的类型:
-
Service Account:Kubernetes 自动创建包含访问 API 凭据的 secret,并自动修改 pod 以使用此类型的 secret。
-
Opaque:使用base64编码存储信息,可以通过base64 --decode解码获得原始数据,因此安全性弱。
-
kubernetes.io/dockerconfigjson:用于存储docker registry的认证信息。
-
(1)Service Account
kubectl test --images=reg.westos.org:5000/busybox
kubectl get pod
kubectl describe pod test
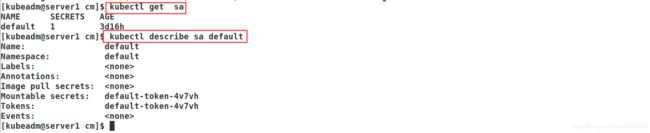
kubectl get sa
kubectl describe sa default


kubectl delete pod test
kubectl run -it test --images=reg.westos.org:5000/busybox
cd /var/run/secrets/kubernetes.io/serviceaccount
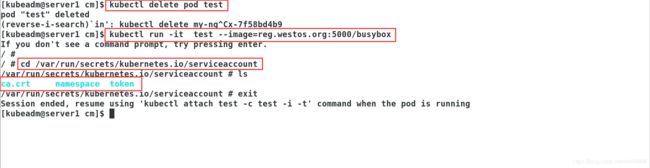
注意:ServiceAccount里有一个名为Tokens的可以作为Volume一样被Mount到Pod里的Secret,当Pod启动时这个Secret会被自动Mount到Pod的指定目录下,用来协助完成Pod中的进程访问API Server时的身份鉴权过程。
kubectl get secret

(2) Opaque
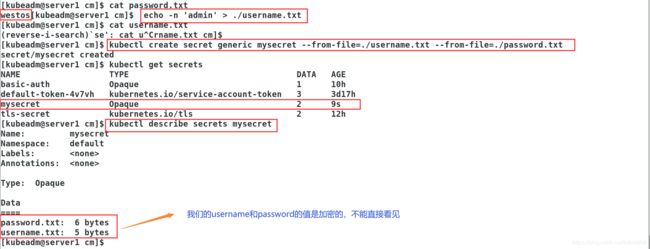
从文件中创建secret,与我们之前从文件创建configmap类似
echo -n 'admin' > ./username.txt
echo -n 'westos' > ./password.txt
kubectl create secret generic mysecret --from-file=./username.txt --from-file=./password.txt  #以文件的方式创建secret
kubectl get secret
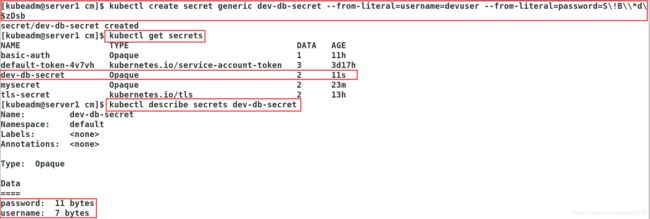
如果密码具有特殊字符,则需要使用 \ 字符对其进行转义
kubectl create secret generic dev-db-secret --from-literal=username=devuser --from-literal=password=S\!B\\*d\$zDsb
kubectl get secrets
kubectl describe secrets
kubectl get secrets dev-db-secret -o yaml
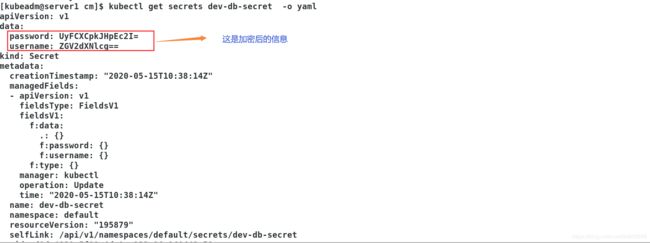
echo UyFCXCpkJHpEc2I= |base64 -d
echo ZGV2dXNlcg== |base64 -d                       #解密
![]()
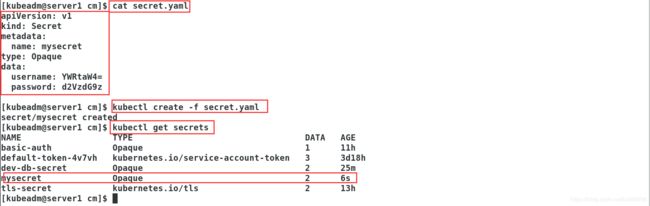
- 编写一个secret对象(也就是编写yaml文件)
vim  secret.yaml

apiVersion: v1
kind: Secret
metadata:
  name: mysecret
type: Opaque
data:
  username: YWRtaW4=
  password: d2VzdG9z

kubectl create -f secret.yaml
kubectl get secrets
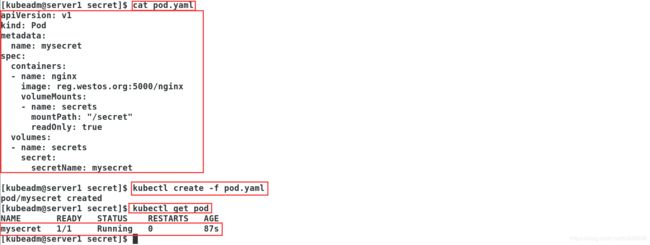
- 将Secret挂载到Volume中
vim pod.yaml

apiVersion: v1
kind: Pod
metadata:
  name: mysecret
spec:
  containers:
  - name: nginx
    image: reg.westos.org:5000/nginx
    volumeMounts:
    - name: secrets
      mountPath: "/secret"
      readOnly: true
  volumes:
  - name: secrets
    secret:
      secretName: mysecret

kubectl create -f pod.yaml
kubectl get pod
kubectl exec mysecret -it -- bash

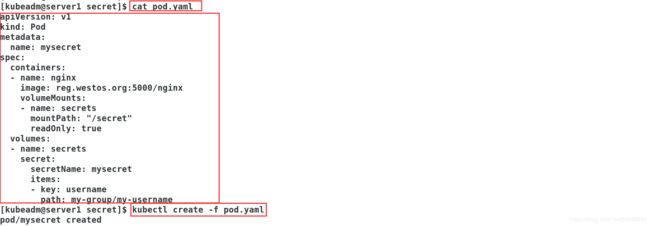
- 向指定路径映射 secret 密钥
vim pod.yaml

apiVersion: v1
kind: Pod
metadata:
  name: mysecret
spec:
  containers:
  - name: nginx
    image: reg.westos.org:5000/nginx
    volumeMounts:
    - name: secrets
      mountPath: "/secret"
      readOnly: true
  volumes:
  - name: secrets
    secret:
      secretName: mysecret
      items:
      - key: username
        path: my-group/my-username			#这里是相对路径,绝对路径是/secretmy-group/my-username

kubectl create -f pod.yaml
kubectl get pod
kubectl exec mysecret -it -- bash

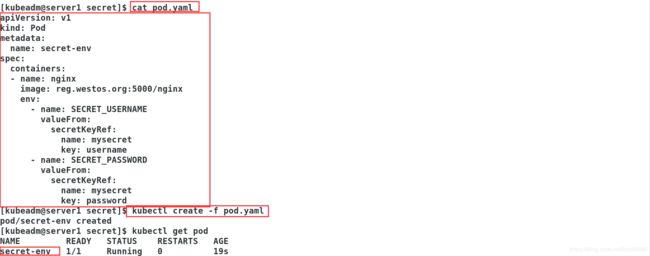
- 将Secret设置为环境变量
vim pod.yaml

apiVersion: v1
kind: Pod
metadata:
  name: secret-env
spec:
  containers:
  - name: nginx
    image: reg.westos.org:5000/nginx
    env:
      - name: SECRET_USERNAME
        valueFrom:
          secretKeyRef:
            name: mysecret
            key: username
      - name: SECRET_PASSWORD
        valueFrom:
          secretKeyRef:
            name: mysecret
            key: password

kubectl create -f pod.yaml
kubectl get pod
kubectl exec secret-env -it -- bash

(3)Volumes配置管理
- 容器中的文件在磁盘上是临时存放的,这给容器中运行的特殊应用程序带来一些问题。首先,当容器崩溃时,kubelet 将重新启动容器,容器中的文件将会丢失,因为容器会以干净的状态重建。其次,当在一个 Pod 中同时运行多个容器时,常常需要在这些容器之间共享文件。 Kubernetes 抽象出 Volume 对象来解决这两个问题。
- Kubernetes 卷具有明确的生命周期,与包裹它的 Pod 相同。 因此,卷比 Pod 中运行的任何容器的存活期都长,在容器重新启动时数据也会得到保留。 当然,当一个 Pod 不再存在时,卷也将不再存在。也许更重要的是,Kubernetes 可以支持许多类型的卷,Pod 也能同时使用任意数量的卷。
- 卷不能挂载到其他卷,也不能与其他卷有硬链接。 Pod 中的每个容器必须独立地指定每个卷的挂载位置。
-
Kubernetes 支持下列类型的卷:
- awsElasticBlockStore 、azureDisk、azureFile、cephfs、cinder、configMap、csi
- downwardAPI、emptyDir、fc (fibre channel)、flexVolume、flocker
- gcePersistentDisk、gitRepo (deprecated)、glusterfs、hostPath、iscsi、local
- nfs、persistentVolumeClaim、projected、portworxVolume、quobyte、rbd
- scaleIO、secret、storageos、vsphereVolume
emptyDir卷
-
当 Pod 指定到某个节点上时,首先创建的是一个 emptyDir 卷,并且只要 Pod 在该节点上运行,卷就一直存在。 就像它的名称表示的那样,卷最初是空的。 尽管 Pod 中的容器挂载 emptyDir 卷的路径可能相同也可能不同,但是这些容器都可以读写 emptyDir 卷中相同的文件。 当 Pod 因为某些原因被从节点上删除时,emptyDir 卷中的数据也会永久删除。
-
emptyDir 的使用场景:
- 缓存空间,例如基于磁盘的归并排序。
- 为耗时较长的计算任务提供检查点,以便任务能方便地从崩溃前状态恢复执行。
- 在 Web 服务器容器服务数据时,保存内容管理器容器获取的文件。
-
默认情况下, emptyDir 卷存储在支持该节点所使用的介质上;这里的介质可以是磁盘或 SSD 或网络存储,这取决于您的环境。 但是,您可以将 emptyDir.medium 字段设置为 “Memory”,以告诉 Kubernetes 为您安装 tmpfs(基于内存的文件系统)。虽然 tmpfs 速度非常快,但是要注意它与磁盘不同。 tmpfs 在节点重启时会被清除,并且您所写入的所有文件都会计入容器的内存消耗,受容器内存限制约束。
-
emptydir缺点:
- 不能及时禁止用户使用内存。虽然过1-2分钟kubelet会将Pod挤出,但是这个时间内,其实对node还是有风险的;
- 影响kubernetes调度,因为empty dir并不涉及node的resources,这样会造成Pod“偷偷”使用了node的内存,但是调度器并不知晓;
-
用户不能及时感知到内存不可用
-
创建一个emptyDir卷
vim pod,yaml

apiVersion: v1
kind: Pod
metadata:
  name: vol1
spec:
  containers:
  - image: reg.westos.org:5000/busyboxplus
    name: vm1
    command: ["sleep", "300"]
    volumeMounts:
    - mountPath: /cache
      name: cache-volume
  - name: vm2
    image: reg.westos.org:5000/nginx
    volumeMounts:
    - mountPath: /usr/share/nginx/html
      name: cache-volume
  volumes:
  - name: cache-volume
    emptyDir:
      medium: Memory
      sizeLimit: 100Mi				#限制读取内存的大小

kubectl create -f pod.yaml
kubectl get pod
kubectl describe pod vol1
kubectl exec vol1 -it -- sh
kubectl get pod -o wide
curl 10.244.2.27

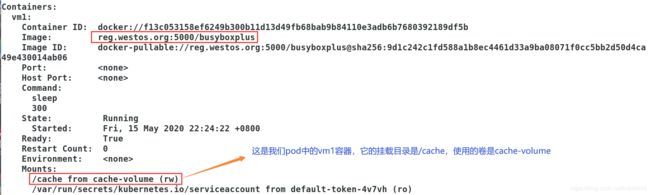
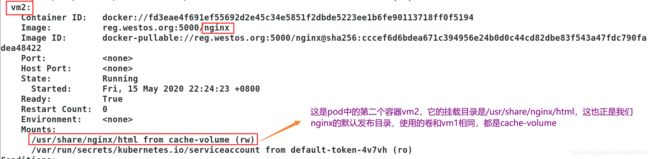
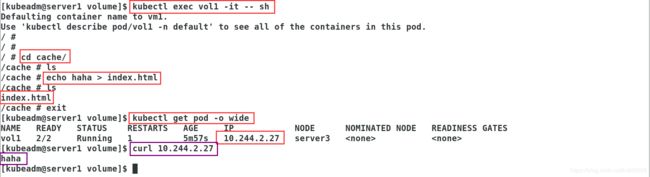
注意:由于我们的两个容器使用的是同一个卷,所以当我们在第一个容器的挂载目录中写入文件,在第二个容器的挂载目录中是可以看到的,又因为我们第二个容器使用的镜像是nginx,挂载目录正好是nginx的默认发布目录,所以当我们访问pod时,就可以看到刚刚在第一个容器的挂载目录中写入的内容了(因为nginx能够作为服务,busyboxplus只是一个环境)。
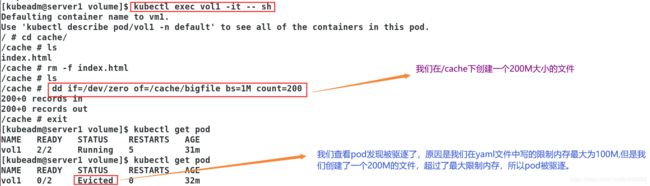
可以看到文件超过sizeLimit,则一段时间后(1-2分钟)会被kubelet evict掉。之所以不是“立即”被evict,是因为kubelet是定期进行检查的,这里会有一个时间差。
hostPath卷
-
hostPath 卷能将主机节点文件系统上的文件或目录挂载到您的 Pod 中。 虽然这不是大多数 Pod 需要的,但是它为一些应用程序提供了强大的逃生舱。
-
hostPath 的一些用法有:
- 运行一个需要访问 Docker 引擎内部机制的容器,挂载 /var/lib/docker 路径。
- 在容器中运行 cAdvisor 时,以 hostPath 方式挂载 /sys。
- 允许 Pod 指定给定的 hostPath 在运行 Pod 之前是否应该存在,是否应该创建以及应该以什么方式存在。
-
除了必需的 path 属性之外,用户可以选择性地为 hostPath 卷指定 type。
-
hostPath的各种type

-
一点注意事项(当使用这种类型的卷时要小心):
- 具有相同配置(例如从 podTemplate 创建)的多个 Pod 会由于节点上文件的不同而在不同节点上有不同的行为。
- 当 Kubernetes 按照计划添加资源感知的调度时,这类调度机制将无法考虑由 hostPath 使用的资源。
- 基础主机上创建的文件或目录只能由 root 用户写入。您需要在 特权容器 中以 root 身份运行进程,或者修改主机上的文件权限以便容器能够写入 hostPath 卷。
-
创建一个hostPath卷
vim pod.yaml
apiVersion: v1
kind: Pod
metadata:
name: test-pd
spec:
containers:
- image: reg.westos.org:5000/nginx
name: test-container
volumeMounts:
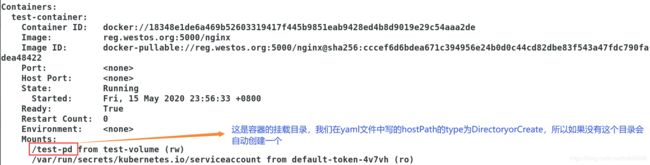
- mountPath: /test-pd
name: test-volume
volumes:
- name: test-volume
hostPath:
path: /data
type: DirectoryOrCreate
kubectl create -f pod.yaml
kubectl get pod -o wide
kubectl describe pod test-pd
kubectl exec -it test-pd -- bash


![]()


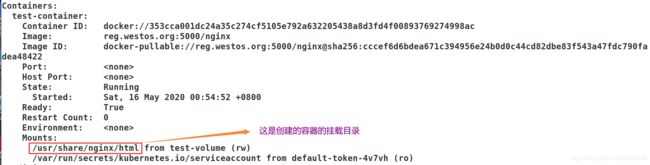
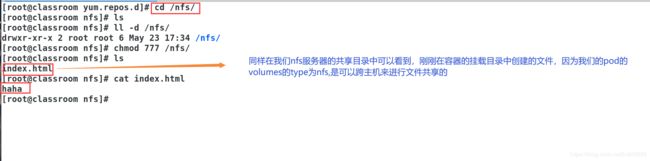
nfs卷
-
nfs 卷能将 NFS (网络文件系统) 挂载到创建的 Pod 中。 不像 emptyDir 那样会在删除 Pod 的同时也会被删除,nfs 卷的内容在删除 Pod 时会被保存,卷只是被卸载掉了。 这意味着 nfs 卷可以被预先填充数据,并且这些数据可以在 Pod 之间"传递”。
-
创建一个nfs卷
vim pod.yaml

apiVersion: v1
kind: Pod
metadata:
  name: test-pd
spec:
  containers:
  - image: reg.westos.org:5000/nginx
    name: test-container
    volumeMounts:
    - mountPath: /usr/share/nginx/html
      name: test-volume
  volumes:
  - name: test-volume
    nfs:
      server: 192.168.43.250
      path: /nfs
kubectl create -f pod.yaml
kubectl get pod -o wide
kubectl describe pod test-pd