我的个人站点搭建 在Idea 中用Spring + SpringMVC + Hibernate 实现 “hello world”
一、创建项目
打开idea 点击file选择new——>project
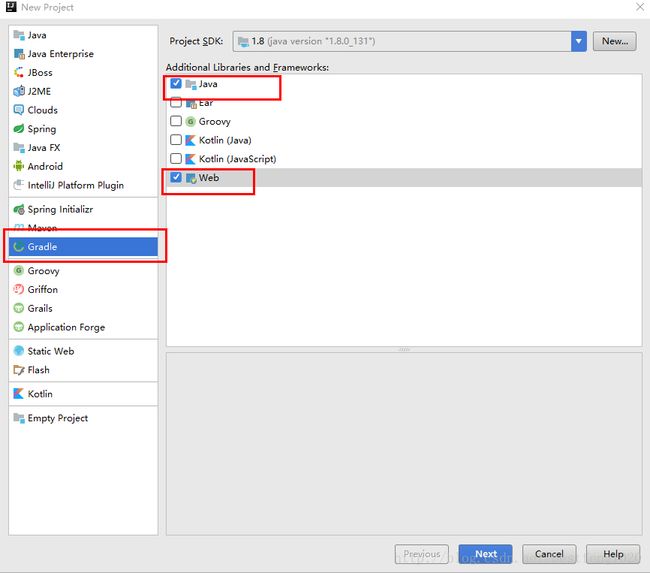
选择gradle下面的java和web生成javaweb项目点击next出现如下界面
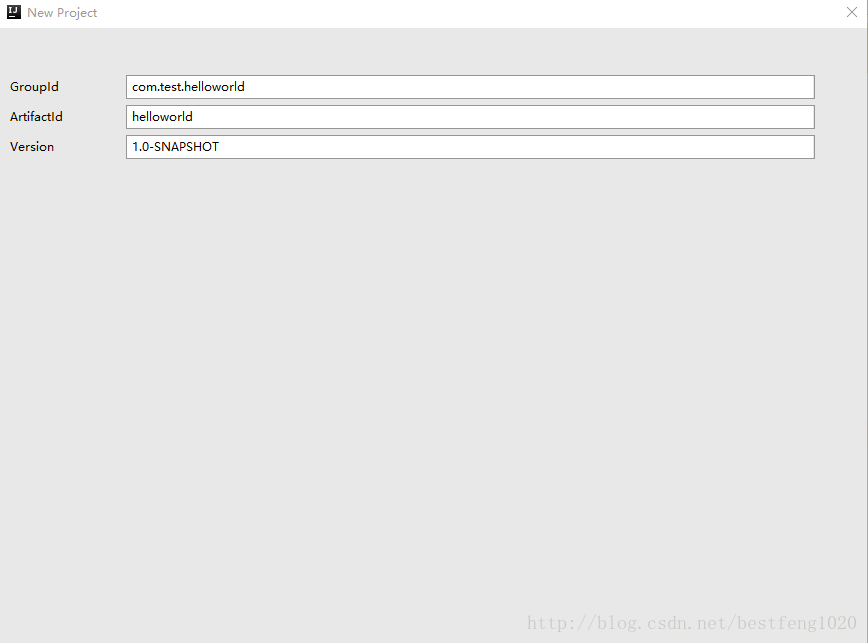
groupid 和artifactid分别填写上项目结构和项目唯标识。下一步选择gradle和创建项目需要的配置

复选框全部勾选上。单选框选择use local gradle distribution,然后选择自己安装的gradle路径和jdk
4.创建完成的项目结构如下
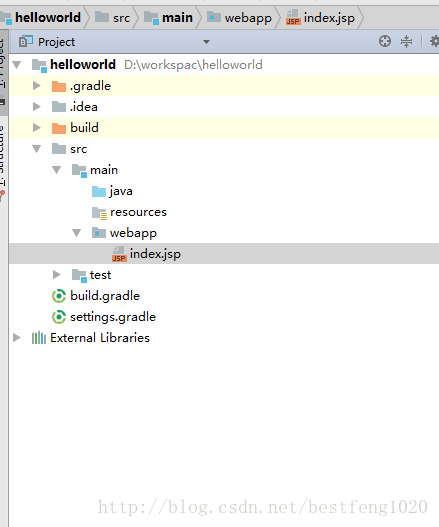
5.创建好的项目还差web.xml和一些文件夹,我们给他创建好
二、运行项目
配置Tomcat容器
1.打开菜单Run -> 选择Edit Configuration
2.点击“+”号 -> 选择“Tomcat Server” -> 选择“Local”出现以下界面

3.选择deployment ——> 右下角 ——>fix图标——>选择结尾带有exploded的项目
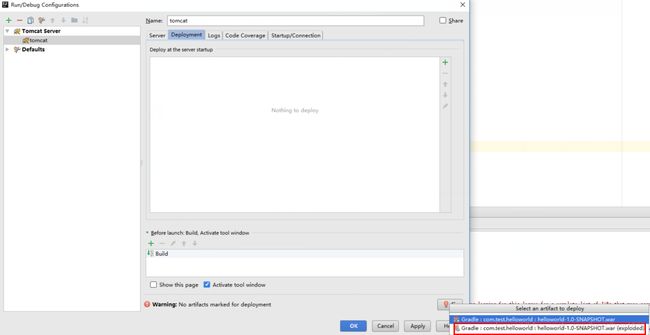
4.完成以后出现的如下界面
5.点击运行,然后访问http://localhost:8080/ 就可以看到浏览器上面出现了hello world。初步的就成功了。
三、加入springMvc
不管是加入什么框架或者引入什么依赖,jar包是少不了的。我们用gradle管理jar包以后不用去各种下载然后加入进来。但是也需要相应的告诉gradle让它知道我们需要些什么。
gradle maven 常用的jar依赖配置可以到这个网站上面去找
http://www.mvnrepository.com/artifact/org.springframework.boot
- build.gradle 配置文件中加入springmvc需要的依赖
group 'com.test.helloworld'
version '1.0-SNAPSHOT'

apply plugin: 'java'
apply plugin: 'war'

sourceCompatibility = 1.8

repositories {
    mavenCentral()
}

dependencies {
    testCompile group: 'junit', name: 'junit', version: '4.11'
    testCompile group: 'junit', name: 'junit', version: '4.12'

    compile group: 'org.springframework', name: 'spring-web', version: '4.3.7.RELEASE'
    compile group: 'org.springframework', name: 'spring-context', version: '4.3.7.RELEASE'
    compile group: 'org.springframework', name: 'spring-core', version: '4.3.7.RELEASE'
    compile group: 'org.springframework', name: 'spring-beans', version: '4.3.7.RELEASE'
    compile group: 'org.springframework', name: 'spring-webmvc', version: '4.3.7.RELEASE'
    compile group: 'org.springframework', name: 'spring-context-support', version: '4.3.7.RELEASE'
    compile group: 'org.glassfish.web', name: 'javax.servlet.jsp.jstl', version: '1.2.4'

}
2.springmvc在web.xml中有一个核心的servlet。配置web.xml如下
"1.0" encoding="UTF-8"?>
"http://xmlns.jcp.org/xml/ns/javaee"
         xmlns:xsi="http://www.w3.org/2001/XMLSchema-instance"
         xsi:schemaLocation="http://xmlns.jcp.org/xml/ns/javaee http://xmlns.jcp.org/xml/ns/javaee/web-app_3_1.xsd"
         version="3.1">


        spring
        org.springframework.web.servlet.DispatcherServlet
        1


        spring
        /
注意:此时如果web.xml的位置在modules中不正确会导致无法配置web.xml
如果出现servlet should hava a mapping…这样的错误
解决方法:点击file——>project structure——>modules 点击“+”号将path的位置设置为自己web.xml的位置就可以了

3.springMvc 配置文件 spring-servlet.xml
<beans xmlns="http://www.springframework.org/schema/beans"
       xmlns:xsi="http://www.w3.org/2001/XMLSchema-instance"
       xmlns:context="http://www.springframework.org/schema/context"
       xmlns:mvc="http://www.springframework.org/schema/mvc"
       xsi:schemaLocation="http://www.springframework.org/schema/beans
       http://www.springframework.org/schema/beans/spring-beans-3.1.xsd
       http://www.springframework.org/schema/context
       http://www.springframework.org/schema/context/spring-context-3.1.xsd
       http://www.springframework.org/schema/mvc
       http://www.springframework.org/schema/mvc/spring-mvc-3.1.xsd">

    <mvc:annotation-driven/>

    <context:component-scan base-package="com.test.helloworld.controller"/>

    <bean class="org.springframework.web.servlet.view.InternalResourceViewResolver">
         <property name="viewClass" value="org.springframework.web.servlet.view.JstlView"/>
         <property name="prefix" value="/"/>
         <property name="suffix" value=".jsp"/>
    bean>

    <bean id="multipartResolver" class="org.springframework.web.multipart.commons.CommonsMultipartResolver">
        <property name="defaultEncoding" value="UTF-8"/>
        <property name="maxUploadSize" value="2000000"/>
    bean>


    <mvc:resources mapping="/static/**" location="/static"/>

    <mvc:default-servlet-handler />
beans>注意: 对于这个SpringMvc的核心配置有一些要求,不然运行会抛出相关io异常。
1.SpringMVC 的配置分为两部分 application.xml 和 spring-servlet.xml
2.两个配置文件的作用和配置位置
2.1.application.xml :对应的是系统级别的配置,作用范围是系统上下文。
2.2.spring-servlet.xml:对应的是 controller 级别的配置,作用范围是控制层上下文。
3.它们在web.xml 中的配置
3.1.因为 application.xml 是系统级别的上下文,所以它的初始化需要放到 web.xml 中的标签中,同时其他的类似定时任务的配置文件等等都是放在这个标签下进行初始化的。
3.2.因为spring-servlet.xml只是 controller 级别的上下文,说白了就是 servlet 级别的初始化,它不涉及到除了转发之外的任何实体,所以它的作用范围仅仅限制在 servlet 级别,所以它的初始化应该是跟spring 的 DispatcherServlet 初始化在一起,所以就是在 表情中初始化的。它有一个默认值就是【/WEB-INF/remoting-servlet.xml 】,注意配置文件的对应的名称是【 servlet-name】-servlet.xml,所以如果你没有给servlet 制定配置文件的位置,并且在默认位置下也没有配置文件,那么系统启动的时候就会报错。
4.对于 servlet配置文件里面应该初始化的东西,除了视图的解析方式、静态资源文件的存放位置、controller的初始化方式之外,其他的都不应该放在 servlet 配置文件中,应为它只负责 请求的转发,返回结果的解析以及静态资源文件的解析,其他的对象的初始化,定时任务…都不应该放到这个配置文件下进行管理。
web.xml 中spring-servlet.xml 和 application.xml 配置位置及含义
4.在controller包下面定义一个HelloWorldController 内容如下
package com.test.helloworld.controller;

import org.springframework.stereotype.Controller;
import org.springframework.web.bind.annotation.RequestMapping;

/**
 * Created by admin on 2017/6/26.
 */
@Controller
public class HelloWorldController {

    @RequestMapping("/index")
    public String helloWorld(){
        System.out.println("测试成功!");
        return "/index";
    }
}
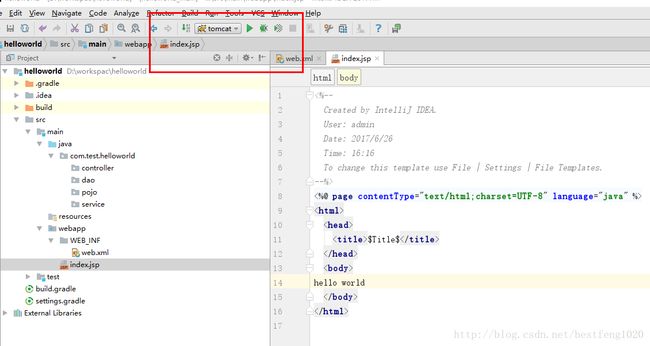
5.访问 http://localhost:8080/index 出现index.jsp页面的内容hello world
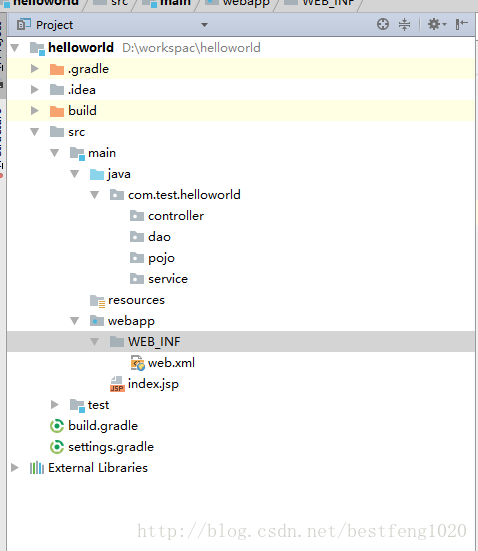
目前的目录结构
四、加入Spring与SpringMvc结合
- 再次配置web.xml
Spring要在程序调用某个对象的时候,就要首先把这个对象的实例注入进去。Spring自己对实例、程序运行的管理构成了Spring自己的容器,第一步就是要在web.xml中注册初始化这个容器。在此之前我们先在/resources文件夹下,创建子路径Spring,然后在这个文件夹下,创建我们后面要用到的applicationContext.xml文件,如果用过spring框架的人对这个文件都不会陌生,这是spring的配置文件。web.xml文件如下:
<web-app xmlns="http://xmlns.jcp.org/xml/ns/javaee"
         xmlns:xsi="http://www.w3.org/2001/XMLSchema-instance"
         xsi:schemaLocation="http://xmlns.jcp.org/xml/ns/javaee http://xmlns.jcp.org/xml/ns/javaee/web-app_3_1.xsd"
         version="3.1">
    <servlet>
        <servlet-name>springmvcservlet-name>
        <servlet-class>org.springframework.web.servlet.DispatcherServletservlet-class>
        <load-on-startup>1load-on-startup>
    servlet>

    <servlet-mapping>
        <servlet-name>springmvcservlet-name>
        <url-pattern>/url-pattern>
    servlet-mapping>


    <context-param>
        <param-name>contextConfigLocationparam-name>
        <param-value>classpath:spring/applicationContext.xml,
        param-value>
    context-param>

    <listener>
        <listener-class>org.springframework.web.context.ContextLoaderListenerlistener-class>
    listener>
web-app>
在spring4之后,spring配置的bean不是在xml文件中配置了,而是采用固定扫描annotation的类,根据对象的类型或者名字自动加载,但此前提是我们仍然要在配置文件中配置好这些类所在包的路径。
applicationContext.xml 配置
<beans xmlns="http://www.springframework.org/schema/beans"
       xmlns:xsi="http://www.w3.org/2001/XMLSchema-instance"
       xmlns:aop="http://www.springframework.org/schema/aop"
       xmlns:context="http://www.springframework.org/schema/context"
       xmlns:jee="http://www.springframework.org/schema/jee"
       xmlns:p="http://www.springframework.org/schema/p"
       xsi:schemaLocation="http://www.springframework.org/schema/beans http://www.springframework.org/schema/beans/spring-beans-3.0.xsd
        http://www.springframework.org/schema/context http://www.springframework.org/schema/context/spring-context-3.0.xsd
        http://www.springframework.org/schema/jee http://www.springframework.org/schema/jee/spring-jee-3.0.xsd">


    <context:component-scan base-package="com.test.helloworld.service"/>
beans>
2.再次加入依赖,文件上传需要的依赖 commons-fileupload。虽然这里我们没有用到
build.gradle 配置
group 'com.test.helloworld'
version '1.0-SNAPSHOT'

apply plugin: 'java'
apply plugin: 'war'

sourceCompatibility = 1.8

repositories {
    mavenCentral()
}

dependencies {
    testCompile group: 'junit', name: 'junit', version: '4.11'
    testCompile group: 'junit', name: 'junit', version: '4.12'

    compile group: 'org.springframework', name: 'spring-web', version: '4.3.7.RELEASE'
    compile group: 'org.springframework', name: 'spring-context', version: '4.3.7.RELEASE'
    compile group: 'org.springframework', name: 'spring-core', version: '4.3.7.RELEASE'
    compile group: 'org.springframework', name: 'spring-beans', version: '4.3.7.RELEASE'
    compile group: 'org.springframework', name: 'spring-webmvc', version: '4.3.7.RELEASE'
    compile group: 'org.springframework', name: 'spring-context-support', version: '4.3.7.RELEASE'
    compile group: 'org.glassfish.web', name: 'javax.servlet.jsp.jstl', version: '1.2.4'

    compile group: 'commons-fileupload', name: 'commons-fileupload', version: '1.3.1'


}
3.配置service类
UserService 接口
package com.test.helloworld.service;

import java.util.Map;

/**
 * Created by admin on 2017/6/27.
 */
public interface UserService {

    Map getUser();
}
UserServiceImpl 实现类
package com.test.helloworld.service.impl;

import com.test.helloworld.service.UserService;
import org.springframework.stereotype.Service;


import java.util.HashMap;
import java.util.Map;

/**
 * Created by admin on 2017/6/27.
 */
@Service
public class UserServiceImpl implements UserService {
    @Override
    public Map getUser() {
        Map user = new HashMap<>();
        String username = "盖世亚索";
        Integer age = 23;
        user.put("username", username);
        user.put("age", age);
        return user;
    }
}
注意 实现类上面要加上@service标注来让spring管理这个类
4.修改HelloWorldController
package com.test.helloworld.controller;

import com.test.helloworld.service.UserService;
import org.springframework.beans.factory.annotation.Autowired;
import org.springframework.stereotype.Controller;
import org.springframework.web.bind.annotation.RequestMapping;
import java.util.Map;

/**
 * Created by admin on 2017/6/26.
 */
@Controller
public class HelloWorldController {

    /**
     * 定义全局变量 userService  @Autowired 标注意思是这个对象没有实例化,需要spring注入一个bean
     */
    @Autowired
    private UserService userService;


    @RequestMapping("/index")
    public String helloWorld() {
        Map user = userService.getUser();
        System.out.println("my name is :" + user.get("username"));
        return "/index";
    }
}
注意 :UserSerivce是一个接口,如果不指定就不知道你想用哪个实现类,Spring会首先看自己的容器里有没有一个叫做userService的对象(刚才创建的UserServiceImpl的对象名字就叫做userServiceImpl),如果找不到就在配置文件里配置的路径下面寻找UserService的实现类,找到了就把它的对象拿过来.除此之外刚才Service那个annotation还可以指 定一个value:@Service(“userService”)。这样一来,对于UserServiceImpl这个类的实例,Spring给它起的名字就不是userServiceImpl了,而是userService,如果某个接口的实现类有多个,就可以使用这种方法来指定用哪个实现类,个人认为,如果每个接口都只有一个实现类,那么这么做确实很方便,但如果有多个实现类并且可能会更换的话,就不如配置文件明了了。
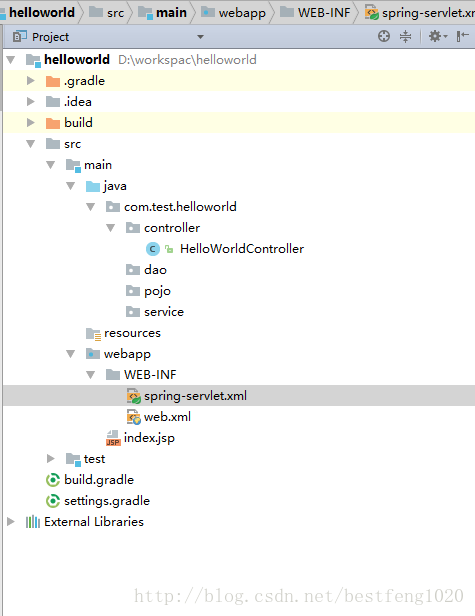
此时的目录结构

5.依然是访问 http://localhost:8080/index 看到后台打印出来自己的名称“盖世亚索”就成功了
五、加入Hibernate框架
1.Hibernate 这里再次需要加入大量的包
group 'com.test.helloworld'
version '1.0-SNAPSHOT'

apply plugin: 'java'
apply plugin: 'war'

sourceCompatibility = 1.8

repositories {
    mavenCentral()
}

dependencies {
    testCompile group: 'junit', name: 'junit', version: '4.11'
    testCompile group: 'junit', name: 'junit', version: '4.12'

    compile group: 'org.springframework', name: 'spring-web', version: '4.3.7.RELEASE'
    compile group: 'org.springframework', name: 'spring-context', version: '4.3.7.RELEASE'
    compile group: 'org.springframework', name: 'spring-core', version: '4.3.7.RELEASE'
    compile group: 'org.springframework', name: 'spring-beans', version: '4.3.7.RELEASE'
    compile group: 'org.springframework', name: 'spring-webmvc', version: '4.3.7.RELEASE'
    compile group: 'org.springframework', name: 'spring-context-support', version: '4.3.7.RELEASE'
    compile group: 'org.glassfish.web', name: 'javax.servlet.jsp.jstl', version: '1.2.4'
    /*springmvc文件上传*/
    compile group: 'commons-fileupload', name: 'commons-fileupload', version: '1.3.1'
    /*spring 管理映射*/
    compile group: 'org.springframework', name: 'spring-orm', version: '4.3.8.RELEASE'
    /*hibernate核心包*/
    compile group: 'org.hibernate', name: 'hibernate-core', version: '4.3.8.Final'
    compile group: 'org.hibernate.common', name: 'hibernate-commons-annotations', version: '4.0.1.Final'
    compile group: 'org.hibernate.javax.persistence', name: 'hibernate-jpa-2.0-api', version: '1.0.1.Final'
    compile group: 'taglibs', name: 'standard', version: '1.1.2'
    /*c3p0连接池*/
    compile group: 'com.mchange', name: 'c3p0', version: '0.9.5.2'
    tomcat api
    compile group: 'org.apache.tomcat', name: 'servlet-api', version: '6.0.53'
    compile group: 'org.apache.tomcat', name: 'jsp-api', version: '6.0.53'
    /*mysql 驱动*/
    compile group: 'mysql', name: 'mysql-connector-java', version: '5.1.39'


}
2.再次修改web.xml
<web-app xmlns="http://xmlns.jcp.org/xml/ns/javaee"
         xmlns:xsi="http://www.w3.org/2001/XMLSchema-instance"
         xsi:schemaLocation="http://xmlns.jcp.org/xml/ns/javaee http://xmlns.jcp.org/xml/ns/javaee/web-app_3_1.xsd"
         version="3.1">
    <servlet>
        <servlet-name>springservlet-name>
        <servlet-class>org.springframework.web.servlet.DispatcherServletservlet-class>
        <load-on-startup>1load-on-startup>
    servlet>

    <servlet-mapping>
        <servlet-name>springservlet-name>
        <url-pattern>/url-pattern>
    servlet-mapping>

    <filter>
        <filter-name>hibernateFilterfilter-name>
        <filter-class>org.springframework.orm.hibernate4.support.OpenSessionInViewFilterfilter-class>
    filter>
    <filter-mapping>
        <filter-name>hibernateFilterfilter-name>
        <url-pattern>/*url-pattern>
    filter-mapping>


    <filter>
        <filter-name>SpringEncodingFilterfilter-name>
        <filter-class>org.springframework.web.filter.CharacterEncodingFilterfilter-class>
        <init-param>
            <param-name>encodingparam-name>
            <param-value>UTF-8param-value>
        init-param>
        <init-param>
            <param-name>forceEncodingparam-name>
            <param-value>trueparam-value>
        init-param>
    filter>
    <filter-mapping>
        <filter-name>SpringEncodingFilterfilter-name>
        <url-pattern>/*url-pattern>
    filter-mapping>


    <context-param>
        <param-name>contextConfigLocationparam-name>
        <param-value>classpath:spring/applicationContext.xml,classpath:hibernate/hibernateConfig.xmlparam-value>
    context-param>

    <listener>
        <listener-class>org.springframework.web.context.ContextLoaderListenerlistener-class>
    listener>
web-app>
Hibernate通过SessionFactory来获取Session,我们要在spring的配置文件中配置一个我们所需的SessionFactory,为了便于修改,我们新建一个配置文件,路径与spring的配置文件相同,我们新建一个hibernateConfig.xml
3.配置hibernateConfig.xml
<beans xmlns="http://www.springframework.org/schema/beans"
       xmlns:xsi="http://www.w3.org/2001/XMLSchema-instance"
       xmlns:tx="http://www.springframework.org/schema/tx"
       xmlns:aop="http://www.springframework.org/schema/aop"
       xmlns:context="http://www.springframework.org/schema/context"
       xsi:schemaLocation="http://www.springframework.org/schema/beans http://www.springframework.org/schema/beans/spring-beans-3.0.xsd
    http://www.springframework.org/schema/tx http://www.springframework.org/schema/tx/spring-tx-3.0.xsd
    http://www.springframework.org/schema/aop http://www.springframework.org/schema/aop/spring-aop-3.0.xsd
    http://www.springframework.org/schema/context http://www.springframework.org/schema/context/spring-context-3.0.xsd
    ">

    <context:property-placeholder location="classpath:hibernate/hibernate.properties" />


    <bean id="dataSource" class="com.mchange.v2.c3p0.ComboPooledDataSource"
          destroy-method="close">

        <property name="driverClass" value="${driverClassName}">property>
        <property name="jdbcUrl" value="${url}">property>
        <property name="user" value="${username}">property>
        <property name="password" value="${password}">property>
        <property name="maxPoolSize" value="40">property>
        <property name="minPoolSize" value="1">property>
        <property name="initialPoolSize" value="1">property>
        <property name="maxIdleTime" value="20">property>
    bean>


    <bean id="sessionFactory"
          class="org.springframework.orm.hibernate4.LocalSessionFactoryBean">
        <property name="dataSource" ref="dataSource" />
        <property name="packagesToScan" value="com.test.helloworld.pojo" />
        <property name="hibernateProperties">
            <props>
                <prop key="hibernate.hbm2ddl.auto">${hibernate.hbm2ddl.auto}prop>
                <prop key="hibernate.dialect">${hibernate.dialect}prop>
                <prop key="hibernate.show_sql">${hibernate.show_sql}prop>
                <prop key="hibernate.format_sql">${hibernate.format_sql}prop>
            props>
        property>
    bean>

    <bean id="transactionManager"
          class="org.springframework.orm.hibernate4.HibernateTransactionManager">
        <property name="sessionFactory" ref="sessionFactory">property>
    bean>


    <tx:annotation-driven transaction-manager="transactionManager" />

beans>
hibernate.properties 内容
hibernate.dialect=org.hibernate.dialect.MySQLDialect
driverClassName=com.mysql.jdbc.Driver
validationQuery=SELECT 1
url=jdbc:mysql://127.0.0.1:3306/frame?useUnicode=true&characterEncoding=UTF-8
username=root
password=m123

hibernate.hbm2ddl.auto=none
hibernate.show_sql=true
hibernate.format_sql=true注意:driverClassName是连数据库的驱动的jar包的名称,这里我用的mysql,所以是com.mysql.jdbc.Driver,url是连接数据库的url,这里是jdbc:mysql://localhost:3306/本机本地数据库,后面是数据库的名称,为test,然后后面的一串,是JDBC对数据库进行CRUD时的编码,我们采用UTF-8以支持中文。
username和password是本地数据库的用户名和密码。
4.在pojo包下添加实体类User
package com.test.helloworld.pojo;

import javax.persistence.Column;
import javax.persistence.Entity;
import javax.persistence.GeneratedValue;
import javax.persistence.Id;
import java.io.Serializable;

/**
 * Created by admin on 2017/6/19.
 */
@Entity(name = "User")
public class User implements Serializable{

    @Id
    @GeneratedValue
    private String id;

    @Column(length = 32)
    private String name;

    @Column(length = 32)
    private String age;

    public String getId() {
        return id;
    }

    public void setId(String id) {
        this.id = id;
    }

    public String getName() {
        return name;
    }

    public void setName(String name) {
        this.name = name;
    }

    public String getAge() {
        return age;
    }

    public void setAge(String age) {
        this.age = age;
    }
}
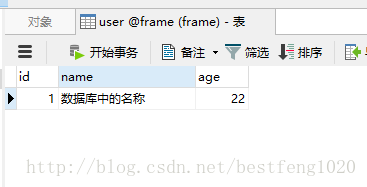
对应数据库表
5.在dao包下面添加hibernate原始的dao接口
IUSerDao
package com.test.helloworld.dao;


import com.test.helloworld.pojo.User;

import java.util.List;

/**
 * Created by admin on 2017/6/20.
 */
public interface IUserDao {

     void addUser(User user);

     List getAllUser();

     boolean delUser(String id);

     User getUser(String id);

     boolean updateUser(User user);
}
UserDao
package com.test.helloworld.dao;

import com.test.helloworld.pojo.User;
import org.hibernate.Query;
import org.hibernate.SessionFactory;
import org.springframework.beans.factory.annotation.Autowired;
import org.springframework.stereotype.Repository;

import java.util.List;

/**
 * Created by admin on 2017/6/20.
 */
@Repository
public class UserDao implements IUserDao{

    @Autowired
    private SessionFactory sessionFactory;

    public void setSessionFactory(SessionFactory sessionFactory) {
        this.sessionFactory = sessionFactory;
    }

    @Override
    public void addUser(User user) {
        sessionFactory.getCurrentSession().save(user);
    }

    @Override
    public List getAllUser() {
        String hql = "from User";
        Query query = sessionFactory.getCurrentSession().createQuery(hql);
        return query.list();
    }

    @Override
    public boolean delUser(String id) {
        String hql = "delete User u where u.id=?";
        Query query = sessionFactory.getCurrentSession().createQuery(hql);
        query.setString(0, id);

        return (query.executeUpdate() > 0);
    }

    @Override
    public User getUser(String id) {
        String hql = "from User u where u.id=?";
        Query query = sessionFactory.getCurrentSession().createQuery(hql);//此时使用的是hql语句
        query.setString(0, id);

        return (User) query.uniqueResult();
    }

    @Override
    public boolean updateUser(User user) {
        String hql = "update User u set u.name=?,u.age=? where u.id=?";
        Query query = sessionFactory.getCurrentSession().createQuery(hql);
        query.setString(0, user.getName());
        query.setString(1, user.getAge());
        query.setString(2, user.getId());

        return (query.executeUpdate() > 0);
    }
}
注意:第一个标注注明这是一个repository,需要被Spring管理,然后自动装载之前在配置文件中配置的 SessionFactory,获取当前session后获取所有的用户,下面修改之前的UserService代码,service封装业务逻辑层代 码,我把每个service方法封装为一个事务。(PS:上面的SessionFactory获取当前Session是依赖于事务的,如果不在某个事务之内, 会报错:No Session found for current thread。)
6.修改UserServiceImpl 让其加载数据库的值出来
UserServiceImpl
package com.test.helloworld.service.impl;

import com.test.helloworld.dao.IUserDao;
import com.test.helloworld.pojo.User;
import com.test.helloworld.service.UserService;
import org.springframework.beans.factory.annotation.Autowired;
import org.springframework.stereotype.Service;
import org.springframework.transaction.annotation.Transactional;


import java.util.HashMap;
import java.util.Map;

/**
 * Created by admin on 2017/6/27.
 */
@Service
@Transactional
public class UserServiceImpl implements UserService {

    @Autowired
    private IUserDao iUserDao;
    @Override
    public Map getUser() {
        Map user = new HashMap<>();
        User userResult = iUserDao.getUser("1");
        user.put("username", userResult.getName());
        user.put("age", userResult.getAge());
        return user;
    }
}
注意:@Transactional这个标注,就是指明每个方法是一个事务。
7.修改applicationContext.xml 让它扫描的包增加
applicationContext.xml
<beans xmlns="http://www.springframework.org/schema/beans"
       xmlns:xsi="http://www.w3.org/2001/XMLSchema-instance"
       xmlns:aop="http://www.springframework.org/schema/aop"
       xmlns:context="http://www.springframework.org/schema/context"
       xmlns:jee="http://www.springframework.org/schema/jee"
       xmlns:p="http://www.springframework.org/schema/p"
       xsi:schemaLocation="http://www.springframework.org/schema/beans http://www.springframework.org/schema/beans/spring-beans-3.0.xsd
        http://www.springframework.org/schema/context http://www.springframework.org/schema/context/spring-context-3.0.xsd
        http://www.springframework.org/schema/jee http://www.springframework.org/schema/jee/spring-jee-3.0.xsd">


    <context:component-scan base-package="com.test.helloworld.service"/>
    <context:component-scan base-package="com.test.helloworld.pojo"/>
    <context:component-scan base-package="com.test.helloworld.dao"/>
beans>
8.访问 http://localhost:8080/index 后台打印出来的名称是数据库中存储的名称就成功啦
最后整个demo的目录结构

如果有什么问题欢迎给笔者留言
这就算是最粗略的框架结构,后面优化加入Spring data jpa 和shiro 框架 敬请期待。