Android基础笔记(十六)- Service:startService()、stopService()、bindService()、unbindService()补充
- 开门见山
- 第一种
- 第二种
- 第三种
- 总结
开门见山
开启服务有三种情况:如果直接使用服务,则没有必要进行绑定,但是如果要使用服务里面的方法,则要进行绑定。
- 具体的启动情况有下:
-
①调用
startService(),再调用stopService()。 -
②单独调用
bindService()方法,再unbindService()后,以执行服务内部的方法。 -
③先调用
startService(),再调用bindService()方法,再调用unbindService(),最后调用stopService()。 - 特殊情况:
- 只要使用了bindService,不管之后是否解绑和停止服务,都可以调用服务中的方法
下面针对这三种启动顺序分别做详细说明。
在讲解之前先贴一下代码:
MyService类,里面就不加注释了
public class MyService extends Service {

    @Override
    public IBinder onBind(Intent intent) {
        return new MyBinder();
    }

    @Override
    public void onCreate() {
        System.out.println("MyService onCreate():Called by the system when the service is first created");
        super.onCreate();
    }

    @Override
    public boolean onUnbind(Intent intent) {
        System.out.println("MyService onUnbind():Called when all clients have disconnected from a particular interface published by the service.");
        return super.onUnbind(intent);
    }

    @Override
    public int onStartCommand(Intent intent, int flags, int startId) {
        System.out.println("MyService onStartCommand():Called by the system every time a client explicitly starts the service by calling android.content.Context.startService, providing the arguments it supplied and a unique integer token representing the start request.");
        return super.onStartCommand(intent, flags, startId);
    }

    @Override
    public void onDestroy() {
        System.out.println("MyService onDestroy():Called by the system to notify a Service that it is no longer used and is being removed. ");
        super.onDestroy();
    }

    public void method1() {
        System.out.println("MyService is method1");
    }

    public void method2() {
        System.out.println("MyService is method2");
    }

    class MyBinder extends Binder {

        public void callMethod1() {
            method1();
        }

        public void callMethod2() {
            method2();
        }
    }
}
MainActivity类
public class MainActivity extends Activity {
    private MyBinder myBinder;

    @Override
    protected void onCreate(Bundle savedInstanceState) {
        super.onCreate(savedInstanceState);
        setContentView(R.layout.activity_main);
        conn = new MyServiceConnection();
    }

    ServiceConnection conn;

    public void start(View v) {
        Intent service = new Intent(this, MyService.class);
        startService(service);
    }

    public void bind(View v) {
        Intent service = new Intent(this, MyService.class);
        bindService(service, conn, Context.BIND_AUTO_CREATE);
    }

    public void unbind(View v) {
        unbindService(conn);
    }

    public void stop(View v) {
        Intent service = new Intent(this, MyService.class);
        stopService(service);
    }

    public void callmethod1(View v) {
        myBinder.callMethod1();
    }

    private class MyServiceConnection implements ServiceConnection {

        @Override
        public void onServiceConnected(ComponentName name, IBinder service) {
            System.out.println("MyServiceConnection connection success");
            myBinder = (MyBinder) service;
        }

        @Override
        public void onServiceDisconnected(ComponentName name) {
            System.out.println("MyServiceConnection disconnection success");
        }
    }
}
activity_main.xml页面布局
<LinearLayout xmlns:android="http://schemas.android.com/apk/res/android"
    xmlns:tools="http://schemas.android.com/tools"
    android:layout_width="match_parent"
    android:layout_height="match_parent"
    android:orientation="vertical"
    tools:context=".MainActivity" >

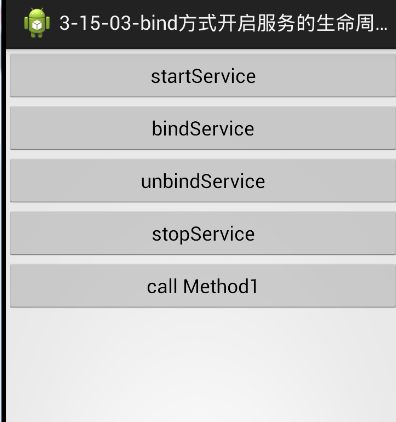
    <Button
        android:layout_width="match_parent"
        android:layout_height="wrap_content"
        android:onClick="start"
        android:text="startService" />

    <Button
        android:layout_width="match_parent"
        android:layout_height="wrap_content"
        android:onClick="bind"
        android:text="bindService" />

    <Button
        android:layout_width="match_parent"
        android:layout_height="wrap_content"
        android:onClick="unbind"
        android:text="unbindService" />

    <Button
        android:layout_width="match_parent"
        android:layout_height="wrap_content"
        android:onClick="stop"
        android:text="stopService" />

    <Button
        android:layout_width="match_parent"
        android:layout_height="wrap_content"
        android:onClick="callmethod1"
        android:text="call Method1" />

LinearLayout>
第一种
调用startService(),再调用stopService()。这种情况适用于直接使用Service,不需要外部调用服务内部的方法。
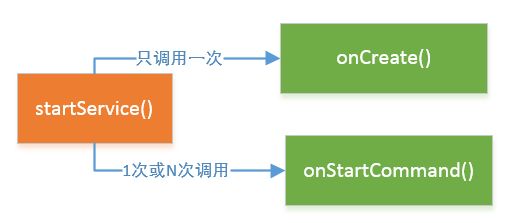
在这一种中,我们分别会点击startService和stopService,在类MyService中,会以onCreate()开始 — 代表第一次创建服务;以onDestory()结束 — 代表服务被销毁;中间会一次或者多次调用(当反复startService时)onStartCommand()方法 — 来表示客户端想明确的启动服务。
当点击startService时,会触发onCreate()和onStartCommand()方法,表示服务是第一次创建并且是客户端明确要求的。这两个方法执行完毕后,后台的服务线程启动。
看一下这张图:

这个过程对应的Log图和应用后台服务进程图如下:

可以清楚的看到,调用了onCreate()和onStartCommand()方法,同时后台的服务进程也已经启动。
当点击stopService时,会触发onDesctory(),此时会去销毁后台服务进程。
看一下这张图:

这个过程对应的Log图和应用后台服务进程图如下:

可以清楚的看到,调用onDesctory()方法,同时后台服务线程也被销毁了。
第二种
单独调用bindService()方法将Activity和Service绑定,以达到服务内部方法的目的,再调用unbindService()解绑。
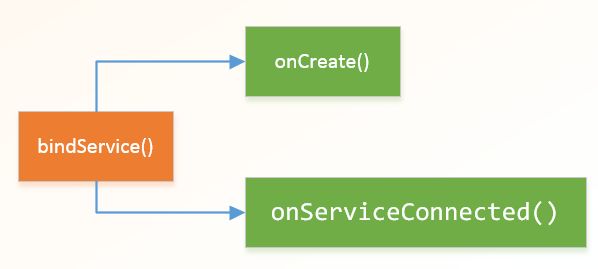
在这一种中,我们分别会点击bindService和unbindService,在类MyService中,会以onCreate()开始 — 代表第一次创建服务;以onDestory()结束 — 代表服务被销毁;在中间,当绑定成功时,会调用onServiceConnected()表明Activity和Service连接成功;当解除绑定时,会调用onUnbind()表明Activity和Service解除连接成功。
当点击bindService时,会触发onCreate()和onServiceConnected()方法,以达到调用服务内部方法的目的。但是,请注意后台服务进程并没有启动
看一下这张图:

这个过程对应的Log图和应用后台服务进程图如下:

可以清楚的看到,调用了onCreate()和onServiceConnected()方法,但是,后台的服务进程却没有启动。绑定后就可以调用服务内部的方法了,而MyService is method1就是证明。
当点击unbindService时,会触发onUnbind()和onDestory()方法表明解除绑定和销毁服务。
看一下这张图:

这个过程对应的Log图和应用后台服务进程图如下:

可以清楚的看到,调用onUnbind()和onDesctory()方法,后台也没有服务线程。但是,虽然解除了绑定,我们却依旧可以调用服务中的方法。
第三种
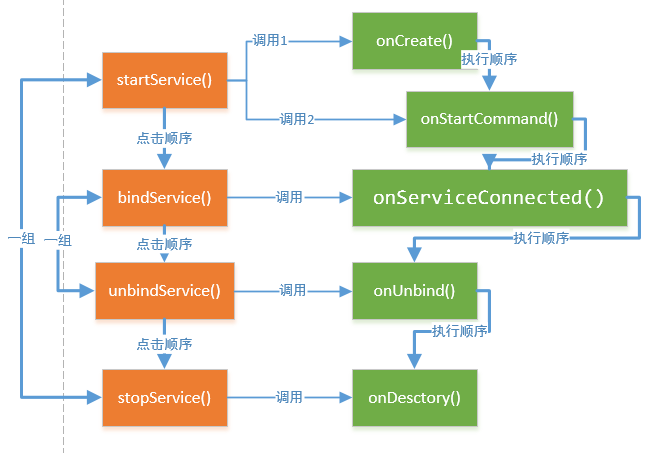
先调用startService(),再调用bindService()方法,再调用unbindService(),最后调用stopService(),这种情况适用于希望服务能够在后台长期运行,只要不stopService就不停止,也可以让Activity调用服务中的方法。
我们可以看到,执行方法的顺序是一级一级的,当上一级没有触发时,是无法进入到下一级的。
当点击完startService和bindService时,Log和后台进程图如下所示:

可以看到,后台进程启动,并且Activity和Service绑定成功,且可以调用后台的方法。
当点击完unbindService时,会执行onUnbind()方法解除绑定,Log和后台进程图如下:

可以看到,虽然解除绑定了,但是服务没有销毁,服务中的内容依旧可以被调用。
当点击完stopService时,服务被销毁onDestory()方法被执行,Log和后台进程图如下:

可以看到,后台的服务已经被销毁了,但是,重点中的重点,服务中的方法依旧可以被调用。
总结
开启服务有三种情况:如果直接使用服务,则没有必要进行绑定,但是如果要使用服务里面的方法,则要进行绑定。另外,只要使用了bindService,不管之后是否解绑和停止服务,都可以调用服务中的方法


