Win7+Python3.7+Pytorch YOLO V3 训练自己的数据
本教程主要参考了:https://blog.csdn.net/qq_41895190/article/details/90286082
WINDOWS7 系统下的运行
1.环境搭建
1.1项目下载
git clone https://github.com/ultralytics/yolov3.git
1.2 满足项目的需求,安装python3.7
在python官网上面:https://www.python.org/downloads/
下载python3.7.0,我一开始下载的是zip文件,然后把环境变量添加进去。
后来不知道为啥 python3命令不好使了,我又下载了一遍exe文件,选择修复安装,才解决问题。
1.3 安装pytorch1.3或者以上
官网:https://pytorch.org/
注意pytorch1.3只支持CUDA9.2、和CUDA10.1了,我的CUDA是8.0的,所以我还要安装一下CUDA10.1!!
安装CUDA之前我的英伟达控制面板还点击没反应看不了。。所以我先安把英伟达驱动升级到最新,然后英伟达控制面板可以看了,看到支持的CUDA可以到最新的版本。然后到英伟达官网下载CUDA10.1的最新版本,以及下载对应的Cudnn,一路下一步,安好以后自动就把环境变量配好了。最后把cudnn的文件考到cuda的安装目录下就好了。
1.4安装项目需要的其他python包
pip 安装 一下requirements里面需要的其他包。
2 数据准备
2.1VOC格式的数据制作
图片的标记工具为lableimg,这里不具体展开,主要说明VOC数据的格式,以及文件夹下的内容。
VOC的文件夹格式如下:

其中Annotation放的是所有的xml文件,JPEGImages放的是所有的jpg图片文件,ImageSets放的是Main文件夹,里面包含了4个txt文件,分别是训练集、测试集、验证集和训练验证集。

这四个txt文件是需要自己生成的。下面贴一下代码。直接放在VOC的路径下就可以直接运行
import os
import random
trainval_percent = 0.8 #这里是训练+验证集占所有数据集的比例,根据需要自己更改
train_percent = 0.8 #这里是训练集占训练+验证集的比例
xmlfilepath = 'VOC2007\\Annotations' #路径可以更改
txtsavepath = 'VOC2007\\ImageSets\\Main'
total_xml = os.listdir(xmlfilepath)
num = len(total_xml)
list = range(num)
tv = int(num * trainval_percent)
tr = int(tv * train_percent)
trainval = random.sample(list, tv)
train = random.sample(trainval, tr)
ftrainval = open('VOC2007/ImageSets/Main/trainval.txt', 'w')
ftest = open('VOC2007/ImageSets/Main/test.txt', 'w')
ftrain = open('VOC2007/ImageSets/Main/train.txt', 'w')
fval = open('VOC2007/ImageSets/Main/val.txt', 'w')
for i in list:
    name = total_xml[i][:-4] + '\n'
    if i in trainval:
        ftrainval.write(name)
        if i in train:
            ftrain.write(name)
        else:
            fval.write(name)
    else:
        ftest.write(name)
ftrainval.close()
ftrain.close()
fval.close()
ftest.close()
2.2生成labels文件
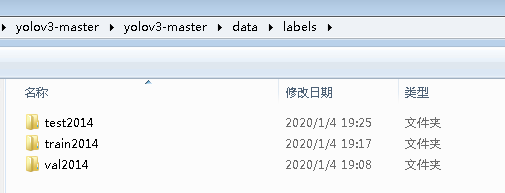
这里说明一下data文件夹下的文件组织关系
-data
  -annotations
  -images
    -test2014 #分别存放测试集、训练集和验证集的图片
    -train2014
    -val2014
  -labels #分别存放测试集、训练集和验证集xml文件对应的txt文件
    -test2014
    -train2014
    -val2014
  -samples#存放待检测的图片
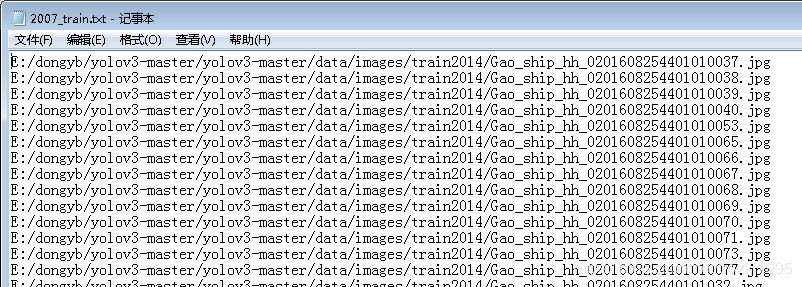
  2007_test.txt #存放测试集图片的路径
  2007_train.txt #同
  2007_val.txt
  coco.data
coco.names# -*- coding: utf-8 -*-
"""
Created on Tue Oct 2 11:42:13 2018
将本文件放到VOC2007目录下,然后就可以直接运行
需要修改的地方:
1. sets中替换为自己的数据集
2. classes中替换为自己的类别
3. 将本文件放到VOC2007目录下
4. 直接开始运行
"""
import xml.etree.ElementTree as ET
import pickle
import os
import shutil
from os import listdir, getcwd
from os.path import join
# sets = [('2007', 'train'), ('2007', 'val'), ('2007', 'test'),('2007', 'trainval')] # 替换为自己的数据集
sets = [('2007', 'test')]
classes = ["ship"] # 修改为自己的类别
def convert(size, box):
dw = 1. / (size[0])
dh = 1. / (size[1])
x = (box[0] + box[1]) / 2.0 - 1
y = (box[2] + box[3]) / 2.0 - 1
w = box[1] - box[0]
h = box[3] - box[2]
x = x * dw
w = w * dw
y = y * dh
h = h * dh
return (x, y, w, h)
def convert_annotation(year, image_id):
in_file = open('VOC2007/Annotations/%s.xml' % (image_id)) # 将数据集放于当前目录下 我这里改成了绝对路径
out_file = open('/data/labels/test2014/%s.txt' % (image_id), 'w')#我这里写的也是绝对路径的
tree = ET.parse(in_file)
root = tree.getroot()
size = root.find('size')
w = int(size.find('width').text)
h = int(size.find('height').text)
for obj in root.iter('object'):
print(image_id)
A=obj.find('Difficult') #这里我改了一下,因为我的xml里面有些字段的Difficult是小写的d,运行源代码会出错,所以我把出错的文件都挑出来了
if A==None:
xml_name = image_id + '.xml'
shutil.copy(os.path.join('VOC2007', 'Annotations', xml_name),
os.path.join('VOC2007', 'Annotations_gai', xml_name))
break
else:
difficult = A.text
# difficult =obj.find('Difficult').text
cls = obj.find('name').text
if cls not in classes or int(difficult) == 1:
continue
cls_id = classes.index(cls)
xmlbox = obj.find('bndbox')
b = (float(xmlbox.find('xmin').text), float(xmlbox.find('xmax').text), float(xmlbox.find('ymin').text),
float(xmlbox.find('ymax').text))
bb = convert((w, h), b)
out_file.write(str(cls_id) + " " + " ".join([str(a) for a in bb]) + '\n')
wd = getcwd()
for year, image_set in sets:
if not os.path.exists('VOC%s/labels/' % (year)):
# os.makedirs('labels/train2014' % (year))
os.makedirs('VOC%s/labels/' % (year))
image_ids = open('VOC%s/ImageSets/Main/%s.txt' % (year, image_set)).read().strip().split()
list_file = open('%s_%s.txt' % (year, image_set), 'w')
for image_id in image_ids:
list_file.write('data/images/test2014/%s.jpg\n' % (image_id))#这里也写绝对路径
convert_annotation(year, image_id)
list_file.close()
# os.system("cat 2007_train.txt 2007_val.txt > train.txt") #修改为自己的数据集用作训练
遇见的问题1:
 问题原因 xml里的字段有Difficult还有difficult 要把这个前面的D大小写统一
问题2:
终于到训练的部分了!
结果出错了我擦

这个问题的原因是因为pytorch在windows系统上不支持多GPU训练(也太坑了吧我丢)
需要对train.py中的代码做改变:
原来的 182 行和397行 :
if device.type != 'cpu' and torch.cuda.device_count() > 1:
dist.destroy_process_group() if torch.cuda.device_count() > 1 else None
变成
if device.type != 'cpu' and torch.cuda.device_count() > 99:
dist.destroy_process_group() if torch.cuda.device_count() > 99 else None
问题3:
AssertionError: No labels found. in running train.py
这个问题是由于当时的lables文件的路径是相对路径引起的。后来我又重新生成了一遍lables,放的是绝对路径,就没错误了。


txt示例:

遇见的问题4:
训练时间太长了。这个代码在windows下运行只能调用一块GPU,我的是1080Ti,我设置的batchsize是20,训练集共大概2w张图片,跑一个epoch要半个小时。
